Deploy a censorship-resistant proxy server — hardened by default, shared via QR code
Verified details
These details have been verified by PyPIProject links
GitHub Statistics
Maintainers

Project description

Meridian


Deploy it right. Share it easily.
One command sets up an undetectable proxy — firewall, TLS, routing, all hardened by default.

What is this
Most proxy setups leak — an open port here, a TLS mismatch there, a fingerprint that gives the server away. Meridian locks every layer down automatically: firewall, certificates, SNI routing, fingerprinting. You deploy in one command. Your people connect via QR code. That's it.
When your IP gets blocked, redeploy and be back in minutes.
Whether you're the "tech friend" setting up VPN for people you care about, a power user managing multiple servers, or an NGO providing access in a censored region — Meridian handles the complexity so you can focus on staying connected.
See SECURITY.md for the threat model and what Meridian protects against (and what it doesn't).
Why Meridian?
Meridian ships the strongest available protocol — today that's VLESS+Reality — and configures it so your server is indistinguishable from any other website. Nothing left open, nothing to give it away.
| Meridian | Raw 3x-ui | Marzban | Hiddify Manager | |
|---|---|---|---|---|
| Install | One command | Manual Docker + config | Docker + CLI | Script + web UI |
| Client handoff | QR + hosted page | Manual URL sharing | Panel-only | Panel-only |
| Architecture | nginx+Xray (hardened) | Xray only | Xray+Nginx | Xray+Nginx |
| Relay support | Built-in L4 relay | Manual | No | Manual |
| Rebuild workflow | deploy NEW_IP |
Start over | Reconfigure | Reconfigure |
Meridian is an orchestrator — it configures Docker, Xray, nginx, firewall, BBR, and TLS certificates automatically. You focus on deploying and sharing access, not debugging configs.
Install
Works on macOS and Linux. Windows users: use WSL.
curl -sSf https://getmeridian.org/install.sh | bash
Or install directly from PyPI:
uv tool install meridian-vpn    # recommended
pipx install meridian-vpn       # alternative
Quick start
meridian deploy                       # interactive wizard
meridian deploy 1.2.3.4               # deploy to server
meridian deploy local                 # deploy on this server (no SSH needed)
meridian deploy 1.2.3.4 --domain d.io # with CDN fallback
After setup, your server is a fully functional proxy. Share access:
meridian client add alice            # generate keys for a friend
meridian client list                 # see all clients
meridian client remove alice         # revoke access
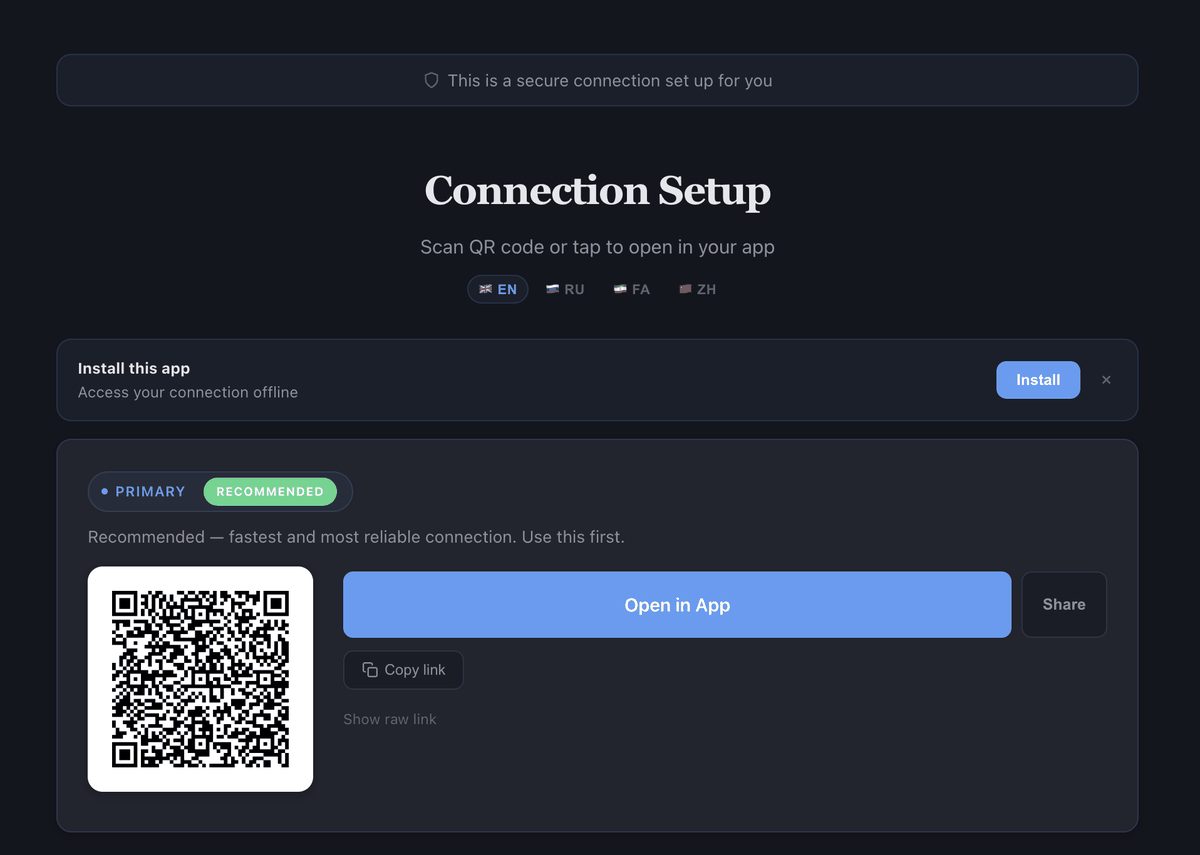
Each client gets a connection page hosted on the server with QR codes, one-tap deep links, and live usage stats. Share the URL directly — no file transfer needed.
How deployment works
The typical workflow: run Meridian on your machine and it connects to the VPS via SSH. You can also run it directly on the VPS (deploy local).
Your machine                       VPS
┌────────────────┐    SSH    ┌────────────────┐
│  meridian CLI  │ ────────→ │  proxy server  │
│  ~/.meridian/  │           │                │
└────────────────┘           └────────────────┘
After meridian deploy 1.2.3.4, credentials are cached at ~/.meridian/ on your machine. Later commands (client add, client list, test) automatically use them — no need to re-specify the server.
Managing multiple servers? Use names:
meridian deploy 1.2.3.4 --display-name finland
meridian client add alice --server finland
How it works
Meridian deploys VLESS+Reality — a protocol that makes your server indistinguishable from a legitimate website:
| Censorship method | How Meridian beats it |
|---|---|
| Deep Packet Inspection | Traffic is byte-for-byte identical to normal HTTPS. No proxy signatures. |
| Active probing | Censors connecting to your server get a real TLS certificate from microsoft.com. Only clients with your private key reach the proxy. |
| TLS fingerprinting | uTLS impersonates Chrome's exact Client Hello, matching billions of real devices. |
| IP blocking | Domain mode routes through Cloudflare CDN as a fallback — no direct IP exposure. |
Architecture

Standalone mode — nginx on port 443 routes Reality traffic to Xray via SNI inspection. nginx also provides TLS (Let's Encrypt IP certificate via acme.sh) for hosted connection pages, panel access, and XHTTP transport. No domain needed.
Domain mode — Same architecture, plus nginx handles VLESS+WSS through Cloudflare CDN as a fallback when the server IP is blocked.
Relay mode — A lightweight TCP forwarder (Realm) on a domestic server forwards port 443 to the exit server abroad. All protocols work through the relay with end-to-end encryption.
What you need
- A VPS (Debian/Ubuntu) with root SSH key access — $5/month from any provider
- Recommended: Finland, Netherlands, Sweden, Germany (low latency, not flagged)
- Optional: a domain pointed to the server (for CDN fallback via Cloudflare)
Commands
| Command | Description |
|---|---|
meridian deploy [IP|local] |
Deploy proxy server (interactive wizard if no IP) |
meridian client add NAME |
Add a named client key |
meridian client show NAME |
Show connection info (QR code, URLs, shareable link) |
meridian client list |
List all clients |
meridian client remove NAME |
Remove a client key |
meridian relay deploy RELAY_IP |
Deploy a relay node (TCP forwarder) |
meridian relay list |
List relay nodes |
meridian relay remove RELAY_IP |
Remove a relay node |
meridian relay check RELAY_IP |
Check relay health |
meridian server add [IP] |
Add a server to local registry |
meridian server list |
List known servers |
meridian server remove NAME |
Remove a server from registry |
meridian preflight [IP] |
Pre-flight server validation (ports, SNI, OS, disk) |
meridian scan [IP] |
Find optimal SNI targets on server's network |
meridian test [IP] |
Test reachability + verify actual proxy connections |
meridian probe [IP|DOMAIN] |
Probe server as a censor would — check if deployment is detectable |
meridian doctor [IP] |
Collect info for bug reports (alias: rage) |
meridian update |
Update Meridian to the latest version |
meridian teardown [IP] |
Remove proxy from server |
See the full CLI reference for all commands and flags.
Client apps
After setup, connect with any of these apps:
| Platform | App |
|---|---|
| iOS | v2RayTun |
| Android | v2rayNG |
| Windows | v2rayN |
| All platforms | Hiddify |
Common scenarios
My IP got blocked — The most common scenario in censored regions. Get a new VPS, run meridian deploy NEW_IP, then re-add clients with meridian client add. If you're in domain mode, update the DNS A record to point at the new IP and re-run deploy. If you're not using domain mode yet, consider switching (--domain) to get a CDN fallback through Cloudflare — when the IP is blocked, the WSS/CDN link still works.
Sharing with family — After meridian client add alice, you get a shareable URL hosted on the server. Send the link by email, iMessage, or any messenger. They open it on their phone, install the app (one tap), scan the QR code, and connect. No file transfer needed.
First-time VPS setup — Rent a VPS from any provider (DigitalOcean, Hetzner, Vultr — $4–6/month). Choose Debian 12 or Ubuntu 22.04+. Make sure you have SSH key access (not just password). Then run meridian deploy YOUR_SERVER_IP.
Troubleshooting
Not connecting? Run meridian test to check if the server is reachable, or use the web-based ping tool.
Something else not working? Get instant AI-powered help:
meridian doctor --ai # copies an AI-ready prompt to clipboard
Paste the prompt into ChatGPT, Claude, or any AI assistant for personalized troubleshooting.
Or open an issue with meridian doctor output.
Docs
Full documentation, interactive command builder, and setup guides:
getmeridian.org · Connection page demo
Community
- Вастрик.Клуб — launch post (78 upvotes, 3k+ views)
Project details
Verified details
These details have been verified by PyPIProject links
GitHub Statistics
Maintainers
Release history Release notifications | RSS feed


Download files
Download the file for your platform. If you're not sure which to choose, learn more about installing packages.
Source Distribution
Built Distribution
Filter files by name, interpreter, ABI, and platform.
If you're not sure about the file name format, learn more about wheel file names.
Copy a direct link to the current filters
File details
Details for the file meridian_vpn-3.15.0.tar.gz.
File metadata
- Download URL: meridian_vpn-3.15.0.tar.gz
- Upload date:
- Size: 185.1 kB
- Tags: Source
- Uploaded using Trusted Publishing? Yes
- Uploaded via: twine/6.1.0 CPython/3.13.12
File hashes
| Algorithm | Hash digest | |
|---|---|---|
| SHA256 |
f6500035db64c5f246ef5302a55afabcbb61583cee784998a8bcad8f1d7fcf00
|
|
| MD5 |
ebdbe4d91ffe12b8bb155d7a5d39ed44
|
|
| BLAKE2b-256 |
92e5f2eae49dfce8e40c1e3f485d149e3242ad76591c0c57d3ee3e5e36157882
|
Provenance
The following attestation bundles were made for meridian_vpn-3.15.0.tar.gz:
Publisher:
release.yml on uburuntu/meridian
-
Statement:
-
Statement type:
https://in-toto.io/Statement/v1 -
Predicate type:
https://docs.pypi.org/attestations/publish/v1 -
Subject name:
meridian_vpn-3.15.0.tar.gz -
Subject digest:
f6500035db64c5f246ef5302a55afabcbb61583cee784998a8bcad8f1d7fcf00 - Sigstore transparency entry: 1262907622
- Sigstore integration time:
-
Permalink:
uburuntu/meridian@d8ad7d8ae220d478e3f94dba44612576ded5de64 -
Branch / Tag:
refs/heads/main - Owner: https://github.com/uburuntu
-
Access:
public
-
Token Issuer:
https://token.actions.githubusercontent.com -
Runner Environment:
github-hosted -
Publication workflow:
release.yml@d8ad7d8ae220d478e3f94dba44612576ded5de64 -
Trigger Event:
workflow_run
-
Statement type:
File details
Details for the file meridian_vpn-3.15.0-py3-none-any.whl.
File metadata
- Download URL: meridian_vpn-3.15.0-py3-none-any.whl
- Upload date:
- Size: 197.1 kB
- Tags: Python 3
- Uploaded using Trusted Publishing? Yes
- Uploaded via: twine/6.1.0 CPython/3.13.12
File hashes
| Algorithm | Hash digest | |
|---|---|---|
| SHA256 |
e79d36d7278b8dd01f907e7d2633c5e927bc90cb0d1b22062288e88a69a5f791
|
|
| MD5 |
60ebb3a62590a07fcabddbd759f646a9
|
|
| BLAKE2b-256 |
f2f418028742ff2a2d46936a9874d58f95efc0a646fc5adeb5f4317956c535cd
|
Provenance
The following attestation bundles were made for meridian_vpn-3.15.0-py3-none-any.whl:
Publisher:
release.yml on uburuntu/meridian
-
Statement:
-
Statement type:
https://in-toto.io/Statement/v1 -
Predicate type:
https://docs.pypi.org/attestations/publish/v1 -
Subject name:
meridian_vpn-3.15.0-py3-none-any.whl -
Subject digest:
e79d36d7278b8dd01f907e7d2633c5e927bc90cb0d1b22062288e88a69a5f791 - Sigstore transparency entry: 1262907640
- Sigstore integration time:
-
Permalink:
uburuntu/meridian@d8ad7d8ae220d478e3f94dba44612576ded5de64 -
Branch / Tag:
refs/heads/main - Owner: https://github.com/uburuntu
-
Access:
public
-
Token Issuer:
https://token.actions.githubusercontent.com -
Runner Environment:
github-hosted -
Publication workflow:
release.yml@d8ad7d8ae220d478e3f94dba44612576ded5de64 -
Trigger Event:
workflow_run
-
Statement type:


