
METIS Test Runner





A graphical front-end for end-to-end testing of the METIS instrument pipeline. It generates synthetic FITS observations via ScopeSim and then runs the matching EDPS reduction workflow — all from a single, self-contained GUI. A command-line interface (mtr-cli) is also shipped as a fallback for scripted or headless use.
Contents
- Quickstart
- The GUI
- Supported workflows
- Output layout
- Reference — install methods, system dependencies, runner modes,
input formats, the
mtr-clioption table, and direct environment access - Related repositories
Quickstart
pipx install metis-test-runner          # needs Python 3.12 or 3.13
mtr                                     # launches the GUI
Then, in the GUI:
- Install tab → Install / Update. Clones
METIS_PipelineandMETIS_Simulationsand installs the ESO pipeline dependencies into MTR's own isolated venv. Takes a while the first time; safe to re-run. - Run tab → Add… and pick an input file, then Run.
No input files yet? The examples ship inside the package:
mtr-cli --copy-examples ~/mtr-examples # or --examples-dir to use them in place
Already have the pipeline installed another way? Skip the Install tab and set
the Runner on the Run tab to native (tools on PATH) or docker / podman
(tools in a container you built) — see Runner modes below.
If the GUI will not start, you are probably missing a Qt system library; see System dependencies.
The GUI
mtr is the recommended way to drive the test runner. It exposes every CLI flag
as a labelled control, remembers your settings between sessions, and streams
colour-coded live output from the pipeline. A Light / Dark theme button sits
in the toolbar.
Run tab
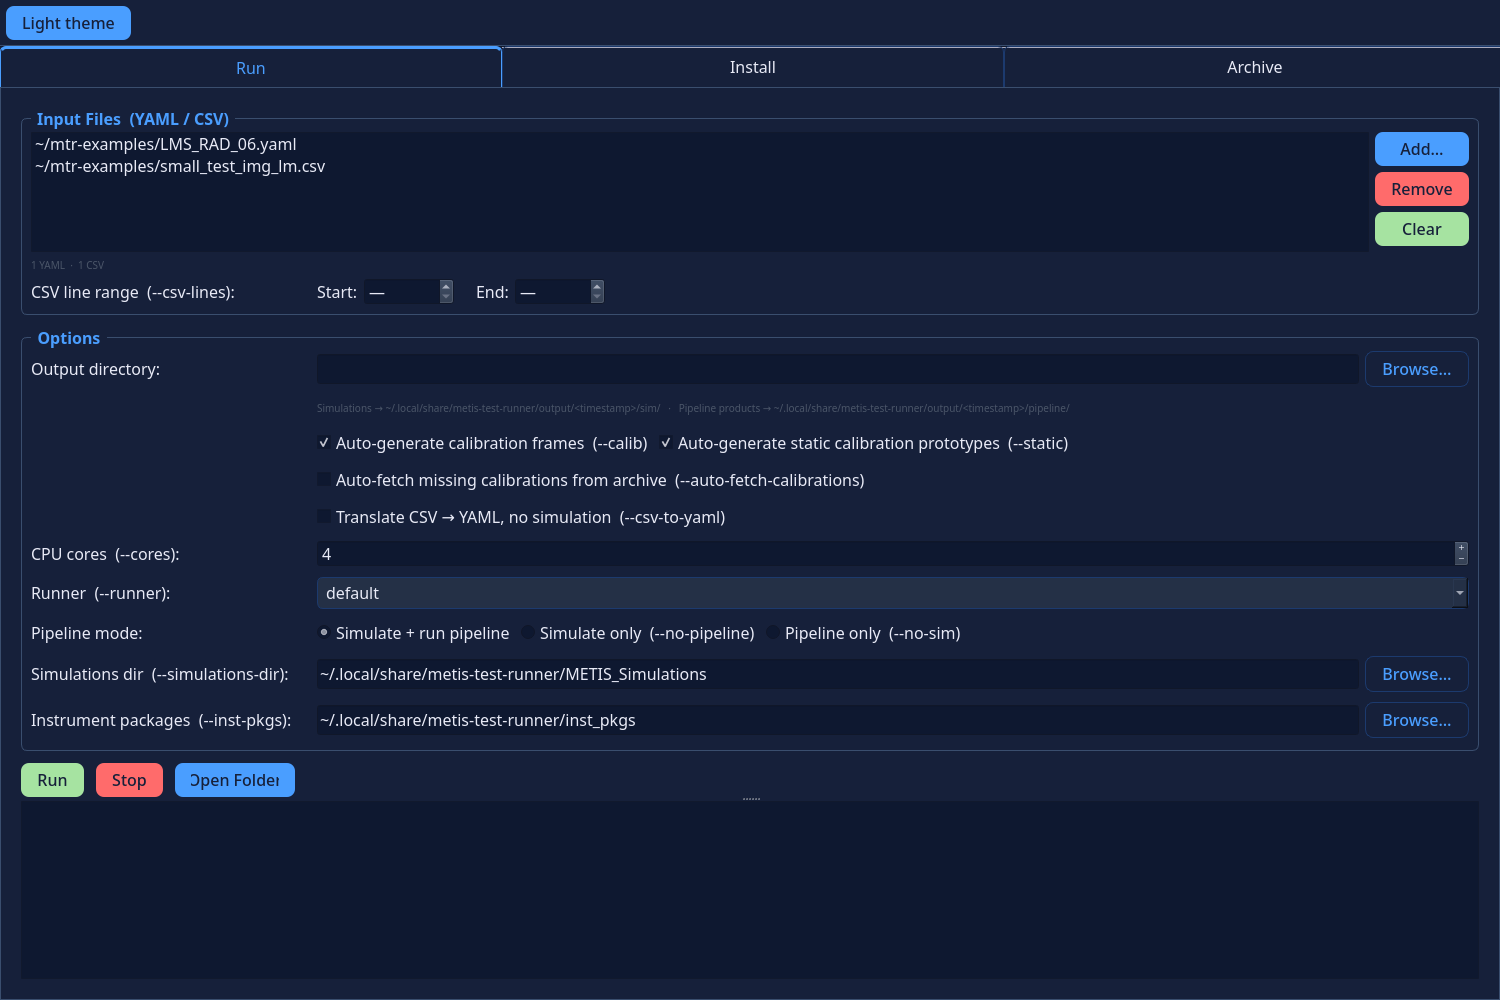
Add YAML observation blocks and/or AIT-format CSV sequences — they can be mixed
freely in one run, and a live tally appears under the list. Every control is
labelled with the CLI flag it maps to. The line under Output directory shows
exactly where simulation frames and pipeline products will land, updating as you
type. Run becomes Stop; output streams into the log below with ANSI
colouring stripped and stderr highlighted. Settings persist to QSettings, so
the last configuration is two clicks away.
Install tab
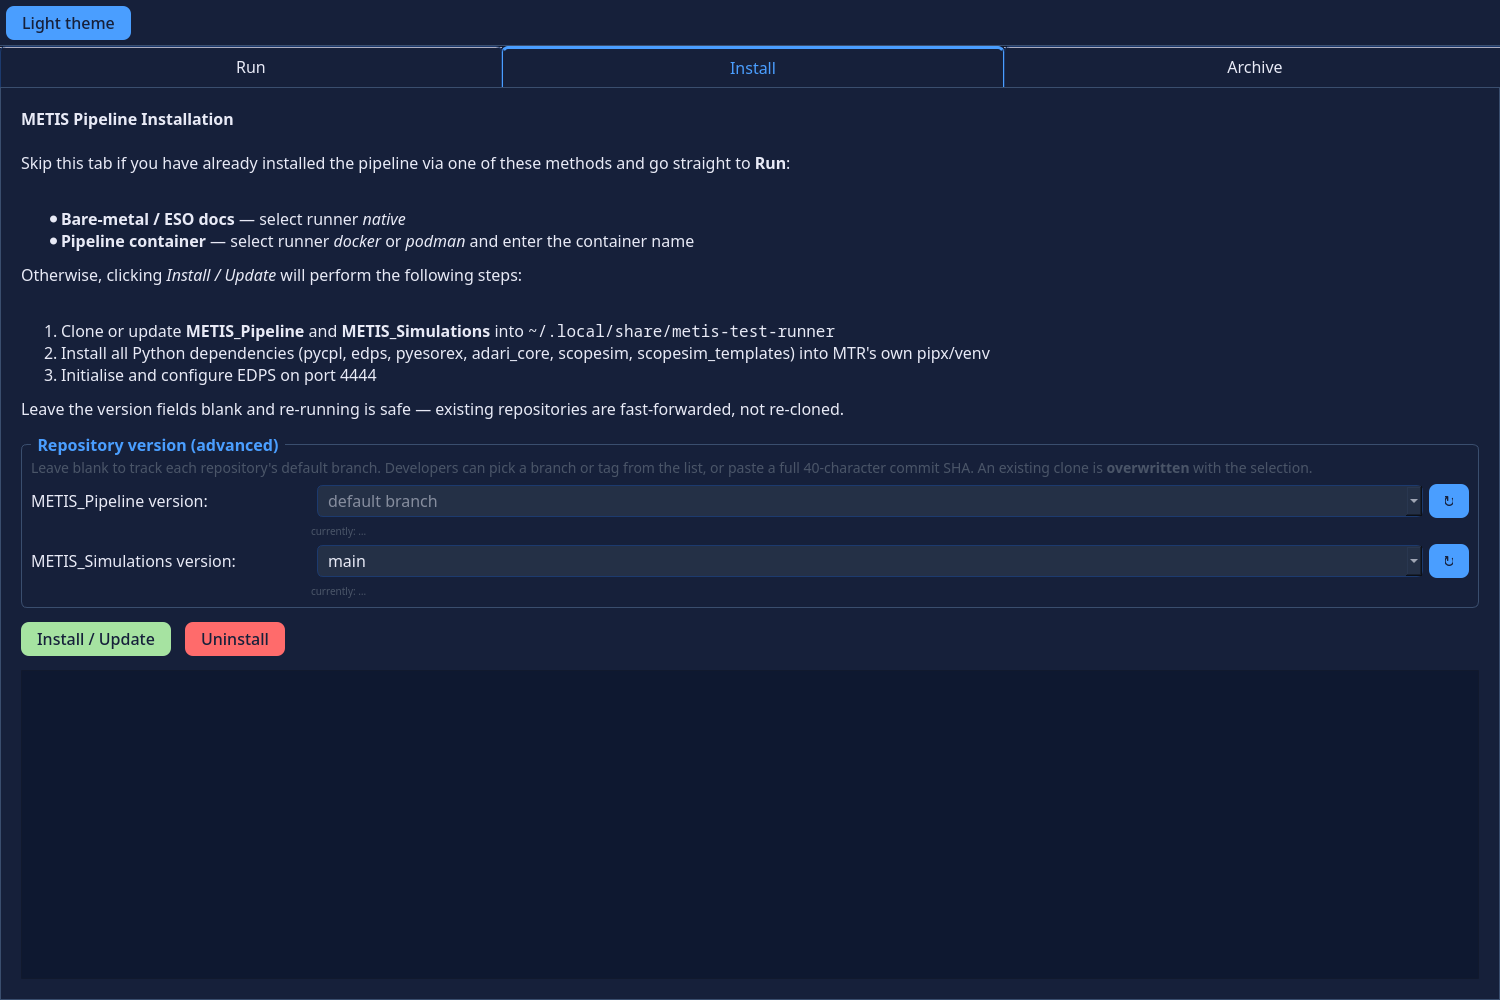
Install / Update clones both repositories into the user data directory
(~/.local/share/metis-test-runner/, override with METIS_DATA_DIR),
pip-installs pycpl, edps, pyesorex, adari_core, scopesim and
scopesim_templates into MTR's own venv, and initialises EDPS on port 4444.
Re-running updates the clones in place rather than re-cloning, and out-of-band
installs such as MetisWISE are preserved. Uninstall reverses all of it.
Leave Repository version (advanced) blank to track each repository's default branch. Set it to install a specific branch, tag or commit instead — for people developing on those repositories.
Archive tab
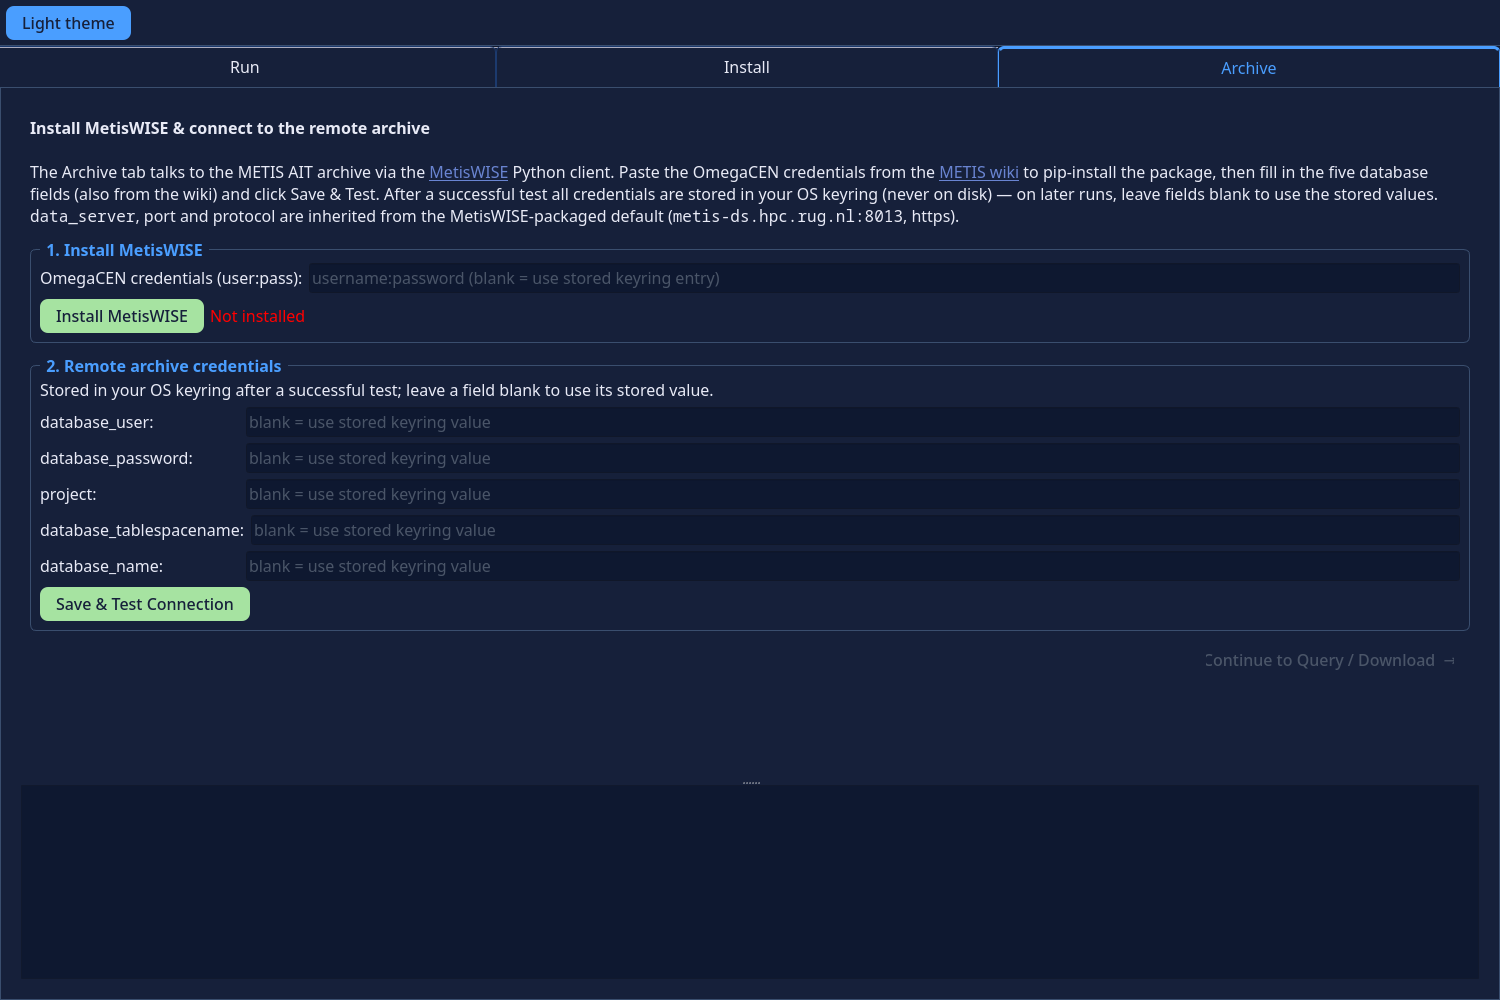
Connects to the remote METIS AIT archive via the MetisWISE client: install the package, store your credentials in the OS keyring, then query and download files. To pull missing master calibrations automatically during a run, tick Auto-fetch missing calibrations on the Run tab instead.
Supported Workflows
| EDPS Workflow | tech values |
|---|---|
metis_lm_img_wkf |
IMAGE,LM |
metis_n_img_wkf |
IMAGE,N |
metis_ifu_wkf |
LMS, IFU, RAVC,IFU |
metis_lm_lss_wkf |
LSS,LM |
metis_n_lss_wkf |
LSS,N |
metis_lm_ravc_wkf |
RAVC,LM |
metis_lm_app_wkf |
APP,LM |
metis_pupil_imaging_wkf |
PUP,LM, PUP,N |
Output Layout
Output is written under the chosen output directory (default: ./output/<timestamp>/):
<output-dir>/sim/— synthetic FITS frames from ScopeSim<output-dir>/pipeline/— reduced data products from EDPS
The GUI displays the resolved paths live under the Output directory field so you can see exactly where products will land before you hit Run.
Reference
Other install methods, and the supported Python versions
MTR is distributed on PyPI. The recommended installer is pipx, which creates an isolated venv per application and never touches your system Python.
Step 1 — install pipx (one-time, skip if you already have it):
# Debian / Ubuntu
sudo apt install pipx && pipx ensurepath

# Fedora
sudo dnf install pipx && pipx ensurepath

# macOS (Homebrew)
brew install pipx && pipx ensurepath

# Any platform with Python ≥ 3.12 (fallback)
python -m pip install --user pipx && pipx ensurepath
Step 2 — install MTR:
pipx install metis-test-runner
mtr                                  # launches the GUI from anywhere

# The example inputs ship inside the package, so copy them out first:
mtr-cli --copy-examples ~/mtr-examples
mtr-cli ~/mtr-examples/LMS_RAD_06.yaml    # CLI equivalent
Tip:
mtr-cli --examples-dirprints where the bundled examples live if you would rather reference them in place than copy them.
Tip: MTR supports Python 3.12–3.13. On a newer default
python3(e.g. 3.14) the ESO pipeline dependencies (scopesim,pycpl, …) have no matching wheels yet, so the Install tab fails to build them. Pin MTR to a supported interpreter:pipx install metis-test-runner --python python3.12.
If you'd rather not install pipx, use Python's built-in venv module:
python -m venv ~/.venvs/mtr
~/.venvs/mtr/bin/pip install metis-test-runner
~/.venvs/mtr/bin/mtr                 # or: source ~/.venvs/mtr/bin/activate && mtr
On first launch, open the Install tab and click Install / Update to fetch the METIS_Pipeline, METIS_Simulations, and ESO pipeline dependencies into ~/.local/share/metis-test-runner/ (override with METIS_DATA_DIR=/path). All pipeline dependencies install into the same isolated venv that MTR itself lives in — they never leak into your system Python.
System dependencies (Qt6 libraries, per distro)
The GUI requires a handful of system libraries for Qt6 / OpenGL rendering. Python, Git, and basic CLI tools (curl, tar, …) are assumed to already be present.
Debian / Ubuntu
sudo apt install \
  libgl1 libegl1 libglib2.0-0 libxkbcommon0 \
  libfontconfig1 libfreetype6 libdbus-1-3 \
  libxkbcommon-x11-0 libxcb-cursor0 libxcb-keysyms1 libxcb-icccm4 libxcb-shape0
Fedora
sudo dnf install \
  mesa-libGL mesa-libEGL glib2 libxkbcommon \
  fontconfig freetype dbus-libs \
  libxkbcommon-x11 xcb-util-cursor xcb-util-keysyms xcb-util-wm
macOS (Homebrew)
On macOS, Qt uses the native Cocoa backend so X11/xcb packages are not needed:
brew install freetype fontconfig glib
Tip: if the GUI crashes at startup with "could not find or load the Qt platform plugin", set
QT_DEBUG_PLUGINS=1to get detailed diagnostics:QT_DEBUG_PLUGINS=1 mtrThe output will list exactly which shared library failed to load.
Runner modes — where the pipeline tools live (default / native / docker / podman)
Regardless of whether you drive the runner from the GUI or the CLI, the underlying pipeline tools have to live somewhere. Three layouts are supported — pick the one that matches your install:
Option A — pipx install (runner default, the default)
The Install tab takes care of this automatically. It pip-installs all pipeline
dependencies (pycpl, edps, pyesorex, adari_core, scopesim,
scopesim_templates) into the same isolated venv that hosts MTR, clones
METIS_Pipeline and METIS_Simulations into the user data directory
(~/.local/share/metis-test-runner/ by default). The default runner then
derives the environment (PYTHONPATH, recipe directories, instrument-packages
path) from those locations automatically and invokes every subprocess with the
MTR venv's Python interpreter — no .env file required.
Option B — Docker or Podman container (runner docker / podman)
Build and start the pipeline container from METIS_Pipeline/toolbox/:
cd METIS_Pipeline/toolbox
docker build -t metispipeline .
docker run -d --name metis-pipeline --net=host \
  --mount type=bind,source=/path/to/output,target=/output \
  metispipeline
Then in the GUI, set runner to docker (or podman) and enter the container name. The output directory must be bind-mounted into the container so EDPS can write products back to the host.
Option C — bare-metal or inside a container (runner native)
If the pipeline tools (edps, python, ScopeSim) are already on your PATH — either because you are running inside a container, or have installed everything directly — no extra setup is needed. Select runner native.
ScopeSim instrument packages (Armazones, ELT, METIS) will be downloaded into ./inst_pkgs/ in your current working directory on first use. Set the GUI's Instrument packages field (or --inst-pkgs PATH) to download or reuse packages from a fixed location instead.
Tip: always launch the GUI (or invoke
mtr-cli) from the same directory — otherwise ScopeSim will download a fresh copy of the instrument packages into every new directory, cluttering your filesystem.
Reference
| Mode | When to use |
|---|---|
default |
You used the GUI's Install tab. Pipeline tools are pip-installed alongside MTR in the same isolated pipx/venv. Subprocesses run with that venv's Python interpreter and an environment derived automatically from the install locations (see Overriding the environment). No external dependencies. |
native |
Tools (edps, python, ScopeSim) are installed directly on PATH — e.g. you are running inside a Docker/Podman container, or have a bare-metal install. |
docker / podman |
Tools live inside a container and you are running the script outside it. The runner wraps every command with docker exec / podman exec. |
Note for
docker/podmanrunners: the output directory (-o) must be bind-mounted into the container so EDPS can write pipeline products to it. The--simulations-dirflag should point to the path ofMETIS_Simulations/Simulationsinside the container (default:/home/metis/METIS_Simulations).
Input formats — YAML observation blocks and AIT CSV
Two input formats are supported and may be mixed in a single run:
- YAML observation blocks (
*.yaml,*.yml) — the primary, human-authored format. Workflow auto-detection works on YAML content. - AIT-format CSV test sequences (
*.csv) — the AIT performance-test sheet exported as CSV. Parsed bymetis_simulations.csvParserat simulation time. MTR does not inspect CSV content itself, so for CSV-only runs the workflow is auto-detected from the simulated FITS headers (after the simulation step).
See small_test_img_lm.csv (IMAGE,LM) and small_test_img_n.csv (IMAGE,N) for minimal CSVs; the rest of this section covers YAML. All of these ship inside the package — mtr-cli --copy-examples DIR writes them somewhere you can edit them.
YAML Format
Each top-level key in the YAML is one observation block. The workflow (lm_img, n_img, ifu, lm_lss, n_lss, …) and the deepest pipeline target task are inferred automatically from the YAML content — primarily from properties.tech, falling back to mode.
Required fields per block:
BLOCK_NAME:
  do.catg: <EDPS classification tag>   # e.g. DETLIN_IFU_RAW, IFU_SCI_RAW
  mode: <scopesim mode>                 # e.g. wcu_lms, lms
  source:
    name: <scopesim source name>        # e.g. empty_sky, star
    kwargs: {}
  properties:
    dit: <float>          # detector integration time (s)
    ndit: <int>           # number of integrations
    catg: <CALIB|SCIENCE>
    tech: <LMS|IMAGE,LM|LSS,LM|…>
    type: <DETLIN|DARK|FLAT|…>
    tplname: <ESO template name>
    nObs: <int>           # number of exposures to simulate
See LMS_RAD_06.yaml (see mtr-cli --examples-dir) for a complete IFU example covering the full calibration + science chain.
The small per-mode examples — small_test.yaml (IFU),
small_test_img_lm.yaml / small_test_img_lm.csv (IMAGE,LM), and
small_test_img_n.yaml / small_test_img_n.csv (IMAGE,N) —
are minimal inputs that exercise the detector linearity + gain step
(metis_det_lingain) and the master-dark step (metis_det_dark). Each provides
the DETLIN frames that recipe requires: six distinct DITs, each with two
illuminated (ON) and two dark (OFF) frames (the OFF frames use
filter_name: "closed"), plus ≥2 dark frames for the dark step. Six DITs are
used because metis_det_lingain's gain fit — np.polyfit(deg=1, cov=True) —
needs at least four DIT points below the linearity limit (len > order+2);
fewer raises "the number of data points must exceed order to scale the
covariance matrix."
Command-line reference (`mtr-cli`) — all options and worked examples
mtr-cli is the headless interface that the GUI drives under the hood. It is useful for scripting, CI jobs, and SSH sessions without a display. It accepts the same options as the GUI.
mtr-cli [OPTIONS] input1.yaml [input2.csv ...]
YAML and CSV inputs may be mixed in any combination.
Options
| Flag | Default | Description |
|---|---|---|
-o / --output |
./output/<timestamp> |
Root directory for all outputs (env: METIS_OUTPUT_DIR) |
--runner {default,native,docker,podman} |
default |
Execution mode (see below; env: METIS_RUNNER) |
--container NAME |
— | Container name/ID for docker / podman runners (env: METIS_CONTAINER) |
--calib N |
1 |
Auto-generate N calibration frames (dark/flat) per unique config, inferred from input content. Forwarded to METIS_Simulations as doCalib, which sets nObs per calibration config. Pass --calib 0 or --no-calib to disable. |
--static {0,1} |
1 |
Ensure static calibration prototypes (PERSISTENCE_MAP_*, ATM_PROFILE, REF_STD_CAT, …) exist in a shared cache directory and pass it to EDPS. Generated once and reused across runs. Pass --static 0 or --no-static to disable. |
--cores N |
4 |
CPU cores used for parallel simulations |
--no-sim |
off | Skip simulation; run pipeline on existing FITS data (source defaults to <output>/sim/ — override with --pipeline-input) |
--pipeline-input DIR |
<output>/sim/ |
Directory containing FITS files to feed the pipeline (only with --no-sim; env: METIS_PIPELINE_INPUT) |
--no-pipeline |
off | Run simulation only; skip EDPS pipeline |
--csv-to-yaml |
off | Dry run: translate CSV input(s) to YAML via METIS_Simulations (testRun+writeYaml) and stop — writes <name>.yaml next to each CSV, with no simulation and no pipeline. Only CSV inputs are affected. Note: the YAML is written next to the source CSV, so don't point it at a bundled examples/*.csv whose .yaml you want to keep. |
--csv-lines START:END |
all rows | Restrict CSV inputs to a range of 1-based file lines (e.g. 6:12, 6: from line 6 to end, :12 from start to line 12). The header block (column-name row + component/description/type rows) is always kept; MTR writes a sliced copy under <output>/sliced_inputs/ and feeds that to the simulation. Applies to .csv inputs only; ignored with --no-sim. Also exposed in the GUI Run tab. |
--simulations-dir PATH |
./METIS_Simulations (host) or /home/metis/METIS_Simulations (container) |
Path to ScopeSim scripts (env: METIS_SIMULATIONS_DIR) |
--inst-pkgs PATH |
see below | Path to ScopeSim instrument packages (Armazones, ELT, METIS). Defaults to the user data dir for the default runner, ./inst_pkgs for native, and container-resolved ./inst_pkgs for docker/podman (env: METIS_INST_PKGS) |
--auto-fetch-calibrations |
off | Before running the pipeline, query the remote METIS archive (via MetisWISE) for any master calibrations the input set is missing and download them into the pipeline input directory. Requires MetisWISE to be installed and archive credentials stored via the Archive tab (OS keyring; a legacy ~/.awe/Environment.cfg also works). |
--prefer-masters |
off | Set EDPS association_preference to master_per_quality_level for this run, preferring master calibrations over reduced raw data. Only useful when EDPS was configured outside MTR — the Install tab already pins this value, so on a standard install the flag changes nothing. Ignored for docker/podman, where EDPS reads the container's own configuration. Not exposed in the GUI for the same reason. |
Overriding the environment
For the default runner, the environment (PYTHONPATH, PYCPL_RECIPE_DIR, PYESOREX_PLUGIN_DIR, METIS_INST_PKGS, …) is derived automatically from the install locations — there is no env file to maintain. The same resolved environment is shared by mtr-cli, the GUI, and the mtr-exec / mtr-shell commands.
If you need to override or add a variable, create a .env file in the user data directory (~/.local/share/metis-test-runner/.env); any keys in it take precedence over the derived defaults. For example, to raise the pyesorex log verbosity:
PYESOREX_MSG_LEVEL=info
PYESOREX_LOG_LEVEL=info
The file is entirely optional — it is read if present and ignored if absent.
Examples
# Full run with the pipx-installed pipeline (default runner)
mtr-cli ~/mtr-examples/LMS_RAD_06.yaml

# Inside a container or bare-metal install (tools on PATH)
mtr-cli --runner native ~/mtr-examples/LMS_RAD_06.yaml

# Exec into a running Docker container from the host
mtr-cli --runner docker --container metis-pipeline ~/mtr-examples/LMS_RAD_06.yaml

# Exec into a running Podman container; set runner via env var
METIS_RUNNER=podman METIS_CONTAINER=metis-pipeline mtr-cli ~/mtr-examples/LMS_RAD_06.yaml

# Multiple YAML files, custom output dir, 2 auto-calibration frames per config
mtr-cli -o /tmp/myrun --calib 2 obs1.yaml obs2.yaml

# Skip the auto-generated calibration frames entirely
mtr-cli --no-calib obs1.yaml obs2.yaml

# Crank up parallelism for big simulation batches
mtr-cli --cores 12 ~/mtr-examples/LMS_RAD_06.yaml

# Only simulate, inspect the FITS files manually
mtr-cli --no-pipeline ~/mtr-examples/LMS_RAD_06.yaml

# Only run the pipeline on previously simulated data
mtr-cli --no-sim -o /tmp/myrun ~/mtr-examples/LMS_RAD_06.yaml

# Pipeline-only with FITS files from a custom location
mtr-cli --no-sim --pipeline-input /data/sim_fits -o /tmp/myrun

# CSV-only input, simulate only (workflow auto-detection not needed)
mtr-cli --no-pipeline ~/mtr-examples/small_test_img_lm.csv

# CSV-only input, full simulate + pipeline run (workflow auto-detected from the
# simulated FITS headers)
mtr-cli ~/mtr-examples/small_test_img_lm.csv

# Dry run: translate a CSV test sheet to YAML (writes my_sheet.yaml next to it),
# no simulation and no pipeline
mtr-cli --csv-to-yaml /path/to/my_sheet.csv

# Mixed YAML + CSV in a single run
mtr-cli ~/mtr-examples/small_test.yaml examples/small_test_img_lm.csv
Direct environment access (`mtr-exec` / `mtr-shell`)
For developers who want to drive the pipeline tools themselves — bypassing MTR's
simulation, workflow detection, and EDPS server lifecycle — two commands hand you
the fully-resolved environment with no env file to pass (PYTHONPATH, recipe
dirs, instrument-packages path, and the MTR venv on PATH are all set for you):
# Run a single command in MTR's environment (everything after -- is verbatim)
mtr-exec -- edps -w metis.metis_wkf -t metis_ifu_dark -i ./sim -o ./out
mtr-exec -- pyesorex --recipes
mtr-exec -- python my_scopesim_probe.py

# Open an interactive shell with the environment pre-applied
mtr-shell
# then, inside it:
(mtr) $ edps -lw
(mtr) $ pyesorex metis_ifu_dark ...
(mtr) $ python        # scopesim importable, instrument packages resolved
Both accept --runner {default,native,docker,podman} and --container NAME
(same semantics and env vars as mtr-cli); for docker/podman the command or
shell runs inside the named container. These replace the old
uv run --env-file .env … workflow.
Repository layout
MTR/
├── src/metis_test_runner/
│   ├── gui.py              # Graphical front-end (PyQt6) — primary entry point
│   ├── run_metis.py        # Headless CLI (used directly or wrapped by the GUI)
│   ├── archive.py          # MetisWISE archive integration
│   ├── credentials.py      # OS-keyring storage for archive credentials
│   ├── direct.py           # mtr-exec / mtr-shell direct environment access
│   ├── env.py              # Shared runtime-environment resolution
│   ├── paths.py            # User data directory resolution (platformdirs)
│   ├── indexes.py          # ESO mirror pip-index URL constants
│   └── examples/           # Bundled YAML / CSV example inputs
├── tests/                  # Unit tests (pytest)
└── pyproject.toml          # Project metadata (hatchling build backend)
Related Repositories
This runner is designed to work alongside the following repos, which are installed via the GUI's Install tab:
- METIS_Pipeline — the core Python/C pipeline, EDPS workflows, and PyEsoRex recipes
- METIS_Simulations — ScopeSim scripts that generate synthetic FITS observations for each observing mode
1 maintainer

Metadata
1 maintainer
Release files for metis-test-runner 0.5.0
For a detailed explanation of source distributions (sdists) and built distributions (wheels), please see the package formats documentation.
Source distribution (sdist)
| File | Size | Uploaded | |
|---|---|---|---|
| metis_test_runner-0.5.0.tar.gz | 152.8 kB | Details |
Built distribution (wheel)
| File | Interpreter | ABI | Platform | Reset |
|---|---|---|---|---|
| metis_test_runner-0.5.0-py3-none-any.whl | Python 3 | none | any | Details |
Total release size: 252.1 kB
Release files / metis_test_runner-0.5.0.tar.gz
| Download URL | metis_test_runner-0.5.0.tar.gz |
|---|---|
| Size | 152.8 kB |
| Tags | Source |
|
SHA-256 checksum How to use checksums |
68edc5218837013b68526dfb6a28ba88455f3426393e4a03a723051432716ff3
|
|
BLAKE2b-256 checksum How to use checksums |
478fbce8b4caf5e383b17decee31c01d2e274e166d4dc25df148c6625cbcc42c
|
| Upload date | |
|
Uploaded using Trusted Publishing? What is trusted publishing? |
Yes |
| Uploaded via |
twine/7.0.0 CPython/3.13.14
|
Provenance
Provenance describes where a file came from. On PyPI, provenance is shared via attestations, which provide a verifiable record of the build or publishing details. View details, limitations and caveats.


PyPI Publish Attestation
PyPI verified that this artifact, at this checksum, originated from the publisher listed below.
Signed by GitHub Actions, verified by PyPI on Sep 19, 2026.
Transparency logRelease files / metis_test_runner-0.5.0-py3-none-any.whl
| Download URL | metis_test_runner-0.5.0-py3-none-any.whl |
|---|---|
| Size | 99.2 kB |
| Tags | Python 3 |
|
SHA-256 checksum How to use checksums |
24b252aac59cad69dd8bcfcd987fe7e7fcf6de4bfa6f80188d35aa26b4110492
|
|
BLAKE2b-256 checksum How to use checksums |
449d22df7febe651883524d4211579cfc069b1c0c10d3526fd9e324761ad66fd
|
| Upload date | |
|
Uploaded using Trusted Publishing? What is trusted publishing? |
Yes |
| Uploaded via |
twine/7.0.0 CPython/3.13.14
|
Provenance
Provenance describes where a file came from. On PyPI, provenance is shared via attestations, which provide a verifiable record of the build or publishing details. View details, limitations and caveats.
PyPI Publish Attestation
PyPI verified that this artifact, at this checksum, originated from the publisher listed below.
Signed by GitHub Actions, verified by PyPI on Sep 19, 2026.
Transparency log













