A hybrid quantum-classic framework for quantum computing


Project description
MindQuantum


- MindQuantum
What is MindQuantum
MindQuantum is a new-generation quantum computing framework based on MindSpore, focusing on the implementation of NISQ algorithms. It combines the HiQ high-performance quantum computing simulator with the parallel automatic differentiation capability of MindSpore. MindQuantum is easy-to-use with ultra-high performance. It can efficiently handle problems like quantum machine learning, quantum chemistry simulation, and quantum optimization. MindQuantum provides an efficient platform for researchers, teachers and students to quickly design and verify quantum algorithms, making quantum computing at your fingertips.

First experience
Build parameterized quantum circuit
The below example shows how to build a parameterized quantum circuit.
from mindquantum import *
import numpy as np

encoder = Circuit().h(0).rx({'a0': 2}, 0).ry('a1', 1)
print(encoder)
print(encoder.get_qs(pr={'a0': np.pi / 2, 'a1': np.pi / 2}, ket=True))
Then you will get,
      ┏━━━┓ ┏━━━━━━━━━━┓
q0: ──┨ H ┠─┨ RX(2*a0) ┠───
      ┗━━━┛ ┗━━━━━━━━━━┛
      ┏━━━━━━━━┓
q1: ──┨ RY(a1) ┠───────────
      ┗━━━━━━━━┛

-1/2j¦00⟩
-1/2j¦01⟩
-1/2j¦10⟩
-1/2j¦11⟩
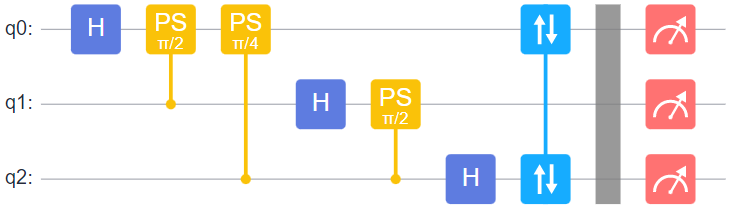
In jupyter notebook, we can just call svg() of any circuit to display the circuit in svg picture (dark and light mode are also supported).
circuit = (qft(range(3)) + BarrierGate(True)).measure_all()
circuit.svg()  # circuit.svg('light')
Train quantum neural network
ansatz = CPN(encoder.hermitian(), {'a0': 'b0', 'a1': 'b1'})
sim = Simulator('mqvector', 2)
ham = Hamiltonian(-QubitOperator('Z0 Z1'))
grad_ops = sim.get_expectation_with_grad(
    ham,
    encoder.as_encoder() + ansatz.as_ansatz(),
)

import mindspore as ms

ms.set_context(mode=ms.PYNATIVE_MODE, device_target='CPU')
net = MQLayer(grad_ops)
encoder_data = ms.Tensor(np.array([[np.pi / 2, np.pi / 2]]))
opti = ms.nn.Adam(net.trainable_params(), learning_rate=0.1)
train_net = ms.nn.TrainOneStepCell(net, opti)
for i in range(100):
    train_net(encoder_data)
print(dict(zip(ansatz.params_name, net.trainable_params()[0].asnumpy())))
The trained parameters are,
{'b1': 1.5720831, 'b0': 0.006396801}
Tutorials
-
Beginner Tutorial
-
Middle Level Tutorial
-
Advanced Tutorial
Case Library
-
General Quantum Algorithms
-
NISQ Algorithms
API
For more API, please refer to MindQuantum API.
Installation
Confirming System Environment Information
- The hardware platform should be CPU with avx2 supported.
- Refer to MindQuantum Installation Guide, install MindSpore, version 1.4.0 or later is required.
- See setup.py for the remaining dependencies.
Install by Source Code
1.Download Source Code from Gitee
cd ~
git clone https://gitee.com/mindspore/mindquantum.git
2.Compiling MindQuantum
cd ~/mindquantum
bash build.sh
cd output
pip install mindquantum-*.whl
Install by pip
Install MindSpore
Please refer to the MindSpore installation guide to install an appropriate version of MindSpore.
Install MindQuantum
pip install mindquantum
Build from source
-
Clone source.
cd ~
git clone https://gitee.com/mindspore/mindquantum.git
-
Build MindQuantum
For linux system, please make sure your cmake version >= 3.18.3, and then run code:
cd ~/mindquantum
bash build.sh --gitee
Here
--giteeis telling the script to download third party from gitee. If you want to download from github, you can ignore this flag. If you want to build under GPU, please make sure you have install CUDA 11.x and the GPU driver, and then run code:cd ~/mindquantum bash build.sh --gitee --gpu
For windows system, please make sure you have install MinGW-W64 and CMake >= 3.18.3, and then run:
cd ~/mindquantum
./build.bat /Gitee
For Mac system, please make sure you have install openmp and CMake >= 3.18.3, and then run:
cd ~/mindquantum
bash build.sh --gitee
-
Install whl
Please go to output, and install mindquantum wheel package by
pip.
Verifying Successful Installation
Successfully installed, if there is no error message such as No module named 'mindquantum' when execute the following command:
python -c 'import mindquantum'
Install with Docker
Mac or Windows users can install MindQuantum through Docker. Please refer to Docker installation guide
Note
Please set the parallel core number before running MindQuantum scripts. For example, if you want to set the parallel core number to 4, please run the command below:
export OMP_NUM_THREADS=4
For large servers, please set the number of parallel kernels appropriately according to the size of the model to achieve optimal results.
Building binary wheels
If you would like to build some binary wheels for redistribution, please have a look to our binary wheel building guide
Quick Start
For more details about how to build a parameterized quantum circuit and a quantum neural network and how to train these models, see the MindQuantum Tutorial.
Docs
More details about installation guide, tutorials and APIs, please see the User Documentation.
Community
Governance
Check out how MindSpore Open Governance works.
Contributing
Welcome contributions. See our Contributor Wiki for more details.
How to cite
Welcome to access the white paper of MindQuantum. When using MindQuantum for research, please cite:
@misc{xu2024mindspore,
      title={MindSpore Quantum: A User-Friendly, High-Performance, and AI-Compatible Quantum Computing Framework},
      author={Xusheng Xu and Jiangyu Cui and Zidong Cui and Runhong He and Qingyu Li and Xiaowei Li and Yanling Lin and Jiale Liu and Wuxin Liu and Jiale Lu and others},
      year={2024},
      eprint={2406.17248},
      archivePrefix={arXiv},
      primaryClass={quant-ph},
      url={https://arxiv.org/abs/2406.17248},
}
License
Release history Release notifications | RSS feed


Download files
Download the file for your platform. If you're not sure which to choose, learn more about installing packages.
Source Distributions
Built Distributions
Filter files by name, interpreter, ABI, and platform.
If you're not sure about the file name format, learn more about wheel file names.
Copy a direct link to the current filters
File details
Details for the file mindquantum-0.12.0-cp311-none-any.whl.
File metadata
- Download URL: mindquantum-0.12.0-cp311-none-any.whl
- Upload date:
- Size: 15.1 MB
- Tags: CPython 3.11
- Uploaded using Trusted Publishing? No
- Uploaded via: twine/6.1.0 CPython/3.11.10
File hashes
| Algorithm | Hash digest | |
|---|---|---|
| SHA256 |
c35a301fd7c7cd828d194633802c5500d64abdde9744de23b3d9dfd3f39fbd3a
|
|
| MD5 |
67e716257c93a283e6e37179d2c868f0
|
|
| BLAKE2b-256 |
7b63f42cb1c7dad784493d50451e4a55b8f1784a587547d330a13ca4fce7462e
|
File details
Details for the file mindquantum-0.12.0-cp311-cp311-win_amd64.whl.
File metadata
- Download URL: mindquantum-0.12.0-cp311-cp311-win_amd64.whl
- Upload date:
- Size: 12.7 MB
- Tags: CPython 3.11, Windows x86-64
- Uploaded using Trusted Publishing? No
- Uploaded via: twine/6.1.0 CPython/3.11.10
File hashes
| Algorithm | Hash digest | |
|---|---|---|
| SHA256 |
a753767549c7b06b00b3652627a6a2aac5d4c2a8855b16d7bb6c23461206d66a
|
|
| MD5 |
ebe3e6099fb35412b5dfabb63e4f6389
|
|
| BLAKE2b-256 |
56c5b8e76f64f00f79552797f07017fcd3f80fea51e9e870bd9f0bfcf4126809
|
File details
Details for the file mindquantum-0.12.0-cp311-cp311-manylinux1_x86_64.whl.
File metadata
- Download URL: mindquantum-0.12.0-cp311-cp311-manylinux1_x86_64.whl
- Upload date:
- Size: 173.0 MB
- Tags: CPython 3.11
- Uploaded using Trusted Publishing? No
- Uploaded via: twine/6.1.0 CPython/3.11.10
File hashes
| Algorithm | Hash digest | |
|---|---|---|
| SHA256 |
e0fad57dab858a5274ec296a8e234594fe05cd61e172719886b2e9526aff8146
|
|
| MD5 |
935cd7fea85d3fc344feb15139712e8a
|
|
| BLAKE2b-256 |
8c4a61f24b0b2d21111b0019eb2b79070a0967673087e72373bf44518cc9c7b7
|
File details
Details for the file mindquantum-0.12.0-cp311-cp311-macosx_11_0_arm64.whl.
File metadata
- Download URL: mindquantum-0.12.0-cp311-cp311-macosx_11_0_arm64.whl
- Upload date:
- Size: 14.9 MB
- Tags: CPython 3.11, macOS 11.0+ ARM64
- Uploaded using Trusted Publishing? No
- Uploaded via: twine/6.1.0 CPython/3.11.10
File hashes
| Algorithm | Hash digest | |
|---|---|---|
| SHA256 |
d996da13932b2a88553876d2170a2fa326d6715f6c70231177c8ffcdf7e141a9
|
|
| MD5 |
1d6eca3be3cd3ecd3baab30f1bffbbb4
|
|
| BLAKE2b-256 |
8017dfa4e4ccc6d81e112754cd7a08bc50b229e9523d0658be494505bb3cad04
|
File details
Details for the file mindquantum-0.12.0-cp311-cp311-macosx_10_15_x86_64.whl.
File metadata
- Download URL: mindquantum-0.12.0-cp311-cp311-macosx_10_15_x86_64.whl
- Upload date:
- Size: 16.7 MB
- Tags: CPython 3.11, macOS 10.15+ x86-64
- Uploaded using Trusted Publishing? No
- Uploaded via: twine/6.1.0 CPython/3.11.10
File hashes
| Algorithm | Hash digest | |
|---|---|---|
| SHA256 |
798ea2d2996bc9661b5236e289e2cfed1bfe026c48d321c5517103b5d3c382f5
|
|
| MD5 |
886f4efbd09d8e5616f40dfa148ecdf5
|
|
| BLAKE2b-256 |
0b9db40f4abe95f2b2849ffd24dc4d5beb93550eeb53b3eb071e352822e6ff52
|
File details
Details for the file mindquantum-0.12.0-cp310-none-any.whl.
File metadata
- Download URL: mindquantum-0.12.0-cp310-none-any.whl
- Upload date:
- Size: 15.1 MB
- Tags: CPython 3.10
- Uploaded using Trusted Publishing? No
- Uploaded via: twine/6.1.0 CPython/3.11.10
File hashes
| Algorithm | Hash digest | |
|---|---|---|
| SHA256 |
763494302a3cca17e877f3b411c122a571507b54f2068e0155a2395f5c7d5fef
|
|
| MD5 |
1676f13cae881c892ecf137cc17336f3
|
|
| BLAKE2b-256 |
b8e147f59659239a82e8a5b261fe6a1ebc15885e088a3d1f1400542a09b65b8b
|
File details
Details for the file mindquantum-0.12.0-cp310-cp310-win_amd64.whl.
File metadata
- Download URL: mindquantum-0.12.0-cp310-cp310-win_amd64.whl
- Upload date:
- Size: 12.6 MB
- Tags: CPython 3.10, Windows x86-64
- Uploaded using Trusted Publishing? No
- Uploaded via: twine/6.1.0 CPython/3.11.10
File hashes
| Algorithm | Hash digest | |
|---|---|---|
| SHA256 |
5468df4f363a46dadfc5efabab3b8d913f92a0ea61601564cccceff921c8c923
|
|
| MD5 |
34813be0b77850a4f3758cf5f0d4e39d
|
|
| BLAKE2b-256 |
bbde129a8e49eb20b09977986f8791d645f817dc0c2a6d639eb63a616349be28
|
File details
Details for the file mindquantum-0.12.0-cp310-cp310-manylinux1_x86_64.whl.
File metadata
- Download URL: mindquantum-0.12.0-cp310-cp310-manylinux1_x86_64.whl
- Upload date:
- Size: 173.0 MB
- Tags: CPython 3.10
- Uploaded using Trusted Publishing? No
- Uploaded via: twine/6.1.0 CPython/3.11.10
File hashes
| Algorithm | Hash digest | |
|---|---|---|
| SHA256 |
79b3b12be5bc10245feb3b0d93c3edd9c6e6cb1337f95e6cb1172fe3a3918e12
|
|
| MD5 |
645a920238bd5d4a4144c6d12f111082
|
|
| BLAKE2b-256 |
8babd1d9cc4ea3c502130e44e6dfa780a91acd0a1bad0e5f3fd3a5fb1bc8b954
|
File details
Details for the file mindquantum-0.12.0-cp310-cp310-macosx_11_0_arm64.whl.
File metadata
- Download URL: mindquantum-0.12.0-cp310-cp310-macosx_11_0_arm64.whl
- Upload date:
- Size: 14.7 MB
- Tags: CPython 3.10, macOS 11.0+ ARM64
- Uploaded using Trusted Publishing? No
- Uploaded via: twine/6.1.0 CPython/3.11.10
File hashes
| Algorithm | Hash digest | |
|---|---|---|
| SHA256 |
595020be29830aa4bc463afd8b125aa4302b521c598649c54561f6a0f3aff566
|
|
| MD5 |
e6734d22034b3e81a641d0e89c645c5b
|
|
| BLAKE2b-256 |
250b2d10eeb49860539a3fc1856a8f58cbb155e9be4b46fd8f297e4c1730500d
|
File details
Details for the file mindquantum-0.12.0-cp310-cp310-macosx_10_15_x86_64.whl.
File metadata
- Download URL: mindquantum-0.12.0-cp310-cp310-macosx_10_15_x86_64.whl
- Upload date:
- Size: 16.7 MB
- Tags: CPython 3.10, macOS 10.15+ x86-64
- Uploaded using Trusted Publishing? No
- Uploaded via: twine/6.1.0 CPython/3.11.10
File hashes
| Algorithm | Hash digest | |
|---|---|---|
| SHA256 |
9e638e127e0a7600b3e5087ce3f0ee130ddf7700c1787ceb4b476597535d2ef1
|
|
| MD5 |
e438bdbcbfd7ab3f600ce6e6baaec585
|
|
| BLAKE2b-256 |
8de655cc8a8a9efe352c3b94de94de03ac3d2aad090ad4cda73de7d77448f668
|
File details
Details for the file mindquantum-0.12.0-cp39-none-any.whl.
File metadata
- Download URL: mindquantum-0.12.0-cp39-none-any.whl
- Upload date:
- Size: 15.1 MB
- Tags: CPython 3.9
- Uploaded using Trusted Publishing? No
- Uploaded via: twine/6.1.0 CPython/3.11.10
File hashes
| Algorithm | Hash digest | |
|---|---|---|
| SHA256 |
accee49e1fb7eaa472837e6bc24f979a442bc11fc4d8e83bb867dc990c5263dd
|
|
| MD5 |
87e43e045f1e47e1ace59ac62de57e61
|
|
| BLAKE2b-256 |
50548814a425f4a499bb0143f495daca4d3fe4e84c231045d1fecab9fb822bff
|
File details
Details for the file mindquantum-0.12.0-cp39-cp39-win_amd64.whl.
File metadata
- Download URL: mindquantum-0.12.0-cp39-cp39-win_amd64.whl
- Upload date:
- Size: 12.7 MB
- Tags: CPython 3.9, Windows x86-64
- Uploaded using Trusted Publishing? No
- Uploaded via: twine/6.1.0 CPython/3.11.10
File hashes
| Algorithm | Hash digest | |
|---|---|---|
| SHA256 |
9c6c42802024300f5de619e43c4c2cc23deffee411f260d70ec6e53296e50e4f
|
|
| MD5 |
4805d6fa5712ab9b2fc76e821574732c
|
|
| BLAKE2b-256 |
19a6f4cf1f83ff1f7f7aef58a45ff55533bcb127dbe29d45a1fb2f5c2ed0109f
|
File details
Details for the file mindquantum-0.12.0-cp39-cp39-manylinux1_x86_64.whl.
File metadata
- Download URL: mindquantum-0.12.0-cp39-cp39-manylinux1_x86_64.whl
- Upload date:
- Size: 173.0 MB
- Tags: CPython 3.9
- Uploaded using Trusted Publishing? No
- Uploaded via: twine/6.1.0 CPython/3.11.10
File hashes
| Algorithm | Hash digest | |
|---|---|---|
| SHA256 |
ef8f1c9aef7d08de0bc2f078772cc0d35f0aec5caf949bcdea995ee7d5739ff1
|
|
| MD5 |
ee994edde0dc10f3b9f548375d2e7568
|
|
| BLAKE2b-256 |
fa783006677b7a90d30bea19daf2e8e06be315597f1989ca8f317ae0dd5e7efb
|
File details
Details for the file mindquantum-0.12.0-cp39-cp39-macosx_11_0_arm64.whl.
File metadata
- Download URL: mindquantum-0.12.0-cp39-cp39-macosx_11_0_arm64.whl
- Upload date:
- Size: 14.9 MB
- Tags: CPython 3.9, macOS 11.0+ ARM64
- Uploaded using Trusted Publishing? No
- Uploaded via: twine/6.1.0 CPython/3.11.10
File hashes
| Algorithm | Hash digest | |
|---|---|---|
| SHA256 |
1b826a6ba3268b1eb74447d517717a06e5deedfa26d249aadde2a425b1252294
|
|
| MD5 |
a9ffb5c005e50f19055614a028e03ec9
|
|
| BLAKE2b-256 |
a2b562e2a1e7e46808eb16f3b5bf370afd7c88e1e8d4db184678bbe1bcd615d7
|
File details
Details for the file mindquantum-0.12.0-cp39-cp39-macosx_10_15_x86_64.whl.
File metadata
- Download URL: mindquantum-0.12.0-cp39-cp39-macosx_10_15_x86_64.whl
- Upload date:
- Size: 16.7 MB
- Tags: CPython 3.9, macOS 10.15+ x86-64
- Uploaded using Trusted Publishing? No
- Uploaded via: twine/6.1.0 CPython/3.11.10
File hashes
| Algorithm | Hash digest | |
|---|---|---|
| SHA256 |
3bc771c033412293559d5df36d92d52d037ceb5d3d722c13833be7864d5cd33a
|
|
| MD5 |
cef370a2c9f8ff25f1382767e2ea92f8
|
|
| BLAKE2b-256 |
56ff96da2b09dae27c8cd7823b5175b18cb67fb14b62d282fd8ff10d09a82fe1
|


