
mockframe
Turns an app screenshot into a perspective-rendered device image. No browser, no purchased 3D models, no GPU.
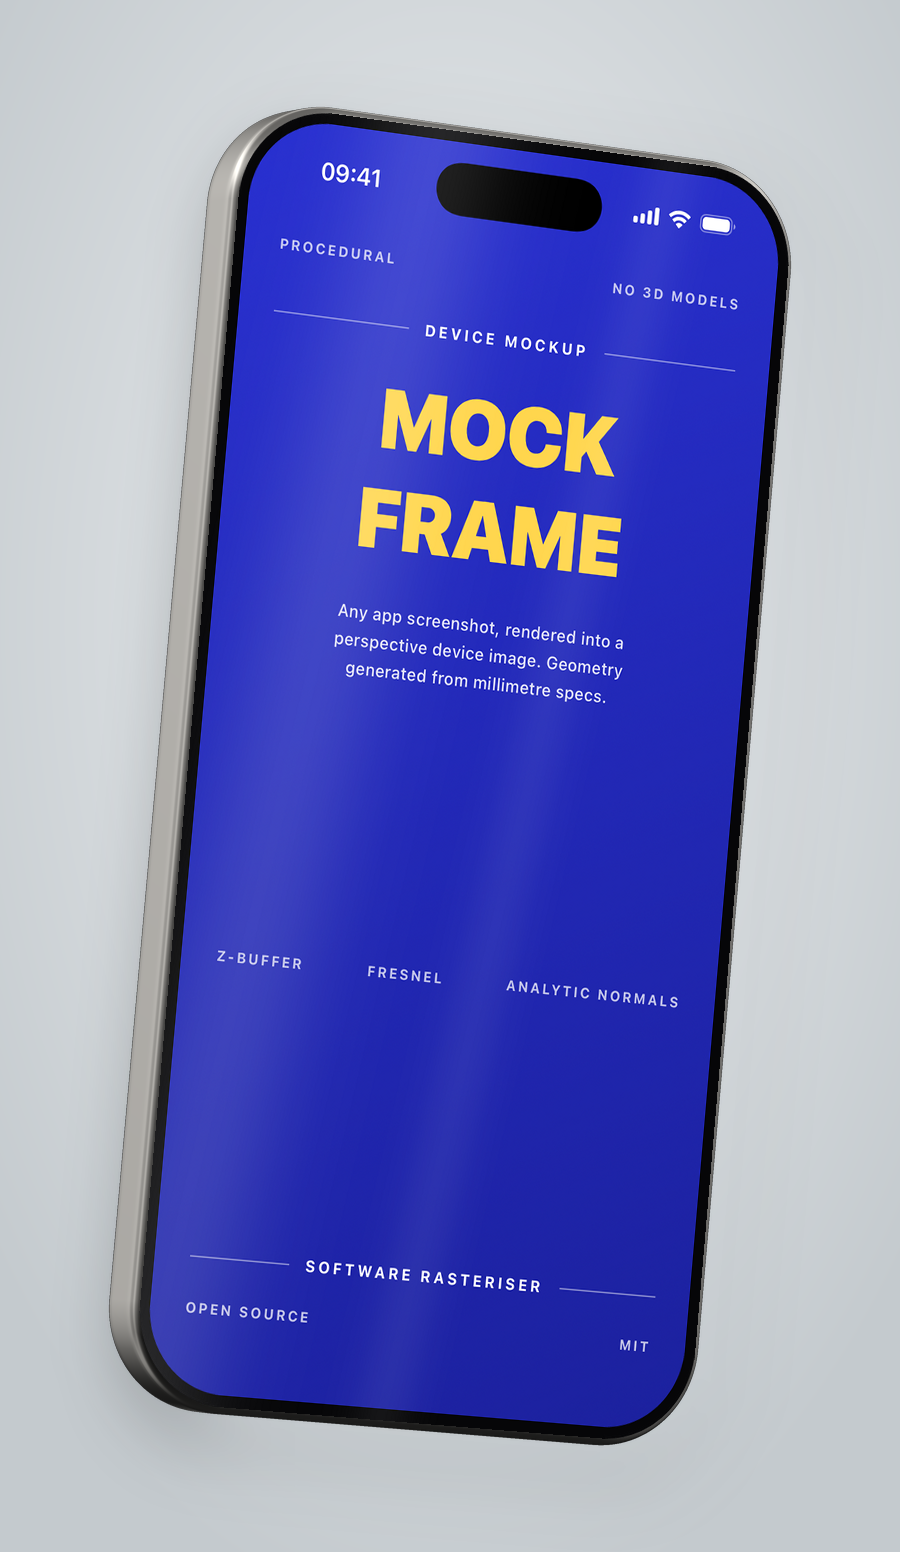
uvx mockframe render today.png --auto-device --bg light -o hero.png
The housing is generated procedurally from millimetre specs and shaded with a software rasteriser written for the job. Adding a device is therefore a table entry, not an asset file.
Version 0.2, 49 tests passing. A 1400 x 1750 image takes about three to four seconds on an Apple Silicon Mac.
Why not just buy a 3D model
The obvious route would be to buy an iPhone model and render it. Three reasons against, in this order.
Licensing. Models from Sketchfab, TurboSquid or CGTrader are mostly "editorial use only", or they forbid redistribution inside a product. Putting a model into a repo that other people clone is a different legal situation from rendering an image with it. Procedural geometry from publicly known dimensions sidesteps the problem instead of managing it.
Geometry. A phone housing is a rounded rect extruded along a curved edge profile. That is forty lines of code. An imported model brings material setups, scale questions and triangle soup with it, without solving anything that is hard here.
Choice of device. When the geometry comes from numbers, a new model is a table entry. With imported meshes it is a new file, a new material and a new calibration pass.
What that costs: the rasteriser handles exactly one class of object, and things a bought model would have brought along are still missing here — the camera bump, antenna lines, real glass refraction.
Architecture
graph TD
    CLI["cli.py — command line"]
    SCENE["scene.py — composition, presets"]
    GEO["geometry.py — mesh, projection"]
    RAST["raster.py — z-buffer, culling"]
    SHADE["shading.py — material, environments"]
    SCR["screen.py — warp, aspect check"]
    DEV["devices.py — device table, edge profile"]

    CLI --> SCENE
    SCENE --> GEO
    SCENE --> RAST
    SCENE --> SCR
    RAST --> SHADE
    GEO --> DEV
    SCR --> DEV
    SCENE --> DEV
devices.py imports nothing and is read by everything. That is why a new device is a table row rather than a code change.
Two decisions shape the rest. The glass plane is deliberately not rasterised with the housing; it is composited separately through a four-point perspective warp. Being planar, the warp is exact and sharper than interpolating a texture across triangles. And normals are computed analytically rather than averaged from neighbouring facets — that is the reason no faceting shows on the narrow side rail.
The full flow of a render, including the abort branch on a wrong aspect ratio: ARCHITECTURE.md.
Using it
With Claude Code — once, and after that "make me a hero image" is enough:
/plugin marketplace add moOritzl/claude-plugins
/plugin install mockframe@moritzlenhard
Without Claude Code, or with a different agent:
uvx mockframe render shot.png --auto-device -o hero.png
uvx fetches the package on first call and leaves nothing in your project. Without uv: brew install uv on macOS, otherwise the instructions from Astral.
The capture subcommand additionally needs macOS with Xcode; everything else is platform independent.
Development
Python 3.11 or newer. Everything lands in a venv inside the project folder, nothing in the system Python.
python3 -m venv .venv
source .venv/bin/activate
pip install -e ".[dev]"
-e installs it editable, so changes to src/mockframe/ take effect immediately. [dev] pulls in pytest; without it you get only the runtime dependencies numpy, Pillow and scipy.
The skill deliberately always calls uvx mockframe, meaning the published version. When developing, call .venv/bin/mockframe ... directly.
Commands
mockframe stands here and below for whichever invocation you chose above: uvx mockframe with no install, .venv/bin/mockframe from the project folder, or a bare mockframe with the venv activated.
mockframe devices                                  # table with provenance
mockframe render shot.png --device iphone-16-pro --preset hero-left
mockframe render shot.png --auto-device --bg dark
mockframe render shot.png --auto-device --zoom top   # close up on the top
mockframe hdri-synth studio.npy                    # synthetic environment map
mockframe capture --screens today,history --render   # macOS only
--auto-device derives the device from the screenshot resolution. 1206 x 2622 is an iPhone 16 Pro, and the tool knows that.
Close-ups
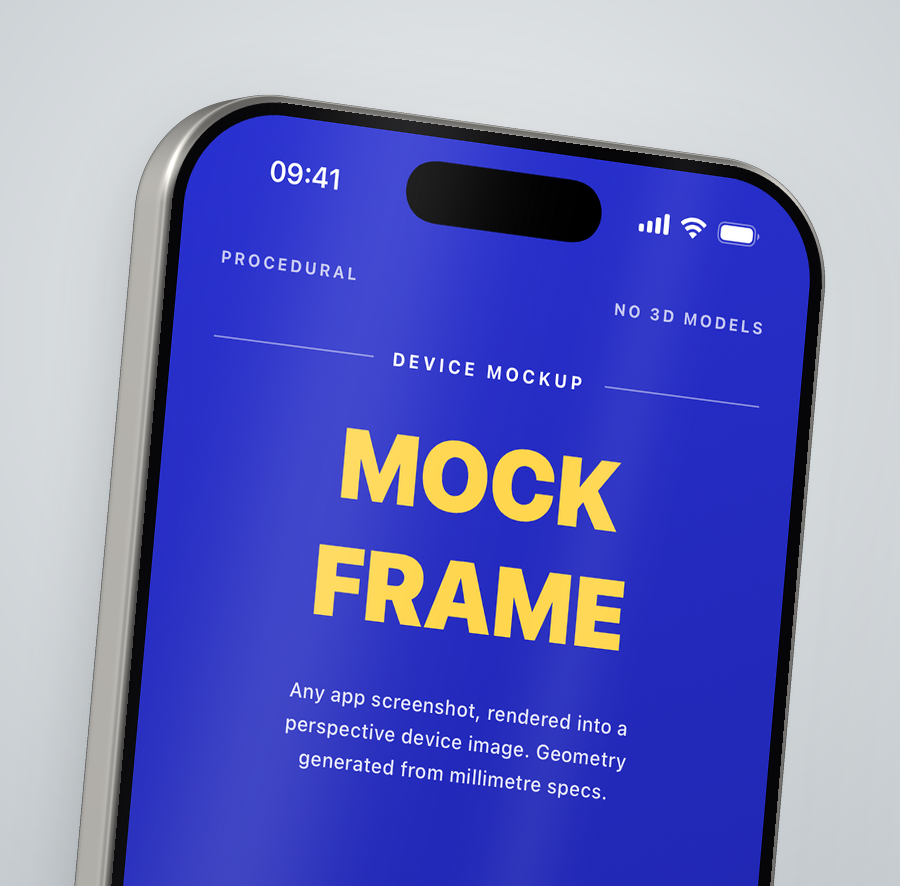
uvx mockframe render today.png --auto-device --zoom top -o header.png
--zoom top and --zoom bottom frame one end of the device — a navigation bar, a tab bar, a primary action. The crop sets the aspect ratio, so the output is a wide banner rather than the usual portrait image, and --width sets its resolution.
This is a camera change, not a crop of a finished render: the focal length scales and the principal point shifts, so the perspective and the reflections on the rail stay correct and the full output resolution is used.
--crop x0,y0,x1,y1 takes a custom rect as fractions of the device. The two axes are measured differently, which matters: y selects a band off the whole device, and x is measured against the device's width within that band. Under yaw and roll the top of the phone does not sit at the horizontal middle of the whole device, so measuring against the full outline would leave dead space on one side. Values outside 0..1 add air around the phone.
A tighter crop magnifies the screenshot. Both named zooms stay at native sharpness, but past roughly 2x there is no more detail in the source — lower --width to get it back, since half the width is half the magnification for the same framing.
There is no corner preset on purpose. A corner shot shows the chassis and almost none of the app, and this tool exists to present a screenshot.
Transparency
--bg none writes an RGBA PNG with the contact shadow kept in the alpha channel, so the cutout sits on whatever it is composited onto instead of floating above it. It needs a PNG output; the run aborts on a JPEG rather than silently filling the transparency with black.
If the screenshot does not fit the device, the run aborts instead of stretching silently:
Aborted: screenshot 1920x1080 (ratio 1.7778) does not match
iPhone 16 Pro (Natural Titanium) (expected 0.4600).
That is deliberate. A stretched render looks almost right, and the mistake usually surfaces only once the image has been published.
HDRI
The built-in environment is a formula made of Gaussian lobes. It is clean but smooth, because a formula has no structure. Switching to a real environment map is the largest jump in quality per line of code, and it replaces exactly one function — the interface is sample(R): a reflection vector in, linear radiance out.
| Analytic studio environment | Synthetic HDRI |
|---|---|
|
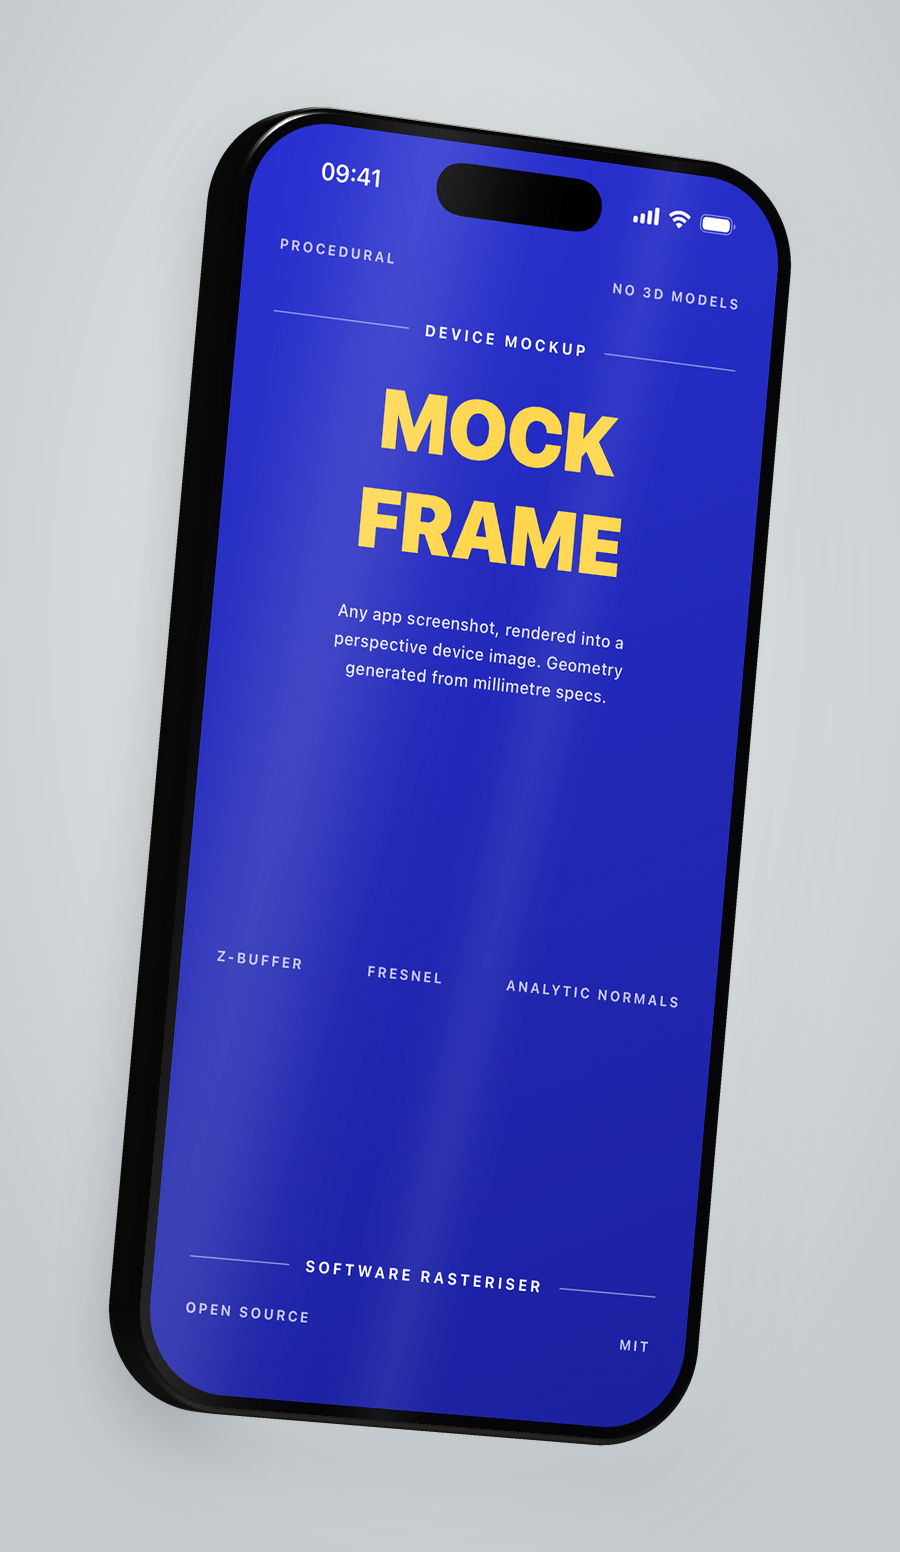 |
| Default, no file needed | --hdri studio.npy |
Both images are the same call, the same device, the same preset. Only the environment differs. The synthetic map is not automatically the better-looking choice — it has a dark base tone with a single softbox, which gives the rail more contrast but also a harder edge. It exists to demonstrate the sampling path:
mockframe hdri-synth studio.npy
mockframe render shot.png --hdri studio.npy
For product images, use a real studio HDRI from Poly Haven; those are CC0. For .exr or .hdr add pip install -e ".[hdr]", read the file yourself and pass it to HDRIEnvironment(array). This is the one path here that needs an installed copy rather than uvx — it does not run through the command line but in your own Python.
Environment maps are not checked in, *.npy is ignored. The synthetic one is 6 MB and reproducible bit for bit from the code; a test pins the hash.
Examples
Every image in this README is rendered from examples/app-screen.png, a real iOS screenshot of a placeholder screen — a small SwiftUI app in tools/mockscreen/, captured from the Simulator through mockframe capture. It shows no third-party app UI and no personal data, so the images carry no rights that are not ours.
With a booted iPhone simulator, the whole set rebuilds:
tools/mockscreen/capture.sh examples/app-screen.png
mockframe hdri-synth examples/studio.npy
mockframe render examples/app-screen.png --device iphone-16-pro --bg light -o examples/hero_light.png
mockframe render examples/app-screen.png --device iphone-16-pro --bg light --hdri examples/studio.npy -o examples/hero_hdri.png
mockframe render examples/app-screen.png --device iphone-16-pro --zoom top --bg light -o examples/zoom_top.png
The environment map is regenerated rather than checked in, because *.npy is ignored and it is 6 MB.
capture.sh builds the app with swiftc straight into an .app bundle — a single-file SwiftUI app needs no Xcode project — then installs it, pins the status bar to 9:41 so re-runs match, and screenshots it. It is a maintainer tool and is not part of the package. The iPhone 17 Pro simulator shoots 1206 x 2622, which --auto-device resolves to iphone-16-pro.
Tests
pytest -q
test_convergence.py is the test that matters. With correct interpolation the image must not depend on the triangle count. It exists because in the prototype the barycentric weights were mapped one position out: w0 is the edge function for v0 to v1 and therefore the weight of v2, not of v1. The bug was plainly visible in the image as a ladder pattern on the side rail, yet high-frequency metrics dropped only from 2.93 to 2.47. The convergence test fails unambiguously.
For renderers this is generally the test that carries: vary a parameter that must not change the result, and check that it does not.
Accuracy of the dimensions
Width, height and thickness come from Apple's tech specs. Corner radius and bezel width are not officially documented and are approximations. Every table entry carries a source field, and a test fails if it is empty. Without that, in three months nobody can tell which figure was verified and which one was guessed.
Status
Five devices, four camera presets, four backgrounds, an analytic studio environment, HDRI sampling, an aspect ratio check, and capture from the iOS Simulator.
Missing: the camera bump on the back, antenna lines, a floor reflection, the duo preset. The duo preset needs the camera bump first, because one device shows up cropped there.
The rasteriser is a Python loop over triangles. Vectorising over tiles, or Numba, would cut render time noticeably — but that is comfort, and it comes after image quality.
License and legal
MIT, see LICENSE.
NOTICE records what the license does not cover: the project is not affiliated with Apple, the repo contains no third-party assets, and images destined for the App Store are additionally subject to Apple's own marketing guidelines.
1 maintainer

Download files
Download the file for your platform. If you're not sure which to choose, learn more about installing packages.
Source Distribution
Built Distribution
Filter files by name, interpreter, ABI, and platform.
If you're not sure about the file name format, learn more about wheel file names.
Copy a direct link to the current filters
File details
Details for the file mockframe-0.2.0.tar.gz.
File metadata
- Download URL: mockframe-0.2.0.tar.gz
- Upload date:
- Size: 34.6 kB
- Tags: Source
- Uploaded using Trusted Publishing? No
- Uploaded via:
twine/7.0.0 CPython/3.13.9
File hashes
| Algorithm | Hash digest | |
|---|---|---|
| SHA256 |
7ea64f9edc49864909ee90db0b918b2697d26e17e856e521376b159b8df62719
|
|
| MD5 |
d1df92b1ee716a80a5afbf0476388dc3
|
|
| BLAKE2b-256 |
249e2a83665d726d9fde233440d10ecf69ed026bd49309f6bdf18ea053b00394
|
File details
Details for the file mockframe-0.2.0-py3-none-any.whl.
File metadata
- Download URL: mockframe-0.2.0-py3-none-any.whl
- Upload date:
- Size: 24.3 kB
- Tags: Python 3
- Uploaded using Trusted Publishing? No
- Uploaded via:
twine/7.0.0 CPython/3.13.9
File hashes
| Algorithm | Hash digest | |
|---|---|---|
| SHA256 |
e686d2055270d292497dcd085167003b872eaeb59b41a2b429c79effe8c44539
|
|
| MD5 |
8df9ea8ceafee1a1062102c5b0d73f7b
|
|
| BLAKE2b-256 |
e404e10e982da7e039a7dc90745ef0cf1e00c86ebc34e6dbc333b7755a1d70c5
|














