
mouse-pupil-analysis


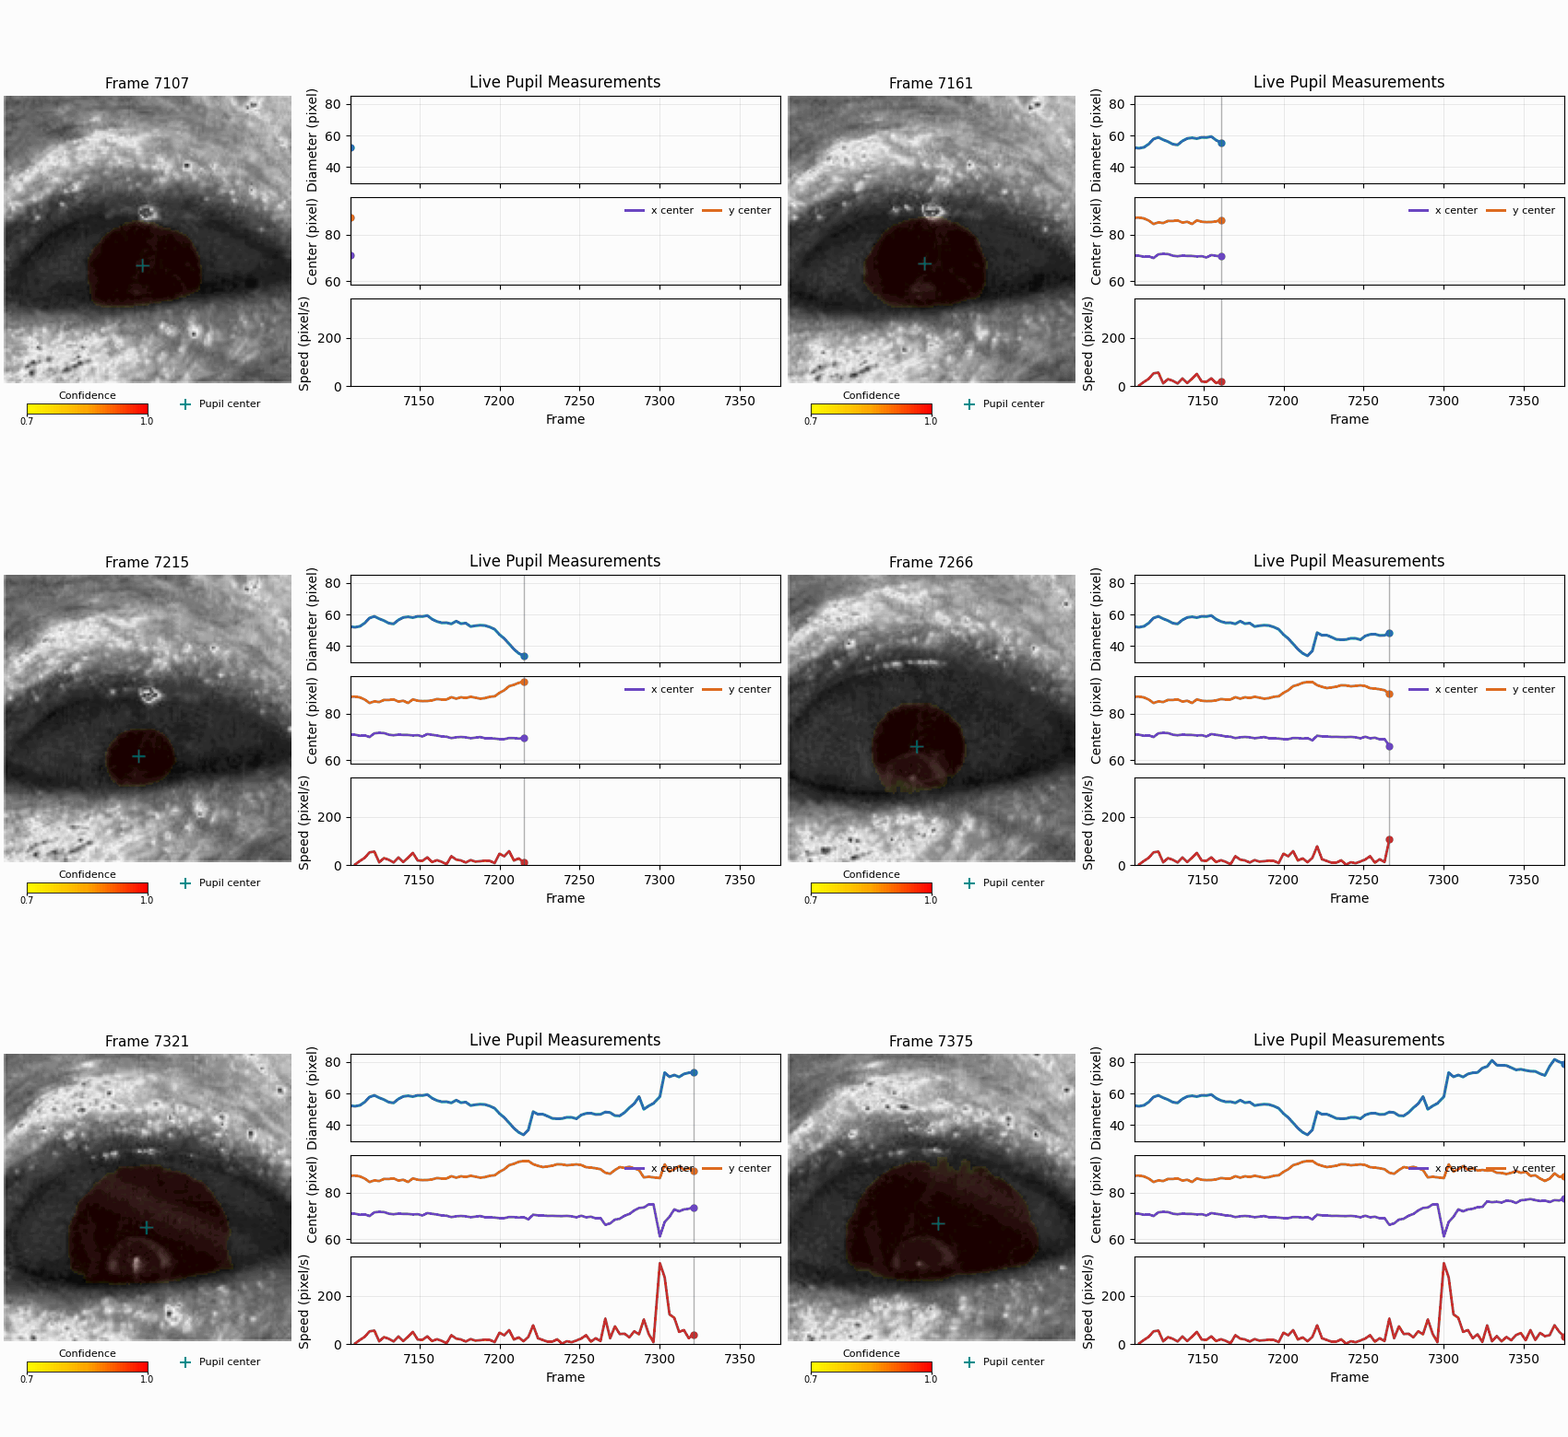
Left: confidence-colored pupil mask and estimated center. Right: pupil diameter, center, and speed over time.
Measure mouse pupil diameter from a video or a folder of frames, in one command. A trained
UNet ships inside the package, so there is no model to download. It targets the low-contrast,
low-resolution frames that rodent eye cameras actually produce. With --calculate_velocity,
it also tracks pupil center, speed, and per-frame segmentation quality.
Contents
Install
pip install mouse-pupil-analysis
Python 3.10 or newer. The trained checkpoint ships with the package, so that is the entire install. See Installation options if you need a particular PyTorch CPU or accelerator build.
Usage
Analyze a video:
run-pupil-analysis --video_path movie.avi
Or analyze a folder of PNG frames:
run-pupil-analysis --image_dir movie_frames/
To save confidence overlays on the original images:
run-pupil-analysis --video_path data/mouse1.avi --output_mask_dir data/predicted_masks_mouse1
To track the pupil center and its speed:
run-pupil-analysis \
  --video_path movie.avi \
  --calculate_velocity \
  --acquisition_fps 33.3333333333
Velocity timing. With video input,
--acquisition_fpsis optional: when it is omitted, the program uses the frame rate encoded in the video. A PNG directory has no such metadata, so velocity mode requires--acquisition_fpsand otherwise reports an error. For scientifically meaningful speeds, always provide the camera's actual acquisition rate; a video header may not represent experimental time.Video frames are sampled at 5 fps by default; velocity mode analyzes every encoded frame instead. Inference uses CUDA when available.
Show all command-line options
| Flag | Description |
|---|---|
--video_path |
Input video. Frames are extracted automatically before analysis. Mutually exclusive with --image_dir. |
--image_dir |
Input directory of existing PNG frames, used instead of a video. |
--out_dir |
Where to write extracted frames. Defaults to <video_stem>_frames/ next to the video. |
--result_dir |
Where to write the CSV and plot. Defaults to <video_stem>_result/ for video input and <image_dir>_result/ for --image_dir. |
--output_mask_dir |
Save translucent confidence-heatmap overlays for threshold-passing pupil pixels. Yellow is closest to the prediction threshold, orange is intermediate, and red is near-perfect confidence. |
--pred_thresh |
Optional confidence-threshold override from 0 to 1. By default, inference uses calibrated metadata beside the checkpoint, then a threshold encoded in its filename, and finally 0.7 for an uncalibrated custom checkpoint. Increase it when segmentation overpredicts the pupil; reduce it when it finds only part of the pupil. |
--prefer_central_component |
Keep one confidence-weighted component with a gentle preference for the image centre. Off by default. It preserves occluded/crescent pupil shapes and is useful when a separate off-centre dark structure is falsely segmented. |
--mask_transparency |
Blend weight of the heatmap color over the source image in overlays (default 0.05). Higher values are more saturated. |
--extraction_fps |
Frames per second to extract from the video (default 5). If extracting at this rate would exceed --max_frames, the rate is automatically reduced so that --max_frames frames are extracted. |
--max_frames |
Cap on frames extracted from a video (default 10000). Useful for long recordings. |
--calculate_velocity |
Analyze every encoded source frame and append pupil-center, speed, and segmentation-quality fields and plot panels to the analysis outputs. |
--acquisition_fps |
Actual experimental sampling rate used for timestamps and velocity. Required with --image_dir in velocity mode; defaults to the video header rate for video input. |
--checkpoint |
Path to a custom model checkpoint. Defaults to the packaged checkpoint with the highest IoU encoded in its filename. |
--batch_size |
Inference batch size (default 32). |
--num_workers |
Dataloader worker processes (default: up to 4, capped by CPU count). Use 0 to load frames in the main process, which is often faster for short recordings. |
To extract PNG frames from a video without analyzing them:
extract-frames --video_path data/mouse1.avi --out_dir data/frames_mouse1
Output
Results land next to the input by default, in <video_stem>_result/ for a video and
<image_dir>_result/ for a frame directory. For example,
movie.avi
movie_frames/
    movie_00001.png
    movie_00002.png
    ...
movie_result/
    movie_pupil_analysis.csv
    movie_pupil_analysis.png
The result files contain:
| File | Contents |
|---|---|
*_pupil_analysis.csv |
The per-frame table, columns below. |
*_pupil_analysis.png |
Frame-indexed diameter plot with valid/warning/invalid points. Velocity mode adds center, speed, and a dedicated quality-control panel. |
Mask images in --output_mask_dir |
Optional. Confidence heatmaps over threshold-passing pupil pixels: yellow near the threshold, orange intermediate, red near-certain. A thin center cross is cyan when accepted and yellow when rejected. |
Segmentation visibility and quality are written for every run. Timestamp, center, speed,
and tracking_status are added in velocity mode:
| Column | Meaning |
|---|---|
image_name |
Source image. The number in a generated name is the one-based source-frame index. |
estimated_pupil_diameter |
Equivalent-circle diameter, sqrt(4 / pi * area), in the 148 x 148 model image. |
pupil_diameter_input_pixels |
The same diameter at the scale of the image you supplied. |
pupil_visibility |
visible, not_detected, uncertain, or partially_visible_or_uncertain. Shape-based uncertainty does not claim to reconstruct a pupil hidden by the eyelid. |
segmentation_status |
Diameter-only status: valid, warning, or invalid. |
quality_reason |
Which check flagged or rejected the segmentation. |
timestamp_seconds |
Derived from the source-frame index and --acquisition_fps. |
center_x_pixels, center_y_pixels |
Pupil center in input-image pixels; x increases right, y increases down. |
speed_pixels_per_second |
Center speed, in input-image pixels per second. |
tracking_status |
valid, warning, or invalid. |
No column is calibrated; see the FAQ before comparing recordings. Segmentation-to-velocity method documents how the center and quality fields are derived.
Python API
Everything the CLI does is available from Python, which is usually more convenient inside a notebook or a larger analysis script. The returned result includes a DataFrame, so there is no need to read the CSV back in.
from mouse_pupil_analysis import analyze_video

result = analyze_video("data/mouse1.avi")
print(result.analysis_table.head())
print(result.csv_path, result.plot_path)
Velocity mode and every CLI flag are keyword arguments:
result = analyze_video(
    "data/mouse1.avi",
    calculate_velocity=True,
    acquisition_fps=33.3333333333,
    output_mask_dir="data/masks_mouse1",
)

usable = result.analysis_table.query("tracking_status != 'invalid'")
print(f"{len(usable)} of {len(result.analysis_table)} frames usable")
To start from frames you already extracted, use analyze_frames instead:
from mouse_pupil_analysis import analyze_frames

result = analyze_frames(
    "data/mouse1_frames",
    calculate_velocity=True,
    acquisition_fps=97,
)
result is an AnalysisResult with these fields:
| Field | Description |
|---|---|
analysis_table |
The same compact table written to CSV, as a DataFrame. |
csv_path, plot_path |
Locations of the written outputs. |
prediction_threshold |
The explicit or checkpoint-calibrated threshold actually used. |
segmentation_dataframe |
Detailed per-frame component and visibility evidence for every run. |
tracking_dataframe |
Detailed per-frame quality evidence in velocity mode, otherwise None. Retains raw centers, component areas, confidence, circularity, and temporal-area calculations that the compact table omits. |
image_frames |
Frame metadata linking each image name to its source-frame index. |
For repeated runs with shared settings, build an AnalysisConfig once and pass it to
run_analysis:
from pathlib import Path

from mouse_pupil_analysis import AnalysisConfig, run_analysis

for video in Path("data").glob("*.avi"):
    run_analysis(AnalysisConfig(video_path=video, pred_thresh=0.75))
Library code logs rather than prints, so it stays quiet by default. To see the same progress messages the CLI shows:
import logging
logging.basicConfig(level=logging.INFO)
Sample data
A clone of the repository carries real images and hand-labeled masks under
sample_data/, so you can exercise the whole pipeline before pointing it at
your own recordings:
git clone https://github.com/yzhaoinuw/mouse-pupil-analysis.git
cd mouse-pupil-analysis

run-pupil-analysis \
  --image_dir sample_data/velocity_frames \
  --result_dir results/sample_velocity \
  --output_mask_dir results/sample_velocity/overlays \
  --calculate_velocity \
  --acquisition_fps 97
Those are 31 consecutive frames acquired at 97 Hz. The fixture also holds full-size frames from two recordings and labeled image/mask pairs arranged by recording session. The sample-data guide covers the fixture-specific commands and provenance.
Installation options
Virtual environments
Recommended but not required, for example with Miniconda:
conda create -n mouse_pupil_analysis python=3.12
conda activate mouse_pupil_analysis
pip install mouse-pupil-analysis
PyTorch builds
PyTorch installation depends on your operating system and hardware. To choose a CPU-only or
accelerated build, use the official PyTorch selector first, then install
this package with pip install mouse-pupil-analysis. The pipeline uses CUDA when
torch.cuda.is_available(); otherwise it runs on the CPU.
FAQ
The pupil mask looks wrong. What do I check first?
Start with framing. The eye should be roughly centered and fill most of the frame. Every image is resized with its aspect ratio preserved and center-padded to the model's 148 x 148 input, so crop a wide scene with a small eye before analyzing it. If the framing is right, write the confidence overlays and look at them:
run-pupil-analysis --video_path movie.avi --output_mask_dir movie_overlays
Each overlay shades the pupil pixels that passed the threshold, from yellow (just over the
threshold) through orange to red (near-certain). Inference normally uses the calibration
stored with the checkpoint. If the mask spills past the pupil, override it with a higher
--pred_thresh; if it catches only part of the pupil, try a lower value.
pupil_visibility and the status/reason columns distinguish a clean segmentation from an
empty, low-confidence, border-touching, or low-circularity candidate. A narrow visible sliver
may be marked partially_visible_or_uncertain; a fully hidden pupil is not reconstructed.
How do I improve or fine-tune the model on my data?
Follow the training guide.
What should I pass for --acquisition_fps?
The rate your camera actually acquired at. Velocity mode derives timestamps from the
source-frame index and this value, not from the frame rate stored in the video container,
which often is not experimental time. With --image_dir there is no container to fall back
on, so the flag is required; with --video_path it defaults to the container rate.
Can I compare diameters or speeds between recordings?
Only when the optics and working distance match, or after applying your own per-recording scale factor. Nothing reported here is calibrated, and converting to millimeters needs a scale factor this package cannot infer.
Within the CSV, prefer pupil_diameter_input_pixels. It inverts the resize-and-pad geometry
back to the scale of the image you supplied: the source video frame with --video_path, or
whatever you prepared with --image_dir. estimated_pupil_diameter is measured in the
148 x 148 model image, so it is not comparable across recordings that differ in resolution
or cropping; it is kept for continuity with earlier results. If your frames were already
148 x 148, the two columns are identical. Center and speed use the same input-image scale.
Why are center_x_pixels and speed_pixels_per_second empty for some frames?
Because the pipeline neither publishes nor interpolates values it cannot stand behind.
Center and speed are empty when segmentation is rejected, and speed is additionally empty
when either adjacent frame is invalid or when the two source frames are not consecutive. A
warning frame remains usable, such as extra foreground components when the selected pupil
component is still acceptable; quality_reason names the check that fired.
Citation
If you use this software in a paper or other scholarly work, please cite the exact version you ran, so your analysis stays reproducible against that code:
Zhao, Y. (2026). mouse-pupil-analysis: Automated mouse pupil segmentation, diameter, and pupil-center velocity analysis using UNet (v0.2.0). Zenodo. https://doi.org/10.5281/zenodo.21897796
Every release is archived on Zenodo under its own version DOI. The concept DOI in the badge above always resolves to the newest version, so use it only when you mean the project as a whole rather than a specific analysis.
GitHub's "Cite this repository" button generates BibTeX from CITATION.cff, and
CHANGELOG.md records what changed between versions.
Development
git clone https://github.com/yzhaoinuw/mouse-pupil-analysis.git
cd mouse-pupil-analysis
pip install -e ".[dev]"
Run the same checks CI runs before submitting a change:
ruff check .
black --check .
pytest
From a source checkout, model training and fine-tuning can also be run with terminal arguments:
python training/run_train.py --help
License
MIT. See LICENSE.
1 maintainer

Download files
Download the file for your platform. If you're not sure which to choose, learn more about installing packages.
Source Distribution
Built Distribution
Filter files by name, interpreter, ABI, and platform.
If you're not sure about the file name format, learn more about wheel file names.
Copy a direct link to the current filters
File details
Details for the file mouse_pupil_analysis-0.3.0.tar.gz.
File metadata
- Download URL: mouse_pupil_analysis-0.3.0.tar.gz
- Upload date:
- Size: 4.0 MB
- Tags: Source
- Uploaded using Trusted Publishing? Yes
- Uploaded via:
twine/7.0.0 CPython/3.13.14
File hashes
| Algorithm | Hash digest | |
|---|---|---|
| SHA256 |
32b94ad36cfcd421faeb395a45227fccdbfd6480722dc982ad361f2efcfff0ce
|
|
| MD5 |
f76db4124ab41236328a7bf916e7198b
|
|
| BLAKE2b-256 |
49d676d14cd6b6d2de0c7f3f79af7e3e81ebe44e958a26ffbe2b895de727aa65
|
Provenance
The following attestation bundles were made for mouse_pupil_analysis-0.3.0.tar.gz:
Publisher:
release.yml on yzhaoinuw/mouse-pupil-analysis
-
Statement:
-
Statement type:
https://in-toto.io/Statement/v1 -
Predicate type:
https://docs.pypi.org/attestations/publish/v1 -
Subject name:
mouse_pupil_analysis-0.3.0.tar.gz -
Subject digest:
32b94ad36cfcd421faeb395a45227fccdbfd6480722dc982ad361f2efcfff0ce - Sigstore transparency entry: 2612408749
- Sigstore integration time:
-
Permalink:
yzhaoinuw/mouse-pupil-analysis@d9283907efbd5069c912631947ba344b9dd028b8 -
Branch / Tag:
refs/tags/v0.3.0 - Owner: https://github.com/yzhaoinuw
-
Access:
public
-
Token Issuer:
https://token.actions.githubusercontent.com -
Runner Environment:
github-hosted -
Publication workflow:
release.yml@d9283907efbd5069c912631947ba344b9dd028b8 -
Trigger Event:
push
-
Statement type:
File details
Details for the file mouse_pupil_analysis-0.3.0-py3-none-any.whl.
File metadata
- Download URL: mouse_pupil_analysis-0.3.0-py3-none-any.whl
- Upload date:
- Size: 1.8 MB
- Tags: Python 3
- Uploaded using Trusted Publishing? Yes
- Uploaded via:
twine/7.0.0 CPython/3.13.14
File hashes
| Algorithm | Hash digest | |
|---|---|---|
| SHA256 |
b356c2b2b3a86ece0c7a2cfdc5b838a8a535038074d36e4ab206619f7cf48d81
|
|
| MD5 |
e19e554b0f264586b5889146d583f0d9
|
|
| BLAKE2b-256 |
29f36671582a98a76304c39f74e165f08d9e8d1c052f8105c9032084d0bb610d
|
Provenance
The following attestation bundles were made for mouse_pupil_analysis-0.3.0-py3-none-any.whl:
Publisher:
release.yml on yzhaoinuw/mouse-pupil-analysis
-
Statement:
-
Statement type:
https://in-toto.io/Statement/v1 -
Predicate type:
https://docs.pypi.org/attestations/publish/v1 -
Subject name:
mouse_pupil_analysis-0.3.0-py3-none-any.whl -
Subject digest:
b356c2b2b3a86ece0c7a2cfdc5b838a8a535038074d36e4ab206619f7cf48d81 - Sigstore transparency entry: 2612408810
- Sigstore integration time:
-
Permalink:
yzhaoinuw/mouse-pupil-analysis@d9283907efbd5069c912631947ba344b9dd028b8 -
Branch / Tag:
refs/tags/v0.3.0 - Owner: https://github.com/yzhaoinuw
-
Access:
public
-
Token Issuer:
https://token.actions.githubusercontent.com -
Runner Environment:
github-hosted -
Publication workflow:
release.yml@d9283907efbd5069c912631947ba344b9dd028b8 -
Trigger Event:
push
-
Statement type:














