
nammy
A proof-of-concept trainer for Neural Amp Modeler's WaveNet architectures (A1 and A2), implemented with tinygrad instead of PyTorch.
What's implemented
- The current standard A2 WaveNet (the default;
--arch a2, ora2-litefor the 3-channel variant): one 23-layer array with LeakyReLU, restarting dilations, mixed kernel sizes (6 and 15) and a 16-tap head conv,head_scale = 0.01, receptive field 6347 — a faithful port ofnam.models.wavenetwith the reference trainer's current config. - The classic A1 WaveNet (
--arch a1): two layer arrays (16 and 8 channels), dilations 1–512, kernel size 3, Tanh, residual 1x1s, per-array 1x1 head rechannel,head_scale = 0.02, receptive field 4093. - NAM-style data pipeline: WAV loading (PCM 16/24/32 and IEEE float),
latency compensation, and
(nx+ny-1, ny)window slicing matchingnam.data.Dataset. - Training matching NAM's standard learning config: Adam(lr=0.004), per-epoch exponential LR decay (gamma 0.993), MSE loss, ESR validation with best-checkpoint restore, JIT-compiled train step and batched JIT inference.
- Export to
.nam: A1 models write the classic v0.5.4 schema every plugin version can read; A2 models write the current v0.7.0 schema (needs a recent NAM plugin). Both schemas load back viaprocess/the GUI.
Not implemented (yet): packed/slimmable training, gated/FiLM variants, MRSTFT loss, pre-emphasis, output loudness normalization, the standardized input-file splits/checks.
Usage
Train from an input/output pair:
$ uv run python -m nammy train input.wav output.wav --epochs 100 --out model.nam
input.wav is the DI/reamp source, output.wav the processed capture; both
must share a sample rate and be time-aligned (use --latency <samples> to
compensate reamp latency).
--out is rewritten every time validation ESR improves, so interrupting a run
leaves the best model so far on disk rather than nothing.
Run audio through a trained model (reamp):
$ uv run python -m nammy process model.nam input.wav output.wav
This also loads classic-schema (non-gated Tanh WaveNet) .nam files trained
elsewhere.
Backend
By default nammy tries Metal (on macOS), then OpenCL, then the CPU, and uses
the first that works. Pick one explicitly with --device, accepted by every
command:
$ uv run python -m nammy train input.wav output.wav --device CL
Any tinygrad target is accepted, not just the ones in the default chain, so
--device AMD, --device CUDA or --device CPU:X86 all work. An explicit
choice is never second-guessed: if it cannot run, that is an error rather than a
silent fall back to something an order of magnitude slower.
Opening a device proves little, so each candidate is tested by compiling and
running a small kernel on it. tinygrad's CPU device, for one, needs clang and
opens perfectly well without it, failing only when the first kernel is compiled
— which is why the CPU:X86 renderer, which emits machine code in-process and
needs nothing installed, is in the chain behind it.
GUI
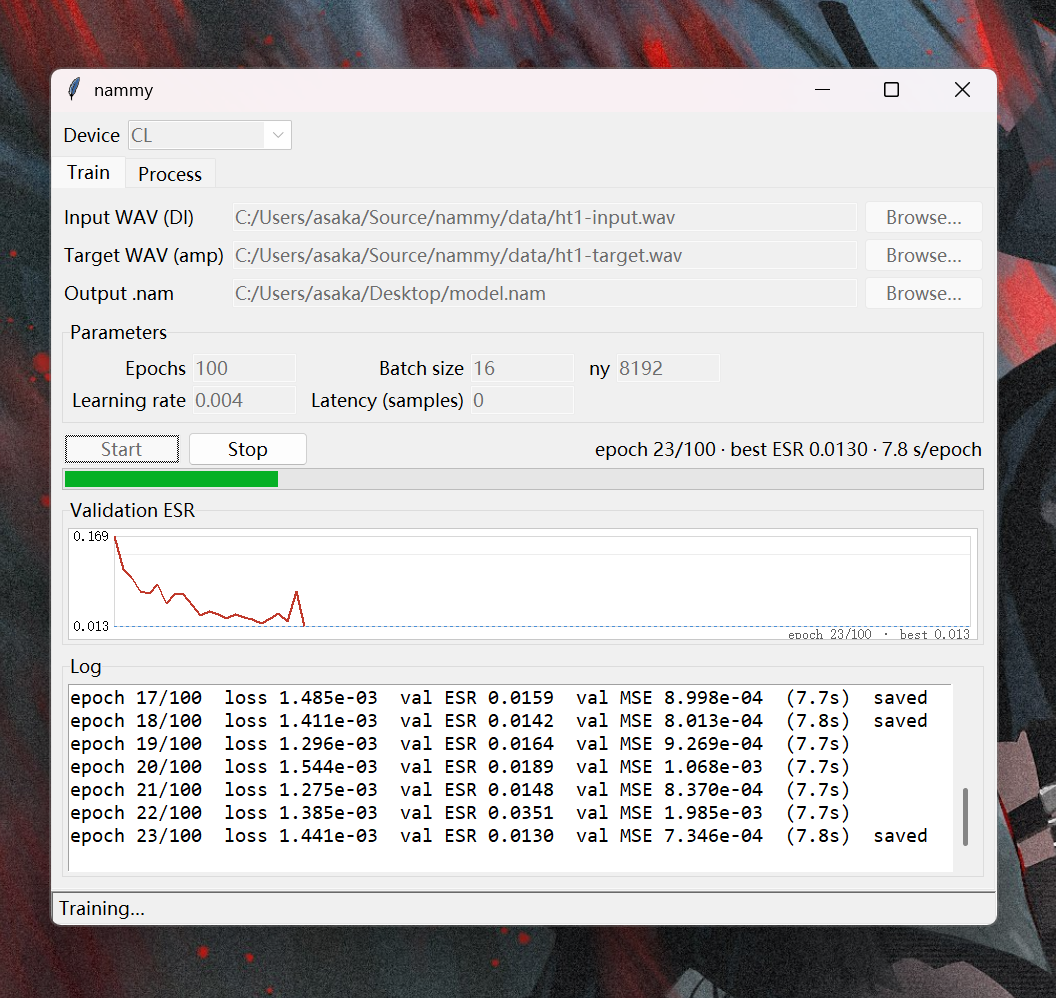
There is a small Tkinter front end over the same two commands:
$ uv run python -m nammy gui
On Windows you can instead double-click nammy-gui.pyw, which re-execs into
.venv so the system Python does not need the dependencies installed.
The Train tab streams the training log, plots validation ESR per epoch, and has
a Stop button that ends the run at the next batch boundary; because --out is
rewritten on every improvement, stopping leaves the best model so far on disk.
The Process tab reamps a WAV through a .nam. The device picker at the top is
shared by both tabs, since tinygrad's device is process-wide; it starts on the
best candidate that passed its probe, and picking one that failed says why.
Work runs on a single background thread, so the window stays responsive. It has to be a single one: tinygrad caches compiled kernels in sqlite, and that connection can only be used by the thread that opened it.
Single-file build
For handing the GUI to someone who has a Python but no interest in installing anything:
$ uv run python tools/build_standalone.py # -> dist/nammy.pyzw
That is a zipapp: an ordinary
zip holding nammy and tinygrad with a __main__.py at its root, which Windows
opens with pythonw on a double click. Everything is imported from inside the
archive, so nothing is unpacked and nothing is written anywhere.
It works because neither package needs compiled code, which zipimport cannot
load. numpy is nammy's one compiled dependency and it is optional:
nammy/_numpy_compat.py stands in for the parts that get used when numpy is
missing, and tests/test_no_numpy.py runs the same work both ways and compares
the results.
tinygrad needs two patches to run from an archive, both applied by the build
and both a consequence of there being no real directory to look at: it reads
the backend list by listing runtime/, and it regenerates its ctypes bindings
over the network when it cannot find their .py file. Both patches are matched
exactly, so a tinygrad upgrade that moves the ground under them fails the build
with a message rather than quietly producing a file that does not work.
Windows Defender's Controlled Folder Access may report that it "blocked python.exe from making changes to memory" (event 1127). That is tinygrad's JIT allocating executable memory, it happens however nammy is started, and it has not stopped a run here on either the OpenCL or the CPU backend. Allowing the interpreter under Ransomware protection silences it.
Example training run
Reference numbers from runs on consumer hardware, training on the Blackstar
HT-1 capture pair from Alec Wright's dataset
(340 s of aligned input/target at 44.1 kHz), on an AMD Radeon RX 6800 on
Windows 11 via tinygrad's OpenCL (CL) backend, at the defaults otherwise:
batch 16, ny 8192, Adam(lr=0.004). For reference, an ESR below 0.01 is a good
model and 0.02–0.05 is usable.
A2 (the default architecture) runs at 7.2 s per epoch, after a first
epoch of 64 s, which puts 100 epochs at about 13 min. Validation ESR is 0.39
after one epoch, 0.079 by epoch 3 and 0.058 by epoch 4. Unlike the A1 numbers
below, that is a per-epoch measurement from a short run rather than a completed
one, so the total is an extrapolation and there is no best-ESR figure to quote.
ny is tuned to 8299 automatically; the epoch is 30.8 s without that, which is
the subject of Where the time goes.
A1 (--arch a1) is a completed 100-epoch run: 61 s for the first epoch
(dominated by JIT compilation), then a steady ~8 s per epoch, 14 min total, for
a best validation ESR of 0.0070 reached at epoch 88. Convergence is fast:
ESR hits 0.054 by epoch 3 and 0.019 by epoch 10, then flattens while the
training loss keeps falling. The best checkpoint stands at 0.0086 by epoch 60
and 0.0079 by epoch 80, so the last 40 epochs are still worth about 20%.
Epoch-to-epoch validation noise is larger than that, though: ESR bounces between
0.0070 and 0.018 across epochs 40–100, so which epoch wins the best-checkpoint
pick is partly luck. At 8 s per epoch there is little reason to stop early.
Where the time goes
The bottleneck is not raw compute. Both networks are narrow (16 and 8 channels
in A1, 8 in A2) but deep (20 and 23 layers), so every layer is a small kernel
that cannot fill a modern GPU, and the layers are serially dependent. A training
step at the default batch 16 / ny 8192 issues around 800 kernels for A1 and
950 for A2, and both sustain ~300–350 GFLOPS by tinygrad's op counter against
the RX 6800's ~16 TFLOPS FP32 peak, a few percent of the card.
Reaching even that took two fixes, both worth knowing about if you port this to another backend:
- The backward pass reduces weight gradients over the (batch × time) axis,
~12k long against a handful of output elements. tinygrad only splits such a
reduce across two kernels when the input/output element ratio reaches 32768,
and this model sits just under that, so those reduces landed in single
low-occupancy kernels: two of them alone cost 73 of the 188 ms step, running
at 3–11 GFLOPS.
nammy/device.pylowersREDUCEOP_SPLIT_THRESHOLDto 8192 when it selects an accelerator, which takes the step to 63 ms; set it in the environment to override. A CPU has no occupancy to win back and measures a few percent slower, so the setting follows the device rather than being global. - Validation ran one 65536-sample chunk at a time at batch 1, rebuilding the
graph in Python for each. Chunks are independent, so
WaveNet.processstacks them on the batch axis under a JIT: 5.3 s → 0.1 s per epoch.
Together those took the epoch from ~26 s to ~8 s, with the same results to
within float reordering. Memory is not a constraint: activations peak around
1 GB at the default batch and ny.
A2 hit a third, sharper version of the first problem. tinygrad splits a long
reduce by factoring the reduced axis, trying divisors from 256 down to 8, so an
axis whose factors all fall outside that window cannot be split at all, and
every sequence length in the network derives from the training window
nx + ny - 1. A2's default window is 6347 + 8192 - 1 = 14538 = 2·3·2423, which
has no such factor, so none of its weight-gradient reduces were split and one
kernel alone took 146 ms of the 293 ms step. Moving ny to 8299 makes the
window 14645 = 5·29·101 and the step 64 ms. nammy/train.py:tune_ny does this
automatically, searching within 1.5% of the ny it was given and leaving
windows that already factor alone (A1's 12284 is one, and the nearby windows
the search would otherwise prefer all measured slower). On the HT-1 pair that
is 30.8 s → 7.2 s per epoch, 52 min → 13 min over 100 epochs.
What is left of the first epoch is tinygrad scheduling the graph in Python,
which TinyJit pays twice, once running eagerly and once capturing, for the
training step (~52 s) and again for validation's forward pass (~25 s). Compiling
the kernels themselves costs another ~2 minutes the first time a given window
length is seen on a machine, and no time afterwards: tinygrad keeps compiled
kernels in a sqlite cache that survives across runs.
Notes
- Every command takes
--device; see Backend. - Tests:
uv run tests/test_poc.pychecks receptive field, forward parity against an independent numpy implementation,.namexport round-trip, dataset alignment, a training smoke test, backend selection, and the progress/stop hooks the GUI drives training through.
1 maintainer

Download files
Download the file for your platform. If you're not sure which to choose, learn more about installing packages.
Source Distribution
Built Distribution
Filter files by name, interpreter, ABI, and platform.
If you're not sure about the file name format, learn more about wheel file names.
Copy a direct link to the current filters
File details
Details for the file nammy-0.3.0.tar.gz.
File metadata
- Download URL: nammy-0.3.0.tar.gz
- Upload date:
- Size: 44.7 kB
- Tags: Source
- Uploaded using Trusted Publishing? No
- Uploaded via:
uv/0.9.16 {"installer":{"name":"uv","version":"0.9.16","subcommand":["publish"]},"python":null,"implementation":{"name":null,"version":null},"distro":null,"system":{"name":null,"release":null},"cpu":null,"openssl_version":null,"setuptools_version":null,"rustc_version":null,"ci":null}
File hashes
| Algorithm | Hash digest | |
|---|---|---|
| SHA256 |
444d6cf509664e057ab69df0b53aecedc9aefadc139008a5de800e43888ec12c
|
|
| MD5 |
ea9026d10a94c842d534a392b7526dac
|
|
| BLAKE2b-256 |
f2ce0c74af3f3aea22d010623c65e508846340f96a0ec794179e28acabbc9dad
|
File details
Details for the file nammy-0.3.0-py3-none-any.whl.
File metadata
- Download URL: nammy-0.3.0-py3-none-any.whl
- Upload date:
- Size: 35.5 kB
- Tags: Python 3
- Uploaded using Trusted Publishing? No
- Uploaded via:
uv/0.9.16 {"installer":{"name":"uv","version":"0.9.16","subcommand":["publish"]},"python":null,"implementation":{"name":null,"version":null},"distro":null,"system":{"name":null,"release":null},"cpu":null,"openssl_version":null,"setuptools_version":null,"rustc_version":null,"ci":null}
File hashes
| Algorithm | Hash digest | |
|---|---|---|
| SHA256 |
31026c39a5bcd8f454558662f1358e2eb64cf85ef51caaab376889293eb7af1d
|
|
| MD5 |
a2aa7245f8fb5c55ad82b96f2d86b567
|
|
| BLAKE2b-256 |
44e3c6abb62be454872c0d78099d0caa2ad955345a1810e19adaeed2e69d3095
|







