A package that allows to sync Nested AAD Group to DataBricks

Project description
nested-aad-scim-connector


This utility provides ability to sync Users and Groups from AAD to Databricks. This application allows to sync nested groups and users as well which is not supported in "Azure Databricks SCIM Provisioning Connector application"
Using the code is as simple as below few commands :
Install
pip install nestedaaddb
Configure
Copy the config.cfg.template from here (https://github.com/mick2004/nested-aad-scim-connector/blob/main/config.cfg.template) ,populate details and rename to config.cfg
Usage
from nestedaaddb.nested_groups import SyncNestedGroups
sn = SyncNestedGroups()
sn.loadConfig(<<Path of config.cfg>>")
sn.sync(<<Top level Group>>,<<Is Dry Run>>)
Details
Steps for running code:
Step (i)
Register an application in Azure ADD with ReadAll permissions
You will need to register an application in Azure Active Directory to enable user authentication
Follow the steps below to do same:
1.Open a browser and navigate to the Azure Active Directory admin center and login using a personal account (aka: Microsoft Account) or Work or School Account.
2.Select Azure Active Directory in the left-hand navigation, then select App registrations under Manage.

3.Select New registration. Enter a name for your application, for example, CustomAADConnector.
4.Set Supported account types as desired.
5.Leave Redirect URI empty.
6.Select Register. On the application's Overview page, copy the value of the** Application (client) ID** and save it, you will need it in the next step. If you chose Accounts in this organizational directory only for Supported account types, also copy the Directory (tenant) ID and save it.

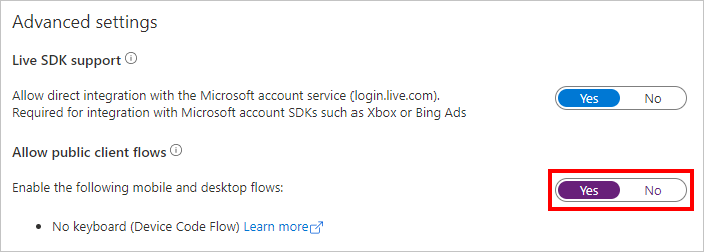
7.Select Authentication under Manage. Locate the Advanced settings section and change the **Allow public client flows toggle to Yes, then choose Save.
- In the Application menu blade, click on the Certificates & secrets, in the Client secrets section, choose New client secret:
-
Type a key description (for instance app secret)
-
Select a key duration as per your security concerns
-
The generated key value will be displayed when you click the Add button. Copy the generated value for use in the steps later.
-
You'll need this key later in your code's configuration files. This key value will not be displayed again, and is not retrievable by any other means, so make sure to note it from the Azure portal before navigating to any other screen or blade.
9.In the Application menu blade, click on the API permissions in the left to open the page where we add access to the Apis that your application needs.
-
Click the Add a permission button and then,
-
Ensure that the Microsoft APIs tab is selected
-
In the Commonly used Microsoft APIs section, click on Microsoft Graph
-
In the Application permissions section, ensure that the right permissions are checked: User.Read.All
-
Select the Add permissions button at the bottom.
10.At this stage, the permissions are assigned correctly but since the client app does not allow users to interact, the user's themselves cannot consent to these permissions. To get around this problem, we'd let the tenant administrator consent on behalf of all users in the tenant. Click the Grant admin consent for {tenant} button, and then select Yes when you are asked if you want to grant consent for the requested permissions for all account in the tenant. You need to be the tenant admin to be able to carry out this operation.
Step (i)
Populate config.cfg files with Databricks Settings Extract the SCIM Token and ACCOUNT SCIM URL Details: https://learn.microsoft.com/en-us/azure/databricks/administration-guide/users-groups/scim/aad#step-1-configure-azure-databricks

Step (iii)
Running the app
As Standalon Python app:
- Install utility via pip
pip install nestedaaddb
- Copy the config.cfg.template ,populate details and rename to config.cfg
- Run as below:
from nestedaaddb.nested_groups import SyncNestedGroups
sn = SyncNestedGroups()
sn.loadConfig(<<Path of config.cfg>>")
sn.sync(<<Top level Group>>,<<Is Dry Run>>)
Contributors
 Shubham Jain 💻 ⚠️ |
 Abhishek Pratap Singh 🚇 ⚠️ 💻 |
Release history Release notifications | RSS feed


Download files
Download the file for your platform. If you're not sure which to choose, learn more about installing packages.
Source Distribution
Built Distribution
Filter files by name, interpreter, ABI, and platform.
If you're not sure about the file name format, learn more about wheel file names.
Copy a direct link to the current filters
File details
Details for the file nestedaaddb-1.0.4.tar.gz.
File metadata
- Download URL: nestedaaddb-1.0.4.tar.gz
- Upload date:
- Size: 14.7 kB
- Tags: Source
- Uploaded using Trusted Publishing? No
- Uploaded via: twine/4.0.2 CPython/3.11.9
File hashes
| Algorithm | Hash digest | |
|---|---|---|
| SHA256 |
f486a4fe3e026fbda2549d8538b41e2a79adfbd3b603ad7ee5753a354c38f089
|
|
| MD5 |
10000d9067a85fec5da302596a1bc9be
|
|
| BLAKE2b-256 |
43ccd14351078bcea8ad4a484579b21fd4df1b9eb4faf2e819dceb65a6d2d3dc
|
File details
Details for the file nestedaaddb-1.0.4-py3-none-any.whl.
File metadata
- Download URL: nestedaaddb-1.0.4-py3-none-any.whl
- Upload date:
- Size: 13.1 kB
- Tags: Python 3
- Uploaded using Trusted Publishing? No
- Uploaded via: twine/4.0.2 CPython/3.11.9
File hashes
| Algorithm | Hash digest | |
|---|---|---|
| SHA256 |
7b6665816f75d5017afab26da5beda47fd09ace55e820c50dcfbe215990d130b
|
|
| MD5 |
0e6fc66ef8e3abbed621fb3d4594867c
|
|
| BLAKE2b-256 |
62ea21795edbb86e619c2ba2eb3b3f804646d41dcd8e2a0b85fd58026a1bb006
|


