
Sefile CLI

Sefile CLI is a personal project created by Faisal Ramadhan or myself. This project was built using the Python programming language. At the time of its creation, this CLI was only useful for finding the desired file according to the initial directory, but over time I started adding several new commands, such as Create, Read, Write and Delete. All of these commands have their own purpose and function.
This CLI tool has available in https://pypi.org/ you can access it in https://pypi.org/project/new-sefile/ from there you can know how this CLI tool was made.
To install this CLI tool, you can simply type on your terminal or CMD:
python3 -m pip install new-sefile
To upgrade the CLI tool to the newest version, you can simply type on your terminal or CMD:
python3 -m pip install --upgrade new-sefile
For Linux OS & Mac OS:
sudo nano ~/.bashrc
And now you are in .bashrc file, then add new line code, like:
export PATH="/home/(user)/(path)/bin:$PATH
Remember the (path) is different for every linux users, so from me is that you must search first where all you python package was saved. Then you can add new PATH into your python PATH, like above.
There are some different file names, that run executable dotfiles (.file) is your system, such as:
- .bashrc
- .profile
- .bash_profile
- .zprofile
- .zlogin
- .bash_login
So in my opinion, that you must search where the executable file that execute your python package.
For Windows OS:
Requirements
Each project must have additional modules or packages for ease of project creation. I myself use a lot of packages to make this CLI. The modules or packages list that I use is:
- typing
- fnmatch
- logging
- os
Info: > if you want more information about this library, see https://docs.python.org/3/library/os.html
- pathlib
- typer
Installation:
python -m pip install "typer[all]"
- rich
Installation:
python -m pip install rich
- termcolor
Installation:
python -m pip install termcolor
- npyscreen
Installation:
python -m pip install npyscreen
- ascii-magic
Installation:
python -m pip install ascii-magic
- colorama
Installation:
python -m pip install colorama
- Pillow
Installation:
python -m pip install Pillow
- art
Installation:
python -m pip install art
How to use it
It's quite easy, you just need to enter the command sefile --help, then you get the output like this:
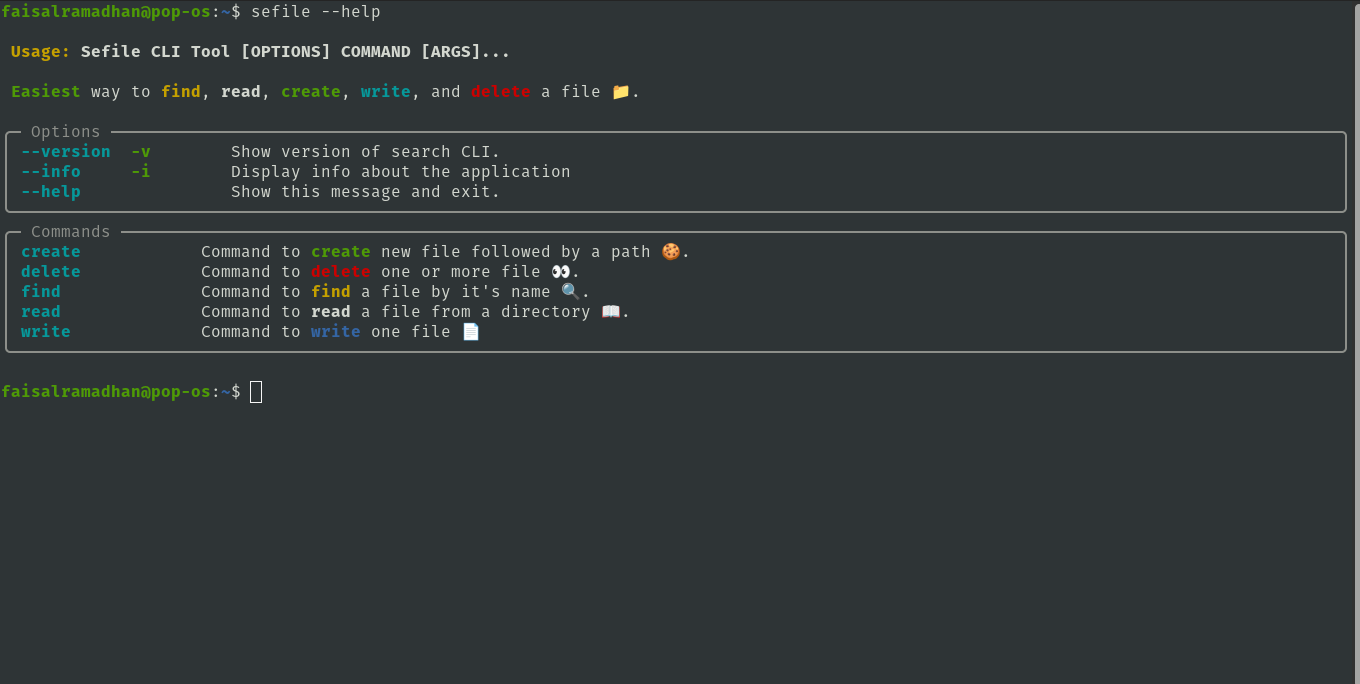
How to use it
It's quite easy, you just need to enter the command python -m sefile --help, then you get the output like this:
How to show CLI version and information?
sefile --version
or
sefile -v
How to find a file?
sefile find <filename>
or
sefile find <filename> <path>
At first I created this based only on the filename, but eventually I added new flag options, namely --startswith and --endswith.
- --startswith flag is useful for searching files with your own custom prefix. Usage examples:
sefile find --startswith main
When you do this, the system will automatically look for files with a certain (in this case main) prefix from each directory or sub-directory that matches the initial directory.
- --endswith flag is useful for searching files with your own custome prefix. Usage examples:
sefile find --endswith .py
This flag has same functional as --startswith flag, but search file by the end name of the file that match with your custome prefix. Also, you need to input from what (path) you want to search file endswith (prefix).
sefile find --lazy
This flag can be use if you to lazy to input CLI command. You only need to enter a special custom query, namely find from . This custom query has same functionality as sefile find command.
There are several input command you can do:
- find (filename) from (path)
for Linux OS: find main.py from /home/(user)/Documents
for Windows OS: find main.py from C:\Directory\SubDirectory
- find from (path) startswith (prefix)
for Linux OS: find file from /home/(user)/Documents startswith main
for Windows OS: find file from C:\Directory\SubDirectory startswith main
- find from (path) like (prefix)
for Linux OS: find file from /home/(user)/Documents like test
for Windows OS: find file from C:\Directory\SubDirectory like test
NOTE: You can also do 'quit' or 'exit' custom query in input field. This situation will needed if you want to cancel the find activity. So it makes more flexible for you to use find command
How to create a file?
sefile create <filename>
or
sefile create <filename> <path>
The system will automatically create a file with a certain file type (according to the type you add at the end of the file) in the directory you enter.
To run --project Options, you just simply write it in your terminal like this below:
sefile create --project
And you got this little thing:
What's project you want to create?
 >  🐍 Easy Python
    👑 The king of Javascript
    🐼 Cute Go
    ❌ Nah, i'm good
What's the name of the 🐍 Easy Python project? my_api_project
Where do you want to save this my_api_project? /home/users/Documents
NOTE: You can do 'quit' or 'exit' command in input field. This command so useful if you are in the situation where you don't wanna input anything, or you do wrong input name in project name, or project directory, or when you choose the wrong project what you want to make.
In the newest update, i add another functionality for this create command. It's --write options. To using it, just simply type:
sefile create --write
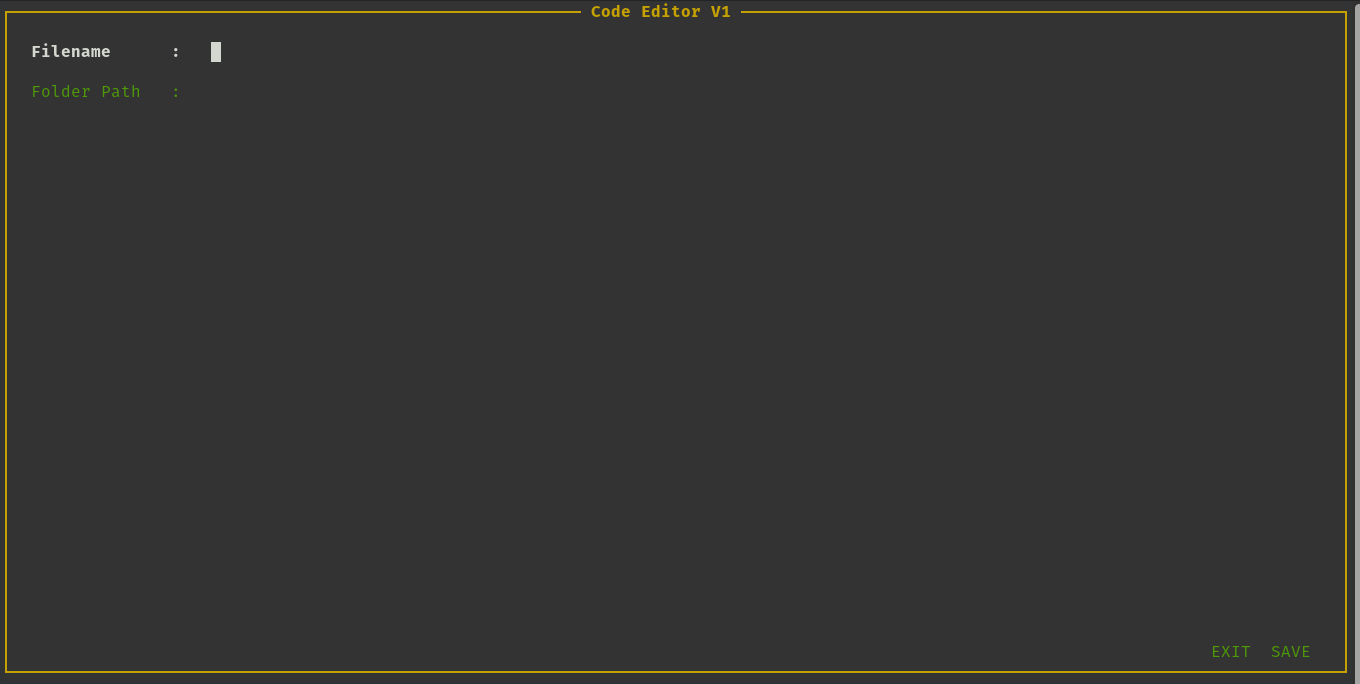
It's automatically displaying Code Editor Interface in your terminal.
So this write command, doesn't need ARGS at all, you just input command in your terminal above, and you can do code in your terminal.
INFORMATION:
So if you notice, theres is 'EXIT' button and 'SAVE' button right? the functionality of these 2(two) button are same as 'EXIT' button and 'SAVE' button in your code editor.
You can exit whatever you want, but you can't save the code if you not input value in 'Filename' and 'Folder Path'. So be careful when you use this.
How to read a file?
sefile read <filename> <path>
or
- --format flag is especially useful for reading files of a certain type. Default file typer set as text or .txt. Example of the output:
Example 1:
Do this command in your terminal:
sefile read <filename> <path> --format python --indent --theme one-dark
And you get a result like this in your terminal (NOTE: This is just example)
╭────────────────────────────────────────────────────────── experiments.py ───────────────────────────────────────────────────────────╮
│ 1 # ./learn_class/experiments.py │
│ 2 │
│ 3 import geocoder │
│ 4 │
│ 5 from dataclasses import dataclass │
│ 6 from fuzzywuzzy import fuzz, process │
│ 7 from geopy.geocoders import Nominatim │
│ 8 from geonamescache import GeonamesCache │
│ 9 from timezonefinder import TimezoneFinder │
│ 10 │
│ 11 @dataclass │
│ 12 class Experiment: │
│ 13 │ │
│ 14 │ @staticmethod │
│ 15 │ def first_experiment() -> None: │
│ 16 │ │ """ │
│ 17 │ │ ------------ │
│ 18 │ │ |Definition| │
│ 19 │ │ ------------ │
│ 20 │ │ │
│ 21 │ │ This function is useful for tracking the current location by using the user's IP address. │
│ 22 │ │ """ │
│ 23 │ │ locator = Nominatim(user_agent="My App") │
│ 24 │ │ my_location = geocoder.ip('me') │
│ 25 │ │ latitude = my_location.geojson['features'][0]['properties']['lat'] │
│ 26 │ │ longtitude = my_location.geojson['features'][0]['properties']['lng'] │
│ 27 │ │ │
│ 28 │ │ location = locator.reverse(f"{latitude}, {longtitude}") │
│ 29 │ │ print(f"Your current IP location: {location}") │
│ 30 │ │
│ 31 │ @staticmethod │
│ 32 │ def second_experiment(city: str) -> None: │
│ 33 │ │ """ │
│ 34 │ │ ------------ │
│ 35 │ │ |Definition| │
│ 36 │ │ ------------ │
│ 37 │ │ │
│ 38 │ │ This function is useful for tracking the current location by simply entering the city inputted by the user. │
│ 39 │ │ """ │
│ 40 │ │ geolocator = Nominatim(user_agent='My App') │
│ 41 │ │ location = geolocator.geocode(city) │
│ 42 │ │ latitude = location.latitude │
│ 43 │ │ longitude = location.longitude │
│ 44 │ │ print(f"City name: {city}\nLatitude: {latitude}\nLongitude: {longitude}\n") │
│ 45 │ │ │
│ 46 │ │ timezone = TimezoneFinder() │
│ 47 │ │ timezone_of_the_city = timezone.timezone_at(lat=latitude, lng=longitude) │
│ 48 │ │ print(f"Timezone of {city}: {timezone_of_the_city}") │
│ 49 │ │ │
│ 50 │ │ geonamescache_obj = GeonamesCache() │
│ 51 │ │ cities = [city['name'] for city in geonamescache_obj.get_cities().values()] │
│ 52 │ │ print(cities[:100]) │
│ 53 │
│ 54 │
│ 55 │
╰─────────────────────────────────────────────────────────────────────────────────────────────────────────────────────────────────────╯
If you want to add indent for read code, you just simply add --indent or -i, you can just type like:
sefile read <filename> <path> --format python --indent
If you want to change theme also want to add indent, you can just type like:
sefile read <filename> <path> --format python --indent --theme monokai
All of theme that i add are:
- one-dark (dark theme)
- monokai (dark theme)
- dracula (dark theme)
- material (dark theme)
- gruvbox-light (light theme)
- lightbulb (light theme)
Or you can just type,
sefile read --help
For to know what all themes that available.
How to remove a file?
sefile remove <path> <filename>
So you must input the path directory first then file that inside the directory.
In other hand, this command also has many options. The first one is --startswith or you just simpy type -s. To implement this command, you can type like:
sefile remove <path> --startswith <prefix>
The second options is --endswith or you just simply type -e. To implement this command, you can type like:
sefile remove <path> --endswith <prefix>
The last one is --subfolder or you just simply type -sf. This options has functionality to remove sub folder and it's content from path directory target. To implement this command, you can type like:
sefile remove <path> --subfolder
Keep in mind
This program is only useful for find, create, read, write and remove. Apart from that, I have nothing to add. I personally will only focus on the main command program, because there are still many things that can be updated in the future.
1 maintainer

Metadata
1 maintainer
Release files for new-sefile 0.0.17
For a detailed explanation of source distributions (sdists) and built distributions (wheels), please see the package formats documentation.
Source distribution (sdist)
| File | Size | Uploaded | |
|---|---|---|---|
| new-sefile-0.0.17.tar.gz | 30.1 kB | Details |
Built distribution (wheel)
| File | Interpreter | ABI | Platform | Reset |
|---|---|---|---|---|
| new_sefile-0.0.17-py3-none-any.whl | Python 3 | none | any | Details |
Total release size: 63.5 kB
Release files / new-sefile-0.0.17.tar.gz
| Download URL | new-sefile-0.0.17.tar.gz |
|---|---|
| Size | 30.1 kB |
| Tags | Source |
|
SHA-256 checksum How to use checksums |
911f944a4418885dcae919619a948b61022f12675a7a5253e01739dcb5ea22eb
|
|
BLAKE2b-256 checksum How to use checksums |
0b544b282278c0323b8e96d804d9fa4438de74122e537ddd1b19f690946b7e62
|
| Upload date | |
|
Uploaded using Trusted Publishing? What is trusted publishing? |
No |
| Uploaded via |
twine/4.0.2 CPython/3.10.12
|
Release files / new_sefile-0.0.17-py3-none-any.whl
| Download URL | new_sefile-0.0.17-py3-none-any.whl |
|---|---|
| Size | 33.4 kB |
| Tags | Python 3 |
|
SHA-256 checksum How to use checksums |
169abba1bf97128b94b8686b17ce9027d2a109ed5454af043d3f834243ebc130
|
|
BLAKE2b-256 checksum How to use checksums |
28ea0f0d0a508841ede306358c60f2c78a12dd44158a1b79ddf3c377d199e279
|
| Upload date | |
|
Uploaded using Trusted Publishing? What is trusted publishing? |
No |
| Uploaded via |
twine/4.0.2 CPython/3.10.12
|














