

nimbus
Nimbus is engineered to optimize data backup processes and efficiently orchestrate service deployments for homelabs and dev environments.




Table of Contents
Overview
Nimbus stands as a comprehensive data backup manager and service deployment orchestrator tailored for homelabs, media centers, and local development environments. It offers a seamless, turnkey solution to streamline your data management and service orchestration needs. While Nimbus is robust for personal or developmental use, it is not intended to supplant production-level or mission-critical tools designed for commercial-scale backups and deployments.
Getting Started
It is recommended to use pipx for installing Nimbus:
pipx install nimbuscli --python python3.12
ni --version
Before using Nimbus you need to configure it. By default, Nimbus looks for its configuration file at ~/.nimbus/config.yaml. All application configurations are centralized within this file. Below is a minimal example configuration:
commands:
  deploy:
    services:
      - ~/services
  backup:
    destination: ~/backups
    archive: tar
    directories:
      docs:
        - ~/Documents
With the above configuration:
ni updeploys all Docker Compose services under~/services.ni backupcreates atarbackup of the~/Documentsdirectory and saves it under~/backups/docs/Documents/Documents_{datetime}.tar.- Notifications (such as Discord or email) are disabled.
- Generation of the operation report is also disabled.
For additional configuration options, refer to the example configuration file.
Backups
The backup command facilitates the creation of backups and enables their optional upload to a remote destination, such as an AWS S3 bucket. The command accepts optional group selectors, that filter the configured backup groups using specified glob patterns.
ni backup [selectors]
Directory Groups
Nimbus organizes backup directories into directory groups, allowing you to manage and back up specific sets of data. Each directory group can be backed up independently. You can also select multiple groups using group selectors. If no group selectors are specified, all directory groups will be backed up.
Consider the following directory groups defined in your configuration:
directories:
  photos:
    - ~/Pictures
  cloud:
    - ~/.nextcloud
  docs:
    - ~/Documents
With these directory groups, the following backup commands would result in:
| Command | Selected Groups |
|---|---|
ni backup |
photos cloud docs |
ni backup nx* |
(No groups selected) |
ni backup photos |
photos |
ni backup ph* *cloud* |
photos cloud |
ni backup *o?? |
cloud docs |
Archiver Profiles
Nimbus supports various archiver backends for creating backups. Each backend has a default profile with a matching name. For example the tar backend has a default tar profile that could be used using the archive: tar configuration. You can also create custom profiles or overwrite default ones.
Available Archiver Backends
| Backend | Support | Output | Default Profile |
|---|---|---|---|
zip |
Native | zip archive | compress: xz |
tar |
Native | tar archive | compress: xz |
rar |
Requires installation of rar | rar archive | compress: 3, recovery: 3 |
Customizing Archiver Profiles
You can define custom profiles in your configuration file. For example:
profiles:
  archive:
    - name: rar # Overwrite default 'rar' profile
      provider: rar
      recovery: 5
    - name: rar_protected
      provider: rar
      password: SecretPwd
      recovery: 3
      compress: 1
In the above example:
- The
rarprofile is overwritten with custom settings (recovery level: 5). - A new profile named
rar_protectedis defined with a password, recovery level, and compression settings.
Remember to adjust the profiles according to your backup requirements. For detailed configuration options, refer to the example configuration file.
Uploader Profiles
Nimbus supports various uploader backends for uploading the created archives. If you want to use the upload functionality, consider creating a custom uploader profile.
Available Uploader Backends
| Backend | Support | Destination |
|---|---|---|
aws |
Native | AWS S3 bucket |
Customizing Uploader Profiles
Define custom profiles in your configuration file. For example:
profiles:
  upload:
    - name: aws_store
      provider: aws
      access_key: XXXXXXX
      secret_key: XXXXXXXXXXXXX
      bucket: aws.storage.bucket
      storage: STANDARD
    - name: aws_archival
      provider: aws
      access_key: XXXXXXX
      secret_key: XXXXXXXXXXXXXX
      bucket: aws.archival.bucket
      storage: DEEP_ARCHIVE
In the above example:
- The
aws_storeprofile specifies settings for storing backups in an S3 bucket with standard storage class. - The
aws_archivalprofile configures archival storage with a deep archive storage class.
Remember to adjust the profiles according to your backup requirements. For detailed configuration options, refer to the example configuration file.
Deployments
Nimbus manages service deployments using the up and down commands. The commands accepts optional service selectors, allowing you to filter the discovered services using specified glob patterns.
# Deploys services based on the specified service selectors.
ni up [selectors]

# Undeploys services based on the specified service selectors.
ni down [selectors]
Service Providers
Nimbus supports various service providers and performs recursive service discovery within the configured directories.
| Provider | Support | Identified By |
|---|---|---|
docker |
Requires installation of Docker | Docker Compose file |
Service Discovery
Nimbus performs recursive service discovery within the configured directories, searching for specific files associated with each service provider to identify discovered services.
Let’s assume the following Nimbus configuration:
commands:
  deploy:
    services:
      - ~/.nimbus/services
Under the ~/.nimbus/services directory, we have the following structure:
|- services
    |- shared
        |- media
            |- .env
            |- compose.yaml
        |- getty
            |- deploy.sh
            |- readme.md
    |- cloud
        |- .env
        |- compose.yaml
    |- git
        |- some_file.txt
        |- start.sh
With this configuration and directory structure, the following deployment commands would result in:
| Command | Selected Services |
|---|---|
ni up |
media cloud |
ni up media |
media |
ni down g* |
(No services selected) |
ni down git |
(No services selected) |
ni down cl* |
cloud |
Environment Configuration
Optionally, you can configure environment variable mappings for deployed services. Each environment mapping is specified by a glob pattern. The discovered service will receive a consolidated collection of environment variables based on all matched patterns, following a top-to-bottom approach. For example:
commands:
  deploy:
    secrets:
      - service: "*"
        environment:
          UID: 1001
          GID: 1001
      - service: "git*"
        environment:
          UID: 1002
          GID: 1002
      - service: "gitlab"
        environment:
          HTTP_PORT: 8080
          SSH_PORT: 8022
With this configuration:
- The
cloudservice will have the following environment variables:UID: 1001GID: 1001
- The
gitlabservice will have the following environment variables:UID: 1002GID: 1002HTTP_PORT: 8080SSH_PORT: 8082
Feel free to customize your environment mappings based on your specific deployment needs. For the details, refer to the example configuration file.
Reports
Nimbus can optionally generate a detailed report for each executed command. By default, the detailed reports are disabled, but a summary report is output to stdout. To enable detailed reports, include the following reports section in your configuration file and configure the root directory where all reports will be stored:
observability:
  reports:
    format: txt
    directory: ~/.nimbus/reports
For more details, refer to the example configuration file. You can also find an example of the detailed report here.
Notifications
Nimbus supports Discord notifications for completed operations. If detailed reports are enabled, they will be included in the Discord notification as file attachments. To enable Discord notifications, configure a Discord webhook and specify it in the Nimbus configuration:
observability:
  notifications:
    discord:
      webhook: https://discord.com/api/webhooks/id/token
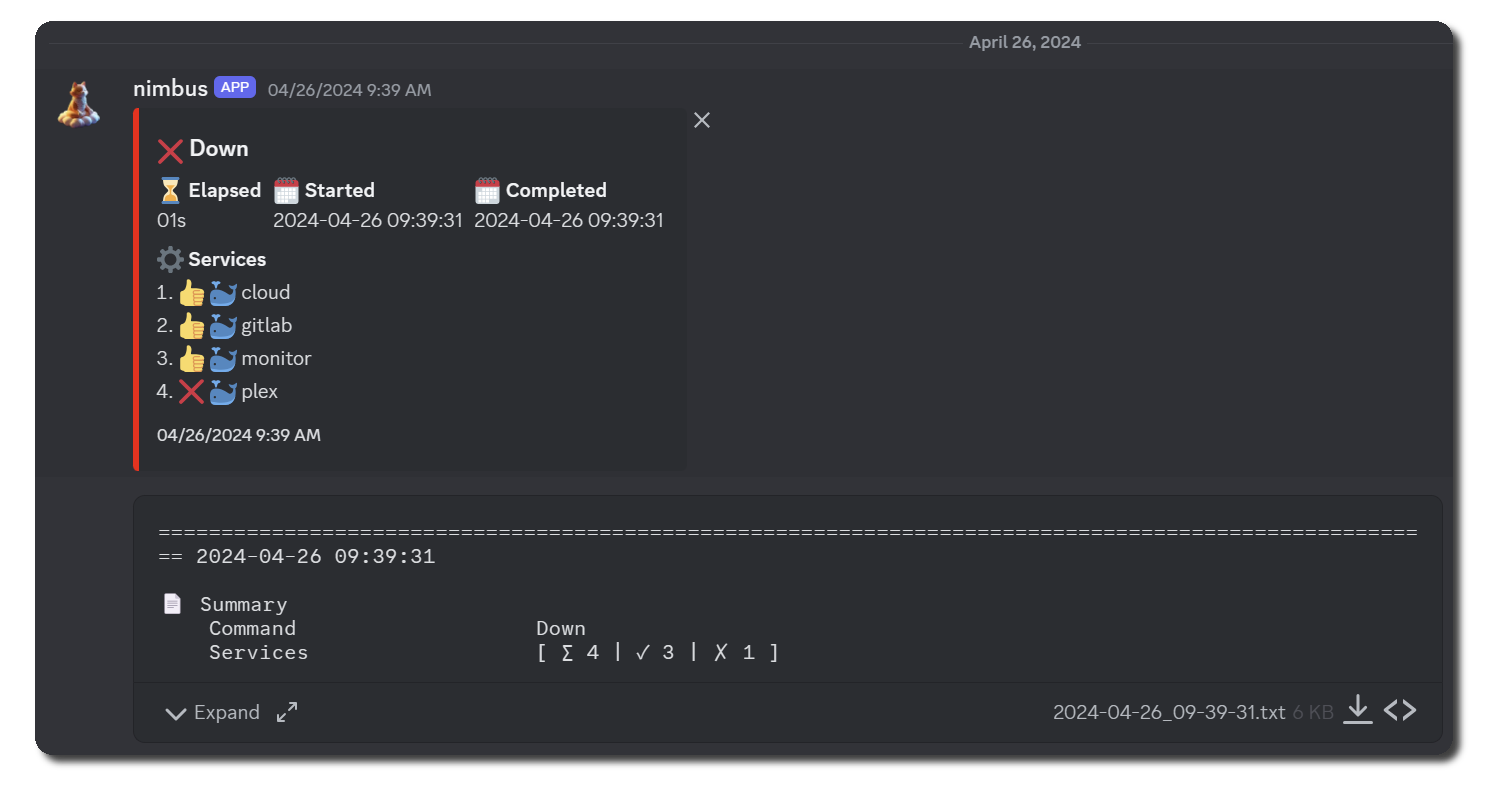
The following Discord notification, including the detailed operation report as an attachment, would be generated for the deployment command:
For more details, refer to the example configuration file.
1 maintainer

Metadata
1 maintainer
Release files for nimbuscli 0.4.0
For a detailed explanation of source distributions (sdists) and built distributions (wheels), please see the package formats documentation.
Source distribution (sdist)
| File | Size | Uploaded | |
|---|---|---|---|
| nimbuscli-0.4.0.tar.gz | 35.0 kB | Details |
Built distribution (wheel)
| File | Interpreter | ABI | Platform | Reset |
|---|---|---|---|---|
| nimbuscli-0.4.0-py3-none-any.whl | Python 3 | none | any | Details |
Total release size: 81.1 kB
Release files / nimbuscli-0.4.0.tar.gz
| Download URL | nimbuscli-0.4.0.tar.gz |
|---|---|
| Size | 35.0 kB |
| Tags | Source |
|
SHA-256 checksum How to use checksums |
7a08c00ad0ede7d4b824930f26b17c5aa48a2a7ff4b0dd44818d53ce63bfb3b2
|
|
BLAKE2b-256 checksum How to use checksums |
f81f1a40e31eef8fe47652f73bef987e0278b77e9b935b7ad2cdbf4dc2dc6144
|
| Upload date | |
|
Uploaded using Trusted Publishing? What is trusted publishing? |
Yes |
| Uploaded via |
twine/5.0.0 CPython/3.12.3
|
Release files / nimbuscli-0.4.0-py3-none-any.whl
| Download URL | nimbuscli-0.4.0-py3-none-any.whl |
|---|---|
| Size | 46.2 kB |
| Tags | Python 3 |
|
SHA-256 checksum How to use checksums |
fd4b546da47f5d0dcabfbff788552ace1c6c13499f5e91038fe731196d57d6ba
|
|
BLAKE2b-256 checksum How to use checksums |
9051f0c69ba80593ee82fa0efd2a08e500f67ef4b4622c067e48f1a3d728ce49
|
| Upload date | |
|
Uploaded using Trusted Publishing? What is trusted publishing? |
Yes |
| Uploaded via |
twine/5.0.0 CPython/3.12.3
|














