

One library. DETR made simple.




Train, validate, export and run vision models. The code and the official pretrained weights are released under the Apache License 2.0, so you can ship them inside your own product without opening your code or paying for a license.
nitid, from Latin nitidus: clear, transparent, precise.
No AGPL, no surprises.
Installation · Quick start · Models · Documentation
Why nitid?
- Edge first. The models are designed to run at the edge, on the hardware next to your cameras, not only on a datacenter GPU or NPU.
- Self-contained checkpoints. Every checkpoint carries the config and the class names it needs to be reproduced and checked — one file per model.
- Handles messy datasets. COCO and YOLO layouts are read directly, with no conversion step, and the inconsistencies real datasets have are tolerated.
- Export anywhere. OpenVINO, ONNX, TorchScript and TensorRT, from the same checkpoint.
One library, three tasks, five operations
Object detection, instance segmentation and semantic segmentation, through one
API: predict, track, train, val and export. The DETR family moves fast
— RT-DETR, D-FINE — and nitid brings the best DETR made easy, so getting
from your dataset to an exported model does not mean following every paper.
What comes with it:
- Python API and command line
- Automatic download of the official COCO checkpoints for detection and instance segmentation; semantic segmentation is fine-tuned on your own masks
- Fine-tuning and validation for boxes, masks and dense semantic maps
- ByteTrack, BoT-SORT, and OC-SORT tracking with persistent IDs and annotated video output
What "open" means here
The nitid code is released under the Apache License 2.0. You can use it commercially, modify it, and ship it in closed products.
The official pretrained weights are published by their authors under Apache 2.0 as well: the detection checkpoints by D-FINE and the instance-segmentation checkpoints by D-FINE-seg. nitid downloads them from those sources on first use. The public datasets used for pretraining keep their own terms: the checkpoints listed in Verified models are trained on COCO and Objects365.
Installation
Requires Python 3.10, 3.11 or 3.12.
pip install nitid
Inference and export work out of the box. Other features are optional extras:
| Extra | Adds |
|---|---|
train |
Fine-tuning and COCO-style validation |
track |
ByteTrack, BoT-SORT, and OC-SORT object tracking |
openvino |
OpenVINO export and runtime for Intel CPU, iGPU, and NPU |
wandb, mlflow |
Experiment tracking during training |
pip install "nitid[train,track]"
pip installs the default PyTorch build for your platform. If you need a specific CUDA version, install PyTorch first following pytorch.org, then install nitid. TensorRT export has its own requirements; see docs/export.md.
Quick Start
The canonical quickstart lives in docs/quickstart.md; use the docs guide for the full walkthrough.
Inference
from nitid import NITID

model = NITID("model1s", task="detect")
results = model.predict("image.jpg", conf=0.5)
results[0].save("out.jpg")

# Export detections to Pandas DataFrame or crop bounding boxes
df = results[0].pandas()
results[0].crop(save_dir="crops/")
| Input | Detection |
|---|---|
 |
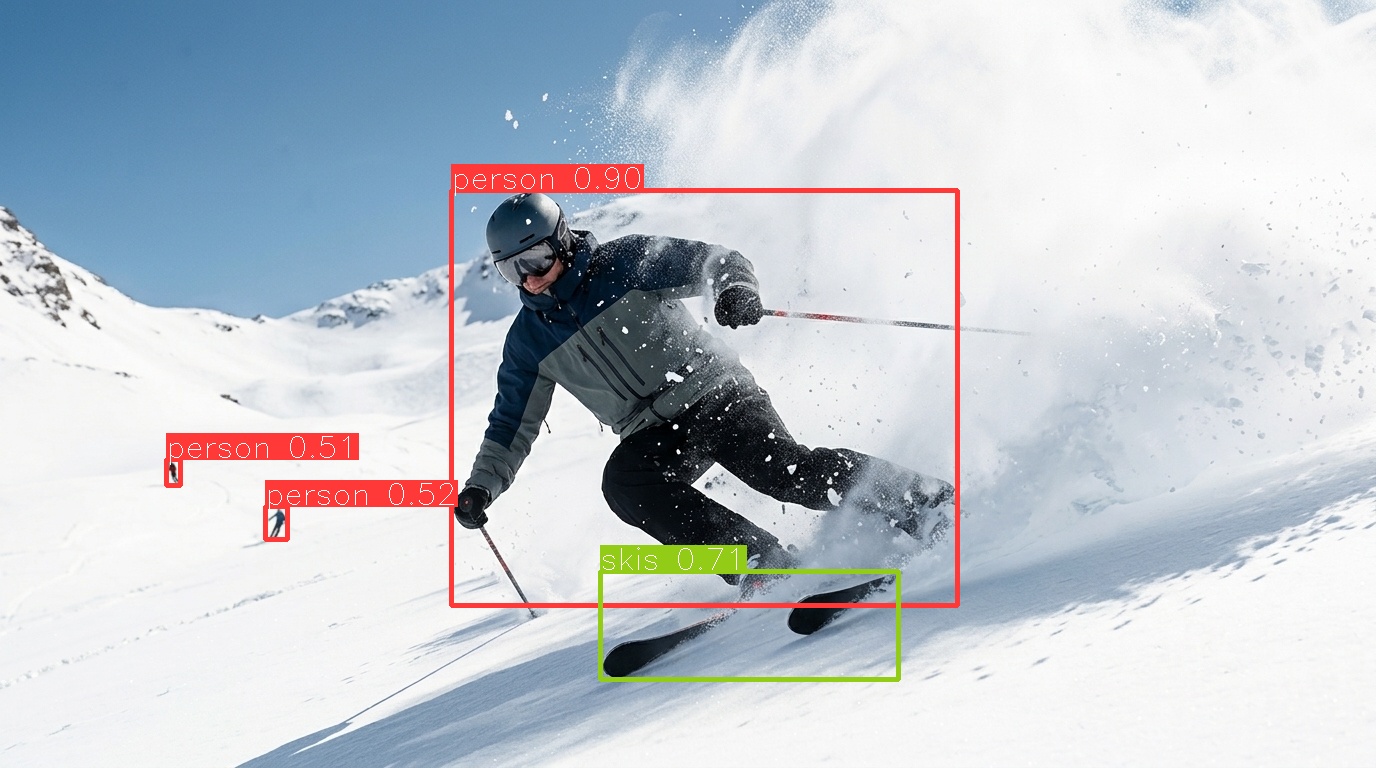 |
Generated with:
nitid predict model=model1m task=detect source=docs/assets/demo/source/ski.jpg conf=0.5 save=true
Instance segmentation uses the same API and downloads the matching COCO mask checkpoint:
model = NITID("model1s", task="segment")
result = model.predict("image.jpg", conf=0.5)[0]
print(result.masks.data.shape)  # [N, H, W]
result.save("segmented.jpg")
| Input | Instance segmentation |
|---|---|
 |
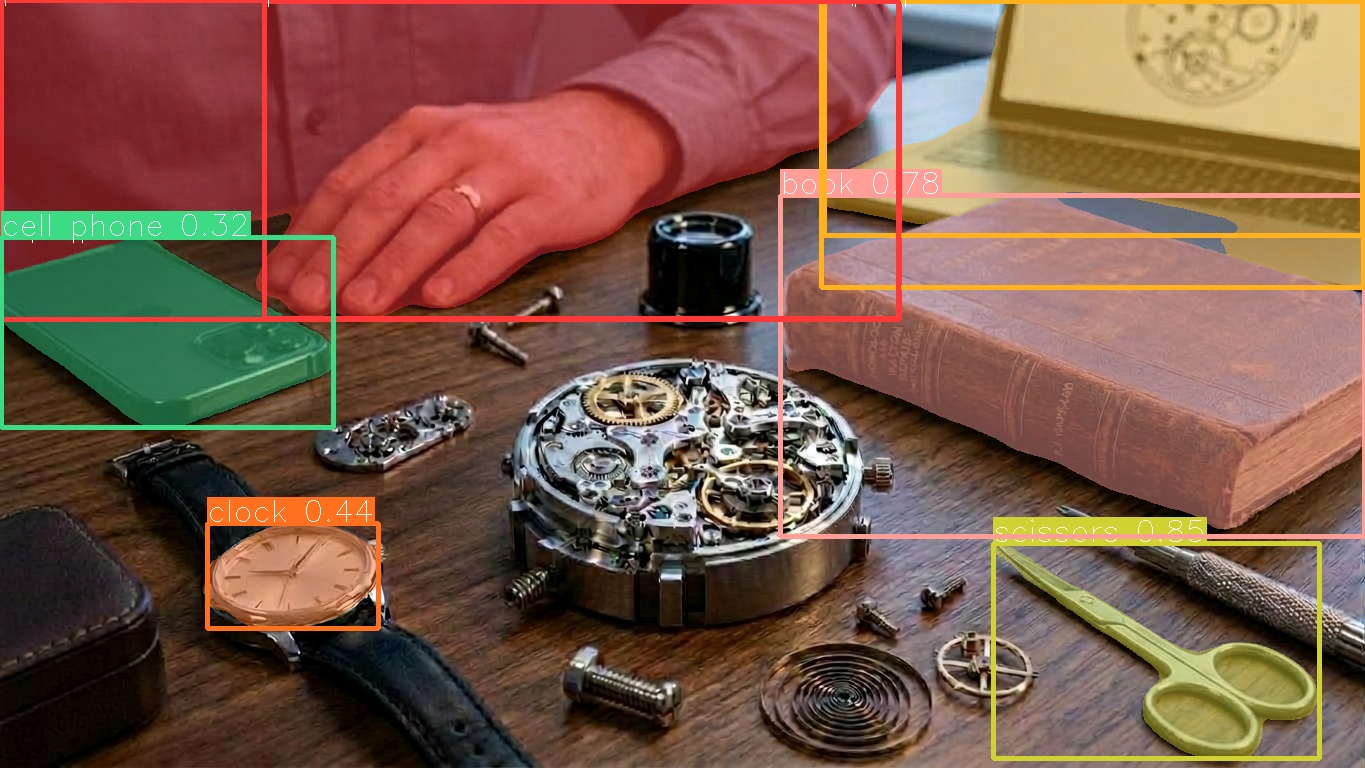 |
Generated with:
nitid predict model=model1l task=segment source=docs/assets/demo/source/watchmaker.jpg conf=0.3 save=true
Semantic segmentation returns one class ID per pixel. There are no pretrained
semantic weights yet: NITID("model1s", task="semantic") is a starting point for
fine-tuning, so predict with your fine-tuned checkpoint:
model = NITID("semantic_best.pth", task="semantic")
result = model.predict("image.jpg", return_probs=True)[0]
print(result.semantic.mask.shape)  # [H, W]
result.save_semantic("class_ids.png")
Training
metrics = model.train(
    data="configs/datasets/my_dataset.yml",
    epochs=50,
    batch=8,
)
print(f"mAP50: {metrics['mAP50']:.4f}, mAP50-95: {metrics['mAP50-95']:.4f}")
See fine-tuning for COCO, YOLO, and semantic-mask dataset formats.
Tracking
for result in model.track("video.mp4", conf=0.5, stream=True, save=True):
    if result.boxes.id is not None:
        track_ids = result.boxes.id
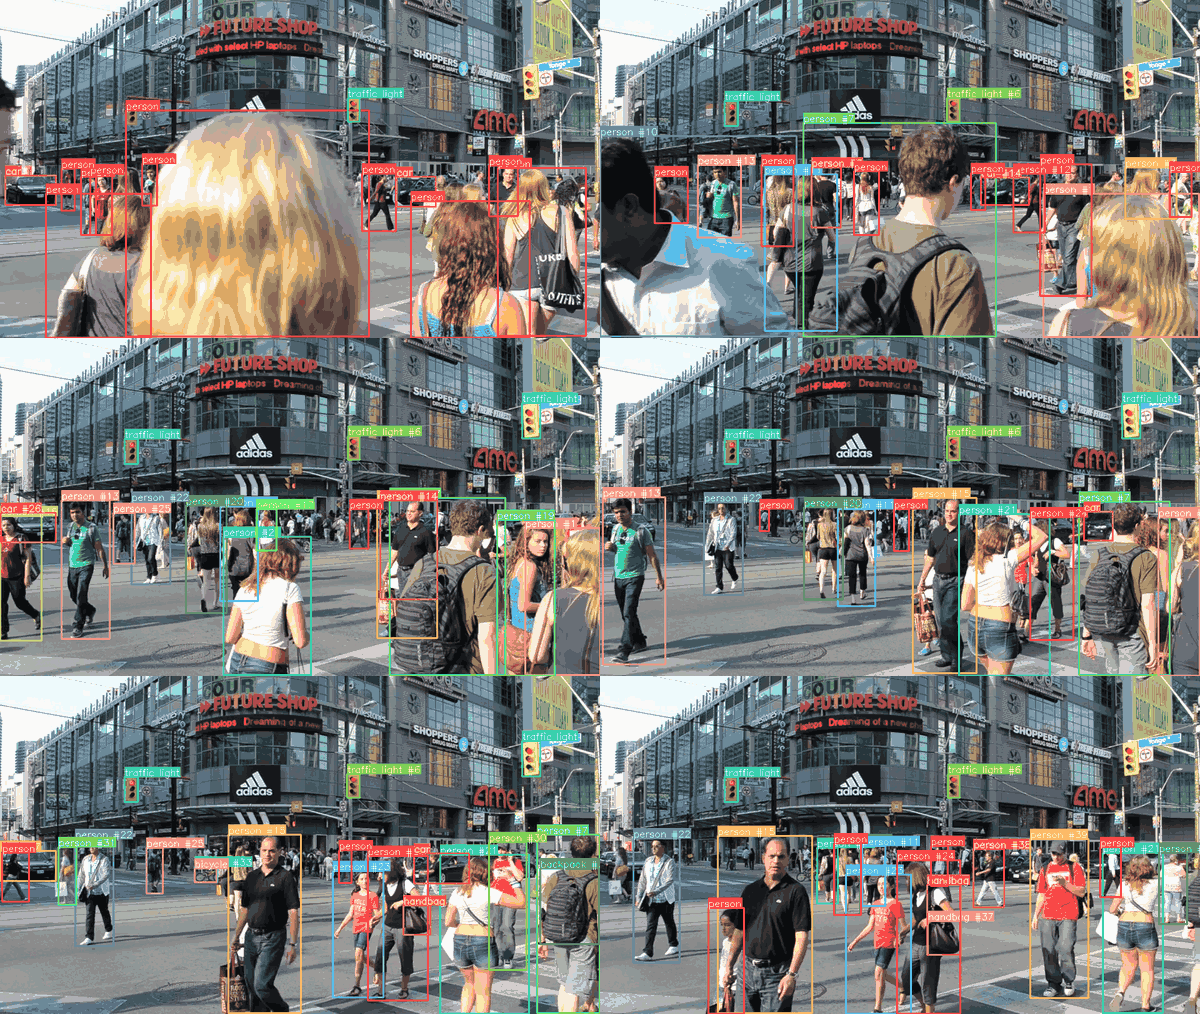
model1s detection with ByteTrack and vid_stride=2 on a CC0 street video.
The annotated video is saved under runs/track/exp/. Tracking dependencies
are optional; install them with pip install "nitid[track]".
Validation
metrics = model.val(
    data="configs/datasets/my_dataset.yml",
    project="runs/val",
    name="exp",
)
# saves validation plots to runs/val/exp by default
Export
model.export(format="openvino")
model.export(format="onnx")
model.export(format="torchscript")
model.export(format="tensorrt")
| Deployment target | Hardware | Export format | Extra install |
|---|---|---|---|
| OpenVINO | Intel CPU, iGPU and NPU | format="openvino" |
pip install "nitid[openvino]" |
| ONNX | Any ONNX runtime (CPU, GPU) | format="onnx" |
A runtime, e.g. pip install onnxruntime |
| PyTorch | CPU, CUDA GPU | .pth checkpoint |
None |
| TorchScript | LibTorch (C++) | format="torchscript" |
None |
| TensorRT | NVIDIA GPU (Jetson, RTX, data center) | format="tensorrt" |
tensorrt>=8.6 (see docs/export.md) |
Capture Python API output, environment details, and failure tracebacks in one attachable log:
from nitid import NITID, bugreport

with bugreport("prediction") as report:
    model = NITID("model1s", task="detect")
    model.predict("image.jpg")

print(report.path)
Command Line Interface
nitid predict model=model1s task=detect source=image.jpg
nitid predict model=semantic_best.pth task=semantic source=image.jpg save=true
nitid track model=model1s source=video.mp4 conf=0.5 save=true
nitid train model=model1s task=detect data=my_dataset.yml epochs=50
nitid val model=model1s task=detect data=my_dataset.yml
nitid export model=model1s task=detect format=onnx
nitid predict model=model1s source=image.jpg --report
nitid bugreport
For the full guide:
- Full quickstart: docs/quickstart.md
- Notebooks and scripts: examples/
- Fine-tuning and validation: docs/fine_tuning.md
- Export: docs/export.md
- Deployment: docs/deployment.md
- CLI: docs/cli.md
Migrating from YOLO & Compatibility
If you are coming from a YOLO codebase, the quickstart has a side-by-side mapping of the API and the behaviour that differs: Coming from YOLO.
Verified models
💡
NITID("model1s", task=...)is the canonical constructor. The trailing size letter selects the model size, andmodel1identifies the model generation. Supported tasks aredetect,segment, andsemantic.
Object Detection (task="detect")
Evaluated on COCO val2017 at 640x640 resolution.
| Model Alias | Architecture | COCO mAP50-95 (vs YOLO11) | SpeedT4 TRT10 FP16 (vs YOLO11) | Params | FLOPs | Config | Official Checkpoint |
|---|---|---|---|---|---|---|---|
model1n* |
D-FINE-N | 42.8 (40.9) | 2.12 ms (1.70 ms) | 4.0M | 7B | yml | pth |
model1s |
D-FINE-S | 50.7 (48.6) | 3.49 ms (2.50 ms) | 10.0M | 25B | yml | pth |
model1m |
D-FINE-M | 55.1 (53.1) | 5.62 ms (4.70 ms) | 19.0M | 57B | yml | pth |
model1l |
D-FINE-L | 57.3 (55.0) | 8.07 ms (6.20 ms) | 31.0M | 91B | yml | pth |
model1x |
D-FINE-X | 59.3 (57.5) | 12.89 ms (11.80 ms) | 62.0M | 202B | yml | pth |
Numbers in parentheses correspond to the equivalent YOLO11 model (YOLO11n/s/m/l/x) for quick reference.
* Official checkpoints for model1s/m/l/x download automatically upon first use. model1n detection requires a checkpoint path or custom weights.
Instance Segmentation (task="segment")
Based on D-FINE-seg. Published in the official D-FINE-seg model repository. Official checkpoints download automatically upon first use.
| Model Alias | Architecture | Backing Checkpoint | Weights |
|---|---|---|---|
model1n |
D-FINE-Seg-N | dfine_seg_n_coco.pt |
Auto-download / Hugging Face |
model1s |
D-FINE-Seg-S | dfine_seg_s_coco.pt |
Auto-download / Hugging Face |
model1m |
D-FINE-Seg-M | dfine_seg_m_coco.pt |
Auto-download / Hugging Face |
model1l |
D-FINE-Seg-L | dfine_seg_l_coco.pt |
Auto-download / Hugging Face |
model1x |
D-FINE-Seg-X | dfine_seg_x_coco.pt |
Auto-download / Hugging Face |
Semantic Segmentation (task="semantic")
There are no pretrained semantic checkpoints. NITID("model1s", task="semantic") starts
from the instance-segmentation checkpoint of the same size and is meant for
fine-tuning on your own masks.
Documentation
| Doc | Description |
|---|---|
| docs/quickstart.md | Full quickstart |
| examples/ | Notebooks (Colab) and runnable scripts |
| docs/fine_tuning.md | Training, validation, AMP, EMA, dataset formats |
| docs/export.md | OpenVINO, ONNX, TorchScript, and TensorRT export |
| docs/deployment.md | Running exported models with ONNX Runtime, OpenVINO, LibTorch, Triton |
| docs/training_cuda_openvino.md | End-to-end run on an NVIDIA GPU or an Intel machine with OpenVINO |
| docs/cli.md | Command-line reference |
| docs/api_reference.md | Full Python API reference |
| docs/troubleshooting.md | FAQ and fixes for common install, model, Docker, CUDA, and CLI problems |
| docs/macos_docker_setup.md | macOS / Apple Silicon development environment with Docker |
| docs/brand.md | Brand: logo, palette, typography, and what the project announces |
Development
Everything above is for using nitid. To work on nitid itself, use a source
checkout and uv, which installs the exact
dependency versions pinned in uv.lock — including CUDA 12.1 PyTorch wheels on
Linux and Windows.
git clone https://github.com/Nitidio/nitid.git && cd nitid
uv sync --extra dev --extra train
Inside the checkout, run the CLI and tools through the project environment:
uv run nitid predict model=model1s task=detect source=image.jpg

# Unit tests (no GPU, no checkpoint needed)
uv run pytest tests/unit

# All tests (integration tests build a tiny checkpoint automatically)
uv run pytest

# Lint and format
uv run ruff check .
uv run ruff format --check .

# Type-check
uv run mypy dfine tools
Integration tests use a session-scoped fixture in tests/conftest.py that
builds a small D-FINE-S model with random weights at test time — no download
required.
- docs/onboarding.md — start here if you're new to the codebase: architecture, conventions, gotchas
- CONTRIBUTING.md — branch workflow, commit conventions, and the PR checklist
Docker Environment
For developers on macOS (Apple Silicon) or environments needing isolated Linux containers, a preconfigured Dockerfile and docker-compose.yml are provided:
docker compose run --rm nitid-dev
See macOS Docker Setup for the setup guide.
Acknowledgements & Citation
nitid contains code derived from D-FINE and D-FINE-seg, with smaller portions from RT-DETR, DETR and PaddleDetection. See THIRD_PARTY_NOTICES.md and the Apache 2.0 License.
If you use nitid in your research or product, please cite:
@software{nitid2026,
  title={nitid: Real-Time Open Source Computer Vision},
  author={{Vaelsys}},
  year={2026},
  url={https://github.com/Nitidio/nitid}
}

@article{peng2024dfine,
  title={D-FINE: Redefine Regression Task in DETRs as Fine-grained Distribution Refinement},
  author={Peng, Yansong and Shi, Hongtao and Li, Shiyu and Wang, Yan and Li, Hongbin and Liu, Guozheng and Li, Bing and Hu, Weiming},
  journal={arXiv preprint arXiv:2410.13842},
  year={2024}
}

@article{saakyan2026dfineseg,
  title={D-FINE-seg: Object Detection and Instance Segmentation Framework with multi-backend deployment},
  author={Saakyan, Argo and Solntsev, Dmitry},
  journal={arXiv preprint arXiv:2602.23043},
  year={2026}
}
1 maintainer

Metadata
1 maintainer
Release files for nitid 0.9.1
For a detailed explanation of source distributions (sdists) and built distributions (wheels), please see the package formats documentation.
Source distribution (sdist)
| File | Size | Uploaded | |
|---|---|---|---|
| nitid-0.9.1.tar.gz | 162.8 kB | Details |
Built distribution (wheel)
| File | Interpreter | ABI | Platform | Reset |
|---|---|---|---|---|
| nitid-0.9.1-py3-none-any.whl | Python 3 | none | any | Details |
Total release size: 339.1 kB
Release files / nitid-0.9.1.tar.gz
| Download URL | nitid-0.9.1.tar.gz |
|---|---|
| Size | 162.8 kB |
| Tags | Source |
|
SHA-256 checksum How to use checksums |
65067ee984fd7d04c7a3113631ac839b2866141da58941615a97de91199f91f1
|
|
BLAKE2b-256 checksum How to use checksums |
074031eea467d238b232e266ebceb812c454ae846c57b310ea95e78843d2bb6b
|
| Upload date | |
|
Uploaded using Trusted Publishing? What is trusted publishing? |
Yes |
| Uploaded via |
twine/7.0.0 CPython/3.13.14
|
Provenance
Provenance describes where a file came from. On PyPI, provenance is shared via attestations, which provide a verifiable record of the build or publishing details. View details, limitations and caveats.


PyPI Publish Attestation
PyPI verified that this artifact, at this checksum, originated from the publisher listed below.
Signed by GitHub Actions, verified by PyPI on Oct 9, 2026.
Transparency logRelease files / nitid-0.9.1-py3-none-any.whl
| Download URL | nitid-0.9.1-py3-none-any.whl |
|---|---|
| Size | 176.3 kB |
| Tags | Python 3 |
|
SHA-256 checksum How to use checksums |
08f19b7d49c2e74a796bf193650a5dcde560b8121e149b4adbabea4274626261
|
|
BLAKE2b-256 checksum How to use checksums |
978ee9da6f6bc3396d7343a3f1f6b0f4dcd5a1a859427b4f8e8b4a3d445a8a0d
|
| Upload date | |
|
Uploaded using Trusted Publishing? What is trusted publishing? |
Yes |
| Uploaded via |
twine/7.0.0 CPython/3.13.14
|
Provenance
Provenance describes where a file came from. On PyPI, provenance is shared via attestations, which provide a verifiable record of the build or publishing details. View details, limitations and caveats.
PyPI Publish Attestation
PyPI verified that this artifact, at this checksum, originated from the publisher listed below.
Signed by GitHub Actions, verified by PyPI on Oct 9, 2026.
Transparency log













