
A Neuro-San powered Smart Agent Network Framework
Verified details
These details have been verified by PyPIProject links
GitHub Statistics
Maintainers


Project description
nsflow - A FastAPI powered client and IDE for Neuro-San
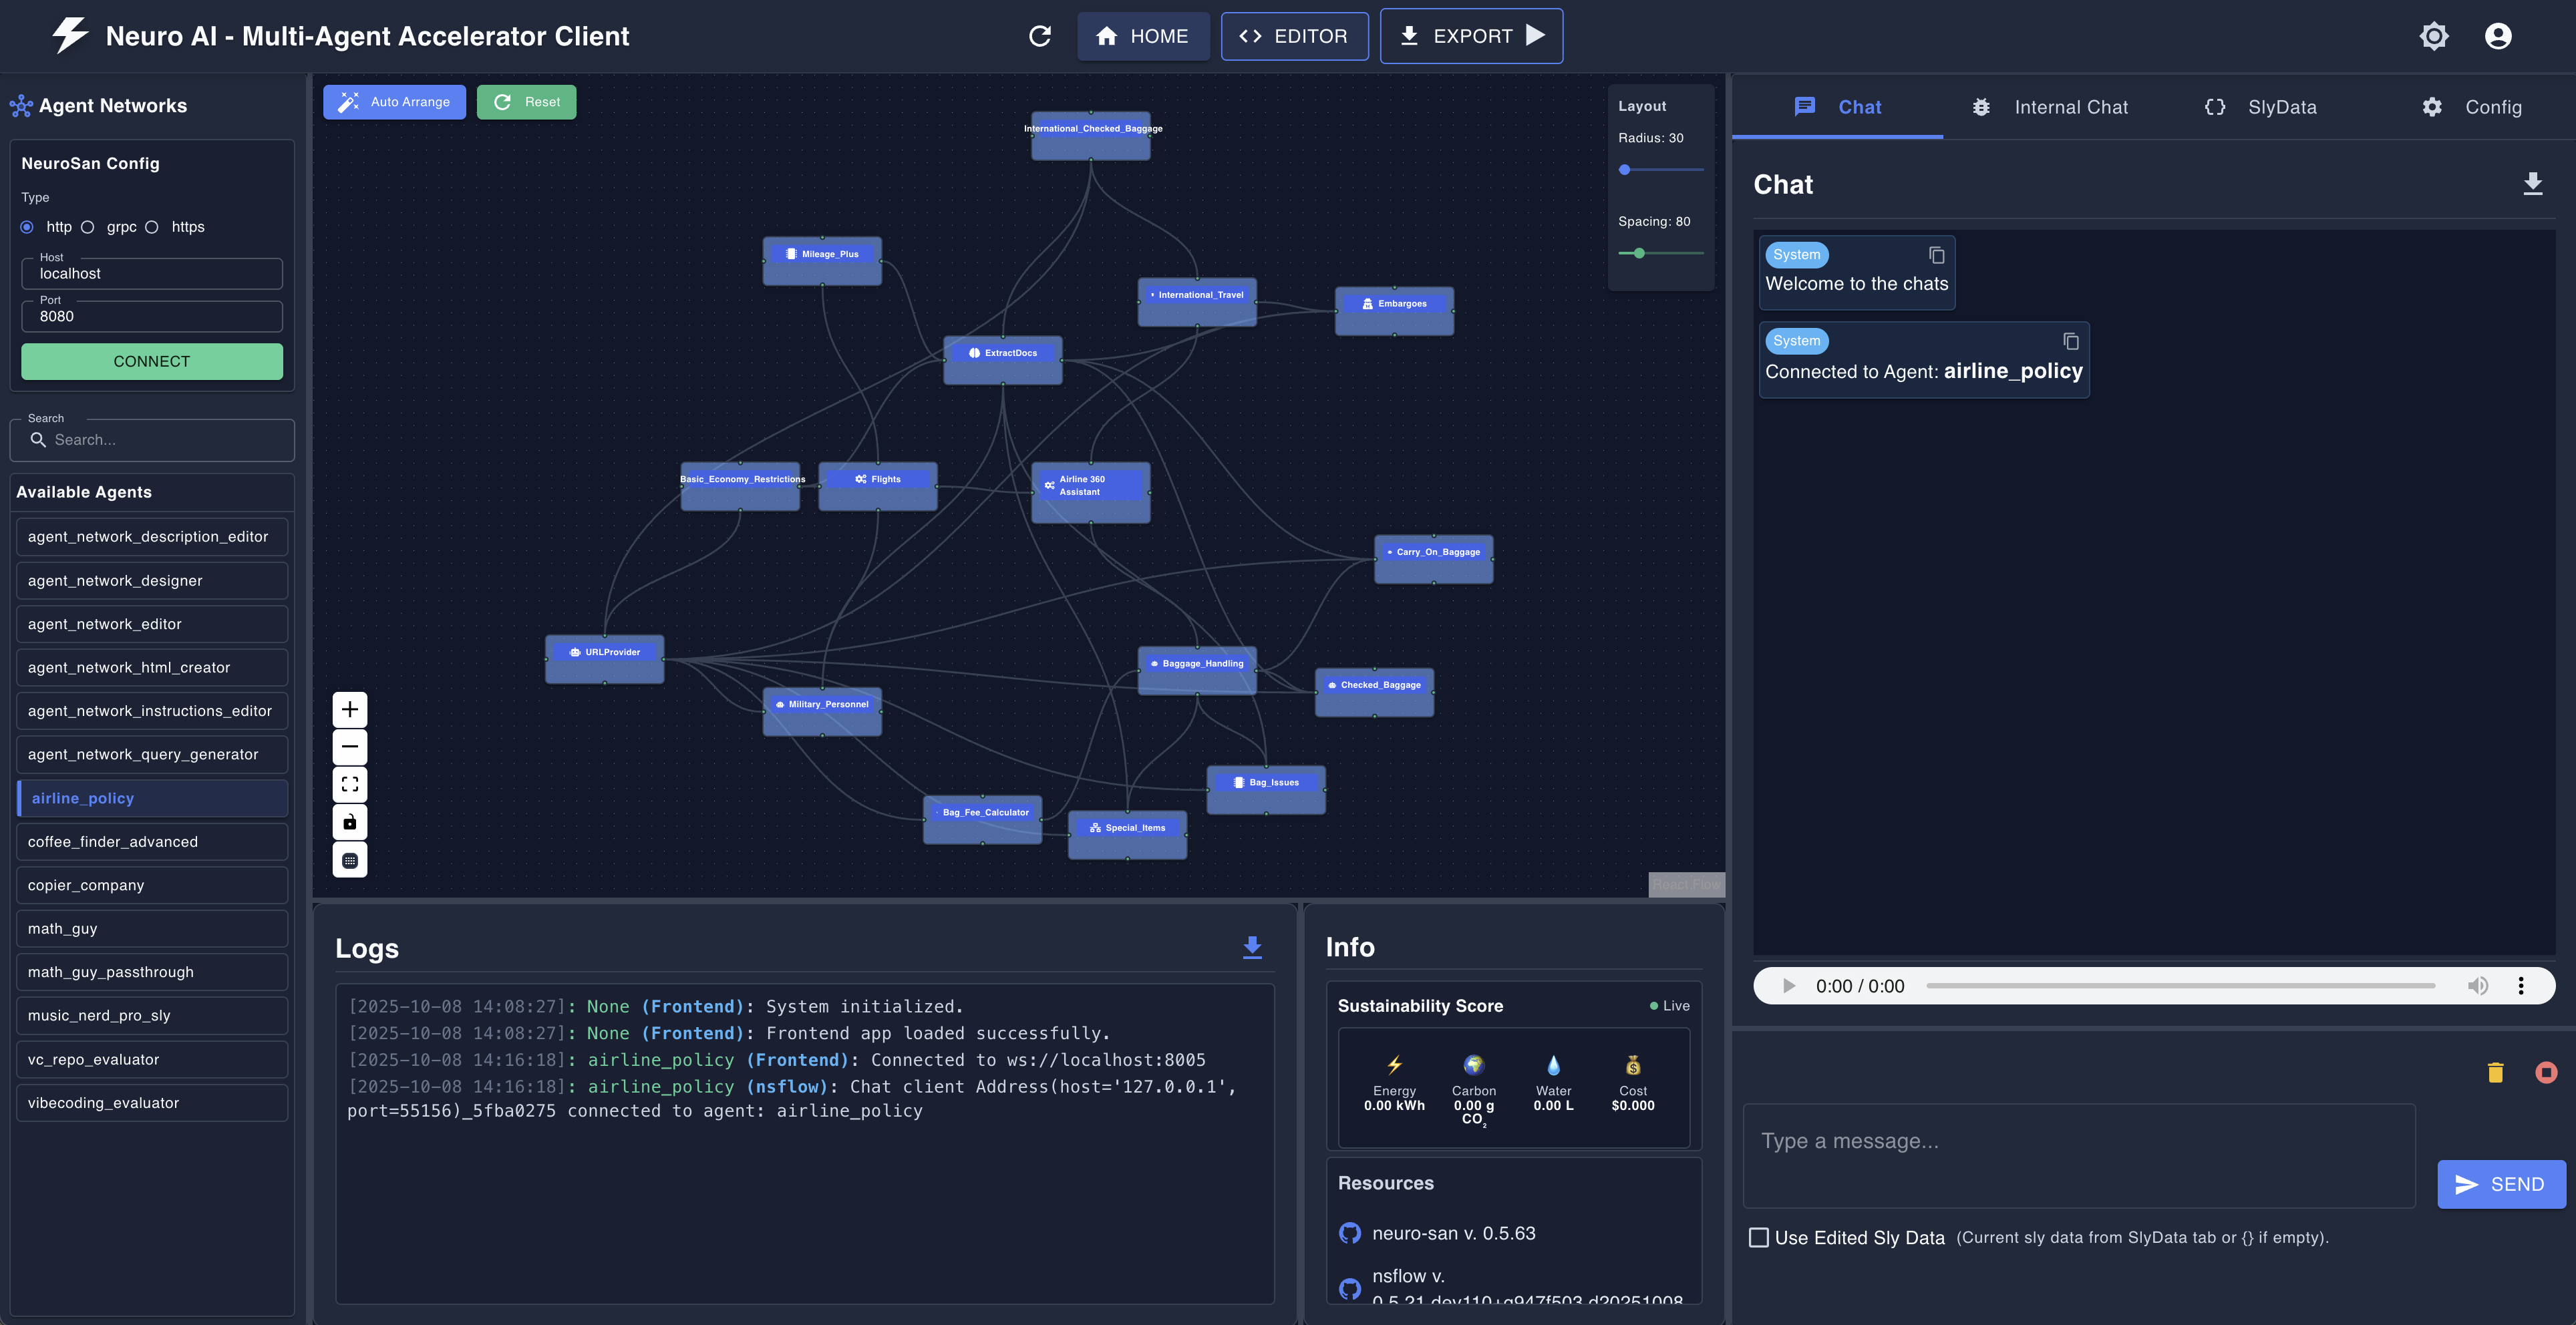
A fastapi and react based developer-oriented client and IDE that enables users to explore, visualize, and interact with smart agent networks. It integrates with NeuroSan for intelligent agent-based interactions.
[!TIP] To see how
nsflowworks in conjunction with the neuro-san library, visit https://github.com/cognizant-ai-lab/neuro-san-studio
[!TIP] For a production oriented client for neuro-san, visit https://github.com/cognizant-ai-lab/neuro-san-ui
Intro
nsflow comes with an Agent Network Designer that embodies the agentic design philosophy, making the neuro-san library accessible to both developers and non-developers alike. This transforms nsflow from a simple interactive chat client into a well-featured agent orchestration platform with visual design capabilities.
Enabling/Disabling text-to-speech and speech-to-text
For local development (when running the backend and frontend separately), you can toggle text-to-speech and speech-to-text by setting the VITE_USE_SPEECH variable in the nsflow/frontend/.env.development file to "true" or "false".
The frontend development server reads this file directly.
Installation & Running nsflow
nsflow can be installed and run in two different ways:
1️⃣ Run nsflow using pypi package
To simplify execution, nsflow provides a CLI command to start both the backend and frontend simultaneously.
Step 1: Create and source a virtual environment
python -m venv .venv
source .venv/bin/activate
Step 2: Install nsflow from pip
pip install nsflow
Step 3: Run Everything with a Single Command
python -m nsflow.run
By default, this will start:
- backend (FastAPI + NeuroSan) here:
http://127.0.0.1:4173/docsorhttp://127.0.0.1:4173/redoc - frontend (React) here:
http://127.0.0.1:4173
2️⃣ Development & Contribution (Manually Start Frontend & Backend)
If you want to contribute, ensure you have the necessary dependencies installed. To start the frontend and backend separately, follow these steps:
Step 1: Clone the Repository
git clone https://github.com/cognizant-ai-lab/nsflow.git
cd nsflow
Step 2: Install Dependencies
- Make sure you have python (preferably Python 3.12) installed.
python -m venv .venv
source .venv/bin/activate
pip install -r requirements.txt
pip install -r requirements-build.txt
Step 3: Start the Backend in dev mode & Frontend separately
-
Ensure that you have a few example hocon files in your
registriesand the same mapped inregistries/manifest. -
[Optional] Ensure that you have the necessary coded tools in the
coded_toolsdir. -
From the root start Backend:
python -m nsflow.run --dev
-
Start Frontend:
- Ensure that you have Node.js (with Yarn) installed.
- Follow the instructions to setup the frontend here: ./nsflow/frontend/README.md
- On another terminal window
cd nsflow/frontend; yarn install
yarn dev
-
By default:
- backend will be available at:
http://127.0.0.1:8005 - frontend will be available at:
http://127.0.0.1:5173 - You may change the host/port configs using environment variables for fastapi (refer run.py) and using frontend/.env.development for react app
- backend will be available at:
Step 4: To make sure your changes to frontend take effect in the wheel, run the script
- To build the Frontend
sh build_scripts/build_frontend.sh
Note: The above script's output should show that ./nsflow dir contains a module prebuilt_frontend
- To build and test the wheel locally
sh build_scripts/build_wheel.sh
For using Text-to-Speech and Speech-to-Text
Prerequisite: install ffmpeg for text-to-speech and speech-to-text support
- On Mac
brew install ffmpeg
- On Linux
sudo apt install ffmpeg
- On windows, follow the instructions here.
Enabling Visual Question Answering (VQA) http endpoints
Follow these instructions
Project details
Verified details
These details have been verified by PyPIProject links
GitHub Statistics
Maintainers
Release history Release notifications | RSS feed


Download files
Download the file for your platform. If you're not sure which to choose, learn more about installing packages.
Source Distribution
Built Distribution
Filter files by name, interpreter, ABI, and platform.
If you're not sure about the file name format, learn more about wheel file names.
Copy a direct link to the current filters
File details
Details for the file nsflow-0.6.16.tar.gz.
File metadata
- Download URL: nsflow-0.6.16.tar.gz
- Upload date:
- Size: 1.4 MB
- Tags: Source
- Uploaded using Trusted Publishing? Yes
- Uploaded via: twine/6.1.0 CPython/3.13.13
File hashes
| Algorithm | Hash digest | |
|---|---|---|
| SHA256 |
6bd929f761cbea29934aaece99dd8f59e733b638b9a822487547e141309e556b
|
|
| MD5 |
ea6170462210bca5723da45c9a989ba2
|
|
| BLAKE2b-256 |
e7fcf0bca111dfc19aba1072dd94e32329d23f16111c8b16e6103a4524b2b81f
|
Provenance
The following attestation bundles were made for nsflow-0.6.16.tar.gz:
Publisher:
publish.yml on cognizant-ai-lab/nsflow
-
Statement:
-
Statement type:
https://in-toto.io/Statement/v1 -
Predicate type:
https://docs.pypi.org/attestations/publish/v1 -
Subject name:
nsflow-0.6.16.tar.gz -
Subject digest:
6bd929f761cbea29934aaece99dd8f59e733b638b9a822487547e141309e556b - Sigstore transparency entry: 1833184033
- Sigstore integration time:
-
Permalink:
cognizant-ai-lab/nsflow@f96f1ecf62eaef38e7f703d35e7c87abb6d596cf -
Branch / Tag:
refs/tags/0.6.16 - Owner: https://github.com/cognizant-ai-lab
-
Access:
public
-
Token Issuer:
https://token.actions.githubusercontent.com -
Runner Environment:
github-hosted -
Publication workflow:
publish.yml@f96f1ecf62eaef38e7f703d35e7c87abb6d596cf -
Trigger Event:
release
-
Statement type:
File details
Details for the file nsflow-0.6.16-py3-none-any.whl.
File metadata
- Download URL: nsflow-0.6.16-py3-none-any.whl
- Upload date:
- Size: 1.4 MB
- Tags: Python 3
- Uploaded using Trusted Publishing? Yes
- Uploaded via: twine/6.1.0 CPython/3.13.13
File hashes
| Algorithm | Hash digest | |
|---|---|---|
| SHA256 |
a4aada156c19a86cac026cc03e3d70425d1d532e2514c46ff56eeb45efe04a75
|
|
| MD5 |
41a9cd9f676e6f4eec0c70600adc1798
|
|
| BLAKE2b-256 |
de9434b337170b6a21e0daadabcb681258d0291cf98d67944d5cb1ec7617f460
|
Provenance
The following attestation bundles were made for nsflow-0.6.16-py3-none-any.whl:
Publisher:
publish.yml on cognizant-ai-lab/nsflow
-
Statement:
-
Statement type:
https://in-toto.io/Statement/v1 -
Predicate type:
https://docs.pypi.org/attestations/publish/v1 -
Subject name:
nsflow-0.6.16-py3-none-any.whl -
Subject digest:
a4aada156c19a86cac026cc03e3d70425d1d532e2514c46ff56eeb45efe04a75 - Sigstore transparency entry: 1833184111
- Sigstore integration time:
-
Permalink:
cognizant-ai-lab/nsflow@f96f1ecf62eaef38e7f703d35e7c87abb6d596cf -
Branch / Tag:
refs/tags/0.6.16 - Owner: https://github.com/cognizant-ai-lab
-
Access:
public
-
Token Issuer:
https://token.actions.githubusercontent.com -
Runner Environment:
github-hosted -
Publication workflow:
publish.yml@f96f1ecf62eaef38e7f703d35e7c87abb6d596cf -
Trigger Event:
release
-
Statement type:






