Fast & Free notifications for your code: Python wrapper around the ntfy.sh notifications service.

Project description

ntfy-wrapper is a free and hassle-free customizable notifier for Python. No login, no API token, no fees, no bullshit.
It's actually a simple Python wrapper around ntfy. Kudos to them ❤️
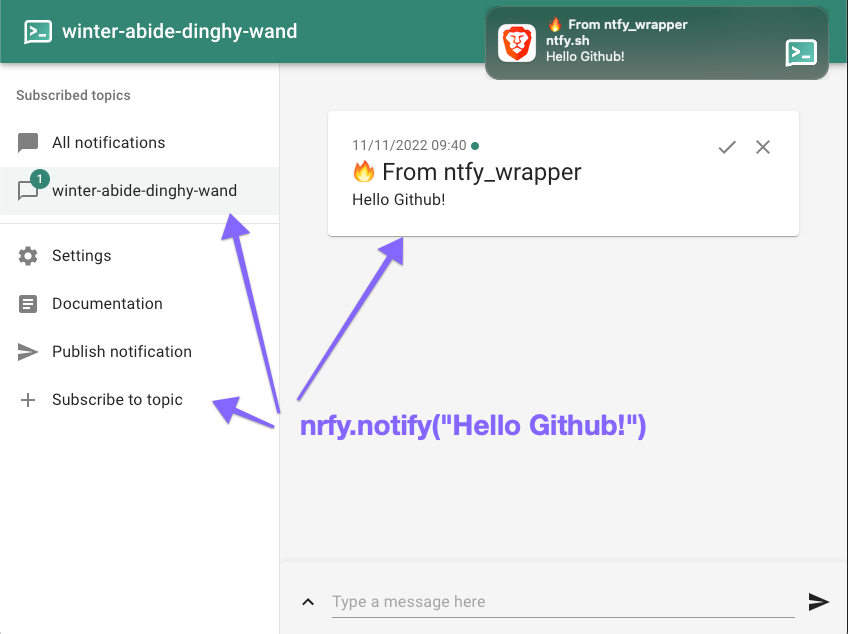
You can now send notification from your Python code and receive them on your computer through a Web App or a CLI, or on your phone with a dedicated app!
Again, all credit to ntfy.
Install
Install ntfy-wrapper with pip:
pip install ntfy-wrapper
Dependencies:
requestsfor easy HTTP requests and interacting with thentfy.shAPItyperfor a powerful and beautiful CLIxkcdpassto generate secure but human-friendly topics1
Why?
Imagine you execute jobs on a shared cluster. They are in a queue. You get notified when they start. You get notified if there's an error. You get notified with the final performance of your model and if you click on the notification, you have access to the online logs from wandb or comet.ml.
That's just one scenario inspired from my work in AI, but really you can use it in any context!
Getting Started
from ntfy_wrapper import Notifier
if __name__ == "__main__":
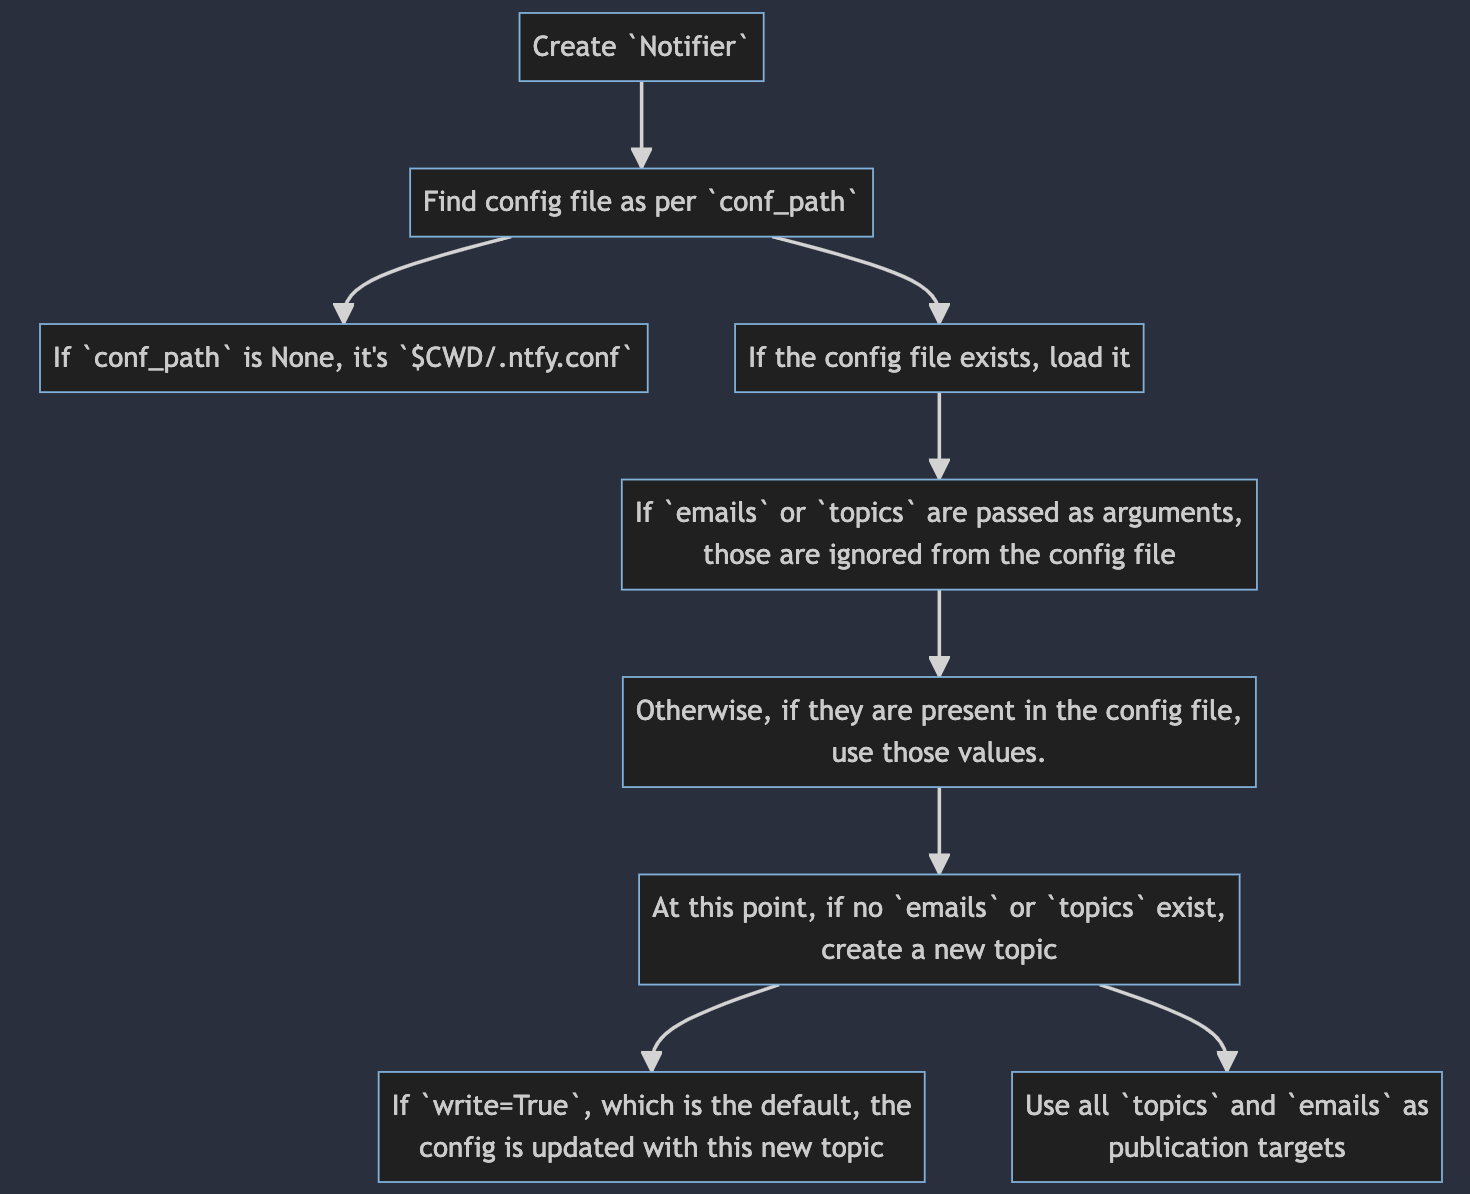
ntfy = Notifier(notify_defaults={"title": "Your Project Name"})
# IFF this is the first call to `ntfy_wrapper` in your project, this line ^
# will print a topic id.
# It will also write the topic id to `.ntfy.conf` so this only happens once!
#
# Use one of those methods (from the print or the conf file) to copy the topic id
# and use it to subscribe to notifications from the web or mobile apps.
#
# You can also use the command-line `$ py-ntfy init` before executing your code
# and the same process will happen (new topic + conf file)
#
# Note: anyone with your topic id can subscribe to your notification. It's probably
# best to *exclude* the configuration file from version control.
ntfy("Job has been allocated, starting Model training")
try:
results = do_some_stuff()
if results["metric"] > threshold:
ntfy(
f"Great model! Its metric is {results['metric']:.3f}",
tags="white_check_mark", # this is the ✅ emoji
click=results["online_run_url"],
)
else:
ntfy(f"Done, but not great ({results['metric']:.3f})", tags="disappointed")
except Exception as e:
ntfy.notify(f"Error! -> {str(e)}", priority=4, emails="you@foo.bar")
Note ntfy(message) is equivalent to ntfy.notify(message), the former is an alias of the latter.
If you do not receive notifications after you've made sure you've subscribed to the exact topic used by your Notifier, it's probably because the request being sent out is malformed. Investigate using debug=True in the notify() call (e.g. : ntfy(message, debug=True)).
User Guide
The central concept is "topics". It's basically an ID used to publish/subscribe to notifications. You should keep it secret and not easily guessable because anyone with the topic id can subscribe to your notifications. In particular, you should add .ntfy.conf to .gitignore.
In short, ntfy-wrapper will publish to a topic and you'll have to subscribe to that same topic in order to receive the notification. You can receive your notification:
- On your computer
- By opening a local web app
- By setting up the
ntfyCLI tool
- By opening a local web app
- On your phone
- By installing a mobile app
How to use
- Create topics in one of the following ways:
- configure one manually
- In a Python console use
ntfy_wrapper.utils.generate_topic()to get a secure unique and human-readable topic (eg:winter-abide-dinghy-wand) - From the command-line use
$ py-ntfy new-topicto get a similar topic. Add--saveto add it to the configuration.
- Tell the
Notifierto use this topic in one of the following ways:- In your code
Notifier(topics=your_topic)orNotifier(topics=[topic1, topic2]) - Using a configuration file
- A configuration file will be created by default when constructing a
Notifierexcept if you addwrite=Falseto theNotifier.__init__arguments - The configuration file is used to hold default values for:
targets, i.e. a list of comma-separatedtopicsand a list of comma-separatedemailsmessage_defaultswhich are default values used when calling.notify(...)
- You can also use
$ py-ntfy initto initialize yourntfy-wrapperconfiguration
- A configuration file will be created by default when constructing a
- From the command-line with
$ py-ntfy add topic your-topic
- In your code
- Setup defaults in one of the following ways
- By editing the config file
- By using the
py-ntfycommand-line tool
- Explore notification options by referring to the original
ntfydocs
Configuration file
ntfy-wrapper uses the INI standard along with configparser to parse the configuration file. It expects 2 sections:
[notifier_init]with optional fieldsemails =,topics =andbase_url =to define systematic targets for the notification instead of putting them in your Python code.base_urlallows to push to a differentntfyserver than the defaulthttps://ntfy.sh.[notify_defaults]with optional fields listed below, which will define default parameters used byNotifier.notify(...). For instance you can set defaulttitleandtagsfor your code's.notify(...)calls and override them at specific locations with keyword arguments.notify(title="Non-default title")- The behavior of the
title,priority,tags,click,attach,actionsandiconkeys is described in thentfydocs
- The behavior of the
# For Notifier(emails=..., topics=...)
[notifier_init]
topics = my-secret-topic-1, mysecrettopic2
emails = you@foo.bar
base_url = https://custom-ntfy-instance.io

# For Notifier.notify(title=..., priority=..., etc.)
[notify_defaults]
title = Message from ntfy-wrapper
priority = 0
tags = fire
click =
attach =
actions =
icon = https://raw.githubusercontent.com/vict0rsch/ntfy-wrapper/main/assets/logo.png
Command-line
ntfy_wrapper comes with a command-line interface called py-ntfy. It uses the great Python CLI tool Typer. Its goal is to interact with ntfy-wrapper's configuration in a user-friendly way. It is different in that sense to the original ntfy CLI tool which is more generic.
-
Get help
$ py-ntfy --help
Usage: py-ntfy [OPTIONS] COMMAND [ARGS]...

╭─ Options ────────────────────────────────────────────────────────────────────────────────╮
│ --install-completion          Install completion for the current shell.                  │
│ --show-completion             Show completion for the current shell, to copy it or       │
│                               customize the installation.                                │
│ --help                        Show this message and exit.                                │
╰──────────────────────────────────────────────────────────────────────────────────────────╯
╭─ Commands ───────────────────────────────────────────────────────────────────────────────╮
│ add        [command sub-group] Add a new notification target or a default notification   │
│            value. Run `$ py-ntfy add --help` for more info.                              │
│ clean      Removes the configuration file. Use --conf-path to specify a path to the      │
│            configuration file. Use --force to skip the confirmation prompt.              │
│ init       Initializes the configuration file. It should NOT be tracked by version       │
│            control in order to protect the topic ID. Use --conf-path to specify a path   │
│            to the configuration file. Use --force to overwrite an existing configuration │
│            file.                                                                         │
│ new-topic  Generates a random topic name and saves it to the config file if you use the  │
│            --save option.                                                                │
│ remove     [command sub-group] Remove a notification target or a default notification    │
│            value. Run `$ py-ntfy remove --help` for more info.                           │
│ send       Sends a notification to the given emails and topics. Optional command-line    │
│            arguments can be passed to override the defaults in the config file and       │
│            customize the message options. Refer to https://ntfy.sh/docs/publish to       │
│            understand the options. Run `py-ntfy send --help` to see the available        │
│            options.                                                                      │
╰──────────────────────────────────────────────────────────────────────────────────────────╯

$ py-ntfy add --help
(similar output)

$ py-ntfy add default --help
(similar output)

$ py-ntfy remove --help
(similar output)
-
Initialize the configuration file
$ py-ntfy init
🔑 Your first topic is `aloe-corset-stream-alto`. Use it to subscribe to notifications!
🎉 Config file created at /path/to/repo/.ntfy.conf
-
Add a topic or an email
$ py-ntfy add topic some-secret-string-for-your-topic
🎉 Topic `some-secret-string-for-your-topic` added to /path/to/repo/.ntfy.conf

$ py-ntfy add email you@foo.bar
🎉 Email you@foo.bar added to /Users/.../vict0rsch/ntfy-wrapper/.ntfy.conf
-
Add a default value for the
.notify(...)calls$ py-ntfy add default key value 🎉 Default key=value added to /Users/.../vict0rsch/ntfy-wrapper/.ntfy.conf
-
Remove items by simply replacing
addbyremove$ py-ntfy remove default key 🎉 Default key=value removed from /Users/.../vict0rsch/ntfy-wrapper/.ntfy.conf $ py-ntfy remove email hello@you.com Email hello@you.com does not exist. Ignoring.
-
Generate a new topic with
new-topicand add it to your configuration with--save$ py-ntfy new-topic --save 🎉 Topic nutty-tiling-clear-parlor added to /Users/.../vict0rsch/ntfy-wrapper/.ntfy.conf
-
Send a notification from the command-line with
send$ py-ntfy send "hello" --topics frays-errant-acting-huddle --title "This is Victor" --click "https://9gag.com" 🎉 Notification sent to frays-errant-acting-huddle, you@foo.bar
-
Change the default configuration path for any command with the option
--conf-path- Specify a directory
--conf-path path/to/conf/directoryand.ntfy.confwill be created there - Specify a file
--conf-path path/to/file.confand that will be used as a configuration file
- Specify a directory
Todo
- Better readme and doc
- CLI
- Screenshots
-
requeststimeout or non-blocking


Download files
Download the file for your platform. If you're not sure which to choose, learn more about installing packages.
Source Distribution
Built Distribution
Filter files by name, interpreter, ABI, and platform.
If you're not sure about the file name format, learn more about wheel file names.
Copy a direct link to the current filters
File details
Details for the file ntfy_wrapper-0.1.7.tar.gz.
File metadata
- Download URL: ntfy_wrapper-0.1.7.tar.gz
- Upload date:
- Size: 19.4 kB
- Tags: Source
- Uploaded using Trusted Publishing? No
- Uploaded via: poetry/1.2.2 CPython/3.9.2 Darwin/21.2.0
File hashes
| Algorithm | Hash digest | |
|---|---|---|
| SHA256 |
073886f4d10fa2f29e93edae2d7fdbacdb2539ba60349ec22fdf01374cbf0643
|
|
| MD5 |
4da50caee981257c42e1d34f45fb6468
|
|
| BLAKE2b-256 |
ab9a9c8f74dee2e6d2ac5071fcc8d43119ec14aaeb40dc4cb8e3ac0c824aea9f
|
File details
Details for the file ntfy_wrapper-0.1.7-py3-none-any.whl.
File metadata
- Download URL: ntfy_wrapper-0.1.7-py3-none-any.whl
- Upload date:
- Size: 16.8 kB
- Tags: Python 3
- Uploaded using Trusted Publishing? No
- Uploaded via: poetry/1.2.2 CPython/3.9.2 Darwin/21.2.0
File hashes
| Algorithm | Hash digest | |
|---|---|---|
| SHA256 |
9bcd2a24d2577f7cffae92ccf15eeee1c1ec9ea2184746740e0f8a9a2beeeaae
|
|
| MD5 |
b565fed23cafbe50f0190ccd31a8498b
|
|
| BLAKE2b-256 |
218f18156909cfe306af0b867aec4aa1d229bdb183fca3545f7c0b7b8b2f3207
|


