Python library to interface with Bot'n Roll One A+

Project description
Python library to interface with Bot'n Roll One A+ (for Raspberry Pi 5)
Welcome to the Bot'n Roll One A+ Pyhton library!
This library enables seamless control of the Bot'n Roll One A+, allowing you to quickly program and interact with your Bot'n Roll One A+.
Please check the available documentation at: https://botnroll.github.io/bnronepi/
About
The Bot'n Roll One A+ is a versatile and customizable robot designed for students, hobbyists, and educators. With its robust hardware and software capabilities, it is an excellent tool for learning and experimenting with robotics and Arduino programming.

Features
- Easy integration with Arduino® IDE, Raspberry Pi® 5, Open Roberta® Lab, Matlab Simulink® and others.
- Provides functions to control motors, sensors, and other peripherals.
- Full documentation and support provided.
Installation
bnronepi
Python library to interface with Bot'n Roll One A+.
1. Installation:
1.1. Setup Raspberry Pi:
If you already have a Raspberry Pi setup with SPI and I2C enabled please skip to step 1.2.
- Download Raspberry Pi Imager https://www.raspberrypi.com/software/
- Using the Imager install Raspberry PI OS (32 bit) in a micro sd card (64Gb)
- Put the micro sd card into the Raspberry Pi socket
- Boot up the Raspberry Pi
- Follow the on screen instructions to setup your desktop
- Enable SPI and I2C interface
- Open a terminal (CTR+ALT+T) and run “sudo raspi-config”
- Use the down arrow to select “Interfacing Options”
- Arrow down to SPI.
- Select yes when it asks you to enable SPI,
- Repeat the process to enable I2C
- Reboot the Raspberry Pi
1.2. Install onepi library:source ~/env/onepi/bin/activate
You can chose to install the onepi library by following one of the two options listed below.
1.2.1 Install using pip (option 1):
pip3 install onepi
1.2.1 Install form github (option 2):
- Open a terminal (CTRL + ALT + T)
- Create a directory to clone the repo: “mkdir src; cd src” source ~/env/onepi/bin/activate3. Download the zip file (https://github.com/botnroll/bnronepi/releases) and extract it into the src directory.
- Navigate to directory “cd bnronepi-release/
- Run:
cd bnronepi-release
python setup.py sdist
pip install .
1.3. Troubleshooting
If you find an error when installing matplotlitb you might need to install the Open Blas library:
sudo apt-get install libopenblas-dev
If installation fails and asks you to create a virtual environment then do:
sudo apt-get install python-full
mkdir ~/env/onepi
python3 -m venv ~/env/onepi
to activate the virtual environment:
source ~/env/onepi/bin/activate
to deactivate
deactivate
Within the virtual environment you can install the external library e.g.
pip install rpi-lgpio
1.4. Verify the installation:
- Create a file “nano test.py”
- Copy and paste the following code:
from onepi.one import BnrOneAPlus
one = BnrOneAPlus(0, 0)  # object variable to control the Bot'n Roll ONE A+
one.stop()  # stop motors
one.lcd1(" Hello Pi! ")  # print data on LCD line 1
- Save (CTRL + O) and exit (CTRL + X)
- Connect the Raspberry PI to BotnRoll ONE.
- Run the example: “python3 test.py”
- The robot lcd should display “Hello Pi!” In the first row.
2. Usage:
Simple example: Displays a message "Hello Pi!" on the robot lcd.
from onepi.one import BnrOneAPlus

one = BnrOneAPlus(0, 0)  # object variable to control the Bot'n Roll ONE A+
one.stop()  # stop motors
one.lcd1(" Hello Pi! ")  # print data on LCD line 1
3. Examples
You can find lots of examples in the examples folder. It contains several complete programs to allow you to take the most out of Bot'n Roll One A+ robot.
All the examples are documented and easy to follow. You can use them as a starting point for your applications.
3.1 basic
The basic folder contains a series of examples for you to interact with the hardware of the Bot'n Roll One A+.
The list includes examples such as:
- battery: displays the battery level and sets the minum value
- buzzer: plays a short tune
- lcd: displays a message using both lines of the lcd
- led: blinks the yellow LED on the robot
- motors: moves the motors in a variety of ways
- push_buttons: reads and displays the button pressed by the user
3.2 advanced
The advanced folder contains a set of examples which are just a bit more advanced relatively to the basic examples. These include:
- compass_calibration: used to calibrate the CMPS11 compass
- ir_sensors: shows how to enable and read ir_sensors for obstacle detection
- motors_calibration: to calibrate the minimum torque for the motors
- start_race_detection: example to detect the start signal for the race of champions challenge (see https://www.roboparty.org).
3.3 extra
The extra folder comtains examples used by extra hardware you may wish to complement your robot with. The examples provided include:
- compass_read: to read bearing, pitch and roll from the CMPS11 compass via I2C bus
- gripper: to control the gripper by using PMW signals
- servos: to control a couple of servos you may wish to attach
- sonar: to read the distance from a sonar HC-SR04 attached to the robot
3.4 line_sensor
Inside the line_sensor folder there are many examples for you to use and learn with.
- 01_sensor_read: reads and displays raw sensor values from the line sensor
- 02_line_follow: simple example showing how to use sensor readings to drive the robot and follow the back line.
- 03_1_line_read_weight: reads and averages the top values read from the line sensor
- 03_2_line_follow_weight: drives the robot to follow a line using average weight from the sensor
- 03_3_line_follow_weight_lin: drives the robot by applying a linear gain
- 04_1_line_calibration: routine to calibrate the line sensor
- 04_2_line_read_linear: displays the sensor reading in the range [-100: 100]
- 04_3_line_follow_linear: drives the robot to follow the line using a linear gain
- 04_4_line_follow_wave: drives the robot to follow the line using a wave control
- 04_5_line_follow_pid: drives the robot to follow the line using a pid controller
3.5 obstacles_sensor
The obstacles_sensor folder contains examples to use for obstacle detection and avoidance, namely:
- 01_emitters_on_off: to turn on/off the ir emitters
- 02_obstacles_read: reads and displays a different value depending on which sensor(s) are detecting obstacles
- 03_obstacles_avoidance: runs the robot by avoiding obstacles
3.6 fun_challenge
Routines useful for the fun challenge (see https://www.roboparty.org).
- fun_challenge_delays: sets a timer to control the duration of the challenge
- start_end_fun_challenge: routines to start timer and stop the robot on timeout
- fun_challenge_state_machine: implements a state machine with different actions for the robot.
4. Tests
The tests folder contains useful routines to test all the public methods of the packet and also for the additional libraries it uses (see utils folder).
4.1 test_onepi
To run all the tests in test_onepi run:
pytest test_onepi.py -s
Optionally you can choose to run individual tests by using the -k option, e.g.
pytest test_onepi.py -s -k test_obstacle_sensors
These tests require you to use the robot and interact with it. Some of them require you to reboot it so it's better if you can just run the individually run the tests you're looking for instead of running them all at once.
4.2 test_line_detector
The test line detector contains a suite of tests to test the public interfaces of the class LineDetector. To run all tests:
pytest test_line_detector.py -s
4.3 test_config
The test config exercises all the public interfaces of the class Config used to store the relevant config values for line detection.
5. Calibration
You should calibrate your robot before using it. This is not mandatory as it comes with working default values but it is always good to run the calibration in order to take the most out of your particular hardware.
5.1 calibrate motors
To calibrate the motors you need to run examples -> advanced -> motors_calibration.py Just place the robot on the floor, run the code and follow the instructions.
5.2 calibrate line sensor
To calibrate the line sensors place the robot on top of a black line making sure the line is in the middle of the sensor to start with. Run the program in examples -> line_sensor -> 04_1_line_calibration.py and follow the instructions. The final configuration is saved in utils -> config.json. In this case you can choose to do a simple or full calibration. The simple calibration only stores the minimum and maximum values for each sensor whereas the full calibration also allows you to chose the threshold and correction factor. For more information please read the description in 04_1_line_calibration.py.
5.3 calibrate compass
If you're using a CMPS11 you should calibrate it using the routine available in examples -> advanced -> compass_calibration.py. Place the robot on a flat surface, making sure it has enough room to rotate on the spot and execute the program following the instructions.
6. Utils
The utils folder contains additional libraries used by onepi.py. These are essential for the normal functioning of the main packet. You should not modify, delete, rename or move these files. Note that the config.json file can be modified directly but that is not recommended. Instead you should use the 04_1_line_calibration routine in the examples -> line_sensor folder.
7. Diagnostics
The diagnostics folder contains useful tools to visualise and diagnose problems.
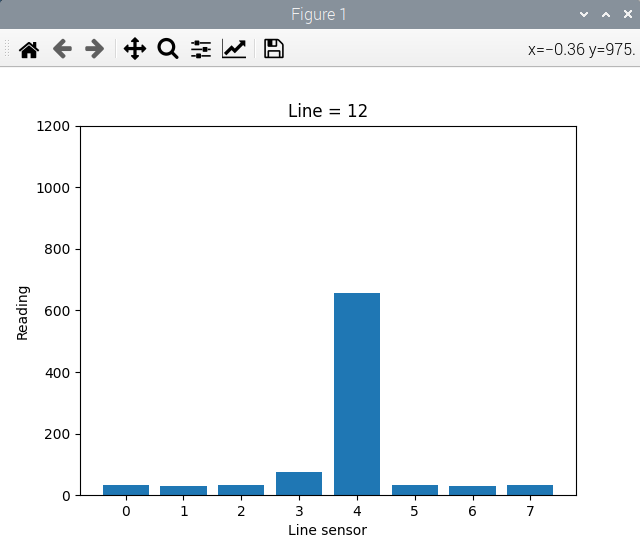
7.1 plot_line_sensor
You can test the line sensor and visualise the raw readings from the sensors in a column type chart. Just place the robot on top of a black line and execute plot_line_sensor.py from the diagnostics folder. In the title you can see the value of the line that gets output from the line_detector.
7.2 simulate_gaussian
The simulate_gaussian program simulates a discretised gaussian reading which emulates the expected raw readings from the sensors. The emulated readings change from the lowest range all the way up to the top range of expected values. It then passes them through the line_detector. We can visualise both the generated sensor readings and the computed line by the line detector in the charted plot.
8. Run at startup
You can run python script at startup. There are several ways to achieve this. Here's one of them:
8.1 Create a folder, copy and rename your python script (e.g. welcome.py)
cd ~ mkdir RunAtStartup copy ~/src/onepi_v1.0.6/examples/basic/welcome.py ~/RunAtStartup/run_at_startup.py
8.2 Add command to ~/.bashrc
nano ~/.bashrc At the end of the file add: python ~/RunAtStartup/run_at_startup.py Save and exit. Reboot and check the execution of the script.
Release history Release notifications | RSS feed


Download files
Download the file for your platform. If you're not sure which to choose, learn more about installing packages.
Source Distribution
Built Distribution
Filter files by name, interpreter, ABI, and platform.
If you're not sure about the file name format, learn more about wheel file names.
Copy a direct link to the current filters
File details
Details for the file onepi-1.1.0.tar.gz.
File metadata
- Download URL: onepi-1.1.0.tar.gz
- Upload date:
- Size: 141.9 kB
- Tags: Source
- Uploaded using Trusted Publishing? No
- Uploaded via: twine/6.1.0 CPython/3.11.9
File hashes
| Algorithm | Hash digest | |
|---|---|---|
| SHA256 |
d0bd70ed9d38f39c079a77399139a5c365b3befd2ac51645fad97b10e94c89be
|
|
| MD5 |
d7b6a0e223c04e9bec8ccc1399156f52
|
|
| BLAKE2b-256 |
073223aa2613a279116c2bd8bd725f547f5746b923b94c8a9467a5c36b4e7b27
|
File details
Details for the file onepi-1.1.0-py3-none-any.whl.
File metadata
- Download URL: onepi-1.1.0-py3-none-any.whl
- Upload date:
- Size: 161.6 kB
- Tags: Python 3
- Uploaded using Trusted Publishing? No
- Uploaded via: twine/6.1.0 CPython/3.11.9
File hashes
| Algorithm | Hash digest | |
|---|---|---|
| SHA256 |
222bbe6181a6521cff748a4349c37645962fdb37631afcfcf0c071dfbf5fad16
|
|
| MD5 |
44ad5912a495d54843382d186bc6283e
|
|
| BLAKE2b-256 |
67a3901da53a4615aa7c6e0f71c98b6e4dc5f567bf2360a4dadbb710c3d950ff
|


