OpenAI Python API

Project description
OpenAI Python API
This package provides a Python API for OpenAI, based on the official API documentation and wraps-up original OpenAI API.


⚠️ Project Status Notice
This project is no longer under active development or maintenance since 2024-04-16. I initially created this package to explore the OpenAI API and its capabilities, but I've decided to discontinue further work on it as I’ve transitioned to using third-party tools that better suit my current needs. That said, I still believe this project has value, and I’d be happy to see it live on in capable hands.
If you're interested in becoming a maintainer or continuing development, feel free to reach out — I'd be glad to pass the torch.
Installation
To install the package, use the package from pypi:
pip install openai_python_api
This package contains API for ChatGPT and DALL-E2, but they not fully covered yet. More functionality will be added in the future.
You need to be registered on OpenAI and have an API key to use this package. You can find your API key on the API tokens page.
ChatGPT
The ChatGPT class is for managing an instance of the ChatGPT model.
Fast start
Here's a basic example of how to use the API:
from openai_python_api import ChatGPT

# Use your API key and any organization you wish
chatgpt = ChatGPT(auth_token='your-auth-token', organization='your-organization', prompt_method=True)
response = chatgpt.str_chat("Hello, my name is John Connor!")
print(response)
This will produce the following output:

Creating personalized a ChatGPT instance
You may need to create a custom ChatGPT instance to use the API. You can do this by passing the following parameters to the ChatGPT constructor:
model(str): The name of the model, Default is 'gpt-4'. List of models you can find in models.py or here.temperature(float, optional): The temperature of the model's output. Default is 1.top_p(float, optional): The top-p value for nucleus sampling. Default is 1.stream(bool, optional): If True, the model will return intermediate results. Default is False.stop(str, optional): The stop sequence at which the model should stop generating further tokens. Default is None.max_tokens(int, optional): The maximum number of tokens in the output. Default is 1024.presence_penalty(float, optional): The penalty for new token presence. Default is 0.frequency_penalty(float, optional): The penalty for token frequency. Default is 0.logit_bias(map, optional): The bias for the logits before sampling. Default is None.history_length(int, optional): Length of history. Default is 5.prompt_method(bool, optional): prompt method. Use messages if False, otherwise - prompt. Default if False.system_settings(str, optional): general instructions for chat. Default is None.
Most of these params reflects OpenAI model parameters. You can find more information about them in the OpenAI API documentation. If you need to get/change them, just use it directly via chatgpt.model.temperature = 0.5 or current_temperature = chatgpt.model.temperature.
But several params are specific for this API: prompt_method is stub to use direct input to model without usage of "messages" and managing/storing them. It might be an option if you need to trigger chat only once, or you don't need to pass extra messages and instructions to chat. system_settings is used to store bot global instructions, like how to behave, how to act and format output. Refer to Best practices. history_length is used to store history of messages. It's used to pass messages to model in a single request. Default is 5, but you can change it if you need to store more messages. More you pass, more expensive request will be.
chatgpt = ChatGPT(auth_token='your-auth-token', organization='your-organization',
                  model='chatgpt3.5', history_length=10)
chatgpt.model.temperature = 0.5
chatgpt.model.top_p = 0.9
Here is a difference between prompt_method=True and prompt_method=False wih message history:
Managing chats
If you plan to use several users or chats, you can use next params while creating ChatGPT instance or set them later. Parameters are:
user(str, optional): The user ID. Default is ''. This field is used to identify global user model. Usually, it's a master of the ChatGPT instance.current_chat(str, optional): Default chat will be used. Default is None. This field is used to identify current chat. If user uses some chat, or it's not created yet, it will be created and stored into this value.chats(dict, optional): Chats dictionary, contains all chats. Default is None. It's placeholder for all chats. You can set this value to any dict to restore, replace or flush chat history for ChatGPT instance.
So, in general, you can use ChatGPT instance as a chatbot for one user, or as a chatbot for several users. If you need to use it as a chatbot for several users, you need to create a ChatGPT instance for each user and store it somewhere. You can use chats parameter to store all chats in one place, or you can store them in a database, or you can store them in a file. It's up to you.
Obtaining enhanced responses
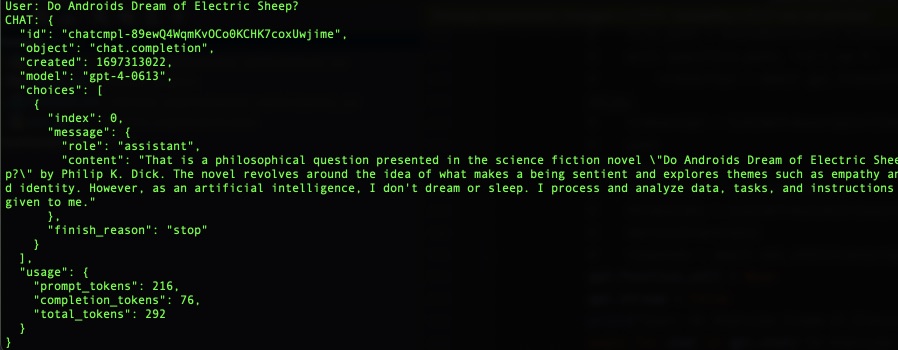
In most cases you need to get a response from the model as string (which you can use directly or format in your frontend). But in some rare cases you may need to get raw answer from the model. In this case you can use process_chat method. It returns a ChatCompletion object, which contains all information about the model's response. You can use it to get raw response, or you can use it to get formatted response. Moreover, it's an only way to obtain several choices at once (i.e. you need 4 different answers from the model).
chatgpt = ChatGPT(auth_token='your-auth-token', organization='your-organization', choices=4)
chatgpt.chat({"role": "user", "content": "Do Androids Dream of Electric Sheep?"})
chatgpt.process_chat({"role": "user", "content": "What use was time to those who'd soon achieve Digital Immortality?"})
Service methods
Fore some reasons you may use ChatGPT instance to transcribe audiofile into text or translate text to English.
# you may use response_format with following values: json, text, srt, verbose_json, or vtt. Default is text.
transcripted_string = chatgpt.transcript('audiofile.mp3', language='russian', response_format='text')
translated_string = chatgpt.translate(transcripted_string, response_format='json')

For details refer to OpenAI API documentation for Audio topic.
Store data
You also may need to store your settings and chats. You may use following methods:
settings = chatgpt.dump_settings()  # dumps ChatGPT settings to JSON
chats = chatgpt.dump_chats()  # dumps all chats to JSON
chat = chatgpt.dump_chat('my_secure_chat')  # dumps chat to JSON
Using functions
To empower your ChatGPT you may want to use functions. Functions are a way to extend the functionality of the model. You can use functions to get some data from the model, or to change the model's behavior. To use them you need to pass several parameters to the ChatGPT constructor or it's attributes:
gpt_functions = [{
            "name": "get_current_weather",
            "description": "Get the current weather in a given location",
            "parameters": {
                "type": "object",
                "properties": {
                    "location": {
                        "type": "string",
                        "description": "The city and state, e.g. San Francisco, CA",
                    },
                    "unit": {"type": "string", "enum": ["celsius", "fahrenheit"]},
                },
                "required": ["location"],
            },
        },]
chatgpt.functions = gpt_functions
chatgpt.function_dict = {"get_current_weather": obtain_weather}  # this is your function somewhere in your code
chatgpt.function_call = "auto"  # none to disable or use dict like {"name": "my_function"} to call them manually
Now, when you're going to asking the ChatGPT about something, it will return related info using your function.

For details refer to OpenAI API documentation for functions or to mine article (as example usage).
DALL-E
The DALLE class is for managing an instance of the DALL-E models. You can generate or edit images using this class.
Fast start
Here's a basic example of how to use the API:
from openai_python_api import DALLE

# Use your API key and any organization you wish
dalle = DALLE(auth_token='your-auth-token', organization='your-organization')
images = dalle.create_image_url("cybernetic cat")  # will return list of urls to images

Creating personalized DALL-E instance
You may need to create a custom DALL-E instance to use the API. You can do this by passing the following parameters to the DALLE constructor or just set them later:
default_count(int): Default count of images to produce. Default is 1.default_size(str): Default dimensions for output images. Default is "512x512". "256x256" and "1024x1024" as option.default_file_format(str): Default file format. Optional. Default is 'PNG'.user(str, optional): The user ID. Default is ''.
dalle = DALLE(auth_token='your-auth-token', organization='your-organization',
              default_count=3, default_size="256x256")
dalle.default_file_format = 'JPG'
Methods
You can use following methods to generate images:
image_bytes = dalle.create_image("robocop")  # will return list of images (dict format).
image_dict = dalle.create_image_data("night city")  # will return list of images (bytes format).
You can save bytes image to file:
# if file format is None, it will be taken from class attribute
image_file = dalle.save_image(image = image_bytes, filename="night_city", file_format=None) # will return filename

You can use following methods to edit images:
with open("robocop.jpg", "rb") as image_file:
    with open("mask.png", "rb") as mask_file:
    edited_image1 = dalle.edit_image_from_file(file=image_file,
                                               prompt="change color to pink",
                                               mask=mask_file)  # return of bytes format
# or use url
edited_image2 = dalle.edit_image_from_url(url=night_city_url,
                                          mask_url=mask_image_url,
                                          prompt="make it daylight")  # return of bytes format
You can use following methods to create variations of images:
with open("robocop.jpg", "rb") as image_file:
    variated_image1 = dalle.create_variation_from_file(file=image_file)  # return of bytes format
# or use url
variated_image2 = dalle.create_variation_from_url(url=night_city_url)  # return of bytes format


Additional notes
Currently, library supports only asynchronous requests. It means that you need to wait for response from the model. It might take some time, so you need to be patient. In the future, we will add support for synchronous requests.
This means you must use async/await syntax to call the API. For example:
import asyncio
from openai_api import ChatGPT

async def main():
    chatgpt = ChatGPT(auth_token='your-auth-token', organization='your-organization')
    response = await chatgpt.str_chat("What are the 3 rules of AI?")
    print(response)

asyncio.run(main())
Please refer to the asyncio documentation for more information. And to my article about TTS/transcriptors for researching against possible pitfalls.
Contributing
We welcome contributions! Please see our Contributing Guidelines for more details.
License
This project is licensed under the MIT License - see the LICENSE file for details.
Donations
If you like this project, you can support it by donating via DonationAlerts.


Download files
Download the file for your platform. If you're not sure which to choose, learn more about installing packages.
Source Distribution
Built Distribution
Filter files by name, interpreter, ABI, and platform.
If you're not sure about the file name format, learn more about wheel file names.
Copy a direct link to the current filters
File details
Details for the file openai_python_api-0.1.0.tar.gz.
File metadata
- Download URL: openai_python_api-0.1.0.tar.gz
- Upload date:
- Size: 23.9 kB
- Tags: Source
- Uploaded using Trusted Publishing? No
- Uploaded via: twine/6.1.0 CPython/3.12.9
File hashes
| Algorithm | Hash digest | |
|---|---|---|
| SHA256 |
dbcb558407f59909d6eb012525405f098c924c79db0e8703eebc9e0c96e664af
|
|
| MD5 |
eb312d8c7e2aedba932df9280f407aee
|
|
| BLAKE2b-256 |
5ba070b394249a94683b8ee17150c635987a3bae4d2f3115fcfb1b1c158fc1b3
|
File details
Details for the file openai_python_api-0.1.0-py3-none-any.whl.
File metadata
- Download URL: openai_python_api-0.1.0-py3-none-any.whl
- Upload date:
- Size: 20.4 kB
- Tags: Python 3
- Uploaded using Trusted Publishing? No
- Uploaded via: twine/6.1.0 CPython/3.12.9
File hashes
| Algorithm | Hash digest | |
|---|---|---|
| SHA256 |
8d312fa9f0af6329ddfbd7ad5422f97fd9e0091c7c134532eb7ad797485af301
|
|
| MD5 |
53b2f0f59a0f612c9f215fdf97d79496
|
|
| BLAKE2b-256 |
11c2aec14d3236a5b69a419fc9025c5a527c514ee75d7d183eb50ae574db6f62
|


