
OSpRad
An open source, low cost, high sensitivity spectroradiometer. Built around the Hamamatsu C12880MA chip. Covers roughly 310 to 880 nm at about 9 nm resolution, with tested sensitivity down to ~0.001 cd/sqm (radiance) and ~0.005 lx (irradiance).
A heavily modified fork of OSpRad. Free software under GPL 3.0, without warranty of any kind. See License and credits.
This repository holds the STL files for the housing, the Arduino Nano firmware, and a Python app for Windows, macOS, Linux, and Android.
Get the app
Prebuilt binaries are attached to each release:
| File | Platform |
|---|---|
OSpRad-<version>-windows-x64.exe |
Windows |
OSpRad-<version>-macos.zip |
macOS (unzip to get OSpRad.app) |
OSpRad-<version>-linux-x86_64.AppImage |
Linux (chmod +x, then run) |
OSpRad-<version>-linux-x86_64.tar.gz |
Linux without FUSE (extract, run OSpRad/OSpRad) |
OSpRad-<version>-android-arm64.apk |
Android (sideload) |
osprad-<version>-py3-none-any.whl |
Any (pip install osprad) |
Or install from PyPI:
pip install osprad
Or run from a source checkout:
pip install -r app/requirements.txt
python app/OSpRad.py
The app writes data.csv next to itself (or, for a pip install, to a per user
directory like ~/.local/share/OSpRad). Keep app/*.py together with the
calibration_data.csv they ship with.
Use the app
Plug the OSpRad in over USB (which also powers it) and launch the app. On Windows you may need to install a driver for the Nano's USB serial chip (CH340 or FTDI, depending on the clone) if it does not show up in Device Manager.
The main tab holds three modes, one open at a time. Measurement for a single Radiance or Irradiance reading, Continuous mode for a live, refreshing plot, and Automatic repeat to save a measurement every N seconds. Opening one folds the others away; the exposure, scan count, and label controls below follow whichever is open, so only the options that mode uses are on screen. A running mode keeps its section open until it is stopped.
The shutter wheel is left closed whenever the OSpRad is idle. Every ordinary measurement ends that way by itself, since its last act is the block of dark scans; a continuous run and a cancelled measurement are parked once the link is free.
Continuous mode is best for aiming the unit at a source and watching the spectrum follow what you point at. Nothing is saved to history. While it runs it borrows the measurement settings: one scan per update, and an exposure it picks and holds unless you have fixed one yourself. Your settings come back when it stops.
Holding the exposure is what makes it quick. Firmware 1.0.0 or newer refreshes the plot in fractions of a second by reusing the dark reference between updates, but only while the exposure and scan count stay put, so an integration time left on 0 (auto) would re exposure ramp every update and undo it. Expect a couple of slow updates whenever it re exposes for a much brighter or darker target, and one pair of wheel movements every 30s, where the app re references the dark to follow the sensor warming up. On older firmware every update re takes a dark, which costs seconds and is mostly fine but noticeably slower.
Hold dark reference stops that periodic re reference, so with one mode ticked the wheel moves only to take the first dark and then stays still for the rest of the run: once if it is already on the dark position (which it is straight after any Radiance or Irradiance measurement), twice from anywhere else, and three times at integration time 0, since choosing an exposure means looking at the scene first. It is for demonstrating and nothing else. The dark offset grows as the sensor warms, so a held one under subtracts and the spectrum reads gradually too high, worst at long exposures and on dim targets. The exposure is held with it, since a dark reading is only good for the exposure it was taken at and re exposing would mean moving the wheel to re measure it: point at something much brighter and the spectrum clips flat, point at something much darker and it sinks into the noise, and neither recovers until you untick the box. Readings taken while the dark was held cannot be saved to the history.
The app and firmware are released together and must share a major version
(currently 1.x). If connecting reports an unexpected reply, reflash. data.csv
files written by the original upstream 1.x app are not readable; the column
layout changed when the firmware gained the framed reply protocol.
Build one
Parts
- Hamamatsu C12880MA chip
- 3D printed housing (black PLA or ABS; not PET, which is IR transparent)
- Arduino Nano
- Cosine corrector: 8 mm diameter, 0.5 mm thick virgin PTFE, sanded circularly with 180 grit
- Digital micro servo (Savox SH 0256 recommended)
- A short USB cable (something like USB C to USB A female + USB A to USB mini works on a phone)
- Solder and thin wire (10 cm lengths stripped from an old Ethernet cable are ideal)
- UV curing glue for the PTFE diffuser
- Optional: a fused silica cover slip or UV transmitting PMMA disk for protection
Print and assemble
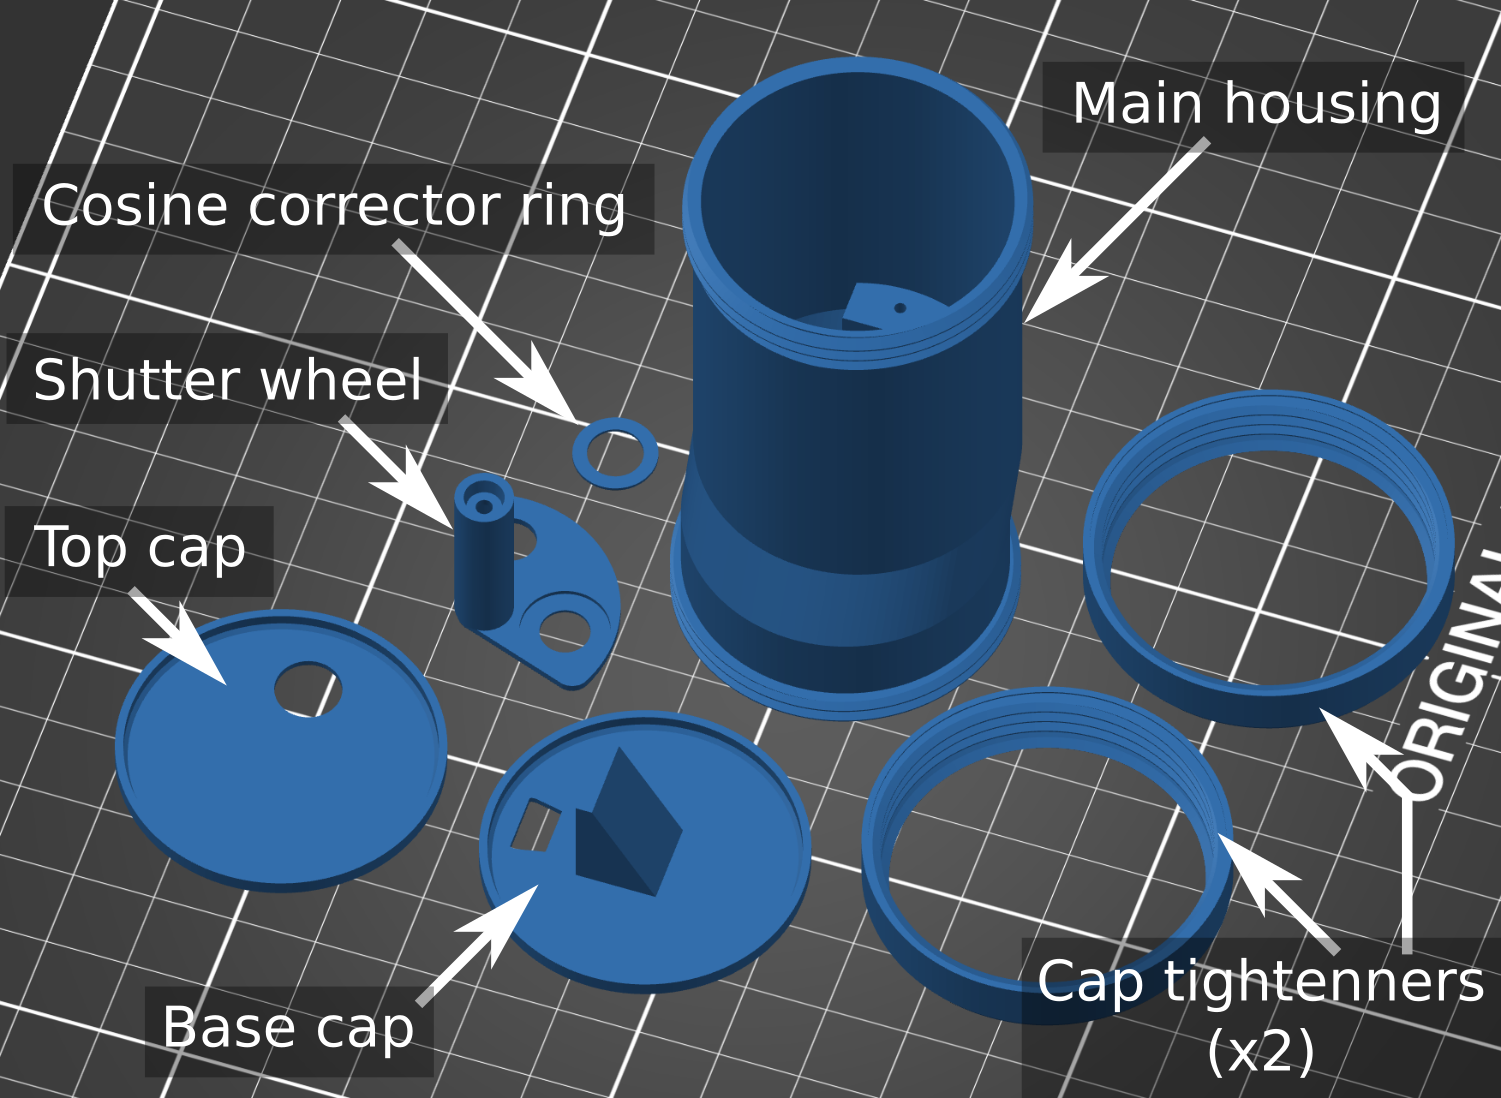
The 3D printed parts need filing and sanding for a snug fit. File the shutter wheel shaft smooth and circular, enlarge the housing hole with a circular file until the shaft rotates without play, and warm the shaft end with a heat gun or lighter flame to press fit it onto the servo while the plastic is flexible.
Wire it up
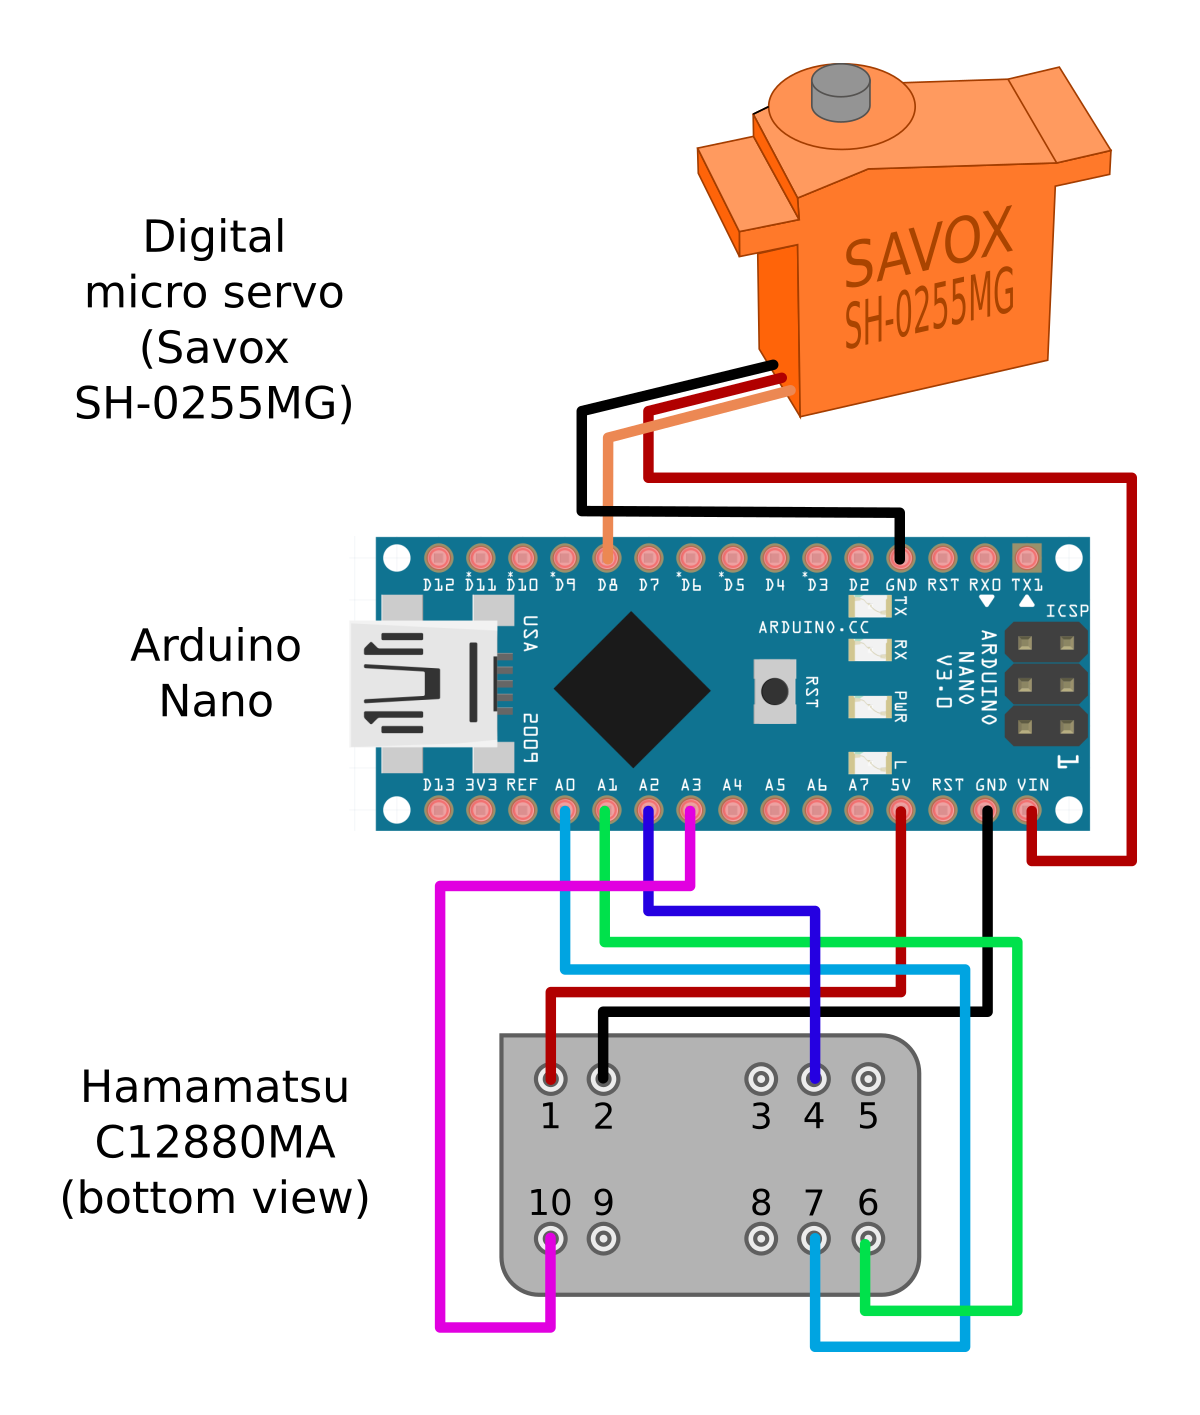
Use separate 5 V supplies for the servo and spectrometer chip. The VIN pin suffers a voltage drop from its protective diode, leaving it just a touch under what the spectrometer needs for stable operation.
Flash and set up
Open firmware/OSpRad_firmware/ in the Arduino IDE and flash it to the Nano. The
unit number and wheel positions live in EEPROM and are set from the app, so the
same firmware goes on every unit. Each unit only needs flashing once.
- Flash, connect over USB, and launch the app.
- Calibration → Import & export: enter the unit number (each unit needs its own ID to look up its calibration data) and press Save to unit.
- Unit & wheel setup: move the wheel to 90 degrees with the slider, remove it from the servo at that central position, and re attach it as close to "closed" as possible.
- Jog the slider (or the +/- buttons) to find each position in turn. Press Set as Dark, Set as Irradiance, and Set as Radiance as each one lines up.
Calibrate it
Each unit's calibration lives in calibration_data.csv, four comma delimited
rows per unit, keyed by the unit number in the first column.
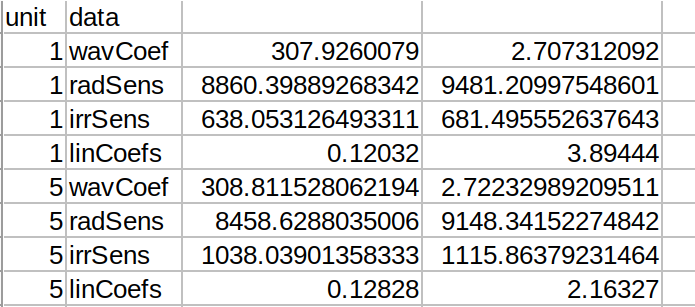
The Calibration tab in the app covers most of this and writes straight into the CSV:
- Linearisation fits linCoefs from one steady source (daylight or incandescent; most LED and fluorescent lighting flickers). The coefficients set the overall scale, so re derive or rescale the spectral sensitivity afterwards.
- Spectral sensitivity: load a 288 value curve from a file, rescale against one known reading, or derive a new one from a reference spectrum. Nothing is written until Save.
- Import & export saves or restores a unit's whole calibration (CSV plus wheel positions on the Arduino) as one JSON file. Tick boxes select what to include; an import merges into the unit rather than replacing it.
The spreadsheets in calibration/ document the full derivation for reference.
Calibrate a monitor
Monitor calibration steps a fullscreen patch through black, then through a
ladder of levels for each of red, green, and blue, measuring the spectrum at
every step (point the unit at the screen in Radiance mode). Export for
Psychtoolbox... writes a fitted PsychCal .mat file that loads with
cal = LoadCalFile(...), no MATLAB side step needed. See
monitor_calibration.py's header for the model and
tone curve choices; cal.describe.gamma.fitType says OSpRad pchip so the
difference from PTB's pipeline is visible rather than implied away.
Calibrate in as dark a room as practical. The tab measures one black screen ambient, but the OSpRad's dark frame subtraction handles sensor noise, not room ambient.
For developers
The Python app lives in app/, the Arduino sketch in firmware/, and the build
scripts in packaging/. Desktop builds use PyInstaller; Windows and macOS must
be built on their own OS, since PyInstaller does not cross compile. Android
builds use pyside6-android-deploy and take 20 to 40+ minutes on a clean
checkout.
[.github/workflows/package.yml](.github/workflows/package.yml) runs the checks,
builds every platform, attaches the artifacts to a GitHub Release, and publishes
the wheel to PyPI.
License and credits
OSpRad is free software under the GNU General Public License v3.0 (see LICENSE),
and comes with no warranty of any kind.
Original OSpRad by Jolyon Troscianko, 2022 (troscianko/OSpRad). This repository is a fork that has since been heavily modified (2026).
1 maintainer

Download files
Download the file for your platform. If you're not sure which to choose, learn more about installing packages.
Source Distribution
Built Distribution
Filter files by name, interpreter, ABI, and platform.
If you're not sure about the file name format, learn more about wheel file names.
Copy a direct link to the current filters
File details
Details for the file osprad-1.0.0.tar.gz.
File metadata
- Download URL: osprad-1.0.0.tar.gz
- Upload date:
- Size: 126.0 kB
- Tags: Source
- Uploaded using Trusted Publishing? Yes
- Uploaded via:
twine/7.0.0 CPython/3.13.14
File hashes
| Algorithm | Hash digest | |
|---|---|---|
| SHA256 |
102caf1bb07e11e8d8dbc5d3c9eba4d139e0e1ab29dea0275f6c45638a138f45
|
|
| MD5 |
612d5d69ceeb887b3a53ac21bf54e2a1
|
|
| BLAKE2b-256 |
ad17ea9e421cfca262dbb4d01b1ef4efbd59e1b47a58099c07ba41d5bd4b45ee
|
Provenance
The following attestation bundles were made for osprad-1.0.0.tar.gz:
Publisher:
package.yml on wieluk/OSpRad
-
Statement:
-
Statement type:
https://in-toto.io/Statement/v1 -
Predicate type:
https://docs.pypi.org/attestations/publish/v1 -
Subject name:
osprad-1.0.0.tar.gz -
Subject digest:
102caf1bb07e11e8d8dbc5d3c9eba4d139e0e1ab29dea0275f6c45638a138f45 - Sigstore transparency entry: 2624093774
- Sigstore integration time:
-
Permalink:
wieluk/OSpRad@05f260257c922bc6fc4f86e8a76cda95377dd3f3 -
Branch / Tag:
refs/tags/v1.0.0 - Owner: https://github.com/wieluk
-
Access:
public
-
Token Issuer:
https://token.actions.githubusercontent.com -
Runner Environment:
github-hosted -
Publication workflow:
package.yml@05f260257c922bc6fc4f86e8a76cda95377dd3f3 -
Trigger Event:
push
-
Statement type:
File details
Details for the file osprad-1.0.0-py3-none-any.whl.
File metadata
- Download URL: osprad-1.0.0-py3-none-any.whl
- Upload date:
- Size: 129.7 kB
- Tags: Python 3
- Uploaded using Trusted Publishing? Yes
- Uploaded via:
twine/7.0.0 CPython/3.13.14
File hashes
| Algorithm | Hash digest | |
|---|---|---|
| SHA256 |
df7434122d6d777db4e71b76272d6179c901538581a5df9c0b37e14b448e0cc4
|
|
| MD5 |
7f3cbdf1e760e5abfc2f3515e393a596
|
|
| BLAKE2b-256 |
606d543f03a7844b34a3e225218dc8f44b73d13afaa1d8fd124bd05260a4ee26
|
Provenance
The following attestation bundles were made for osprad-1.0.0-py3-none-any.whl:
Publisher:
package.yml on wieluk/OSpRad
-
Statement:
-
Statement type:
https://in-toto.io/Statement/v1 -
Predicate type:
https://docs.pypi.org/attestations/publish/v1 -
Subject name:
osprad-1.0.0-py3-none-any.whl -
Subject digest:
df7434122d6d777db4e71b76272d6179c901538581a5df9c0b37e14b448e0cc4 - Sigstore transparency entry: 2624093840
- Sigstore integration time:
-
Permalink:
wieluk/OSpRad@05f260257c922bc6fc4f86e8a76cda95377dd3f3 -
Branch / Tag:
refs/tags/v1.0.0 - Owner: https://github.com/wieluk
-
Access:
public
-
Token Issuer:
https://token.actions.githubusercontent.com -
Runner Environment:
github-hosted -
Publication workflow:
package.yml@05f260257c922bc6fc4f86e8a76cda95377dd3f3 -
Trigger Event:
push
-
Statement type:













