
Oxigraph CLI





Oxigraph CLI is a graph database implementing the SPARQL standard. It is packaged as a command-line tool allowing to manipulate RDF files, query them using SPARQL... It also allows spawning an HTTP server on top of the database.
Oxigraph is in heavy development, and SPARQL query evaluation has not been optimized yet.
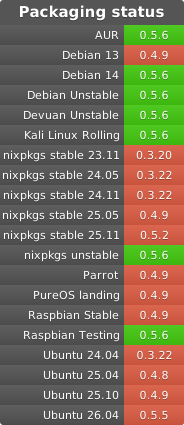
Oxigraph provides different installation methods for Oxigraph CLI:
cargo install(multiplatform)- A Docker image
- A Pypi package: with UV just run
uvx oxigraph - A conda-forge package
- Pre-built binaries
It is also usable as a Rust library and as a Python library.
Oxigraph implements the following specifications:
- SPARQL 1.1 Query, SPARQL 1.1 Update, and SPARQL 1.1 Federated Query.
- Turtle, TriG, N-Triples, N-Quads, and RDF/XML RDF serialization formats for both data ingestion and retrieval.
- SPARQL Query Results XML Format, SPARQL 1.1 Query Results JSON Format and SPARQL 1.1 Query Results CSV and TSV Formats.
- SPARQL 1.1 Protocol and SPARQL 1.1 Graph Store HTTP Protocol.
A preliminary benchmark is provided.
Note that Oxigraph CLI was previously named Oxigraph Server before version 0.4. Older versions are available under this name.
Installation
You need to have a recent stable version of Rust and Cargo installed as well as Clang for the RocksDB Rust bindings.
To download, build, and install the latest released version run cargo install oxigraph-cli.
There is no need to clone the git repository.
To compile the command-line tool from source, clone this git repository including its submodules (git clone --recursive https://github.com/oxigraph/oxigraph.git), and execute cargo build --release in the cli directory to compile the full binary after having downloaded its dependencies.
It will create a fat binary in target/release/oxigraph.
Some build options (cargo features) are available:
rocksdb-pkg-config: links against an already compiled rocksdb shared library found using pkg-config.native-tls: Enables Oxigraph HTTP client for query federation using the host OS TLS stack (enabled by default).rustls-nativeEnables Oxigraph HTTP client for query federation using Rustls and the native certificates.rustls-webpkiEnables Oxigraph HTTP client for query federation using Rustls and the Common CA Database certificates.
Usage
Run oxigraph serve --location my_data_storage_directory to start the server where my_data_storage_directory is the directory where you want Oxigraph data to be stored. It listens by default on localhost:7878.
The server provides an HTML UI, based on YASGUI, with a form to execute SPARQL requests.
It provides the following REST actions:
/queryallows evaluating SPARQL queries against the server repository following the SPARQL 1.1 Protocol. For example:curl -X POST -H 'Content-Type:application/sparql-query' \ --data 'SELECT * WHERE { ?s ?p ?o } LIMIT 10' http://localhost:7878/query
This action supports content negotiation and could return Turtle, N-Triples, RDF/XML, SPARQL Query Results XML Format and SPARQL Query Results JSON Format./updateallows to execute SPARQL updates against the server repository following the SPARQL 1.1 Protocol. For example:curl -X POST -H 'Content-Type: application/sparql-update' \ --data 'DELETE WHERE { <http://example.com/s> ?p ?o }' http://localhost:7878/update
/sparqlallows both SPARQL queries and update (see it as the union of/queryand/update)./storeallows to retrieve and change the server content using the SPARQL 1.1 Graph Store HTTP Protocol. For example:curl -f -X POST -H 'Content-Type:application/n-triples' \ -T MY_FILE.nt "http://localhost:7878/store?graph=http://example.com/g"
will add the N-Triples fileMY_FILE.ntto the server dataset inside of thehttp://example.com/gnamed graph. Turtle, N-Triples and RDF/XML are supported. It is also possible toPOST,PUTandGETthe complete RDF dataset on the server using RDF dataset formats (TriG and N-Quads) against the/storeendpoint. For example:curl -f -X POST -H 'Content-Type:application/n-quads' \ -T MY_FILE.nq http://localhost:7878/store
will add the N-Quads fileMY_FILE.nqto the server dataset.
Use oxigraph --help to see the possible options when starting the server.
It is also possible to load RDF data offline using bulk loading:
oxigraph load --location my_data_storage_directory --file my_file.nq
Using a Docker image
Display the help menu
docker run --rm ghcr.io/oxigraph/oxigraph --help
Run the Webserver
Expose the server on port 7878 of the host machine, and save data on the local ./data folder
docker run --rm -v $PWD/data:/data -p 7878:7878 ghcr.io/oxigraph/oxigraph serve --location /data --bind 0.0.0.0:7878
You can then access it from your machine on port 7878:
# Open the GUI in a browser
firefox http://localhost:7878

# Post some data
curl http://localhost:7878/store?default -H 'Content-Type: text/turtle' -T ./data.ttl

# Make a query
curl -X POST -H 'Accept: application/sparql-results+json' -H 'Content-Type: application/sparql-query' --data 'SELECT * WHERE { ?s ?p ?o } LIMIT 10' http://localhost:7878/query

# Make an UPDATE
curl -X POST -H 'Content-Type: application/sparql-update' --data 'DELETE WHERE { <http://example.com/s> ?p ?o }' http://localhost:7878/update
Run the Web server with basic authentication
It can be useful to make Oxigraph SPARQL endpoint available publicly, with a layer of authentication on /update to be able to add data.
You can do so by using a nginx basic authentication in an additional docker container with docker-compose. First create a nginx.conf file:
daemon off;
events {
    worker_connections  1024;
}
http {
    server {
        server_name localhost;
        listen 7878;
        rewrite ^/(.*) /$1 break;
        proxy_ignore_client_abort on;
        proxy_set_header  X-Real-IP  $remote_addr;
        proxy_set_header  X-Forwarded-For $proxy_add_x_forwarded_for;
        proxy_set_header  Host $http_host;
        proxy_set_header Access-Control-Allow-Origin "*";
        location ~ ^(/|/query)$ {
            proxy_pass http://oxigraph:7878;
            proxy_pass_request_headers on;
        }
        location ~ ^(/update|/store)$ {
            auth_basic "Oxigraph Administrator's Area";
            auth_basic_user_file /etc/nginx/.htpasswd;
            proxy_pass http://oxigraph:7878;
            proxy_pass_request_headers on;
        }
    }
}
Then a docker-compose.yml in the same folder, you can change the default user and password in the environment section:
version: "3"
services:
  oxigraph:
    image: ghcr.io/oxigraph/oxigraph:latest
    ## To build from local source code:
    # build:
    #   context: .
    #   dockerfile: cli/Dockerfile
    volumes:
      - ./data:/data

  nginx-auth:
    image: nginx:1.21.4
    environment:
      - OXIGRAPH_USER=oxigraph
      - OXIGRAPH_PASSWORD=oxigraphy
    volumes:
      - ./nginx.conf:/etc/nginx/nginx.conf
      ## For multiple users: uncomment this line to mount a pre-generated .htpasswd
      # - ./.htpasswd:/etc/nginx/.htpasswd
    ports:
      - "7878:7878"
    entrypoint: "bash -c 'echo -n $OXIGRAPH_USER: >> /etc/nginx/.htpasswd && echo $OXIGRAPH_PASSWORD | openssl passwd -stdin -apr1 >> /etc/nginx/.htpasswd && /docker-entrypoint.sh nginx'"
Once the docker-compose.yaml and nginx.conf are ready, start the Oxigraph server and nginx proxy for authentication on http://localhost:7878:
docker-compose up
Then it is possible to update the graph using basic authentication mechanisms. For example with curl: change $OXIGRAPH_USER and $OXIGRAPH_PASSWORD, or set them as environment variables, then run this command to insert a simple triple:
curl -X POST -u $OXIGRAPH_USER:$OXIGRAPH_PASSWORD -H 'Content-Type: application/sparql-update' --data 'INSERT DATA { <http://example.com/s> <http://example.com/p> <http://example.com/o> }' http://localhost:7878/update
In case you want to have multiple users, you can comment the entrypoint: line in the docker-compose.yml file, uncomment the .htpasswd volume, then generate each user in the .htpasswd file with this command:
htpasswd -Bbn $OXIGRAPH_USER $OXIGRAPH_PASSWORD >> .htpasswd
Build the image
You could easily build your own Docker image by cloning this repository with its submodules, and going to the root folder:
git clone --recursive https://github.com/oxigraph/oxigraph.git
cd oxigraph
Then run this command to build the image locally:
docker build -t ghcr.io/oxigraph/oxigraph -f cli/Dockerfile .
Systemd
It is possible to run Oxigraph in the background using systemd.
For that, you can use the following oxigraph.service file (it might be inserted into /etc/systemd/system/ or $HOME/.config/systemd/user):
[Unit]
Description=Oxigraph database server
After=network-online.target
Wants=network-online.target

[Service]
Type=notify
ExecStart=/PATH/TO/oxigraph serve --location /PATH/TO/OXIGRAPH/DATA

[Install]
WantedBy=multi-user.target
Man pages and autocompletion
Autocompletion for various shells are generated on build in the target/{debug,release}/build/oxigraph-cli-<hash>/out/complete directory.
Similarly, man pages are generated in the target/{debug,release}/build/oxigraph-cli-<hash>/out/man directory.
Migration guide
From 0.2 to 0.3
- The cli API has been completely rewritten. To start the server run
oxigraph serve --location MY_STORAGEinstead ofoxigraph --file MY_STORAGE. - Fast data bulk loading is now supported using
oxigraph load --location MY_STORAGE --file MY_FILE. The file format is guessed from the extension (.nt,.ttl,.nq, ...). - RDF-star is now implemented.
- All operations are now transactional using the "repeatable read" isolation level: the store only exposes changes that have been "committed" (i.e. no partial writes) and the exposed state does not change for the complete duration of a read operation (e.g. a SPARQL query) or a read/write operation (e.g. a SPARQL update).
Help
Feel free to use GitHub discussions or the Gitter chat to ask questions or talk about Oxigraph. Bug reports are also very welcome.
If you need advanced support or are willing to pay to get some extra features, feel free to reach out to Tpt.
License
This project is licensed under either of
- Apache License, Version 2.0, (LICENSE-APACHE or http://www.apache.org/licenses/LICENSE-2.0)
- MIT license (LICENSE-MIT or http://opensource.org/licenses/MIT)
at your option.
Contribution
Unless you explicitly state otherwise, any contribution intentionally submitted for inclusion in Oxigraph by you, as defined in the Apache-2.0 license, shall be dual licensed as above, without any additional terms or conditions.
1 maintainer

Metadata
1 maintainer
Release files for oxigraph 0.5.10
For a detailed explanation of source distributions (sdists) and built distributions (wheels), please see the package formats documentation.
Source distribution (sdist)
| File | Size | Uploaded | |
|---|---|---|---|
| oxigraph-0.5.10.tar.gz | 6.5 MB | Details |
Built distributions (wheels)
| File | Reset | |||
|---|---|---|---|---|
| oxigraph-0.5.10-py3-none-win_arm64.whl | Python 3 | none | Windows ARM64 | Details |
| oxigraph-0.5.10-py3-none-win_amd64.whl | Python 3 | none | Windows x86-64 | Details |
| oxigraph-0.5.10-py3-none-manylinux_2_28_x86_64.whl | Python 3 | none | Linux glibc 2.28+ x86-64 | Details |
| oxigraph-0.5.10-py3-none-manylinux_2_28_aarch64.whl | Python 3 | none | Linux glibc 2.28+ ARM64 | Details |
| oxigraph-0.5.10-py3-none-macosx_11_0_arm64.whl | Python 3 | none | macOS 11.0+ ARM64 | Details |
| oxigraph-0.5.10-py3-none-macosx_10_14_x86_64.whl | Python 3 | none | macOS 10.14+ x86-64 | Details |
Total release size: 47.7 MB
Release files / oxigraph-0.5.10.tar.gz
| Download URL | oxigraph-0.5.10.tar.gz |
|---|---|
| Size | 6.5 MB |
| Tags | Source |
|
SHA-256 checksum How to use checksums |
faff52266101c4aacea44c7b2da966ecc8b9e1cd6668b87721e77c59b0ab9883
|
|
BLAKE2b-256 checksum How to use checksums |
de300ed59c80957f4f8c490c8169ab3362326292615ed680eeef1b52f2918925
|
| Upload date | |
|
Uploaded using Trusted Publishing? What is trusted publishing? |
Yes |
| Uploaded via |
twine/7.0.0 CPython/3.13.14
|
Provenance
Provenance describes where a file came from. On PyPI, provenance is shared via attestations, which provide a verifiable record of the build or publishing details. View details, limitations and caveats.


PyPI Publish Attestation
PyPI verified that this artifact, at this checksum, originated from the publisher listed below.
Signed by GitHub Actions, verified by PyPI on Aug 30, 2026.
Transparency logRelease files / oxigraph-0.5.10-py3-none-win_arm64.whl
| Download URL | oxigraph-0.5.10-py3-none-win_arm64.whl |
|---|---|
| Size | 5.5 MB |
| Tags | Python 3 Windows ARM64 |
|
SHA-256 checksum How to use checksums |
13e0b71b632126a98685ca6259a13f51ff443ed26640fe78f0ea13a0d10f3260
|
|
BLAKE2b-256 checksum How to use checksums |
226b4dedf371824d96a72071225adf28270ce623d6715d47e349beb609e322ac
|
| Upload date | |
|
Uploaded using Trusted Publishing? What is trusted publishing? |
Yes |
| Uploaded via |
twine/7.0.0 CPython/3.13.14
|
Provenance
Provenance describes where a file came from. On PyPI, provenance is shared via attestations, which provide a verifiable record of the build or publishing details. View details, limitations and caveats.
PyPI Publish Attestation
PyPI verified that this artifact, at this checksum, originated from the publisher listed below.
Signed by GitHub Actions, verified by PyPI on Aug 30, 2026.
Transparency logRelease files / oxigraph-0.5.10-py3-none-win_amd64.whl
| Download URL | oxigraph-0.5.10-py3-none-win_amd64.whl |
|---|---|
| Size | 5.8 MB |
| Tags | Python 3 Windows x86-64 |
|
SHA-256 checksum How to use checksums |
1f0d89add3cc7609c25c9e2c5ff2c901f2c643b295811c339b71915267866db3
|
|
BLAKE2b-256 checksum How to use checksums |
da496a2e23e73e3e4606491fdc158412314ef2dfab8dffb786d4151fd1d7b813
|
| Upload date | |
|
Uploaded using Trusted Publishing? What is trusted publishing? |
Yes |
| Uploaded via |
twine/7.0.0 CPython/3.13.14
|
Provenance
Provenance describes where a file came from. On PyPI, provenance is shared via attestations, which provide a verifiable record of the build or publishing details. View details, limitations and caveats.
PyPI Publish Attestation
PyPI verified that this artifact, at this checksum, originated from the publisher listed below.
Signed by GitHub Actions, verified by PyPI on Aug 30, 2026.
Transparency logRelease files / oxigraph-0.5.10-py3-none-manylinux_2_28_x86_64.whl
| Download URL | oxigraph-0.5.10-py3-none-manylinux_2_28_x86_64.whl |
|---|---|
| Size | 8.6 MB |
| Tags | Linux glibc 2.28+ x86-64 Python 3 |
|
SHA-256 checksum How to use checksums |
50bbd07a6ea90505a4814947ff827f2be2542191fe534e9cc6880cd95cfc076f
|
|
BLAKE2b-256 checksum How to use checksums |
2680d231bb31b0c398909055260d450cd98b4b43f14dae759536266a03bd3e1f
|
| Upload date | |
|
Uploaded using Trusted Publishing? What is trusted publishing? |
Yes |
| Uploaded via |
twine/7.0.0 CPython/3.13.14
|
Provenance
Provenance describes where a file came from. On PyPI, provenance is shared via attestations, which provide a verifiable record of the build or publishing details. View details, limitations and caveats.
PyPI Publish Attestation
PyPI verified that this artifact, at this checksum, originated from the publisher listed below.
Signed by GitHub Actions, verified by PyPI on Aug 30, 2026.
Transparency logRelease files / oxigraph-0.5.10-py3-none-manylinux_2_28_aarch64.whl
| Download URL | oxigraph-0.5.10-py3-none-manylinux_2_28_aarch64.whl |
|---|---|
| Size | 8.1 MB |
| Tags | Linux glibc 2.28+ ARM64 Python 3 |
|
SHA-256 checksum How to use checksums |
1d3639d0e3e40ada6d422309dab36bc901cea874106c3d2e7413e2b76a266731
|
|
BLAKE2b-256 checksum How to use checksums |
68bcc16dc27dab895b165eed70981a8db7bdbba19103efb413ad79e8ddfe3caa
|
| Upload date | |
|
Uploaded using Trusted Publishing? What is trusted publishing? |
Yes |
| Uploaded via |
twine/7.0.0 CPython/3.13.14
|
Provenance
Provenance describes where a file came from. On PyPI, provenance is shared via attestations, which provide a verifiable record of the build or publishing details. View details, limitations and caveats.
PyPI Publish Attestation
PyPI verified that this artifact, at this checksum, originated from the publisher listed below.
Signed by GitHub Actions, verified by PyPI on Aug 30, 2026.
Transparency logRelease files / oxigraph-0.5.10-py3-none-macosx_11_0_arm64.whl
| Download URL | oxigraph-0.5.10-py3-none-macosx_11_0_arm64.whl |
|---|---|
| Size | 6.3 MB |
| Tags | Python 3 macOS 11.0+ ARM64 |
|
SHA-256 checksum How to use checksums |
d166dcb698c8431c0ff36e1743ebd2165cbc570a1915961d21a823ec07dec275
|
|
BLAKE2b-256 checksum How to use checksums |
f18c62051b6befd2a5cc9e75c8ef72909a7b4c2cdb617de8daa7e90585d7fc52
|
| Upload date | |
|
Uploaded using Trusted Publishing? What is trusted publishing? |
Yes |
| Uploaded via |
twine/7.0.0 CPython/3.13.14
|
Provenance
Provenance describes where a file came from. On PyPI, provenance is shared via attestations, which provide a verifiable record of the build or publishing details. View details, limitations and caveats.
PyPI Publish Attestation
PyPI verified that this artifact, at this checksum, originated from the publisher listed below.
Signed by GitHub Actions, verified by PyPI on Aug 30, 2026.
Transparency logRelease files / oxigraph-0.5.10-py3-none-macosx_10_14_x86_64.whl
| Download URL | oxigraph-0.5.10-py3-none-macosx_10_14_x86_64.whl |
|---|---|
| Size | 6.8 MB |
| Tags | Python 3 macOS 10.14+ x86-64 |
|
SHA-256 checksum How to use checksums |
8ac28f60302e7bda70801b14b9ecfe48b953ea7d5b640b6a27f3e78dba02996a
|
|
BLAKE2b-256 checksum How to use checksums |
dd8e949effd0e569944ace2ebab57d20cf9a940b46df2ecc90258e068ff889fc
|
| Upload date | |
|
Uploaded using Trusted Publishing? What is trusted publishing? |
Yes |
| Uploaded via |
twine/7.0.0 CPython/3.13.14
|
Provenance
Provenance describes where a file came from. On PyPI, provenance is shared via attestations, which provide a verifiable record of the build or publishing details. View details, limitations and caveats.
PyPI Publish Attestation
PyPI verified that this artifact, at this checksum, originated from the publisher listed below.
Signed by GitHub Actions, verified by PyPI on Aug 30, 2026.
Transparency log













