
PanelWorks


Draw a form in JSON, write Object_Event procedures in Python, and run it as a
real Tkinter desktop window. Every object is live-addressable, by agents over
MCP (Claude can read and set properties, call methods, wait for events, even
draw new controls while the app runs), by devices over MQTT (subscribe
properties to topics, publish on events, mirror the whole form) and by
automations over webhooks (an n8n workflow can be an event procedure).
Hardware comes in over Serial (USB auto-detect, auto-reconnect), Modbus (PLCs, drives,
meters) and SNMP (UPSes, PDUs, switches, with traps), readings go
onto Gauges and live Charts and into a Data control that logs to SQLite and fills a Grid,
a PictureBox shows pictures and draws gauges and diagrams from code,
and any running panel can be opened on a phone in the browser.
📖 The PanelWorks Manual: installing, a click-by-click first panel, the designer, programming, MQTT, serial, n8n, Claude, and the full control reference. Also as a printable A4 PDF.
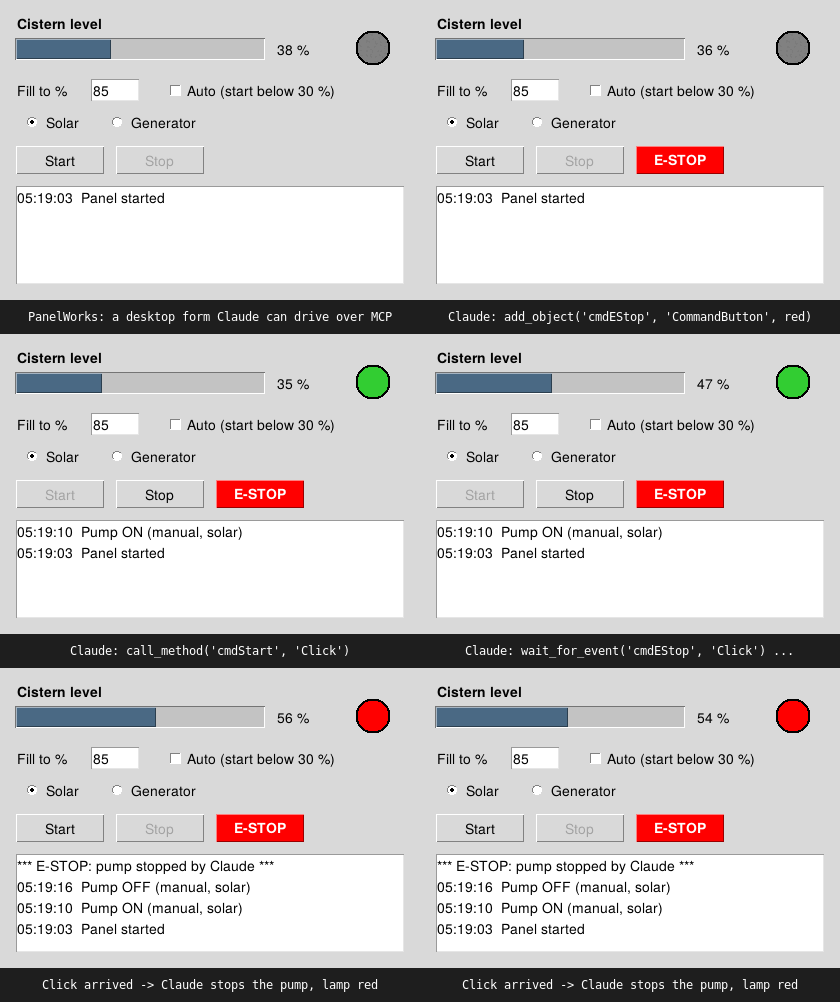
Recorded session: an MCP client (as Claude would) adds an E-STOP button to a
running panel, starts the pump, waits for the E-STOP click, then stops it.
Script: tests/record_demo.py.
The programming model is the classic RAD one: a form, named controls, properties,
methods and events (cmdStart_Click), as popularised by Visual Basic and Delphi.
PanelWorks is an independent project and is not affiliated with Microsoft, nor
with the HoloViz "Panel" dashboard library.
examples/pumppanel.json    <- a form: objects + properties
examples/pumppanel.py      <- its event procedures
examples/cistern_mqtt.*    <- a no-code panel driven entirely by MQTT subscriptions
examples/n8n_demo.*        <- a panel whose event procedures live in n8n
examples/led_panel.*       <- Start/Stop an Arduino's LED over USB serial
examples/truck_scale.*     <- weighbridge: serial scale, chart, tickets in SQLite, menu (+ simulator)
examples/gauges.*          <- PictureBox: a dial and a tank drawn in code, click to set the alarm
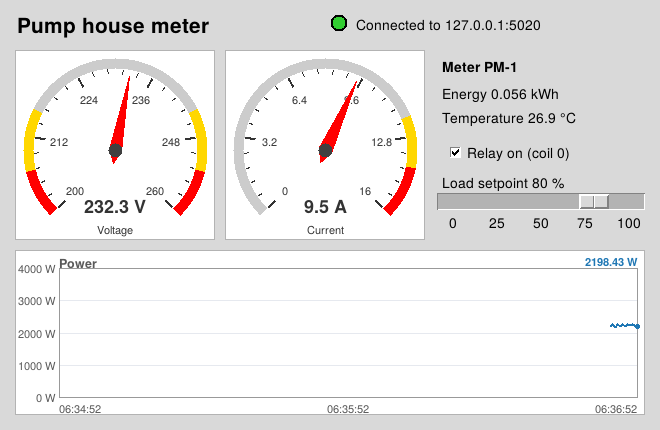
examples/power_meter.*     <- Modbus TCP energy meter: gauges, chart, slider writes a setpoint (+ simulator)
examples/rack_status.*     <- SNMP UPS, PDU and switch: runtime, outlets, port lamps, traps (+ simulator)
examples/hvac_console.*    <- read-only HVAC console for real ESP32 devices over MQTT/TLS
examples/n8n/              <- the matching n8n workflow, ready to import
tests/fake_esp32.py        <- simulated cistern node to test it against
panelworks/runtime.py      <- controls, Form, event dispatch, thread bridge
panelworks/mcp_bridge.py   <- MCP server, single-instance lock and relay
panelworks/mqtt.py         <- MQTT control, subscribe / publish / mirror
panelworks/webhooks.py     <- HTTP webhooks (n8n): events out, replies drive the form
panelworks/serialport.py   <- Serial control (the MSComm replacement)
panelworks/chart.py        <- Chart control: live strip chart, several series
panelworks/picture.py      <- PictureBox: pictures, and drawing from code (gauges, diagrams)
panelworks/slider.py       <- Slider control
panelworks/gauge.py        <- Gauge control (a dial; Interactive makes it a knob)
panelworks/polling.py      <- shared poll/Fill/reconnect plumbing for Modbus and SNMP
panelworks/modbus.py       <- Modbus TCP/RTU control
panelworks/snmp.py         <- SNMP control (Get/Walk/Set, traps)
panelworks/data.py         <- Data control (SQLite logging) and Grid
panelworks/menus.py        <- panel menu bars and the Menu Editor's model
panelworks/webview.py      <- phone view: a running panel as a web page
panelworks/designer.py     <- the visual form designer
panelworks/codeeditor.py   <- its built-in Code window
panelworks/immediate.py    <- the Immediate window
panelworks/make_exe.py     <- File > Make EXE (PyInstaller)
panelworks/cli.py          <- the `panelworks` command
Install
Python 3.10+ with Tkinter (included in the python.org Windows/macOS installers;
on Debian/Ubuntu sudo apt install python3-tk).
From PyPI (the quick way; File > Examples, the designer and updates all work):
python -m venv pw
pw\Scripts\python -m pip install "panelworks[all]"      # Windows
pw/bin/python -m pip install "panelworks[all]"          # macOS / Linux
pw\Scripts\python -m panelworks.designer
Updates: the designer offers them, or python -m pip install -U panelworks.
From GitHub (to read or change the source, and for the manual and example screenshots). From the project folder:
python -m venv .venv
.venv\Scripts\python -m pip install -e ".[mqtt]"      # Windows
.venv/bin/python -m pip install -e ".[mqtt]"          # macOS / Linux
That installs a panelworks command into the venv (-e = editable, so changes to
the source take effect without reinstalling). Leave off [mqtt] to skip paho-mqtt.
Optional extras: [modbus] (pymodbus), [snmp] (pysnmp), [pictures] (Pillow, for JPEG),
or [all], e.g. pip install -e ".[all]".
Works with mcp 2.x (tested 2.3.0) and falls back to the 1.x FastMCP API.
MQTT needs paho-mqtt 2.x (tested 2.2.0); without it, forms still run, minus MQTT.
Serial uses pyserial (installed automatically). On Linux, add yourself to the
dialout group (sudo usermod -aG dialout $USER, then log in again) to open ports.
Run
panelworks examples/pumppanel.json               # window + MCP at http://127.0.0.1:8765/mcp
panelworks examples/pumppanel.json --mcp stdio   # for Claude Desktop / Claude Code
panelworks examples/pumppanel.json --mcp none    # just the desktop app
python -m panelworks ...                         # same thing, if the command isn't on PATH
The examples run by name from any folder, whether you cloned the repo or installed from PyPI:
python -m panelworks --example                           # list them
python -m panelworks --example power_meter --mcp none    # run one
python -m panelworks --simulator power_meter             # its pretend device, in another window
From a PyPI install, --example copies the example to your panels folder (Documents\PanelWorks)
the first time and runs that copy, so it can save its files and keep your changes.
Hook it to Claude Desktop
Add a server to claude_desktop_config.json. Let the app find the file for you,
because its location varies by install. In Claude Desktop, open Settings and type
"developer" in the search box (it isn't in the menu list), choose Extensions,
and use its config button to show the file. Open it in Notepad
(right-click → Open with → Notepad).
Typical locations: %APPDATA%\Claude\ or %LOCALAPPDATA%\Claude-Data\... on
Windows, and ~/Library/Application Support/Claude/ on macOS.
Quit Claude Desktop from the tray icon (or Task Manager) before editing, and
restart it afterwards. Closing the window only hides it, and the app rewrites
this file while running. If the server doesn't show up, that's the usual cause. If the file already has content, add mcpServers as a new top-level
key, and watch the commas:
{
  "mcpServers": {
    "pumppanel": {
      "command": "C:/dev/panelworks/.venv/Scripts/python.exe",
      "args": ["-m", "panelworks", "C:/dev/panelworks/examples/pumppanel.json", "--mcp", "stdio"]
    }
  }
}
(Use the venv's python.exe -m panelworks, not panelworks.exe: Windows 11's Smart
App Control blocks the unsigned .exe launcher pip creates, while python.exe is signed.)
Restart Claude Desktop; the panel window opens and Claude can ask it things like "press Start", "what's the cistern level?", or "add a Stop-All button under Start".
Claude Code over HTTP: start with the default --mcp http, then
claude mcp add --transport http pumppanel http://127.0.0.1:8765/mcp.
Designer: draw forms without writing JSON
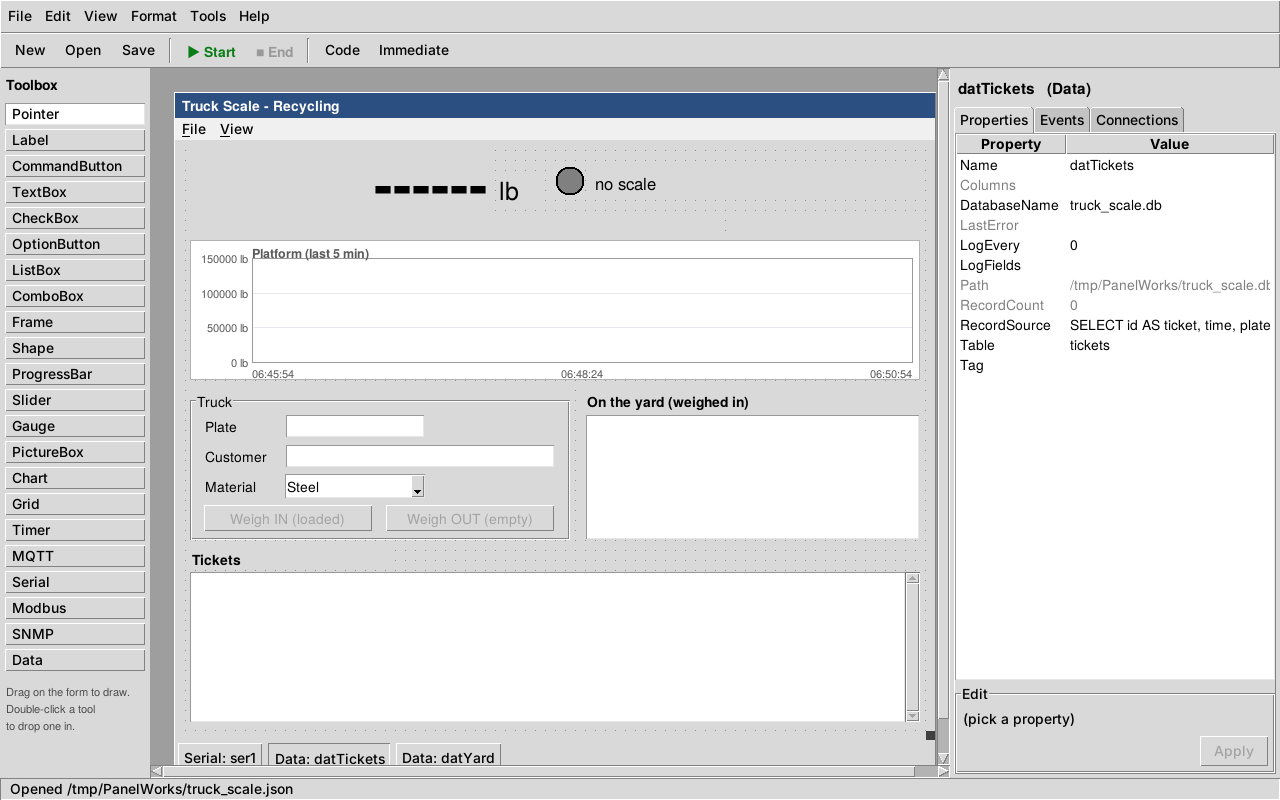
The truck scale example open in the designer: a Chart, a Frame, a Grid, a panel menu
bar, and Serial and Data controls in the tray. The Data control datTickets is selected.
Desktop shortcut (Windows), no console window: right-click the desktop, then
New > Shortcut, with the location
C:\path\to\panelworks\.venv\Scripts\pythonw.exe -m panelworks.designer.
Set Start in to the project folder. Under Change Icon..., browse to
panelworks\assets\panelworks.ico.
panelworks-designer                       # new form
panelworks-designer my_panel.json         # open (or create) a form
panelworks --design my_panel.json         # same thing
The designer works the way classic RAD tools did, and needs no AI:
- Draw: pick a tool in the Toolbox and drag a rectangle on the form, or click for a default-size control. Double-click a tool to drop one in.
- Arrange: drag to move (5 px snap), drag the black grip to resize, arrow keys nudge 1 px (Shift: 10 px). Drag the grip at the form's corner to resize the form.
- Properties: pick a row, edit below. True/False and fixed choices get a drop-down, colours get a picker, lists are one item per line.
- Code: double-click a control (or an event on the Events tab, or press F7) to open the built-in Code window. See below.
- Connections: MQTT
subscribe/publishand n8nwebhookentries for the selected control, ormqtt/webhooksfor the form, edited as JSON. - Run: the green ▶ Start button on the toolbar (or F5) saves and runs the panel; the red ■ End button stops it. Start while it's running restarts it with your latest changes. The Code window has a Start button too.
- File → Make EXE: package a panel (all its forms and code) as one program that runs without Python. Windows will warn about it unless it's code-signed (see the manual).
- Several forms:
f.Show("Settings", modal=True)opensSettings.jsonas a dialog;f.Owner,f.Forms["Name"],f.Hide(). - Menus: Tools → Menu Editor (Ctrl+E) builds the panel's menu bar, VB-style;
each item has a Click event (
mnuFileExit_Click) and Checked/Enabled/Visible/Shortcut. - Several at once: drag a box or Ctrl+click to select several controls; move, nudge, delete or set a property on all of them; Format menu to align, make same size, space evenly.
- Phone view: any running panel on a phone, laid out automatically: Tools → Phone View,
or
--web. PIN-protected, read-only option; use Tailscale away from home. - Updates: the designer checks GitHub once a day; an orange ⬆ Update button
shows what's new and runs
git pullfor you (Help → Check for Updates). - Immediate window (Ctrl+G): live
print()output and errors from the running panel, and VB-style lines typed at it:? lblStatus.Caption,shpLed.FillColor = "red",cmdStart_Click. - File → Open Recent: your last 10 forms, newest first.
- File → Examples: opens a copy of a bundled example (with its code and Arduino
sketch) in your panels folder, so the originals stay clean for
git pull. - File → Panels: the forms in your panels folder (
Documents\PanelWorksby default). - File → Preferences (Ctrl+,): panels folder, grid and snap, Code window font size, external editor, reopen the last form at startup. File → Close (Ctrl+W).
- Keys: Del, Ctrl+D duplicate, Ctrl+Z undo (50 steps), Ctrl+S save, F5 run. Timers, MQTT and Serial controls sit in the tray under the form, as they did in VB.
The Code window
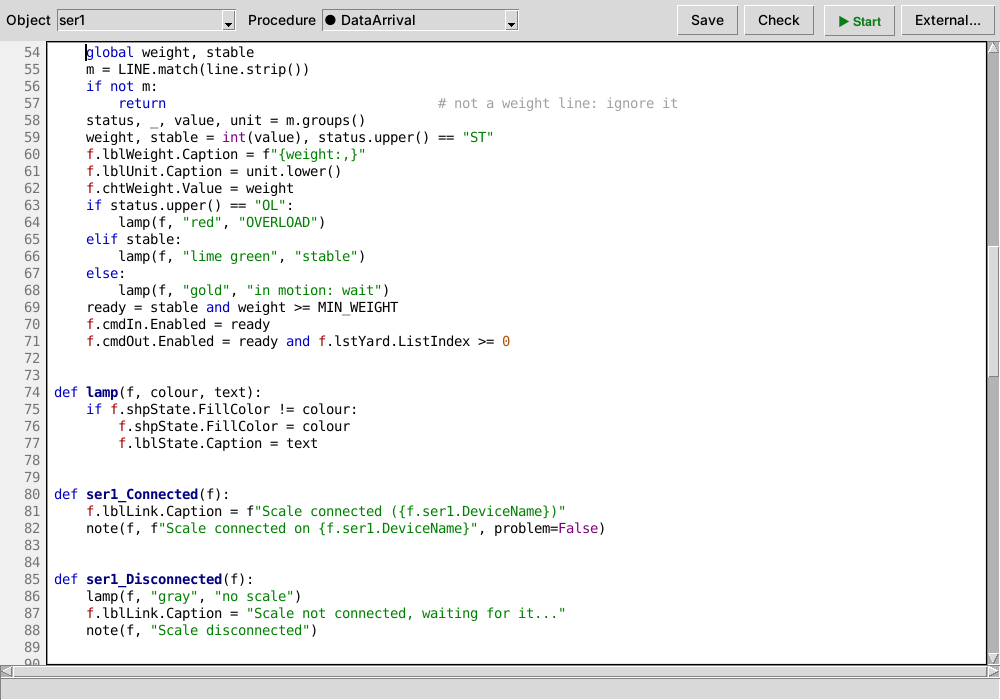
Like VB's: pick an Object and a Procedure at the top to jump to it. If the
procedure doesn't exist yet, a stub is written with pass selected, ready to type over.
The dropdowns follow the cursor, and ● marks procedures that already have code.
(General) lists your own helper functions.
- Python colouring, line numbers, Tab = 4 spaces, auto-indent after
:and dedent afterpass/return, Shift+Tab to un-indent, Ctrl+Z / Ctrl+Y. - Ctrl+S saves after a syntax check. A mistake gets its line marked red and the reason shown, so a panel never fails to start over a missing bracket. Check runs the same test without saving.
- Ctrl+F / F3 find. F5 saves code and form, then runs the panel.
- External... opens the file in VS Code (or Notepad). Set
PANELWORKS_EDITORto make an outside editor the default for double-clicks instead. - If the
.pychanges on disk (Claude, another editor) and you have no unsaved edits, it reloads. If you do, it warns you before saving over it. - Renaming a control keeps the code in step (VB orphaned it into General):
Text1_ChangebecomestxtName_Change,f.Text1/f["Text1"]references follow, and so do webhooksendfields. The Code window shows the change unsaved; Ctrl+S in the designer saves form and code, and Ctrl+Z undoes both.
Set a Label's AutoSize to True and it resizes to fit its caption and font, including captions your code or an MQTT subscription sets later. While it's on, Width and Height follow the text.
Files are saved with only the properties you changed, so they stay readable and
diff well in git. Forms written by hand or by Claude open without losing anything
(form-level mqtt/webhooks, every subscribe/publish/webhook).
With Claude: the designer watches the file it has open. When Claude changes the
form (for example add_object then save_form on a running panel), the designer
reloads it, asking first if you have unsaved edits. Rough a panel out with Claude,
polish it by hand, then have Claude wire up the automations, or the other way round.
The form file
{
  "name": "PumpPanel",
  "caption": "Cistern Pump Panel",
  "width": 420, "height": 300,
  "code": "pumppanel.py",
  "objects": {
    "cmdStart": {"type": "CommandButton", "Caption": "Start",
                 "Left": 15, "Top": 145, "Width": 90, "Height": 30},
    "tmrSim":   {"type": "Timer", "Interval": 500, "Enabled": true}
  }
}
Property names follow the classic RAD conventions (Caption, Text, Value, Left, Top). Positions are pixels from the top-left of the form.
Event procedures
def cmdStart_Click(f):              # f is the form ("Me")
    f.shpPump.FillColor = "lime green"
    f.cmdStop.Enabled = True
    f.lstLog.AddItem("Pump ON")

def txtSetpoint_KeyPress(f, key_ascii):
    ...

def tmrSim_Timer(f):
    f.barLevel.Value += 1
Events are held until the form finishes building, then Form_Load fires.
Setting TextBox.Text fires Change, and setting CheckBox.Value /
OptionButton.Value fires Click, as in classic VB. A handler that raises an exception prints
a traceback and logs the error in the event log; the app keeps running.
Controls
| Type | Key properties | Methods | Events |
|---|---|---|---|
| Label | Caption, Alignment, AutoSize | Click, DblClick | |
| CommandButton | Caption | Click (press it) | Click, GotFocus, LostFocus |
| TextBox | Text, Locked, PasswordChar, SelText | Clear | Change, KeyPress, GotFocus, LostFocus |
| CheckBox | Caption, Value (0/1) | Click | |
| OptionButton | Caption, Value, Group | Click | |
| ListBox | List, ListIndex, ListCount, Text | AddItem, RemoveItem, Clear | Click, DblClick |
| ComboBox | List, ListIndex, ListCount, Text | AddItem, Clear | Click, Change |
| Frame | Caption; contents move, hide and disable with it; its OptionButtons form their own group | Click | |
| Shape | Shape (Oval/Rectangle), FillColor, BorderColor | Click | |
| ProgressBar | Value, Max | ||
| Slider | Min, Max, Value, SmallChange, LargeChange, TickFrequency, Orientation | Change, Scroll | |
| Gauge | Min, Max, Value, Units, Title, Decimals, Zones, Interactive | Change, Scroll, Click | |
| PictureBox | Picture, AutoSize, Stretch, ScaleLeft/Top/Width/Height, ForeColor, FillColor, DrawWidth, CurrentX/Y | Cls, Line, LineTo, Circle, PSet, Polygon, Print, PaintPicture, Scale | Click, DblClick, MouseDown, MouseUp, MouseMove (all with x, y) |
| Chart | Value..Value4 (adds a point), Series, Window, AutoScale, YMin, YMax, Title, Units | AddPoint, Clear | Click |
| Grid | DataSource, Columns, Rows, Row, RowCount, Text | AddRow, Clear, Cell, Refresh | Click, DblClick |
| Data | DatabaseName, Table, LogFields, LogEvery, RecordSource, RecordCount | Log, Query, Execute, ExportCSV, Refresh, Clear | Logged(row), Error |
| Alarms | Rules, Interval, LogTo, TelegramToken, TelegramChat, NotifyPriority, Entries, Active, Unacked, Summary, History, LastJson | Ack, Check, State, ClearHistory | Alarm(name, message, value), Clear(name, value), Ack(name), Change |
| AlarmPanel | Source, Title | Click(name) | |
| Timer | Interval (ms), Enabled | Timer | |
| MQTT | Broker, Port, ClientID, Username, Password, Subscriptions, AutoConnect, Connected | Connect, Disconnect, Publish, Subscribe, Unsubscribe | Connected, Disconnected, MessageArrived |
| Modbus | Mode, Host, Port, SerialPort, Settings, UnitID, ByteOrder, Poll, PollInterval, Fill, Values | Read, Write, PollNow, Open, Close | DataArrival(values), Connected, Disconnected, Error |
| SNMP | Host, Port, Version, Community, WriteCommunity, User/AuthKey/PrivKey, Poll, PollInterval, Fill, TrapPort | Get, Walk, Set, PollNow, Open, Close | DataArrival(values), Trap(source, values), Connected, Disconnected, Error |
| Serial | Port, Settings, Terminator, Fill, Output, Input, Line, PortOpen, AutoOpen, AutoReconnect, DTR, RTS | Open, Close, Write, SendLine, ClearInput, ListPorts | DataArrival(line), Connected, Disconnected, Error |
| Form | Caption, Width, Height, BackColor | MsgBox, Unload | Load, Unload |
All visible controls also have Left, Top, Width, Height, Visible, Enabled,
FontName, FontSize, FontBold, Tag, SetFocus, Refresh; the plain-Tk ones have
BackColor and ForeColor. Ask the control_types tool for the authoritative list.
MCP tools
| Tool | Classic RAD equivalent |
|---|---|
describe_form, list_objects, resource form://describe |
Object browser |
get_property, set_property |
x = Label1.Caption, Label1.Caption = x |
call_method |
List1.AddItem "x", Command1.Value = True (press) |
fire_event |
calling Command1_Click directly |
get_events, wait_for_event |
(new) watch what the user does |
add_object, remove_object, save_form |
the form designer |
control_types |
the toolbox |
mqtt_status, mqtt_publish |
(new) the form's MQTT link, subscriptions and publishers |
webhook_status |
(new) webhook calls: counts, last error, which events call which URLs |
MQTT
Two styles, use either or both.
1. No code: subscribe, publish, mirror in the JSON
Add an mqtt block to the form, then give objects subscribe (a topic sets a
property) and publish (an event sends to a topic):
"mqtt": {"broker": "localhost", "port": 1883,
         "prefix": "panelworks/cistern", "mirror": true},
"objects": {
  "barLevel": {"type": "ProgressBar",
               "subscribe": {"Value": {"topic": "homestead/cistern/level", "json": "level"}}},
  "lblLevel": {"type": "Label",
               "subscribe": {"Caption": {"topic": "homestead/cistern/level", "json": "level",
                                    "format": "{:.0f} %"}}},
  "shpPump":  {"type": "Shape",
               "subscribe": {"FillColor": {"topic": "homestead/pump/state",
                        "map": {"ON": "lime green", "OFF": "gray", "*": "orange"}}}},
  "txtSetpoint": {"type": "TextBox",
               "subscribe": {"Text": {"topic": "homestead/cistern/setpoint", "twoWay": true}}},
  "cmdStart": {"type": "CommandButton",
               "publish": {"Click": {"topic": "homestead/pump/cmd", "payload": "ON"}}}
}
subscribe options, applied in this order to each incoming message (bind is
accepted as an older alias for subscribe):
| Key | Does |
|---|---|
topic |
Topic or wildcard filter (+, #). A bare string means just the topic. |
json |
Pick a field from a JSON payload: "level", "sensors.0.temp" |
map |
Translate values: {"ON": "green", "*": "orange"} (* = anything else) |
scale |
Multiply numeric values |
format |
Python format: "{:.1f} C", "node {}" |
twoWay |
Publish back when the user changes it (TextBox.Text, CheckBox.Value, OptionButton.Value, ComboBox.Text/ListIndex, ListBox.ListIndex) |
publishTopic |
Publish two-way changes here instead of topic (e.g. a /set topic) |
retain |
Retain two-way publishes (default true) |
Connection options in the mqtt block:
| Key | Default | Notes |
|---|---|---|
broker |
localhost |
Host name. ${VAR} / ${VAR:-default} allowed, like every value below |
port |
1883, or 8883 with tls |
|
tls |
false |
Encrypt the connection. Uses the operating system's trusted CAs (fine for Let's Encrypt) |
caFile |
Path to a CA certificate, for private or self-signed brokers | |
username / password |
Keep the password out of the file: "password": "${PW_MQTT_PASS}" |
|
prefix |
panelworks/<form name> |
Where mirror and status topics go |
status |
true |
Publish <prefix>/status online/offline with a Last Will. Set false for read-only accounts |
If the broker refuses the login or can't be reached, the reason is printed once,
Form_MqttError(f, message) fires, and mqtt_status shows it as last_error.
The MQTT control has the same TLS, CAFile, Username and Password
properties, a LastError property, and an Error event.
publish takes one entry or a list per event. payload can template the
object's properties, e.g. "{Text}" or "{Value}". If no payload is given, it defaults to "{Value}"
or the event name. Optional retain and qos.
Incoming values that equal the current value are ignored, and a two-way change is never republished to the topic it arrived on, so there are no echo loops.
Mirror ("mirror": true) publishes every property of every object, retained,
to <prefix>/<object>/<property> whenever it changes (checked every
mirrorInterval ms, default 250). It publishes events (except Timer) to <prefix>/<object>/event.
Writing <prefix>/<object>/<property>/set sets that property, so
mosquitto_pub -t panelworks/cistern/lblLevel/Caption/set -m hi works. <prefix>/status
is online/offline (retained, with Last Will). Node-RED, n8n, Home Assistant
and ESP32s see the same object model Claude sees over MCP.
2. Code: the MQTT control (like the classic Winsock control)
"mqttMon": {"type": "MQTT", "Broker": "localhost",
            "Subscriptions": ["homestead/pump/#"]}
def mqttMon_MessageArrived(f, topic, payload, retained):
    f.lstLog.AddItem(f"{topic} = {payload}")

def cmdFlush_Click(f):
    f.mqttMon.Publish("homestead/valve/flush", "OPEN")
It connects on Form_Load (AutoConnect), reconnects by itself, and re-subscribes
after a reconnect.
Try it
mosquitto                                        # any broker on localhost:1883
python tests/fake_esp32.py                       # simulated cistern node
panelworks --example cistern_mqtt
mosquitto_sub -t 'panelworks/cistern/#' -v          # watch the form mirror itself
Serial (Arduino, GPS, radios): the MSComm control, fixed
For anything plugged into the PC: an Arduino on USB, a GPS, a radio's CAT port, a TNC. Devices on the network use MQTT instead.
"Serial1": {"type": "Serial", "Port": "auto", "Settings": "115200,n,8,1",
            "Fill": ["temp -> lblTemp.Caption", "light -> pbLight.Value"]}
def Serial1_DataArrival(f, line):      # once per complete line
    f.lblLast.Caption = line

def cmdOn_Click(f):
    f.Serial1.Output = "LED ON"        # sends the text plus the line ending
What it does better than MSComm:
- Lines, not chunks.
DataArrivalfires once per complete line, however the bytes arrived.Serial.println's CR+LF is handled. Set Terminator toCR,CRLF, orNone(raw chunks) if your device differs. - No COM-number guessing. The designer's Port drop-down lists the ports
present, with their USB names.
autopicks the USB serial device;auto:CH340(orauto:CP210,auto:Arduino) the one whose name matches. If several match, it refuses and lists them, so a panel never opens the wrong board. - ESP32-S3/C3 native USB is recognised, and DTR/RTS are left low so opening the port can't drop the chip into its bootloader. A COM number that changes after a replug no longer breaks the panel.
- Unplug and replug: AutoReconnect (on by default) reopens it, firing
Disconnectedand thenConnected. - No code for readings. Fill copies fields of JSON lines
(
{"temp":21.5}, paths likeenv.hum) orkey=valuelines into properties. - Network serial too:
socket://192.168.1.50:23(ser2net, ESP-Link),rfc2217://host:port. - Errors you can read: a missing port or bad Settings raises
Erroronce with the reason, andLastErrorkeeps it. - Bridge to MQTT/n8n with the usual JSON.
"publish": {"DataArrival": "bench/line"}sends every line to the broker;"subscribe": {"Output": "bench/cmd"}sends broker messages to the device."webhook": {"DataArrival": ...}hands lines to n8n.
Try it: switch an Arduino's LED from a panel
- Upload
examples/led_panel/led_panel.inoto an Uno, Nano or ESP32, then close the Arduino IDE's Serial Monitor. Only one program can have the port open. - Run the panel:
.venv\Scripts\python -m panelworks --example led_panel --mcp none - The label shows Connected on COM…. Start lights the board's LED, and
Stop turns it off. The lamp follows the board's reply (
LED ON/LED OFF), so it shows what really happened. - Pull the USB cable and plug it back in: it reconnects by itself.
The whole thing is five procedures:
def cmdStart_Click(f):
    f.ser1.Output = "ON"

def cmdStop_Click(f):
    f.ser1.Output = "OFF"

def ser1_DataArrival(f, line):
    if line == "LED ON":
        f.shpLed.FillColor = "lime green"
    elif line == "LED OFF":
        f.shpLed.FillColor = "gray"

def ser1_Connected(f):
    f.lblStatus.Caption = "Connected on " + f.ser1.DeviceName

def ser1_Error(f, message):
    f.lblStatus.Caption = message
The manual's Serial chapter builds it step by step in
the designer. For readings, examples/arduino_bench.* shows Fill putting JSON
values from the board into controls with no code.
n8n (and any HTTP webhook)
Any event can POST to a webhook, and the reply drives the form, so an n8n workflow can act as an event procedure, with all of n8n's nodes and credentials behind it. It works from behind any firewall, because the panel always calls out.
"webhooks": {"baseUrl": "${N8N_WEBHOOK_BASE:-https://n8n.example.com/webhook/}",
             "headers": {"X-Panel-Key": "${PANEL_KEY}"},
             "poll": {"url": "panel-poll", "interval": 10}},
"objects": {
  "cmdAsk": {"type": "CommandButton", "Caption": "Ask n8n",
             "webhook": {"Click": {"url": "panelworks-demo", "send": ["txtName.Text"]}}}
}
The panel POSTs:
{"form": "N8nDemo", "object": "cmdAsk", "event": "Click", "args": [],
 "values": {"txtName.Text": "Steve"}, "time": 1795148800.0}
and applies whatever JSON comes back (use a Respond to Webhook node):
{"set":  {"lblReply.Caption": "Hello Steve", "shpLamp.FillColor": "dodger blue"},
 "call": [["lstLog", "AddItem", "handled by n8n", 0]],
 "msgbox": "optional pop-up"}
sendlists theObject.Propertyvalues to include. The form itself isForm.pollcalls the URL everyintervalseconds as eventPollon objectForm, so n8n can push changes to the panel without being able to reach it.${VAR}and${VAR:-default}inbaseUrl,urlandheadersread environment variables, so keys and your server address stay out of files you commit.- After a reply, the form fires
Object_WebhookResponse(f, data). On failure (unreachable, HTTP error, bad reply) it firesObject_WebhookError(f, message). Requests run on a background thread, so a slow n8n never freezes the window. - The
webhook_statusMCP tool shows sent/ok/failed counts and the last error.
Try it: import examples/n8n/panelworks-demo.workflow.json into n8n
(Workflows → Import from File), publish it, then:
set N8N_WEBHOOK_BASE=https://your-n8n/webhook/     (PowerShell: $env:N8N_WEBHOOK_BASE="...")
panelworks --example n8n_demo
For Claude Desktop, put the variable in the server's "env" block:
"env": {"N8N_WEBHOOK_BASE": "https://your-n8n/webhook/"}.
Charts, logging and grids: Chart, Data, Grid
A Chart plots readings over time. Setting Value adds a point; AddPoint(value, "series")
feeds one of several lines. Set Window (seconds shown), or turn AutoScale off and set
YMin/YMax for a fixed scale. Often it needs no code: subscribe its Value to an MQTT
topic, or point a Serial Fill line at it.
A Data control sits in the tray and is a SQLite database beside your form
(<form>.db unless you set DatabaseName). For logging with no code, list what a row
holds in LogFields and set LogEvery in seconds:
level = barLevel.Value
pump = shpPump.FillColor
That logs a timestamped row every LogEvery seconds; columns are created for you. Draw a Grid, set its DataSource to the Data control, and it shows the newest rows (RecordSource is the query it runs) and updates as rows are logged. In code:
def cmdOut_Click(f):
    f.datTickets.Log({"plate": plate, "gross": gross, "tare": tare, "net": gross - tare})

def datTickets_Logged(f, row):
    f.lblLast.Caption = f"Ticket #{row['id']} at {row['time']}"

def cmdToday_Click(f):
    rows = f.datLog.Query("SELECT AVG(level) AS avg FROM log WHERE time >= date('now','localtime')")

def mnuFileExport_Click(f):
    f.MsgBox(f"Saved {f.datTickets.ExportCSV()}")    # opens in Excel / LibreOffice
Execute(sql, params) runs anything else. The .db file opens in any SQLite tool, and
n8n's SQLite node can read it. A Grid can also be filled by hand: Columns, AddRow(...),
Clear(), Cell(row, col). A built program (Make EXE) keeps its database beside the .exe.
examples/truck_scale.* uses all three: the platform weight on a fixed-scale Chart, trucks
on the yard and finished tickets in two Data tables, and the tickets in a Grid. Its
truck_scale/scale_sim.py simulates the scale, so you can try it without one.
Sliders and gauges
A Slider sets a value by dragging (Scroll while it moves, Change when it's let go). A Gauge
is a ready-made dial with coloured Zones (80 90 gold, 90 100 red); set Interactive and its
needle can be dragged, so it doubles as a knob. Both work in the phone view.
Modbus and SNMP
Two tray controls for equipment that doesn't speak MQTT. Both poll in the background, reconnect by themselves, and fill properties with no code:
mb1 (Modbus TCP)  Poll:  volts = hr 0 *0.1            Fill:  volts -> gauVolts.Value
                         power = hr 2 f32 cdab               power -> chtPower.Value
                         relay = co 0
snmp1 (SNMP)      Poll:  runtime = upsEstimatedMinutesRemaining      Fill:  runtime -> gauRuntime.Value
                         port3   = ifOperStatus.3
f.mb1.Write("hr 10", 75)                     # a setpoint; Write("co 0", True) for a relay
f.snmp1.Set("1.3.6.1.4.1.318.1.1.4.4.2.1.3.4", 3, "i")     # reboot PDU outlet 4
def snmp1_Trap(f, source, values): ...       # with TrapPort set
Modbus (pip install pymodbus): TCP or RTU, hr/ir/co/di addresses or 4xxxx references,
u16 to f64 and text, all four byte orders, Read/Write. SNMP (pip install pysnmp): v1, v2c and
v3, numeric OIDs or common names (sys, if, ups), Get/Walk/Set, traps. Communities and keys can come
from environment variables (${UPS_COMMUNITY}). The power_meter and rack_status examples come with
simulators, so they run without hardware. Chapter 17 of the manual covers both.
Alarms
An Alarms control watches any value with plain rules, one per line, and an AlarmPanel lists what's wrong. New alarms flash until someone clicks them:
HighVolts: mb1.volts > 250 delay=5 deadband=2 priority=1 message=Voltage high
LowTank:   lblLevel.Caption < 20 message=Tank below 20 %
CommsLost: mb1.Connected == False delay=5 priority=1 message=Meter not answering
Delay (it must hold that long), deadband (no chattering), three priorities, acknowledge,
and a history, which are the basics of ISA-18.2. Alarms can go straight to Telegram
(TelegramToken, TelegramChat), to n8n with a webhook, to MQTT as JSON, and into a Data
control's log. The AlarmPanel works on the phone too: tap to acknowledge. Chapter 18 of the
manual has the details.
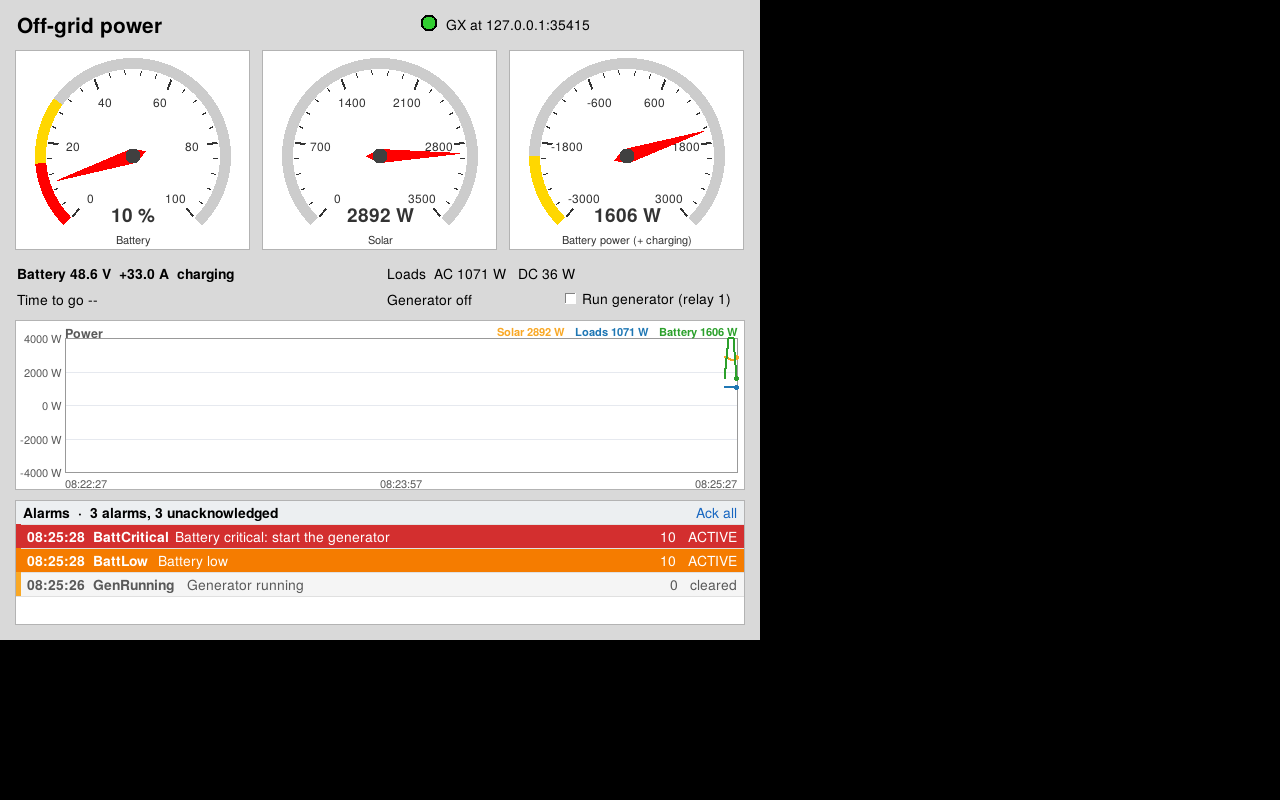
The solar_battery example reads a Victron GX (Cerbo GX, Venus GX) over Modbus TCP: state of charge, solar, battery and load power, and a generator on the GX's relay 1, with alarms for a low battery, low voltage, heavy load and the GX going quiet. Its simulator runs a whole off-grid day in 10 minutes:
python -m panelworks --simulator solar_battery
python -m panelworks --example solar_battery --mcp none
Pictures and drawing: PictureBox
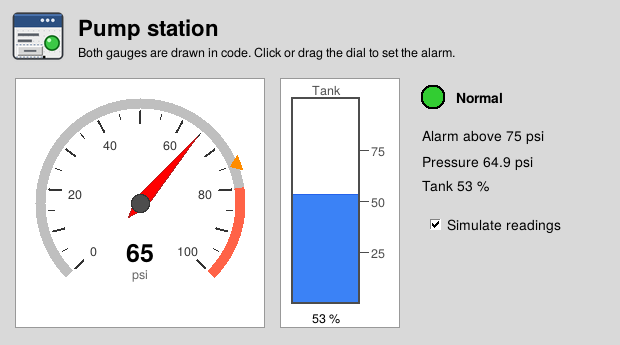
VB's PictureBox: show a picture (PNG/GIF, or JPEG with Pillow), and draw on it from code
with Line, Circle (with arcs), PSet, Polygon, Print and PaintPicture. Scale
gives the box your own units, with y up if you like, so a gauge is just trigonometry:
def show_pressure(f, psi):
    a = math.radians(225 - 2.7 * psi)               # 0..100 psi across 270 degrees
    p = f.picGauge                                  # scaled -100..100, y up: (0, 0) is the centre
    p.Cls()
    p.Circle(0, 0, 90, "gray75", start=-45, end=225, width=8)
    p.Line(0, 0, 80 * math.cos(a), 80 * math.sin(a), "red", width=3)
    p.Print(f"{psi:.0f} psi", 0, -40, anchor="center")

def picGauge_Click(f, x, y):                        # x, y in the box's own units
    ...
Drawings redraw themselves on resize and show in the phone view, where taps fire Click(x, y).
Make EXE packages the pictures. Try examples/gauges.json; chapter 6 of the manual has the details.
Phone view
Any running panel can be opened on a phone, laid out automatically for a narrow screen: labels paired with their values, frames as cards, live charts, the menu as a list. Turn it on with Tools → Phone View in the designer, or from the command line:
panelworks --example truck_scale --web 8080 --pin 4821            # full control
panelworks --example hvac_console --web 8080 --pin 4821 --readonly
Then browse to http://<pc-address>:8080. It's PIN-protected, with a lockout after
wrong guesses. --readonly shows everything and lets nothing be pressed. A menu item
can be kept off the phone with its On phone box in the Menu Editor (File → Exit,
for instance). Away from home, reach it over Tailscale or a VPN, not an open port.
See chapter 16.
Example: HVAC console (real devices, MQTT over TLS)
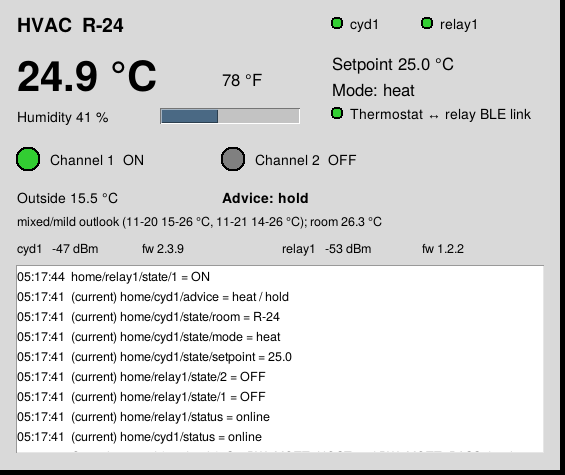
examples/hvac_console.json watches two ESP32s, a thermostat display (cyd1) and
a relay board (relay1), through a TLS broker. Every value on screen is a
subscribe entry: room temperature, humidity, setpoint, mode, relay lamps, device
online lamps, the thermostat-to-relay BLE link, outdoor temperature and forecast
advice. The code module only keeps a change log.
It is read-only by design. The relays drive HVAC contactors and the thermostat
already commands them, so the console publishes nothing to home/.... Give it a
broker account that can only read:
# Mosquitto ACL
user panelworks
topic read home/#
topic readwrite panelworks/#
Connection details come from environment variables, so nothing secret is in the file:
$env:PW_MQTT_HOST="mqtt.example.com"     # your broker (TLS, port 8883 unless PW_MQTT_PORT is set)
$env:PW_MQTT_USER="panelworks"
$env:PW_MQTT_PASS="..."
panelworks --example hvac_console --mcp none
Missing JSON fields (for example partial telemetry while a device boots) are skipped and the last value is kept.
One window per form
The first panelworks process to open a form takes an OS file lock (temp folder,
keyed by the form's full path) and owns the window. A second --mcp stdio launch
of the same form, which Claude Desktop typically does at startup, opens no window and relays its
MCP calls to the first over a localhost port, so every client drives the same
live form. A second launch in other modes prints "already open" and exits. The
OS releases the lock if the owner dies, even when it's killed from Task Manager.
When Claude Desktop quits (stdin closes), the form closes too, so no orphaned windows are left behind.
Thread model
Tkinter (like classic VB) only allows the GUI thread to touch controls. The MCP server and
paho's MQTT network thread both run in the background. Neither touches a widget.
MCP calls go through Form.call_on_gui(), which queues the call and waits for the
result on a Future; incoming MQTT messages go through Form.post(), which queues
without waiting. The GUI thread drains the queue every 20 ms (root.after). wait_for_event blocks only the MCP thread, so an agent
can wait for "user pressed Start" without freezing the window.
Contributing, security, conduct
What's planned: ROADMAP.md. See CONTRIBUTING.md, SECURITY.md (report vulnerabilities privately), CODE_OF_CONDUCT.md, ACCESSIBILITY.md and the CHANGELOG.
License
MIT. See LICENSE. Free to use, modify and share, with no warranty.
About
PanelWorks is built by Steve Spence (KK4HFJ), homesteader, ham and long-time automation tinkerer. More projects and free downloads at kk4hfj.com.
If you build business tools, have a look at OfficeNex, business apps (document control, help desk and more) from the same workshop.
1 maintainer

Metadata
1 maintainer
Release files for panelworks 0.5.0
For a detailed explanation of source distributions (sdists) and built distributions (wheels), please see the package formats documentation.
Source distribution (sdist)
| File | Size | Uploaded | Provenance | Actions |
|---|---|---|---|---|
| panelworks-0.5.0.tar.gz | 246.4 kB | With provenance | Details for panelworks-0.5.0.tar.gz |
Built distribution (wheel)
| File | Interpreter | ABI | Platform | Actions Reset |
|---|---|---|---|---|
| panelworks-0.5.0-py3-none-any.whl | Python 3 | none | any | Details for panelworks-0.5.0-py3-none-any.whl |
Total release size: 494.3 kB
Release files / panelworks-0.5.0.tar.gz
| Download URL | panelworks-0.5.0.tar.gz |
|---|---|
| Size | 246.4 kB |
| Tags | Source |
|
SHA-256 checksum How to use checksums |
bcf9744e7896cf0b326d3ee40fa5094131aeed2e89b44e2bcbfc58a4025704fc
|
|
BLAKE2b-256 checksum How to use checksums |
c993b76a316958e3bb3d95328ed50b021d4011bbb76d331efd6237f4ce950058
|
| Upload date | |
|
Uploaded using Trusted Publishing? What is trusted publishing? |
Yes |
| Uploaded via |
twine/7.0.0 CPython/3.13.16
|
Provenance
Provenance describes where a file came from. On PyPI, provenance is shared via attestations, which provide a verifiable record of the build or publishing details. View details, limitations and caveats.


PyPI Publish Attestation
PyPI verified that this artifact, at this checksum, originated from the publisher listed below.
Signed by GitHub Actions, verified by PyPI on Nov 21, 2026.
Transparency logRelease files / panelworks-0.5.0-py3-none-any.whl
| Download URL | panelworks-0.5.0-py3-none-any.whl |
|---|---|
| Size | 247.9 kB |
| Tags | Python 3 |
|
SHA-256 checksum How to use checksums |
13b89ec324fe282b23674163dd170ca0b58f9f5814e0a793a7466dc33aa645e2
|
|
BLAKE2b-256 checksum How to use checksums |
7f0b808c952214ed2e3376cb0daf51a2007d2e12ea29bfdfe0ba22922e51258b
|
| Upload date | |
|
Uploaded using Trusted Publishing? What is trusted publishing? |
Yes |
| Uploaded via |
twine/7.0.0 CPython/3.13.16
|
Provenance
Provenance describes where a file came from. On PyPI, provenance is shared via attestations, which provide a verifiable record of the build or publishing details. View details, limitations and caveats.
PyPI Publish Attestation
PyPI verified that this artifact, at this checksum, originated from the publisher listed below.
Signed by GitHub Actions, verified by PyPI on Nov 21, 2026.
Transparency logSecurity for panelworks 0.5.0
Provenance
Provenance describes where a file came from. On PyPI, provenance is shared via attestations, which provide a verifiable record of the build or publishing details. View details, limitations and caveats.
Full provenance
Both files in this release have been uploaded with provenance metadata.
Attestation for panelworks-0.5.0.tar.gz
PyPI Publish Attestation
PyPI verified that this artifact, at this checksum, originated from the publisher listed below.
Signed by GitHub Actions, verified by PyPI on Nov 21, 2026.
Transparency logA note on package security
PyPI is a repository for distributing packages, not a service for auditing them. While third-party security researchers and our staff do their best to detect and remove malicious packages, PyPI cannot guarantee the quality, security or suitability of any given package.
To learn more about protecting yourself from malicious actors, visit our package security documentation.














