gRPC for the PANOSETI project.

Project description
panoseti_grpc
Contains gRPC code for the PANOSETI project. See here for the main software repo.
Environment Setup for gRPC Clients and Servers
- Install
miniconda(link) - Clone this (
panoseti_grpc) repo onto a DAQ node or any client computer. - Run the following commands to create the
grpc-py39environment.
git clone https://github.com/panoseti/panoseti_grpc.git
cd panoseti_grpc
conda create -n grpc-py39 python=3.9
conda activate grpc-py39
conda install -c conda-forge grpcio-tools
pip install panoseti-grpc
Using the DaqDataClient API
The DaqDataClient is a Python gRPC client interface for the PANOSETI DaqData service. It provides a user-friendly API for scientists and developers to connect to DAQ nodes, initialize observing runs, and stream real-time image data for analysis and visualization.
See daq_data_client.py for the implementation and daq_data_client_demo.ipynb for code examples showing how to use it.
Developing Real-Time Visualizations
- Define a visualization class.
- Implement an
updatemethod to modify the visualization given a new panoseti image. - Follow the code pattern provided in daq_data_client_demo.ipynb to receive data with the
DaqDataClientAPI:
from daq_data.client import DaqDataClient
from daq_data.plot import PanoImagePreviewer

...
# 1. Connect to all DAQ nodes
with DaqDataClient(daq_config) as ddc:
    # 2. Instantiate visualization class
    previewer = PanoImagePreviewer(stream_movie_data=True, stream_pulse_height_data=True)

    # 3. Call the StreamImages RPC on all valid DAQ nodes
    pano_image_stream = ddc.stream_images(
        hosts=[],
        stream_movie_data=True,
        stream_pulse_height_data=True,
        update_interval_seconds=2.0,
        wait_for_ready=True,
        parse_pano_images=True,
    )

    # 4. Update visualization for each pano_image
    for pano_image in pano_image_stream:
        previewer.update(pano_image)
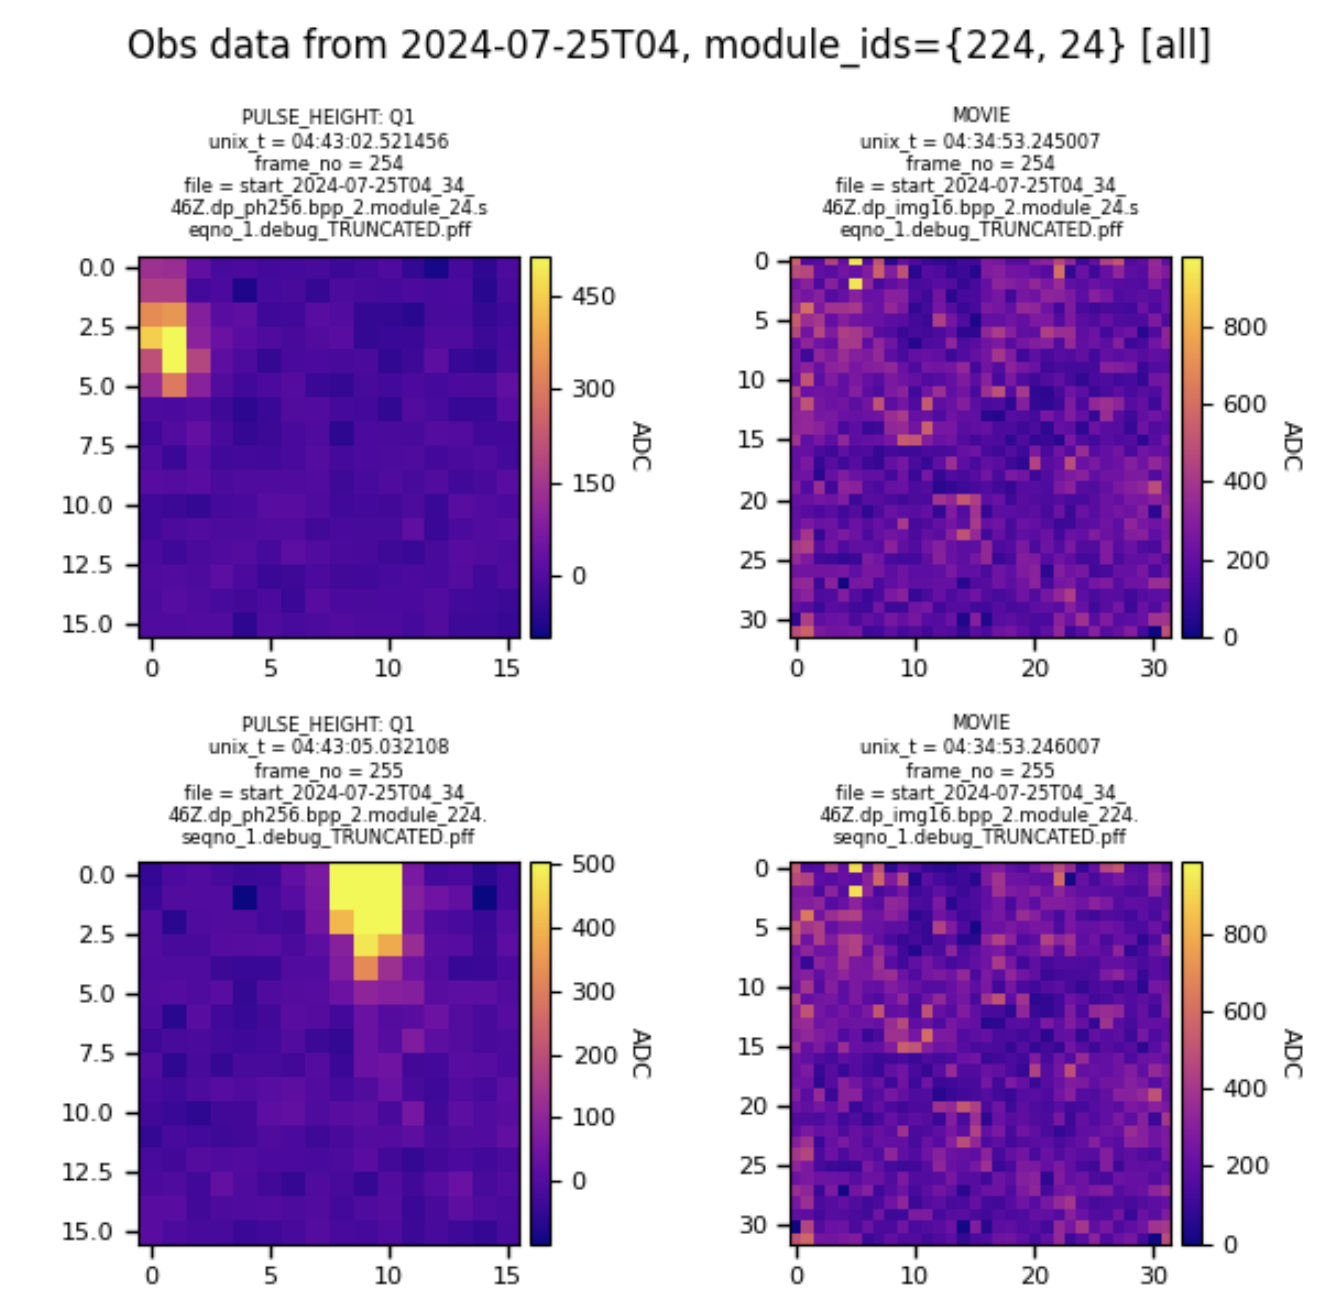
Figure 1. PanoImagePreviewer visualizing a simulated observing run replaying data from 2024-07-25.
Client Initialization
The DaqDataClient requires a configuration dictionary specifying the IP addresses and data directories of the DAQ nodes. This is most conveniently loaded from daq_config.json. The client should be used as a context manager to ensure network resources are handled correctly.
import json
from daq_data.client import DaqDataClient

# 1. Load the DAQ configuration
with open('path/to/your/daq_config.json', 'r') as f:
    daq_config = json.load(f)

# 2. Instantiate the client using a 'with' statement
with DaqDataClient(daq_config) as client:
    # Your code to interact with the client goes here
    valid_hosts = client.get_valid_daq_hosts()
    print(f"Successfully connected to: {valid_hosts}")
API Reference
All methods can accept a single host string or a list of host strings. If the hosts argument is omitted, the method will run on all available DAQ nodes that are responsive.
See The DaqData Service for implementation details.
Checking Server Status
These methods help you verify connectivity and discover the services available on the DAQ nodes.
-
ping(host): Checks if a single DAQ host is online and responsive. -
get_valid_daq_hosts(): Returns a set of all hosts with DaqData servers that successfully responded to a ping. -
reflect_services(hosts): Lists all available gRPC services and methods on the specified hosts. This is useful for exploring the server's capabilities.
with DaqDataClient(daq_config) as client:
    # Get all responsive hosts
    hosts = client.get_valid_daq_hosts()
    print(f"Valid hosts: {hosts}")

    # Discover the services on the first valid host
    if hosts:
        host = list(hosts)[0]
        service_info = client.reflect_services(host)
        print(service_info)
Initializing the Data Source
Before you can stream images, you must initialize the hp_io thread on the server. This thread monitors the observing run directory for new data files.
See InitHpIo for implementation details.
init_hp_io(hosts, hp_io_cfg)
Initializes the hp_io thread for a real observing run.
hosts: The DAQ node(s) to initialize.hp_io_cfg: A dictionary with configuration parameters, as explained in The hp_io_config.json File.
# Load hp_io configuration from a file
with open('path/to/hp_io_config.json', 'r') as f:
    hp_io_config = json.load(f)

with DaqDataClient(daq_config) as client:
    # Initialize all valid hosts
    success = client.init_hp_io(hosts=None, hp_io_cfg=hp_io_config)
    if success:
        print("Successfully initialized hp_io on all DAQ nodes.")
init_sim(host)
A convenience function to initialize the server in simulation mode, which streams archived data for testing and development.
with DaqDataClient(daq_config) as client:
    # Initialize the first valid host in simulation mode
    host = list(client.get_valid_daq_hosts())[0]
    success = client.init_sim(host)
    if success:
        print(f"Successfully initialized simulation on {host}.")
Streaming Image Data
stream_images(...)
The primary method for receiving real-time data. It returns an infinite generator that yields image data as it becomes available from the server. See StreamImages for implementation details.
-
hosts: The DAQ node(s) to stream from. -
stream_movie_data(bool): Request movie-mode images. -
stream_pulse_height_data(bool): Request pulse-height images. -
update_interval_seconds(float): The desired update rate from the server. -
module_ids(tuple): A tuple of module IDs to stream. An empty tuple streams all modules.
with DaqDataClient(daq_config) as client:
    # Initialize first (replace with your logic)
    # ...

    # Create a request to stream pulse-height data for all modules
    image_stream = client.stream_images(
        hosts=None,
        stream_movie_data=False,
        stream_pulse_height_data=True,
        update_interval_seconds=0.5,
        module_ids=()
    )

    # Process the first 10 images from the stream
    print("Starting image stream...")
    for i, image_data in enumerate(image_stream):
        print(
            f"Received image from Module {image_data['module_id']} "
            f"with shape {image_data['image_array'].shape}"
        )
        if i >= 9:
            break
Full Example Workflow
This example demonstrates a complete workflow: initialize the server for a simulated run and then stream data from it. This pattern is shown in daq_data_client_demo.ipynb.
import json
from daq_data.client import DaqDataClient

# 0. Load DAQ configuration
with open('daq_data/config/daq_config_grpc_simulate.json', 'r') as f:
    daq_config = json.load(f)

try:
    with DaqDataClient(daq_config) as client:
        # 1. Get valid hosts
        valid_hosts = client.get_valid_daq_hosts()
        if not valid_hosts:
            raise RuntimeError("No valid DAQ hosts found.")
        print(f"Connected to: {valid_hosts}")

        # 2. Initialize servers in simulation mode
        all_init_success = client.init_sim(valid_hosts)
        if not all_init_success:
            raise RuntimeError("Failed to initialize one or more servers.")
        print("All servers initialized for simulation.")

        # 3. Stream pulse-height and movie data from all modules
        image_stream = client.stream_images(
            hosts=valid_hosts,
            stream_movie_data=True,
            stream_pulse_height_data=True,
            update_interval_seconds=1.0,
            module_ids=()
        )

        # 4. Listen to the stream and process data
        print("Starting data stream. Press Ctrl+C to stop.")
        for image_data in image_stream:
            # In a real application, you would pass this data to a
            # visualization or analysis function.
            print(
                f"Image: Module {image_data['module_id']}, "
                f"Type: {image_data['type']}, "
                f"Timestamp: {image_data['header']['pandas_unix_timestamp']}"
            )

except KeyboardInterrupt:
    print("\nStream stopped by user.")
except Exception as e:
    print(f"An error occurred: {e}")
Using the DaqData Client CLI
daq_data/cli.py  - demonstrates real-time pulse-height and movie-mode visualizations using the DaqData API.

usage: cli.py [-h] [--host HOST] [--ping] [--list-hosts] [--reflect-services] [--init CFG_PATH] [--init-sim] [--plot-view] [--plot-phdist] [--module-ids [MODULE_IDS ...]]
              [--log-level {debug,info,warning,error,critical}]
              daq_config_path

positional arguments:
  daq_config_path       path to daq_config.json file for the current observing run

optional arguments:
  -h, --help            show this help message and exit
  --host HOST           DaqData server hostname or IP address.
  --ping                ping the specified host
  --list-hosts          list available DAQ node hosts
  --reflect-services    list available gRPC services on the DAQ node
  --init CFG_PATH       initialize the hp_io thread with CFG_PATH='/path/to/hp_io_config.json'
  --init-sim            initialize the hp_io thread to track a simulated run directory
  --plot-view           whether to create a live data previewer
  --plot-phdist         whether to create a live pulse-height distribution for the specified module id
  --module-ids [MODULE_IDS ...]
                        whitelist for the module ids to stream data from. If empty, data from all available modules are returned.
  --log-level {debug,info,warning,error,critical}
                        set the log level for the DaqDataClient logger. Default: 'info'
Below is an example workflow for using daq_data/client_cli.py to view real-time data from a real or simulated observing run directory.
On the Headnode
- Start an observing session (docs).
- Run
start.pyin thepanoseti/controldirectory to start an observing run.
On each DAQ Node in /path/to/daq_config.json
- Set up the
grpc-py39environment as described above. - Set the working directory to
panoseti_grpc/. - Run
python -m daq_data.server.
On Any Computer
- Set up the
grpc-py39environment as described above. - Update
hp_io_config.jsonor create a new one (see docs below). - Set the working directory to
panoseti_grpc/. export DAQ_CFG=/path/to/daq_config.json: (optional) create a convenient variable for/path/to/daq_config.json. If you don't want to do this, replace$DAQ_CFGin all following commands with/path/to/daq_config.json.python -m daq_data.cli -h: see the available options.python -m daq_data.cli $DAQ_CFG --list-hosts: find DAQ node hosts running valid DaqData gRPC servers. Hostname argumentsHto--hostshould be in the list of valid hosts returned by this command.- Initialize the
hp_iothread on all DaqData servers:- (Real data)
python -m daq_data.cli $DAQ_CFG --init /path/to/hp_io_config.json: initializehp_iofromhp_io_config.json. See The hp_io_config.json File for details about this config file. - (Simulated data)
python -m daq_data.cli $DAQ_CFG --init-sim: initializehp_iofromdaq_data/config/hp_io_config_simulate.json. This starts a stream of simulated data.
- (Real data)
- Start visualization apps:
python -m daq_data.cli $DAQ_CFG --plot-phdist: make aStreamImagesrequest and launch a real-time pulse-height distribution app.python -m daq_data.cli $DAQ_CFG --plot-view: make aStreamImagesrequest and launch a real-time frame viewer app.
Notes:
- On Linux, the
Ctrl+Pkeyboard shortcut loads commands from your command history. Useful for running thepython -m daq_data.climodule with different options. panoseti_grpchas a package structure, so your working directory should be the repo root,panoseti_grpc/, when running modules inpanoseti_grpc/daq_data/.- Each script (e.g.
server.py) should be prefixed withpython -m daq_data.and, because it is a module, be called without the.pyextension. Following these guidelines gives the example command for step 4:python -m daq_data.server, instead ofdaq_data/server.pyorpython -m daq_data.server.py.
The DaqData Service
See daq_data.proto for the protobuf specification of this service.
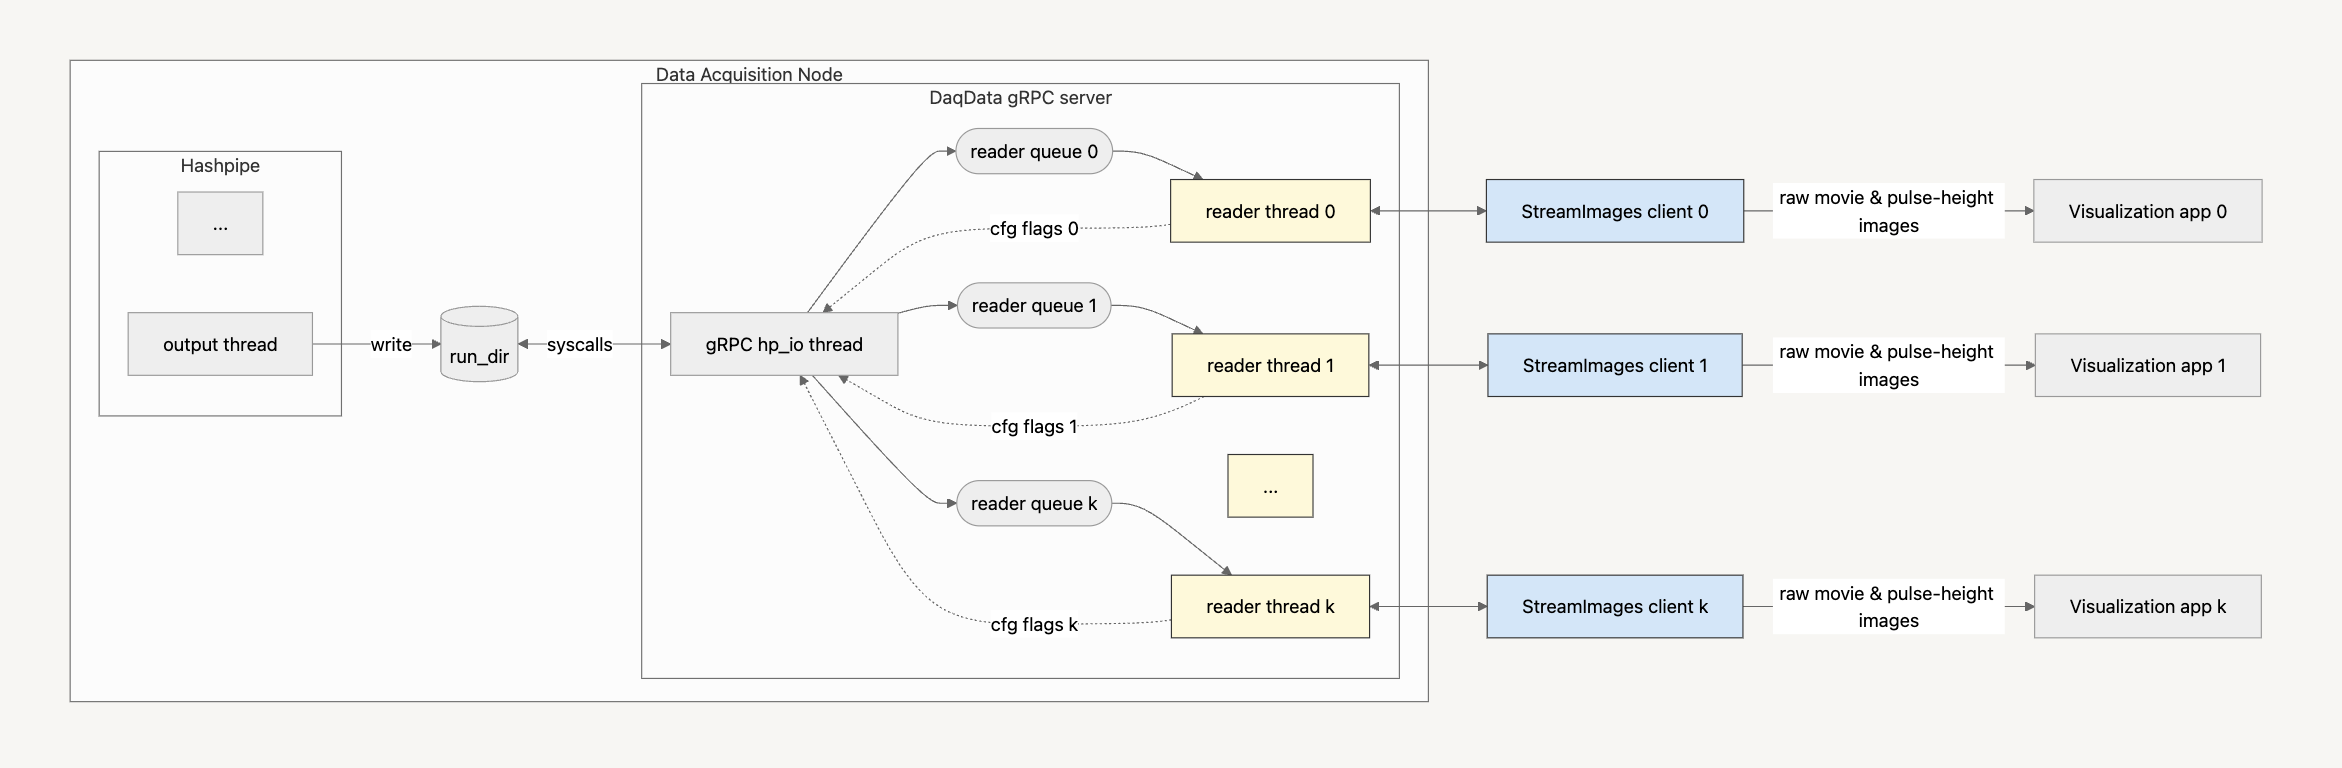 Figure A. DaqData Architecture |
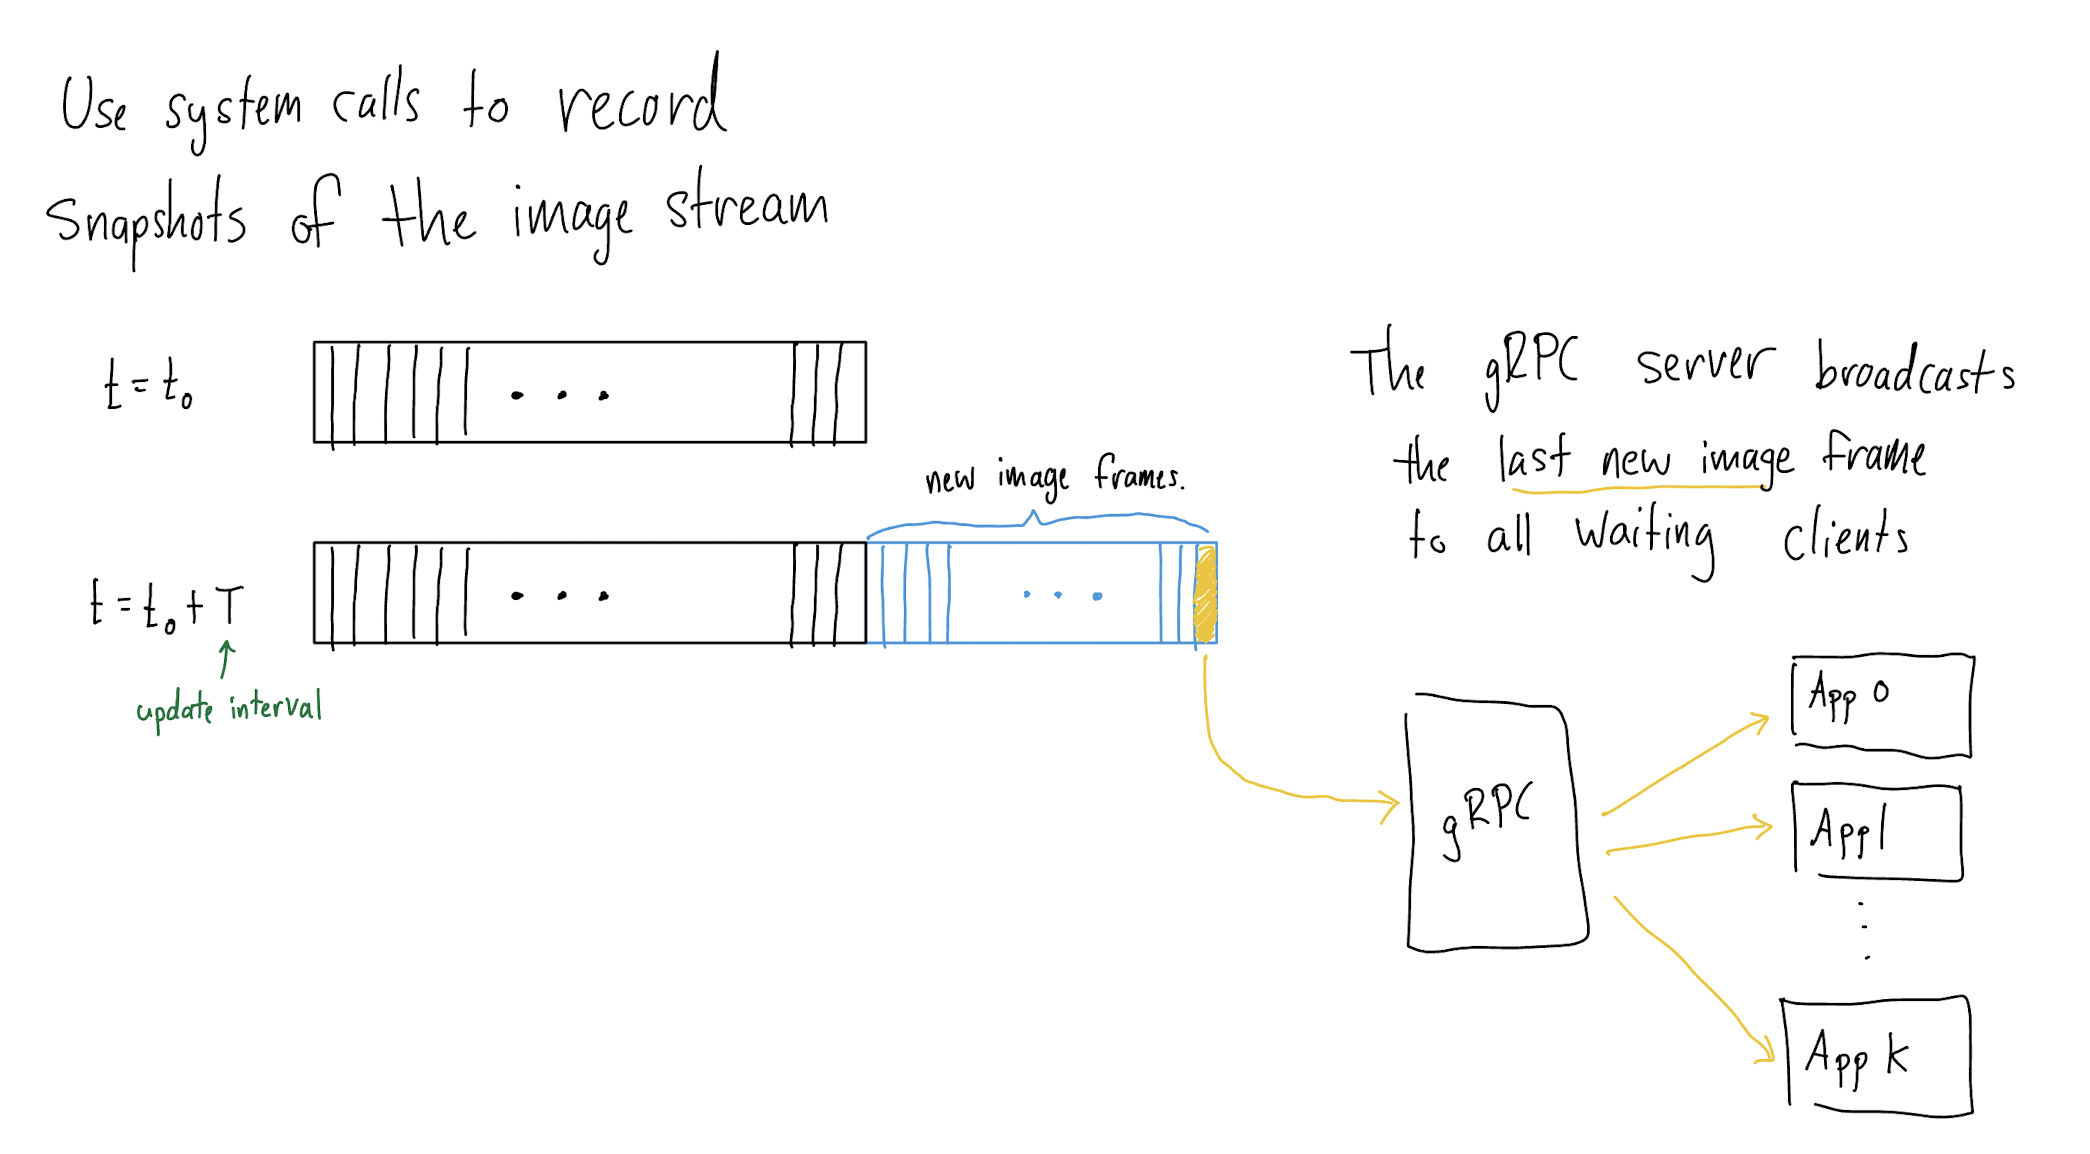 Figure B. StreamImages RPC Flow |
Core Remote Procedure Calls
StreamImages
- The gRPC server's
hp_iothread compares consecutive snapshots of the current run directory to identify the last image frame for each Hashpipe data product, includingph256,ph1024,img8,img16. These image frames are subsequently broadcast to readyStreamImagesclients. - A given image frame of type
dpfrom moduleNwill be sent to a client when the following conditions are satisfied:- The time since the last server response to this client is at least as long as the client’s requested
update_interval_seconds. - The client has requested data of type
dp. - Module
Nis on the client’s whitelist.
- The time since the last server response to this client is at least as long as the client’s requested
- $N \geq 0$
StreamImagesclients may be concurrently connected to the server.
InitHpIo
- Enables reconfiguration of the
hp_iothread during an observing run. - Requires an observing run to be active to succeed.
- $N \leq 1$
InitHpIoclients may be active at any given time. If anInitHpIoclient is active, no other client may be.
Ping
- Succeeds only if a client can contact the DaqData server.
The hp_io_config.json File
hp_io_config.json is used to configure InitHpIo RPCs to initialize the gRPC server's hp_io thread.
{
  "data_dir": "/mnt/panoseti",
  "update_interval_seconds": 0.1,
  "force": true,
  "simulate_daq": false,
  "module_ids": [],
  "comments": "Configures the hp_io thread to track observing runs stored under /mnt/panoseti"
}
data_dir: the data acquisition directory a Hashpipe instance is writing to. Containsmodule_X/directories.update_interval_seconds: the period, in seconds, between consecutive snapshots of the run directory. Must be greater than the minimum period specified by themin_hp_io_update_interval_secondsfield in daq_data/config/daq_data_server_config.json.force: whether to force a configuration ofhp_io, even if other clients are currently active.- If
true, the server will stop all activeStreamImagesRPCs then re-configure thehp_iothread using the given configuration. During initialization, newStreamImagesandInitHpIoclients may join a waiting queue, but will not be handled until after the configuration has finished (regardless of success or failure). Use this option to guarantee yourInitHpIorequest is handled. - If
false, theInitHpIorequest will only succeed if no otherStreamImagesRPCs are active. If anyStreamImagesRPCs are active, thisInitHpIoRPC will immediately return with information about the number of activeStreamImages. Use this option if other users may be using the server.
- If
simulate_daq: overridesdata_dirand causes the server to stream data from archived observing data. Use this option for debugging and developing visualizations without access to observatory hardware.module_ids: whitelist of module data sources.- If empty, the server will broadcast data snapshots from all active modules (detected automatically).
- If non-empty, the server will only broadcast data from the specified modules.
UbloxControl Service (TODO)
...
Release history Release notifications | RSS feed


Download files
Download the file for your platform. If you're not sure which to choose, learn more about installing packages.
Source Distribution
Built Distribution
Filter files by name, interpreter, ABI, and platform.
If you're not sure about the file name format, learn more about wheel file names.
Copy a direct link to the current filters
File details
Details for the file panoseti_grpc-0.1.0.6.tar.gz.
File metadata
- Download URL: panoseti_grpc-0.1.0.6.tar.gz
- Upload date:
- Size: 16.0 MB
- Tags: Source
- Uploaded using Trusted Publishing? No
- Uploaded via: twine/6.1.0 CPython/3.9.13
File hashes
| Algorithm | Hash digest | |
|---|---|---|
| SHA256 |
0094a36b57a504ded08f1b0231c94de2bbf6dbd6ff50cc5b971b3e6396e46bef
|
|
| MD5 |
fd7c822997a173e08c7b43e956d924cd
|
|
| BLAKE2b-256 |
5b751d8a2576ad07b62b2eb4a60352cc6b32f59171fe98391db8cd6dcba836d3
|
File details
Details for the file panoseti_grpc-0.1.0.6-py3-none-any.whl.
File metadata
- Download URL: panoseti_grpc-0.1.0.6-py3-none-any.whl
- Upload date:
- Size: 16.1 MB
- Tags: Python 3
- Uploaded using Trusted Publishing? No
- Uploaded via: twine/6.1.0 CPython/3.9.13
File hashes
| Algorithm | Hash digest | |
|---|---|---|
| SHA256 |
b65788acde645c192d8b0a553999842ef942e7e1addfca570a21752221c70f22
|
|
| MD5 |
b94aceccc317db8e48a8b32127e49948
|
|
| BLAKE2b-256 |
43598a117d6ab5cb83979e7088c8b528eb6697ed92089be56690a27faaaa2d7e
|


