HIPAA-compliant face de-identification for medical images

Project description
phi_anonymize_face


HIPAA-compliant face de-identification for medical images.
Automatically detect and anonymize faces in clinical photographs, DICOM images, and standard image formats. Built for healthcare, research, and any workflow that requires Protected Health Information (PHI) removal from facial imagery.
Use it three ways: Python API, CLI, or GUI desktop app.
Features
- Multi-detector cascade — MediaPipe (fast) → OpenCV DNN/Haar (robust) → RetinaFace (high-recall). Falls back automatically if a detector finds no faces.
- 3 anonymization methods — Gaussian blur, pixelation, or black-box redaction.
- Medical-grade padding — Configurable bounding-box expansion (default 1.3x) ensures ears, hairline, and chin are fully covered.
- Desktop GUI — PyQt6 app with side-by-side preview, tunable parameters, drag-and-drop, and batch processing.
- CLI tool —
phi-anonymizecommand for scripting and pipelines. - DICOM support — Read/write DICOM pixel data (optional
pydicomextra). - EXIF stripping — Removes metadata by default (EXIF can contain PHI).
- Batch processing — Parallel folder processing with progress bar (CLI, GUI, and API).
- Audit logging — CSV trail of every processed image for compliance.
- Verification mode — Re-run detection on output to confirm no residual faces.
- Accepts images or numpy arrays — Integrate into any Python pipeline.
Installation
Core library (API + CLI):
pip install phi-anonymize-face
With GUI:
pip install phi-anonymize-face[gui]
With DICOM support:
pip install phi-anonymize-face[dicom]
With RetinaFace (highest recall):
pip install phi-anonymize-face[retinaface]
Everything:
pip install phi-anonymize-face[all]
GUI Application
Launch the desktop app:
phi-anonymize-gui
Or from Python:
from phi_anonymize_face.gui.app import main
main()
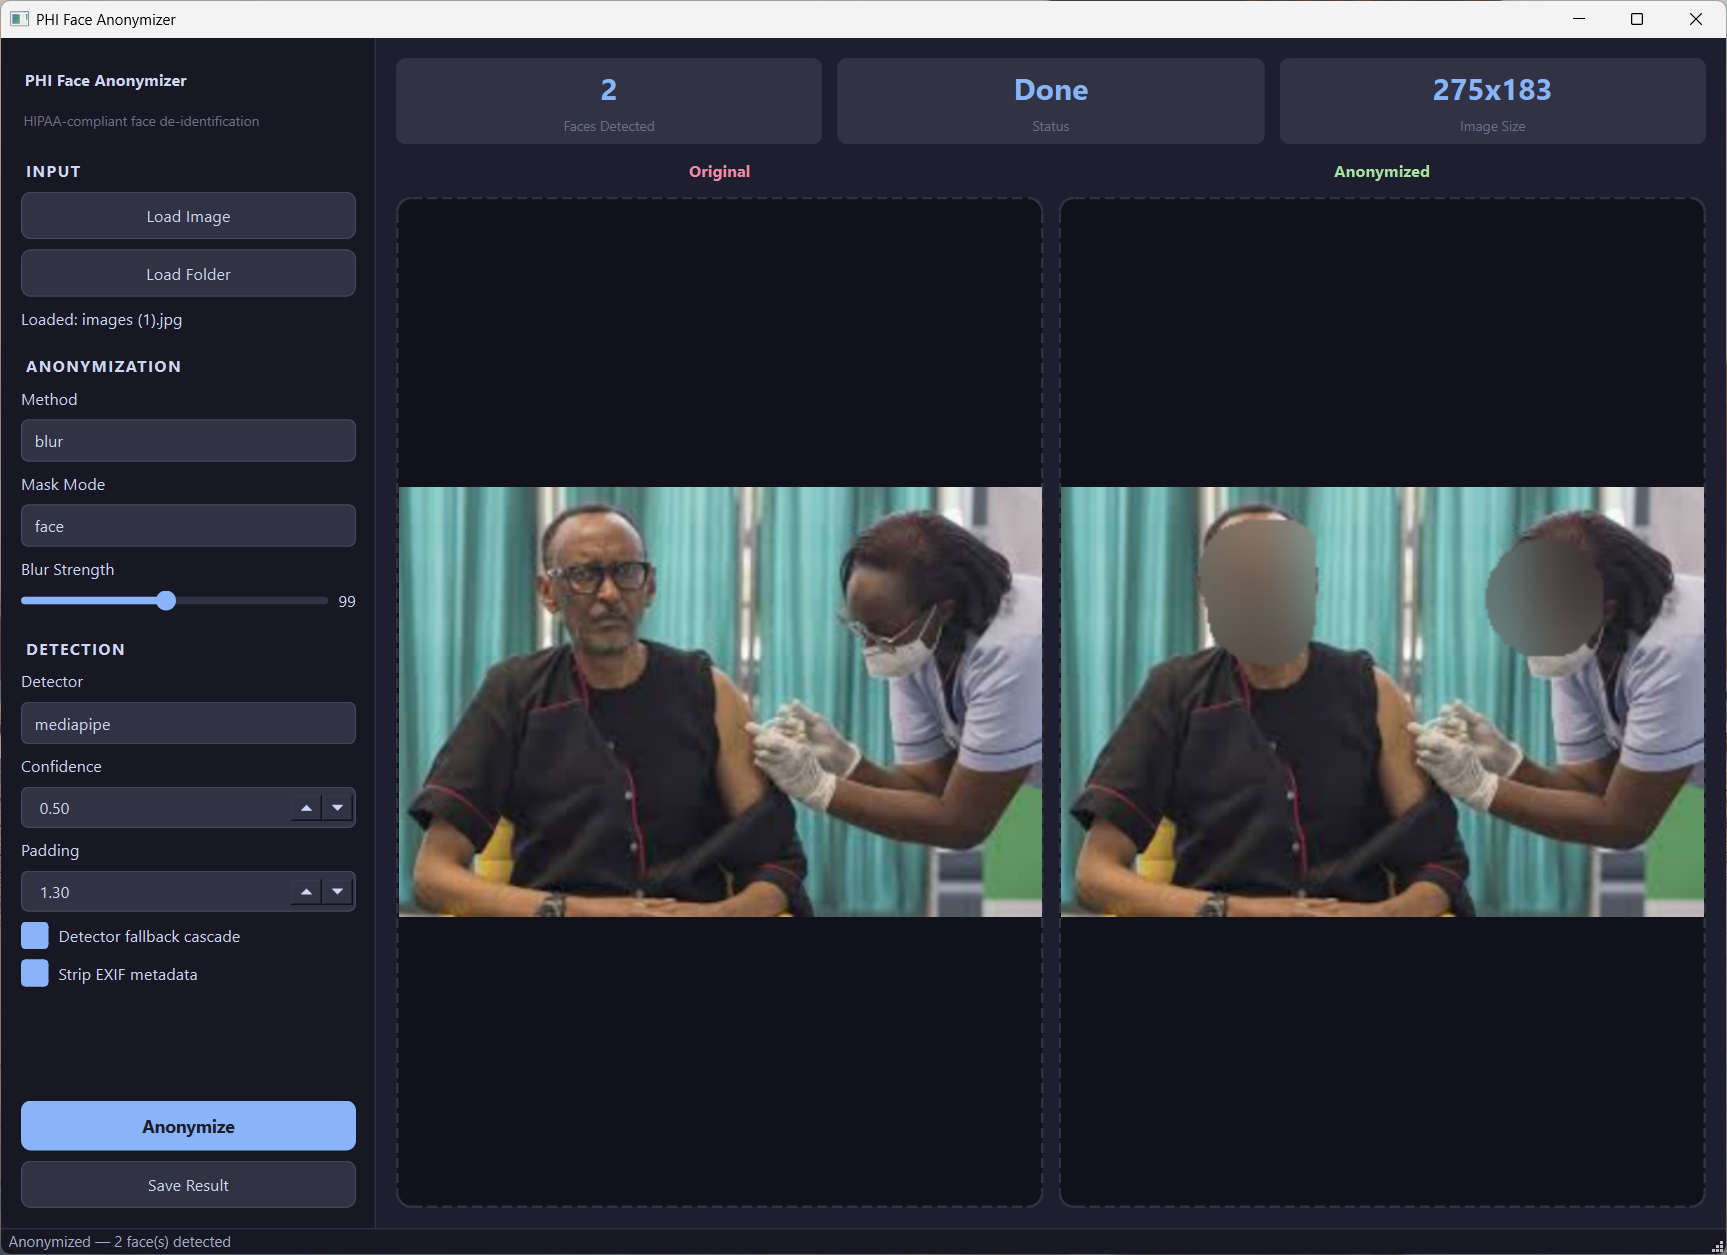
GUI Features
| Feature | Description |
|---|---|
| Side-by-side preview | Original and anonymized images shown together |
| Drag-and-drop | Drop an image directly onto the preview area |
| Tunable controls | Method, blur strength slider, detector, confidence, padding |
| Single image mode | Load Image → adjust settings → Anonymize → Save |
| Batch folder mode | Load Folder → select output folder → processes all with progress bar |
| Stats cards | Live display of faces detected, processing status, image dimensions |
| EXIF toggle | Strip or preserve EXIF metadata |
| Fallback toggle | Enable/disable detector cascade |
| Dark theme | Modern dark UI (Catppuccin Mocha) |
GUI Workflow
Single image:
- Click Load Image (or drag-and-drop onto the preview area)
- Adjust settings in the sidebar (method, blur strength, detector, etc.)
- Click Anonymize
- Review the side-by-side before/after preview
- Click Save Result to export
Batch folder:
- Click Load Folder — all supported images are discovered (including subdirectories)
- Adjust settings in the sidebar
- Click Anonymize → select an output folder
- Watch progress bar and live preview as each image is processed
- Summary dialog shows total faces anonymized
CLI Tool
The phi-anonymize command is available after installation.
Single Image
# Default blur
phi-anonymize -i patient.jpg -o anonymized.jpg

# Choose method
phi-anonymize -i photo.jpg -o out.jpg --method pixelate
phi-anonymize -i photo.jpg -o out.jpg --method blackbox

# Adjust blur strength and padding
phi-anonymize -i photo.jpg -o out.jpg --blur-strength 151 --padding 1.5
Folder Batch
# Process all images in a folder
phi-anonymize -i ./patient_photos/ -o ./anonymized/

# Recursive (includes subdirectories)
phi-anonymize -i ./patient_photos/ -o ./anonymized/ --recursive
Detection Options
# Use a specific detector
phi-anonymize -i photo.jpg -o out.jpg --detector opencv_dnn

# Auto cascade (try all detectors)
phi-anonymize -i photo.jpg -o out.jpg --detector auto

# Lower confidence to catch more faces
phi-anonymize -i photo.jpg -o out.jpg --confidence 0.3

# Disable fallback (use only selected detector)
phi-anonymize -i photo.jpg -o out.jpg --no-fallback
Compliance Options
# Enable audit trail (CSV log of every processed image)
phi-anonymize -i ./photos/ -o ./safe/ --audit-log audit.csv

# Verify output (re-run detection on anonymized images — should find 0 faces)
phi-anonymize -i photo.jpg -o safe.jpg --verify

# Keep EXIF metadata (not recommended for PHI)
phi-anonymize -i photo.jpg -o out.jpg --keep-exif
Full CLI Reference
Usage: phi-anonymize [OPTIONS]

Options:
  -i, --input TEXT        Image or folder path (required)
  -o, --output TEXT       Output path (required)
  -m, --method TEXT       blur | pixelate | blackbox (default: blur)
  --blur-strength INT     Blur kernel size (default: 99)
  --padding FLOAT         Bounding-box padding factor (default: 1.3)
  --detector TEXT         mediapipe | opencv_dnn | retinaface | auto (default: mediapipe)
  --confidence FLOAT      Min detection confidence (default: 0.5)
  --no-fallback           Disable detector cascade fallback
  --recursive             Recurse into subdirectories (folder mode)
  --keep-exif             Preserve EXIF metadata
  --audit-log TEXT        Path for CSV audit log
  --verify                Verify output images have no residual faces
  --version               Show version
  -h, --help              Show help
Python API
Quick Start
from phi_anonymize_face import anonymize_image, anonymize_folder, FaceAnonymizer

# 1. Quick single-image anonymization
result = anonymize_image("patient_photo.jpg", method="blur", output_path="anon.jpg")
print(f"Faces found: {result.faces_detected}")

# 2. Quick folder batch
results = anonymize_folder("input_dir/", output_dir="output_dir/", method="pixelate")

# 3. Configured anonymizer
anon = FaceAnonymizer(
    method="blur",
    blur_strength=99,
    padding=1.3,
    detector="mediapipe",      # or "opencv_dnn", "retinaface", "auto"
    confidence_threshold=0.5,
    fallback=True,             # cascade to next detector if 0 faces found
    audit_log="audit.csv",
)
result = anon.process("patient.jpg", output_path="anonymized.jpg")
results = anon.process_folder("photos/", output_dir="safe_photos/")
Working with Results
result = anonymize_image("photo.jpg", output_path="anon.jpg")

if result.success:
    print(f"Faces: {result.faces_detected}")
    for box in result.bounding_boxes:
        print(f"  x={box.x}, y={box.y}, w={box.w}, h={box.h}, conf={box.confidence:.2f}")
    # result.image is the anonymized numpy array (BGR)
else:
    print(f"Error: {result.error}")
Using with Numpy Arrays
import cv2
from phi_anonymize_face import anonymize_image

img = cv2.imread("photo.jpg")
result = anonymize_image(img, method="pixelate")
cv2.imwrite("anon.jpg", result.image)
How Detection Cascade Works
Input Image
    │
    ▼
┌─────────────┐   faces found?   ┌──────────┐
│  MediaPipe   │ ──── YES ──────► │  Apply    │
│  (primary)   │                  │  method   │
└─────┬───────┘                  └──────────┘
      │ NO
      ▼
┌─────────────┐   faces found?   ┌──────────┐
│  OpenCV DNN  │ ──── YES ──────► │  Apply    │
│  (fallback)  │                  │  method   │
└─────┬───────┘                  └──────────┘
      │ NO
      ▼
┌─────────────┐   faces found?   ┌──────────┐
│  RetinaFace  │ ──── YES ──────► │  Apply    │
│  (optional)  │                  │  method   │
└─────┬───────┘                  └──────────┘
      │ NO
      ▼
  Return image unchanged (log warning)
Set fallback=False to use only the selected detector.
Anonymization Methods
| Method | Description | Use Case |
|---|---|---|
blur |
Gaussian blur (configurable kernel) | Default — preserves image context |
pixelate |
Block-based downscale/upscale | Visible anonymization indicator |
blackbox |
Solid black fill | Maximum privacy, no facial info retained |
DICOM Support
from phi_anonymize_face import anonymize_image

# Works with .dcm files when pydicom is installed
result = anonymize_image("scan.dcm", output_path="anon.dcm")
Install with pip install phi-anonymize-face[dicom].
API Reference
FaceAnonymizer
The main class for configuring and running face anonymization.
| Parameter | Type | Default | Description |
|---|---|---|---|
method |
str |
"blur" |
Anonymization method: "blur", "pixelate", "blackbox" |
blur_strength |
int |
99 |
Kernel size for blur / block size for pixelate |
padding |
float |
1.3 |
Bounding-box expansion factor (1.3 = 30% larger) |
detector |
str |
"mediapipe" |
Backend: "mediapipe", "opencv_dnn", "retinaface", "auto" |
confidence_threshold |
float |
0.5 |
Minimum detection confidence to keep a face |
fallback |
bool |
True |
Cascade to next detector if current finds 0 faces |
strip_exif |
bool |
True |
Remove EXIF metadata from output (recommended for PHI) |
audit_log |
str|None |
None |
Path for CSV audit trail file |
Methods:
| Method | Signature | Description |
|---|---|---|
process() |
process(source, output_path=None) → AnonymizationResult |
Anonymize a single image (path, Path, or numpy array) |
process_folder() |
process_folder(folder, output_dir, recursive=False) → list[AnonymizationResult] |
Batch-process all images in a folder |
verify() |
verify(source) → bool |
Returns True if no faces are detected (post-anonymization check) |
anonymize_image
anonymize_image(source, method="blur", output_path=None, **kwargs) → AnonymizationResult
Quick function for single images. All **kwargs are forwarded to FaceAnonymizer.
anonymize_folder
anonymize_folder(folder, output_dir, method="blur", recursive=False, **kwargs) → list[AnonymizationResult]
Quick function for batch processing. All **kwargs are forwarded to FaceAnonymizer.
AnonymizationResult
Dataclass returned by all processing methods.
| Field | Type | Description |
|---|---|---|
image |
np.ndarray|None |
The anonymized image (BGR numpy array) |
faces_detected |
int |
Number of faces found |
bounding_boxes |
list[BoundingBox] |
Padded bounding boxes of detected faces |
output_path |
str|None |
Path where the image was saved (if requested) |
success |
bool |
Whether processing completed without error |
error |
str|None |
Error message if success is False |
Step-by-Step Usage Guide
Option 1: GUI (Desktop App) — No coding required
- Install:
pip install phi-anonymize-face[gui] - Launch: Run
phi-anonymize-guiin your terminal - Load an image: Click Load Image in the sidebar, or drag-and-drop onto the preview area
- Adjust settings: Use the sidebar controls to pick a method (blur/pixelate/blackbox), set blur strength, choose a detector, and adjust confidence and padding
- Anonymize: Click the blue Anonymize button
- Review: Compare the original and anonymized images side-by-side
- Save: Click Save Result and choose where to export
For a folder of images:
- Click Load Folder instead of Load Image
- Adjust settings as needed
- Click Anonymize → select an output folder when prompted
- Watch the progress bar — each image previews as it completes
- A summary dialog appears when done
Option 2: CLI (Command Line) — For scripting and automation
- Install:
pip install phi-anonymize-face - Single image:
phi-anonymize -i photo.jpg -o anonymized.jpg - Choose a method: Add
--method pixelateor--method blackbox - Adjust blur: Add
--blur-strength 151(higher = more blur) - Batch a folder:
phi-anonymize -i ./photos/ -o ./safe/ --recursive - Add audit log: Append
--audit-log audit.csv - Verify output: Append
--verifyto confirm no residual faces
Option 3: Python API — For integration into code/pipelines
- Install:
pip install phi-anonymize-face - Quick anonymize:
from phi_anonymize_face import anonymize_image
result = anonymize_image("photo.jpg", output_path="anon.jpg")
print(f"Faces blurred: {result.faces_detected}")
- Choose method:
anonymize_image("photo.jpg", method="pixelate", output_path="pix.jpg")
- Batch a folder:
from phi_anonymize_face import anonymize_folder
results = anonymize_folder("./photos/", output_dir="./safe/")
- Fine-tune settings:
from phi_anonymize_face import FaceAnonymizer
anon = FaceAnonymizer(
    method="blur", blur_strength=99, padding=1.3,
    detector="mediapipe", confidence_threshold=0.5,
    fallback=True, audit_log="audit.csv",
)
result = anon.process("photo.jpg", output_path="safe.jpg")
- Use with numpy arrays:
import cv2
from phi_anonymize_face import anonymize_image
img = cv2.imread("photo.jpg")
result = anonymize_image(img, method="blur")
cv2.imwrite("anon.jpg", result.image)
Development
git clone https://github.com/ismailukman/phi_anonymize_face.git
cd phi_anonymize_face
pip install -e ".[dev,gui]"
pytest
ruff check src/ tests/
License
MIT — see LICENSE.
Release history Release notifications | RSS feed


Download files
Download the file for your platform. If you're not sure which to choose, learn more about installing packages.
Source Distribution
Built Distribution
Filter files by name, interpreter, ABI, and platform.
If you're not sure about the file name format, learn more about wheel file names.
Copy a direct link to the current filters
File details
Details for the file phi_anonymize_face-0.2.1.tar.gz.
File metadata
- Download URL: phi_anonymize_face-0.2.1.tar.gz
- Upload date:
- Size: 438.5 kB
- Tags: Source
- Uploaded using Trusted Publishing? No
- Uploaded via: twine/6.2.0 CPython/3.9.12
File hashes
| Algorithm | Hash digest | |
|---|---|---|
| SHA256 |
e3d4d2ca12466a9d9da0bbbfb4cea421aad93b17881a5a27705a4b21b33958b7
|
|
| MD5 |
9567a7782c8e530a23e543b8516ab06e
|
|
| BLAKE2b-256 |
4ec64cb3239764dc377db6af7be50fb1f451c4012eb949a27a0238df8241a07a
|
File details
Details for the file phi_anonymize_face-0.2.1-py3-none-any.whl.
File metadata
- Download URL: phi_anonymize_face-0.2.1-py3-none-any.whl
- Upload date:
- Size: 33.5 kB
- Tags: Python 3
- Uploaded using Trusted Publishing? No
- Uploaded via: twine/6.2.0 CPython/3.9.12
File hashes
| Algorithm | Hash digest | |
|---|---|---|
| SHA256 |
3582a44bd6ecfa756dcf47eabd23c0bcaf8568ce1c1e71106a197126047a23b5
|
|
| MD5 |
79d9131bf361bfb6d6bea99b57ca1eb9
|
|
| BLAKE2b-256 |
3057e2159ababba9caf0eb961d01d30a1085a2ea47510a75ba2e21a6b31aaac3
|


