



ᓚᘏᗢ Whisker: A Pipecat Debugger
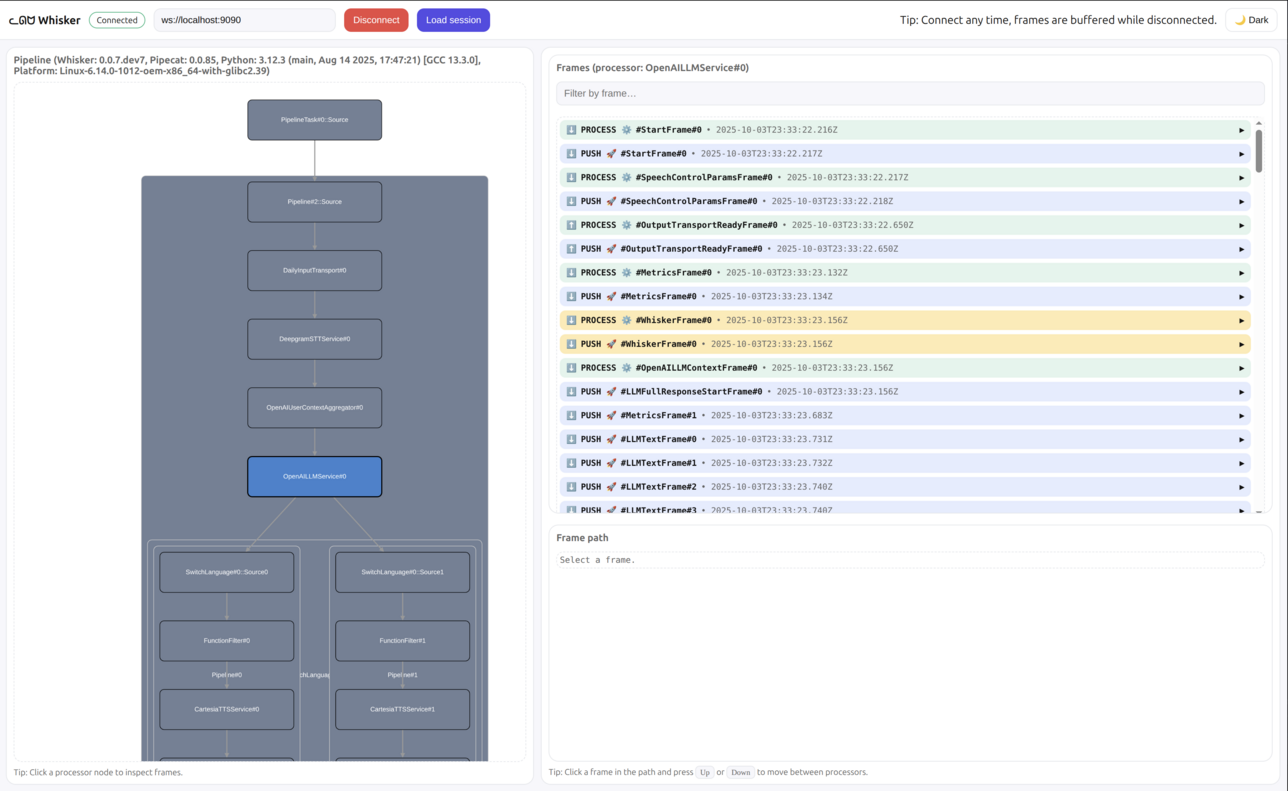
Whisker is a low-level debugger for the Pipecat voice and multimodal conversational AI framework.
Pipecat is a multi-agent systems: workers spawn sub-workers, send jobs to each other, and exchange messages on a shared bus. Whisker gives you a single view over the whole system so you can see exactly what every part is doing.
With Whisker you can:
- 🧑🤝🧑 Browse every worker and sub-worker running in your Pipecat process
- 🗺️ Inspect the selected worker's pipeline
- 🧰 See every job flowing between workers
- 🚌 Follow messages on the Pipecat bus
- 📌 Select a processor to inspect its frames
- 🔍 Filter frames by name and direction
- 🧵 Trace a frame's path through the pipeline
- 💾 Save and load previous sessions
Think of Whisker as trace logging with batteries for Pipecat applications.
🧭 Getting started
Requirements
Install Whisker for Python
uv pip install pipecat-ai-whisker
Add Whisker to your Pipecat pipeline
Whisker is split into two pieces: a WhiskerServer that owns the WebSocket connection to the UI (and listens on the Pipecat bus for cross-worker events), and per-worker WhiskerObservers that forward frame events to the server. Add one server to your runner and an observer to every pipeline worker you want to debug.
pipeline = Pipeline(...)
worker = PipelineWorker(pipeline, ...)

whisker = WhiskerServer()
worker.add_observer(whisker.create_observer(worker))

runner = WorkerRunner()
await runner.add_workers(whisker, worker)
await runner.run()
You can also add Whisker without touching your application code by listing a setup file in the PIPECAT_SETUP_FILES environment variable. The runner picks up setup_worker_runner (called once for the runner) and each worker picks up setup_pipeline_worker (called once per pipeline worker) — both reading from the same file, so a module-level WhiskerServer is shared between them:
whisker = WhiskerServer()

async def setup_worker_runner(runner: WorkerRunner):
    await runner.add_workers(whisker)


async def setup_pipeline_worker(worker: PipelineWorker):
    worker.add_observer(whisker.create_observer(worker))
In both cases, this starts the Whisker server that the graphical UI will connect to. By default, the Whisker server runs at:
ws://localhost:9090
🌐 Option A: Use the hosted UI (Recommended)
-
Expose your local server with ngrok:
ngrok http 9090
-
Copy the ngrok URL (e.g.,
your-ngrok-url.ngrok.io) -
Open the hosted Whisker UI: https://whisker.pipecat.ai/
-
Connect to your bot:
- In the WebSocket URL field, enter:
wss://your-ngrok-url.ngrok.io - Click connect
- In the WebSocket URL field, enter:
🏠 Option B: Run the UI locally
If you prefer to run the UI locally:
-
Clone the repository:
git clone https://github.com/pipecat-ai/whisker.git
-
Start the UI:
cd whisker/ui
npm install
npm run dev
-
Connect to http://localhost:5173
The UI will automatically connect to ws://localhost:9090 by default.
💾 Saving sessions
You can save a Whisker session to a file for later replay or sharing. The on-disk format matches the live wire protocol, so any saved session loads back into the Whisker UI via Load session.
Record alongside the live server by passing file_name= to WhiskerServer:
whisker = WhiskerServer(file_name="whisker.whisk")
For a headless capture without the WebSocket server (CI jobs, scripted recordings), drop in WhiskerFile — same wiring as WhiskerServer, no port reserved:
whisker = WhiskerFile("whisker.whisk")
Custom sinks
WhiskerServer and WhiskerFile are both concrete WhiskerSinks. To stream events to a different backend (HTTP webhook, message queue, custom log format, …), subclass WhiskerSink and implement emit:
class MyCustomSink(WhiskerSink):
    async def emit(self, event: dict) -> None:
        # event is a plain dict — encode and ship it however you like.
        ...
📚 Next steps
- View some examples in the
examplesfolder - See the Pipecat documentation for more about building bots
Download files
Download the file for your platform. If you're not sure which to choose, learn more about installing packages.
Source Distribution
Built Distribution
Filter files by name, interpreter, ABI, and platform.
If you're not sure about the file name format, learn more about wheel file names.
Copy a direct link to the current filters
File details
Details for the file pipecat_ai_whisker-2.0.1.tar.gz.
File metadata
- Download URL: pipecat_ai_whisker-2.0.1.tar.gz
- Upload date:
- Size: 229.8 kB
- Tags: Source
- Uploaded using Trusted Publishing? Yes
- Uploaded via:
twine/7.0.0 CPython/3.13.14
File hashes
| Algorithm | Hash digest | |
|---|---|---|
| SHA256 |
60449d64d37b2a5974501d9ae3eed4cab1bece34c503ef787b64bf3c80e94447
|
|
| MD5 |
d2be0a698a38559856691c6f12e27442
|
|
| BLAKE2b-256 |
ad771e454aecd4913e8b322ee13f4ce325f39a835ecbd66064a44235bbd57255
|
Provenance
The following attestation bundles were made for pipecat_ai_whisker-2.0.1.tar.gz:
Publisher:
publish.yaml on pipecat-ai/whisker
-
Statement:
-
Statement type:
https://in-toto.io/Statement/v1 -
Predicate type:
https://docs.pypi.org/attestations/publish/v1 -
Subject name:
pipecat_ai_whisker-2.0.1.tar.gz -
Subject digest:
60449d64d37b2a5974501d9ae3eed4cab1bece34c503ef787b64bf3c80e94447 - Sigstore transparency entry: 2517320468
- Sigstore integration time:
-
Permalink:
pipecat-ai/whisker@3537dc070f2edfca782620eb7bada2fff65785e5 -
Branch / Tag:
refs/heads/main - Owner: https://github.com/pipecat-ai
-
Access:
public
-
Token Issuer:
https://token.actions.githubusercontent.com -
Runner Environment:
github-hosted -
Publication workflow:
publish.yaml@3537dc070f2edfca782620eb7bada2fff65785e5 -
Trigger Event:
workflow_dispatch
-
Statement type:
File details
Details for the file pipecat_ai_whisker-2.0.1-py3-none-any.whl.
File metadata
- Download URL: pipecat_ai_whisker-2.0.1-py3-none-any.whl
- Upload date:
- Size: 17.7 kB
- Tags: Python 3
- Uploaded using Trusted Publishing? Yes
- Uploaded via:
twine/7.0.0 CPython/3.13.14
File hashes
| Algorithm | Hash digest | |
|---|---|---|
| SHA256 |
ae1555294e542fe81d95c35b76c0ae7be2ef7621fead3f4a5beb031aaa221b55
|
|
| MD5 |
26ecd59d605de6f03664e29431643049
|
|
| BLAKE2b-256 |
6ec4b019bac60caba652d9f04e1ee81d9d5204401e1cd4bb7b6ae0ebb2fad677
|
Provenance
The following attestation bundles were made for pipecat_ai_whisker-2.0.1-py3-none-any.whl:
Publisher:
publish.yaml on pipecat-ai/whisker
-
Statement:
-
Statement type:
https://in-toto.io/Statement/v1 -
Predicate type:
https://docs.pypi.org/attestations/publish/v1 -
Subject name:
pipecat_ai_whisker-2.0.1-py3-none-any.whl -
Subject digest:
ae1555294e542fe81d95c35b76c0ae7be2ef7621fead3f4a5beb031aaa221b55 - Sigstore transparency entry: 2517320541
- Sigstore integration time:
-
Permalink:
pipecat-ai/whisker@3537dc070f2edfca782620eb7bada2fff65785e5 -
Branch / Tag:
refs/heads/main - Owner: https://github.com/pipecat-ai
-
Access:
public
-
Token Issuer:
https://token.actions.githubusercontent.com -
Runner Environment:
github-hosted -
Publication workflow:
publish.yaml@3537dc070f2edfca782620eb7bada2fff65785e5 -
Trigger Event:
workflow_dispatch
-
Statement type:







