pixels2svg : Convert pixels to SVG square-based shapes.

Project description
pixels2svg v0.2.3
Convert pixels to SVG square-based shapes.

There are a few open source tools around that do bitmap -> vector tracing, for instance potrace which is the engine used by Inkscape and also has available python bindings (pypotrace).
But sometimes, what you want is the exact bitmap data, but as a set of SVG shapes, that you could for instance:
- enlarge for big prints
- use as input paths for a wood laser cutter
- customize in a vector graphics software (edit opacity, contours, overlay on some background image etc.)
Medical image segmentation is another typical use case where one has pretty low-res images and sometimes needs to display them best for data visualization/presentation purposes. In this case, an SVG overlay with editable contours and opacity can be convenient.
This package enables you to easily convert your bitmap image to its equivalent SVG representation, each path of the SVG being a polygon made of adjacent pixels of same color merged together.
It is inspired of Florian Berger's pixel2svg package (GitHub fork available here), which is pretty old (python2) and doesn't merge adjacent pixels of same color, making the SVG pretty tedious to edit in vector graphics softwares.
Requirements
- Python >= 3.7
Dependencies
Install
pip install pixels2svg
or directly from Github:
pip install git+git://github.com/ValentinFrancois/pixels2svg#egg=pixels2svg
Usage
CLI
python3 -m pixels2svg [-h] [--output <path>] [--color_tolerance <int>] [--remove_background]
                      [--background_tolerance <float>] [--maximal_non_bg_artifact_size <float>]
                      [--no_group_by_color] [--no_pretty]
                      <input_path>

pixels2svg CLI

positional arguments:
  <input_path>          Path to the input bitmap image (anything supported by PIL.Image).

optional arguments:
  -h, --help            Show this help message and exit
  --output <path>, -o <path>
                        Path to the output SVG image.
                        If not passed, will print the output in the terminal.
  --color_tolerance <int>, -c <int>
                        Color tolerance (1 = the smallest luminosity difference i.e. a difference of 1 on the
                        Blue channel).
  --remove_background, -b
                        If the input image has a solid background, will try to remove it.
  --background_tolerance <float>
                        (Only relevant when `remove_background = True`)
                        Arbitrary quantity of blur use to remove noise - just fine-tune the value if the
                        default (1.0) doesn't work well.
                        0 means no blur will be used.
  --maximal_non_bg_artifact_size <float>
                        (Only relevant when `remove_background = True`)
                        When a blob of pixels is clone enough to the detected image contours and below this
                        threshold, it won't be considered as background.
                        Combined with `background_tolerance`, this allows you to control how progressive the
                        background detection should be with blurred contours.
                        Size is expressed in % of total image pixels.
  --no_group_by_color   Do not group shapes of same color together inside <g> tags.
  --no_pretty           Do not pretty-write the SVG code.
In Python
Simple usage
from pixels2svg import pixels2svg

pixels2svg('input.png', 'output.svg')
pixels2svg() accepts a few optional arguments that should help you
integrate it best within your codebase:
Parameters
-
input_path:str
Path of the input bitmap image -
output_path:Optional[str]
Path of the output SVG image (optional). If passed, the function will return None.
If not passed, the function will return the SVG data as astror aDrawingdepending on theas_stringparameter. -
group_by_color:bool
If True (default), group same-color shapes under SVG elements. -
color_tolerance:int
Optional tolerance parameter that defines if adjacent pixels of close colors should be merged together in a single SVG shape.
Tolerance is applied based on luminosity. 1 represents the smallest difference of luminosity, i.e. a difference of 1 in the Blue channel. -
remove_background:bool
If True, tries to remove the background before the conversion to SVG (default False).
Simple technique based on contour detection, probably won't work well with complex images. -
background_tolerance:float
(Only relevant when remove_background = True)
Arbitrary quantity of blur use to remove noise - just fine-tune the value if the default (1.0) doesn't work well.
0 means no blur will be used. -
maximal_non_bg_artifact_size:float
(Only relevant when remove_background = True)
When a blob of pixels is clone enough to the detected image contours, and below this threshold, it won't be considered as background.
Combined with background_tolerance, this allows you to control how progressive the background detection should be with blurred contours.
Size is expressed in % of total image pixels. -
as_string:bool
If True and nooutput_pathis passed, return astrrepresenting the SVG data. -
pretty:bool
If True (default), output SVG code is pretty-printed.
Returns
Optional[Union[svg.Drawing, str]]
Depends on theoutput_pathandas_stringparameters
Advanced usage
By setting output_path=None and as_string=False, you can get an object
inheriting svgwrite.Drawing,
with the additional useful methods:
def save_to_path(self, path: str, pretty: bool = False)def to_string(self, pretty: bool = False) ‑> str
This gives you access to the svgwrite API to modify the output programmatically.
See advanced examples in examples.
Examples
Example 1 - vectorize and edit pixel art (source)
| File | Preview |
|---|---|
| Original PNG image (32×32) |
|
| Original PNG image (browser enlarged) |
 |
| Output SVG image |  |
| Output SVG image with customized contour style |
 |
Example 2 - brain scan + segmentation overlay (source)
| File | Preview |
|---|---|
| Scan image (PNG) | 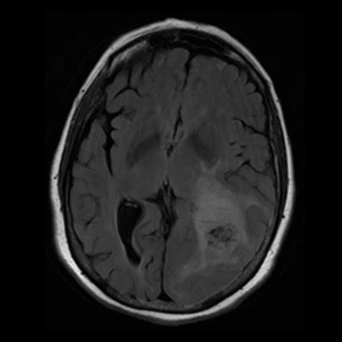 |
| Segmentation overlay (PNG) | 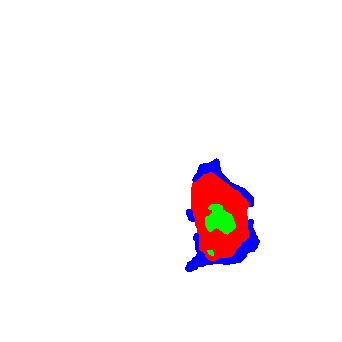 |
| Converted SVG segmentation overlay |  |
| Converted SVG overlayed on PNG scan with customized opacity & contour style |
 |
Example 3 - vectorize pixel art and remove background (source)
| File | Preview |
|---|---|
| Original PNG image (256×256) |
 |
| Output SVG image (background removed) |
 |
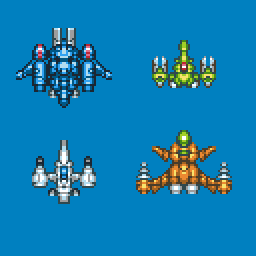
Example 4 - vectorize sprite with gradients and reduce number of colors (source)
| File | Preview |
|---|---|
| Original PNG image (150×150) |
 |
| Output SVG image (color tolerance: 0) |
 |
| Output SVG image (color tolerance: 64) |
 |
| Output SVG image (color tolerance: 128) |
 |
| Output SVG image (color tolerance: 256) |
 |
| Output SVG image (color tolerance: 512) |
 |
Limitations
The code isn't optimized and runtime is pretty much proportional to the dimensions and the number of colors of the image that gets traced in SVG: we indeed iterate over each isolated color blob to calculate its polygonal contour. This is why reducing the number of colors might be useful.
For instance, converting the 150×150 fireball sprite with transparency in
example 4
took 60s on my laptop.
Using color_tolerance=64, it took 4s. Using color_tolerance=128, it took 0.8s.


Download files
Download the file for your platform. If you're not sure which to choose, learn more about installing packages.
Source Distribution
File details
Details for the file pixels2svg-0.2.3.tar.gz.
File metadata
- Download URL: pixels2svg-0.2.3.tar.gz
- Upload date:
- Size: 32.2 kB
- Tags: Source
- Uploaded using Trusted Publishing? No
- Uploaded via: twine/6.1.0 CPython/3.8.18
File hashes
| Algorithm | Hash digest | |
|---|---|---|
| SHA256 |
04da2b84d634331504469359c513dd1f5344d849c8a8a675fc58601dbac33335
|
|
| MD5 |
2d4fabc98bf983e283146867adde521c
|
|
| BLAKE2b-256 |
b487dc432a71b1c6e50b6512d0a270d4946450f59a425f2320f68bea10f64901
|


