
PrivacyFence
Human control and policy enforcement for AI access to enterprise data.
PrivacyFence is a local enterprise AI governance layer for macOS, Windows, and Linux. It sits between an MCP-compatible AI assistant and the business systems it can access, so data reads and actions are reviewed, governed, and logged before they are executed.
Instead of granting an AI assistant broad, persistent access and relying on the assistant to use it safely, PrivacyFence applies an independent control point:
- Human approval for sensitive reads and actions
- Policy-based automation for routine, low-risk requests
- PII detection before personal data enters the AI context
- Audit logging for accepted, denied, and automatically approved requests
- Connector-level control across common enterprise systems
- Local credential ownership: credentials remain in the PrivacyFence daemon, not in the AI-facing shim
PrivacyFence runs on macOS, Windows, and Linux and integrates with Claude through MCP. Its governance model is designed around a broader problem: controlling how AI assistants access and act on enterprise information.
Why PrivacyFence?
Organizations are rapidly adopting AI assistants, but conventional access-control models were designed for people and applications—not autonomous agents that can independently search, retrieve, combine, and modify information across multiple systems.
Granting an assistant access to Gmail, Drive, Slack, Salesforce, Jira, or other business tools can create a new gap between authorization and intent:
- A user may be authorized to access a record, but may not want that record sent to an AI.
- A connector may technically permit an action, but the action may still require human judgment.
- Static permissions cannot capture the context of a specific request.
- Native AI-client prompts may show technical tool names without enough business context.
- Broad access can reduce accountability unless every decision is traceable.
PrivacyFence introduces a governance layer between the assistant and enterprise systems. It allows AI to remain useful while keeping access decisions visible, contextual, and accountable.
Governance principles
PrivacyFence is built around five principles:
-
The AI assistant is not the authorization boundary.
Policy and approval are enforced independently by PrivacyFence. -
Humans stay in control of sensitive data and consequential actions.
Users can inspect the actual content or action before approving it. -
Routine work should remain efficient.
Narrow auto-accept rules and temporary approvals reduce repetitive prompts without creating unrestricted access. -
Every decision should be auditable.
Accepted, denied, and auto-accepted requests are recorded locally. -
Governance should enable AI adoption—not block it.
The objective is safe, practical use of AI across real business workflows.
What PrivacyFence governs
PrivacyFence applies policy and review to both directions of an AI workflow.
Data flowing to the AI
Examples:
- Reading an email or email thread
- Opening a Drive file or Google Doc
- Reading spreadsheet values
- Searching Slack or Telegram
- Reading a Jira issue
- Fetching a Salesforce record or report
- Reading a Confluence page or downloading its attachments
Sensitive reads can be shown in full before release to the assistant. The optional PII detection gate scans read content locally and adds an explicit warning when likely personal data is found.
Actions flowing from the AI
Examples:
- Creating a Gmail draft
- Sending a Slack or Telegram message
- Creating or updating calendar events
- Writing to a Drive file, Google Doc, or spreadsheet
- Creating or updating Jira issues
- Creating or updating Confluence pages
- Creating or updating contacts and tasks
- Moving or uploading files
Write dialogs explain the intended operation in business terms and require explicit approval before execution.
Human-readable approvals
PrivacyFence translates MCP tool calls into operation-specific review dialogs. Users see the target object, relevant metadata, the full content or action, and the available decision—not just a raw tool name or JSON payload.
PII-aware review
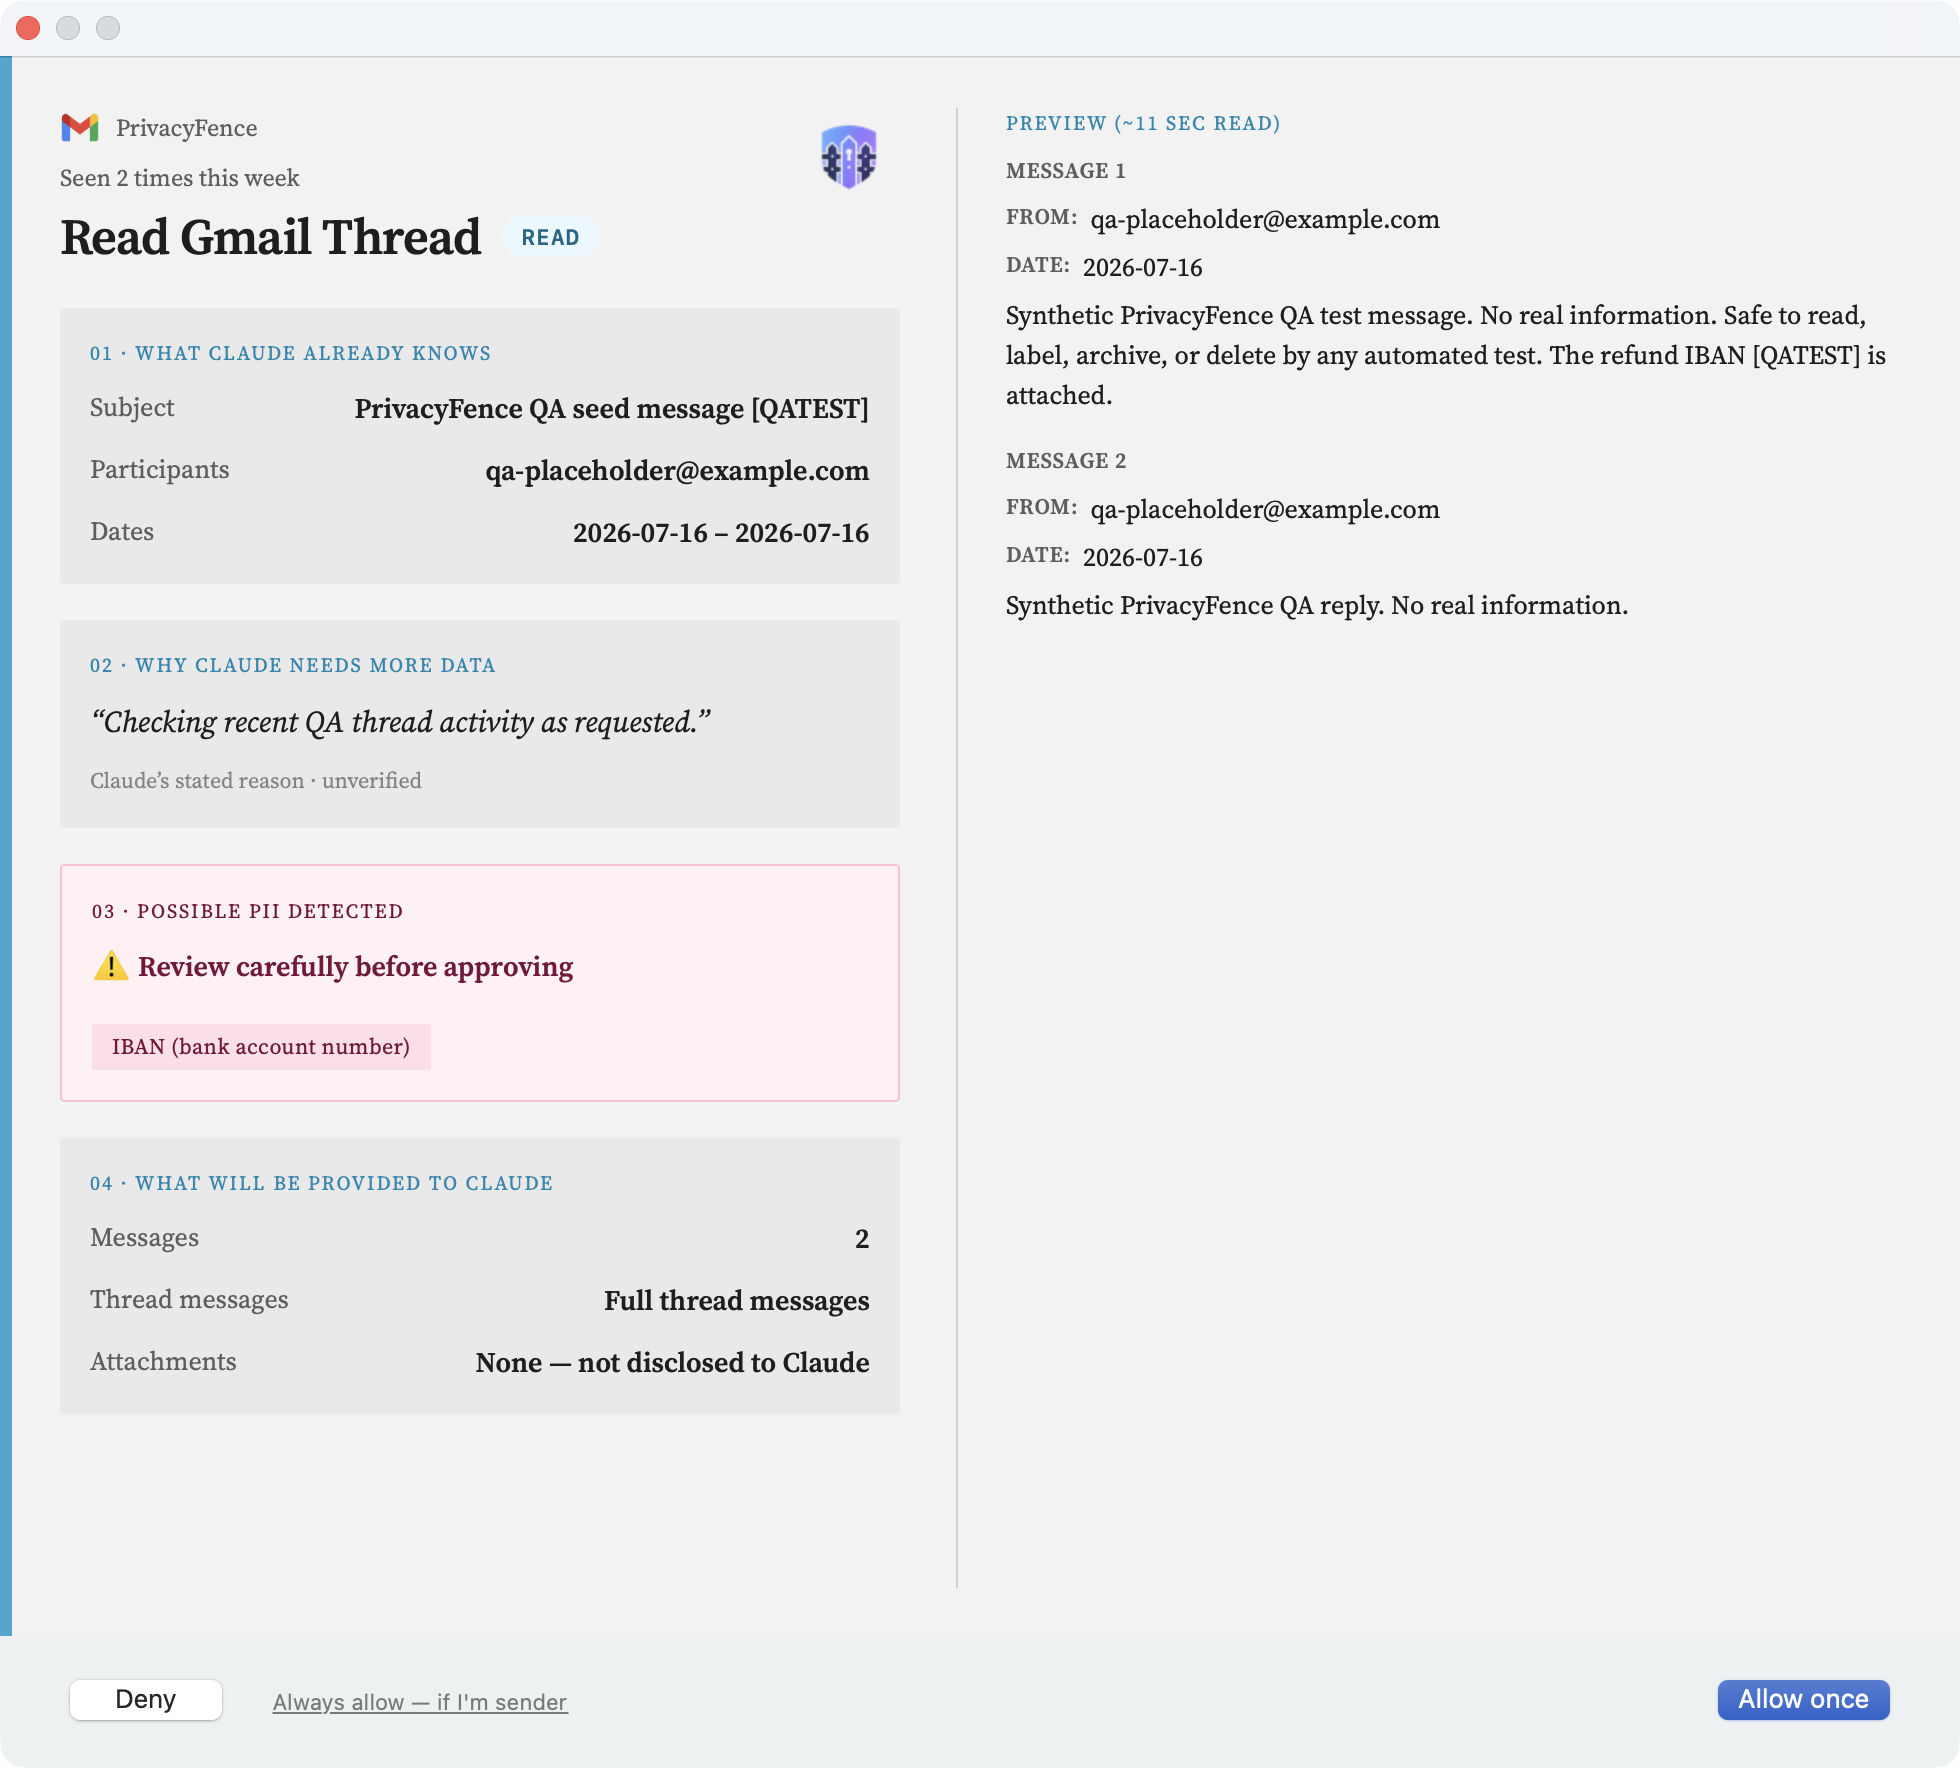
The PII gate runs locally before a read is approved. When likely personal data is detected, PrivacyFence highlights the categories found and requires an additional confirmation. Every review dialog also discloses exactly what the AI will receive, how often the item has come up recently, and the reason Claude gave for the request.
Review before an AI action
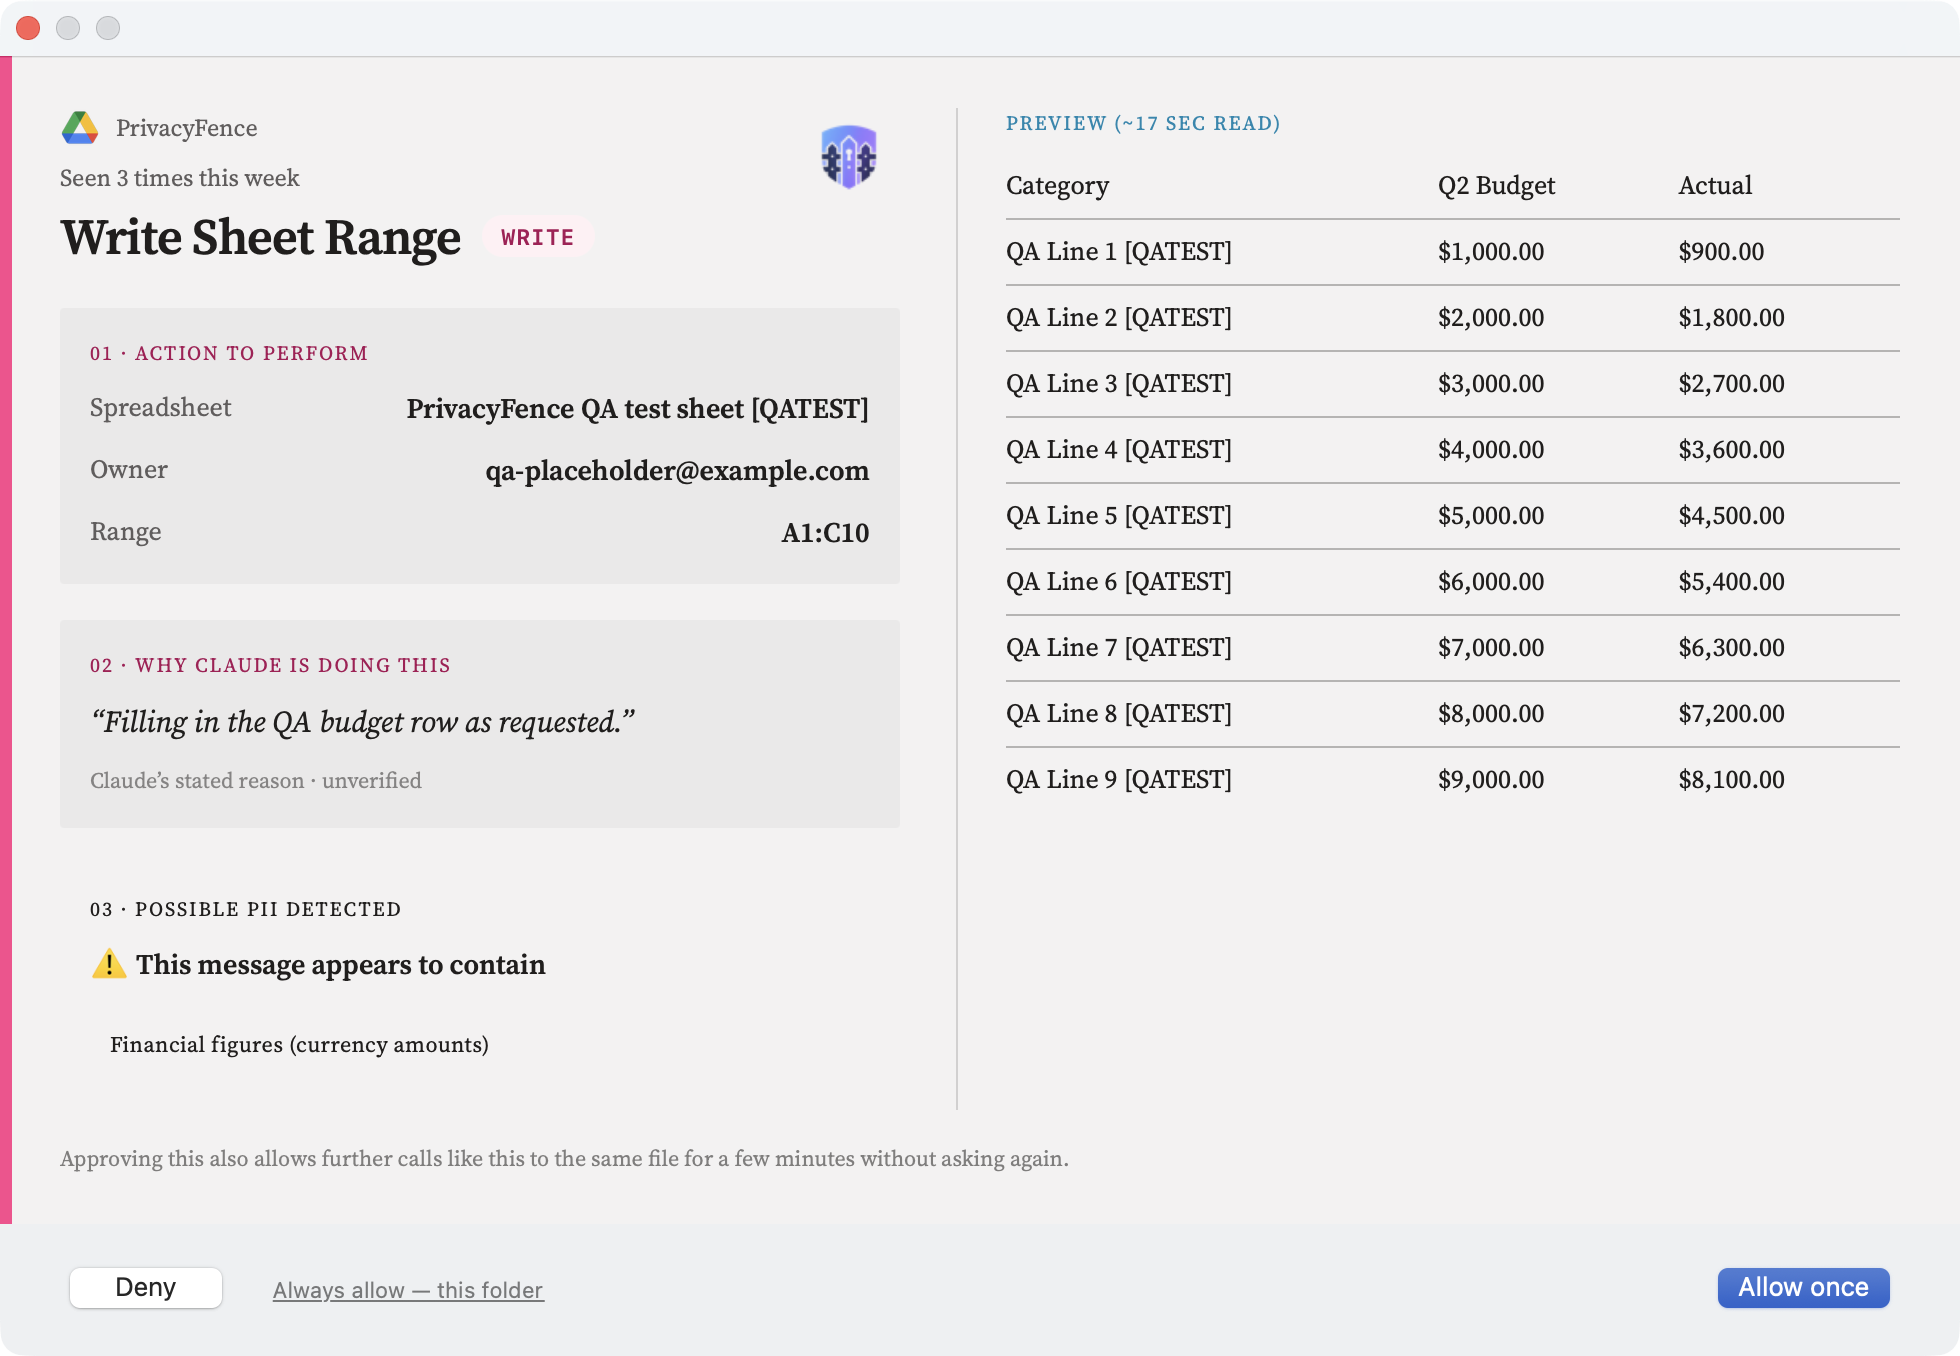
Write operations show exactly which object will change and what values will be written, including an informational warning when Claude's own drafted content appears to contain sensitive figures. Selected high-frequency operations can receive a narrowly scoped, in-memory Accept for 5 min approval.
Local administration
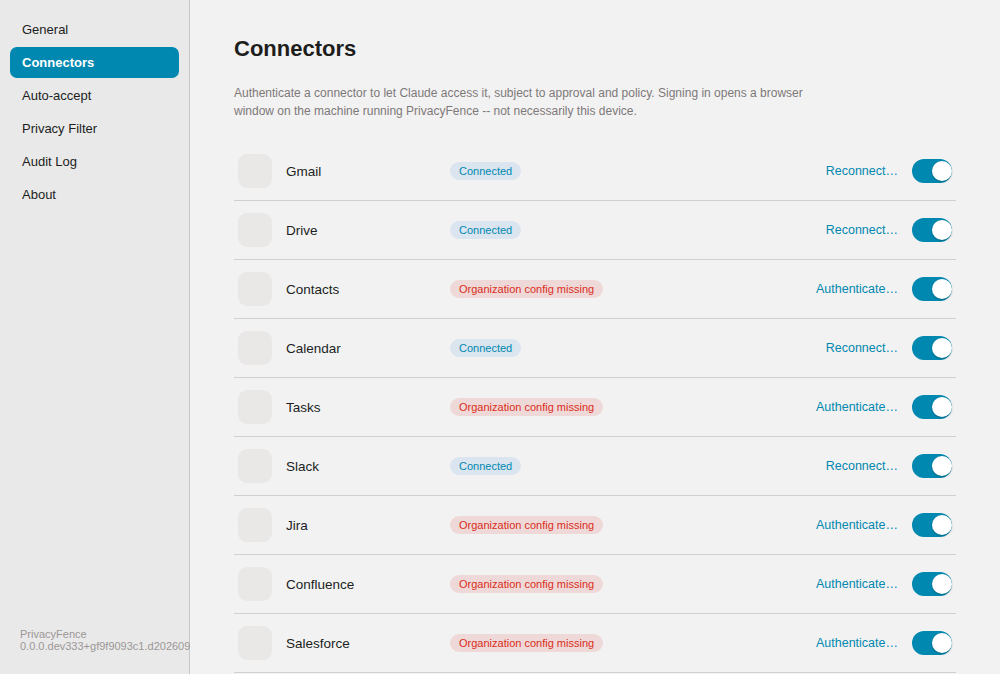
An embedded, local-only web page (PrivacyFence Settings) provides access to:
- PII detection
- Organization configuration
- Auto-accept rules
- Connector authentication and status
- The local audit log
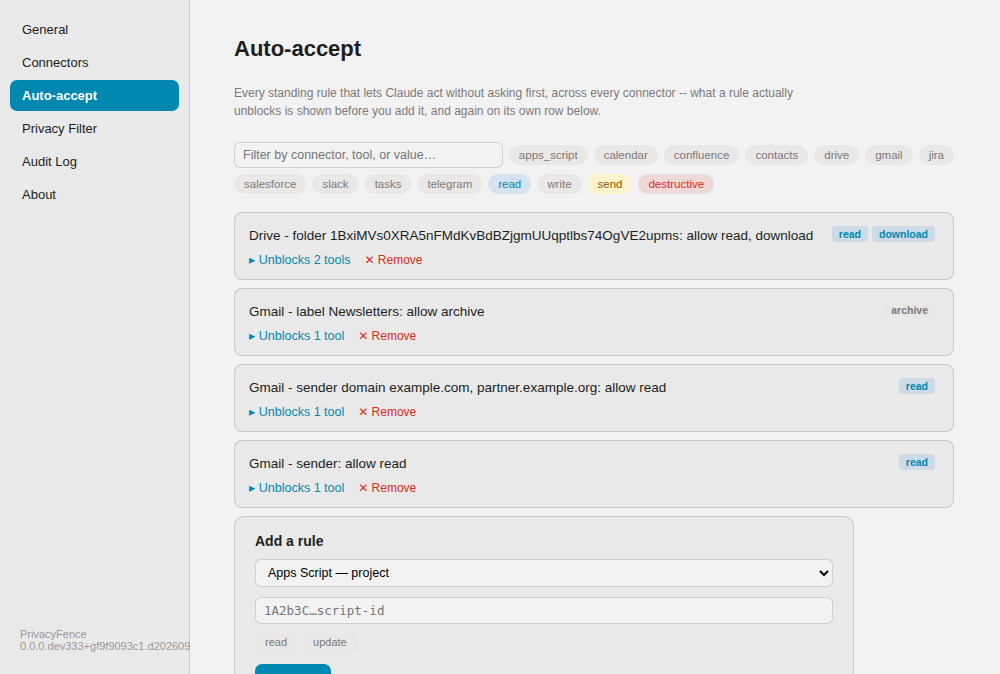
Every auto-accept rule, across every connector, is managed from a single filterable list -- each rule reads as a plain-language sentence, shows exactly which tools it unblocks, and can be added or removed without leaving the page:
Policy-based automation
Not every request needs a popup.
PrivacyFence can automatically approve routine, low-risk operations when a narrowly defined rule matches. Rules can use context such as:
- sender domain or Gmail label
- file ownership or approved Drive folder
- spreadsheet and tab
- Slack channel
- calendar ownership and attendee scope
- Jira project
- Confluence space
- Salesforce object type or report
- Telegram chat
- Google Tasks list
PII detection takes precedence over read auto-accept rules. A request that would normally pass silently is returned to human review when likely personal data is found in the content.
Temporary approval is also available for selected repetitive write operations. These approvals are scoped to the same operation and file, held only in memory, and expire automatically.
Scheduled Claude Cowork tasks can run unattended: a privacyfence_check_policy tool lets Claude
check ahead of time whether a call would auto-accept or need a human, and an opt-in unattended-session
mode denies unmatched requests immediately instead of leaving a popup open for nobody to answer. See
Technical Reference.
Supported connectors
| Connector | Examples of governed capabilities |
|---|---|
| Gmail | Read messages and threads, download attachments, create drafts and replies (plain text or rich text/HTML), manage labels, archive messages, create and update filters |
| Google Drive, Docs & Sheets | Read, download, upload, move, and write files; write, partially edit, and format (including highlight) Google Docs; add comments; read, write, and format Sheets ranges; add and rename tabs; insert and delete rows/columns |
| Google Calendar | Read event details, get/set event visibility, create and update events, create out-of-office entries, set working location |
| Google Contacts | Read, create, update, and label contacts |
| Slack | List channels, DMs, and group chats (filterable by participant), read channels and threads, search messages, send messages |
| Salesforce | Read records, search by name or id, and run reports |
| Jira | Read, create, update, comment on, and transition issues |
| Confluence | Read, create, and update pages; list and download page attachments |
| Google Tasks | Read, create, update, complete, uncomplete, and move tasks |
| Google Apps Script | Read and write script project source; read the result of a run you triggered yourself (PrivacyFence never runs scripts) |
| Telegram | Read chats, search messages, and send messages |
The detailed tool-by-tool privacy matrix is maintained in Technical Reference.
Architecture
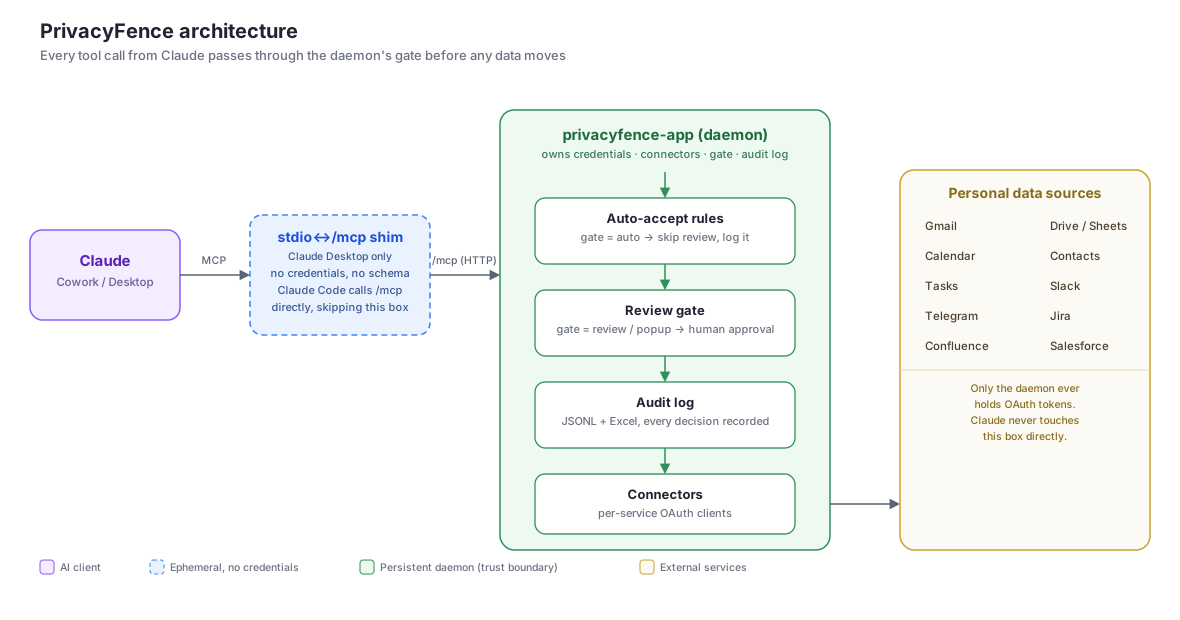
PrivacyFence is one persistent macOS daemon, privacyfence-app, which owns credentials,
connector clients, policy evaluation, approval dialogs, PII detection, temporary approvals, and the
audit log. It exposes a local, token-authenticated /mcp Streamable HTTP endpoint that Claude talks
to directly (Claude Code) or through a thin stdio-to-HTTP shim PrivacyFence.mcpb installs
(Claude Desktop, which has no built-in way to reach an HTTP MCP endpoint directly). The shim carries
no service credentials and no tool-schema knowledge of its own; it only forwards bytes.
This replaced an earlier design where a small, ephemeral privacyfence-bridge Node process, started
by the AI client, forwarded requests over a local TCP loopback socket instead of HTTP — retired once
both transports had shipped for a full release cycle each.
Claude Code          Claude Desktop
     │                     │
     │ MCP over HTTP       │ MCP over stdio
     │                     ▼
     │              stdio<->/mcp shim
     │                     │
     │  local, token-authenticated /mcp
     ▼                     │
     └──────────┬──────────┘
                ▼
         privacyfence-app
                │
                ├── policy and auto-accept rules
                ├── PII detection for reads
                ├── human review gate
                ├── temporary approvals
                ├── audit log
                └── enterprise connectors
See Technical Reference for the review model, connector matrix, rule catalogue, installation, configuration, /mcp design, and MCP annotation rationale.
Who is PrivacyFence for?
PrivacyFence is relevant to:
- CIOs and CTOs introducing AI assistants into business workflows
- CISOs and information-security teams
- AI governance, privacy, risk, and compliance leaders
- Enterprise IT administrators
- Developers building MCP-enabled workflows
- Organizations assessing AI use under GDPR, the EU AI Act, and internal information-handling policies
PrivacyFence is currently an open-source macOS/Linux implementation rather than a certified compliance product. It can support governance and evidence collection, but it does not by itself make an organization compliant with any regulation.
Why existing approaches fall short
| Existing approach | PrivacyFence |
|---|---|
| Block AI access entirely | Enable AI through governed access |
| Trust the AI client as the final control point | Enforce policy in an independent local daemon |
| Use static, broad permissions | Evaluate each operation in context |
| Show generic technical prompts | Present business-aware previews |
| Provide limited decision history | Maintain a local audit trail |
| Reapprove every routine request | Allow narrow policy rules and expiring approvals |
| Ignore content sensitivity | Detect likely PII before read content reaches the AI |
Quick start
Every local install (macOS/Windows/Linux) follows the same shape: install the app (you don't need to open it yourself), connect an MCP client, ask that client to open PrivacyFence for you, then authenticate from there. The platform-specific steps below are that shape applied to each installer. Centrally managed ("organization mode") deployments follow a different shape — see Organization mode below.
For a fuller walkthrough of the same installs — every click and command, what you should see after each one, how to connect Claude Code instead of Claude Desktop, and what to do when a step doesn't work — see Getting started.
Install on macOS
- Download the latest
PrivacyFence-<version>.dmgfrom privacyfence.eu/download. - Open it and double-click PrivacyFence.pkg. The installer puts PrivacyFence in
/Applicationsand, using the administrator password it asks for as part of the install, sets up privilege separation right then (see below) — so nothing has to ask you again later. If this is the first PrivacyFence install on this account, log out and back in once when it finishes: macOS only checks group membership at login. - Install PrivacyFence.mcpb into Claude Desktop — it's the other file on the disk image, next to the installer. The next time Claude Desktop loads the extension, its shim starts the daemon automatically if it isn't already running.
- Open PrivacyFence's menu-bar icon and choose Open Settings. (Ask Claude to set up
PrivacyFence and it will tell you the same thing: its
initializeresponse already tells Claude to checkprivacyfence_statusbefore its first governed action, and an un-onboarded install answers that with "send the human to the companion". Claude cannot hand you a sign-in link — PrivacyFence does not issue one to the program it governs.) - Settings opens on its Connectors page: install the organization configuration provided by your IT administrator, if any, and authenticate the connectors you want.
- Add a passkey when the companion asks. A packaged install requires one before it will
release any approval, and a fresh one has none yet — so until you add it, PrivacyFence approves
nothing and every page says so. The companion opens the Passkeys page for you at each start
until one is enrolled; you can also reach it at
/securityfrom that banner. Write down the one-time recovery code it shows you: it is the only way back from a lost authenticator, local mode has no IdP to fall back on, and the companion can issue a fresh one later but never re-show that one.
Stable releases are code-signed and notarized by Apple, so this just works — no Gatekeeper warnings, no manual quarantine step. Pre-release (alpha/beta/rc) builds might not be, depending on signing/notarization credential availability at build time. Full installation details are in Technical Reference.
Upgrading is the same as installing: download the newer DMG and re-run PrivacyFence.pkg.
The installer restarts the daemon on the new build as part of the install — there's nothing to
quit first, and no separate upgrade procedure.
Privilege separation is mandatory on a packaged install: without it, PrivacyFence's daemon runs
as you — and so does the AI client it governs, which is why that client could otherwise read and
rewrite the policy deciding what it's allowed to do. The installer in step 2 moves the daemon to an
account of its own — which takes the policy, the audit key and the connector credentials out of its
reach — and starts a menu-bar companion so you still have a way in, all while it already has the
administrator password you gave it. (If you install some other way, by copying the app bundle from
another machine say, the daemon asks for it itself, via the standard admin-password dialog, every
time it starts and finds the install unseparated — a decline is an unfinished install, not a
setting, and a packaged build that stays unseparated refuses to serve at all rather than serve a
guarantee it cannot keep.) Run
sudo ./scripts/macos_privilege_separation.sh enable any time afterward if you need to re-run it
by hand (... disable reverses the layout, but on a packaged install it stops being a way to keep
the daemon running — it refuses to serve once it finds no marker). Worth reading
Security and compliance
before you run it by hand — the migration moves live connector tokens.
Install on Windows
- Download the latest
PrivacyFence-<version>-setup.exefrom privacyfence.eu/download. - Run the installer — it asks for administrator rights (it needs them regardless of privilege
separation, to register the autostart task) and installs PrivacyFence to
%ProgramFiles%\PrivacyFence\. Using that same elevated token, it also sets up privilege separation right then (see below) — so nothing has to ask you again later. It registers a Task Scheduler task so the companion starts at login, and starts the daemon immediately — no separate "install the mcpb first" step is needed to get it running (unlike macOS, above), though you still need it installed to talk to Claude Desktop. - Install PrivacyFence.mcpb into Claude Desktop: on the installer's last page, leave the
checked box for it checked and click Finish. If Windows already has a working
.mcpbfile association (normally set up by Claude Desktop's own installer), that box reads "Install PrivacyFence into Claude Desktop" and Claude Desktop opens on its own and offers to install it. Otherwise the box instead reads "Show the PrivacyFence Claude Desktop extension in File Explorer" and does exactly that. That second case isn't only "Claude Desktop isn't installed yet" — Claude Desktop's own installer doesn't always register the.mcpbassociation cleanly on Windows the first time, so it can happen even with Claude Desktop already installed. From File Explorer, either install Claude Desktop first if you haven't, then double-click the file; or, if Claude Desktop is already there but the file still won't open, drag it onto Claude Desktop's Settings → Extensions page instead (that always works, association or not), or right-click the file → Open With → Claude → check "Always use this app" to fix the association for next time. Either way, if you unchecked the box, or need to do this again later, open File Explorer yourself: paste the install path from step 2 into the address bar (%ProgramFiles%\PrivacyFence\or%LOCALAPPDATA%\Programs\PrivacyFence\, whichever applies to you) and press Enter, then act on the.mcpbfile there as above. - Open PrivacyFence's tray icon and choose Open Settings. (Ask Claude to set up PrivacyFence and it will tell you the same thing — see the macOS steps above for why it cannot hand you a link itself. The Start Menu shortcut points at the bare, cookie-authenticated URL, so it only works once you are already signed in — not as the first way in.)
- Settings opens on its Connectors page: install the organization configuration provided by your IT administrator, if any, and authenticate the connectors you want.
- Add a passkey when the companion asks. A packaged install requires one before it will
release any approval, and a fresh one has none yet — so until you add it, PrivacyFence approves
nothing and every page says so. The companion opens the Passkeys page for you at each start
until one is enrolled; you can also reach it at
/securityfrom that banner. Write down the one-time recovery code it shows you: it is the only way back from a lost authenticator, local mode has no IdP to fall back on, and the companion can issue a fresh one later but never re-show that one.
Stable releases are Authenticode-signed; pre-release (alpha/beta/rc) builds might not be, depending on signing certificate availability at build time. Full installation details, including what uninstalling does and doesn't remove, are in Technical Reference.
Privilege separation is mandatory on a packaged install: without it, PrivacyFence's daemon runs
as you — and so does the AI client it governs, which is why that client could otherwise read and
rewrite the policy deciding what it's allowed to do. The installer in step 2 moves the daemon to a
Windows service
running under a virtual account of its own — which takes the policy, the audit key and the
connector credentials out of that client's reach — and starts a tray companion so you still have a
way in, all while it already has the administrator rights it needs to do that. One thing differs
from macOS and Linux: your data directory moves to %ProgramData%\PrivacyFence\, so run … disable before uninstalling if you ever want it back under your own account. The same command,
powershell -ExecutionPolicy Bypass -File "$env:ProgramFiles\PrivacyFence\privilege-separation.ps1" enable
from an elevated PowerShell, remains available for inspecting or re-running it by hand. … disable reverses the layout, but on a packaged install it stops being a way to keep the daemon
running — it refuses to serve once it finds no marker. Worth reading
Security and compliance
either way — the migration moves live connector tokens.
Install from the .deb (Debian/Ubuntu desktop)
- Download the latest
privacyfence_<version>_amd64.debfrom privacyfence.eu/download. sudo apt install ./privacyfence_<version>_amd64.deb(resolves any future declared dependencies automatically; a plainsudo dpkg -i privacyfence_<version>_amd64.debworks too — the package declares none today, see below).- Log out and back in — PrivacyFence starts automatically at the next graphical login (an XDG
autostart entry, not a menu icon; there's no window to open, all interaction is through the web
UI). To start it immediately instead of waiting for that, run
privacyfence-app &. - Connect an MCP client. Claude Desktop has no Linux build, so the
.mcpb/Claude Desktop route used on macOS and Windows doesn't apply here — instead, point an HTTP-capable client (Claude Code, for example) directly at the daemon's local, token-authenticated/mcpendpoint. See Technical Reference for connection details. - Open PrivacyFence from your applications menu and choose its Open Settings action. (Linux has no tray icon — see ADR 0002 decision 4 — so the menu entry is the way in. Asking your MCP client instead gets you pointed back here: PrivacyFence does not issue a sign-in link to the program it governs.)
- Settings opens on its Connectors page: install the organization configuration provided by your IT administrator, if any, and authenticate the connectors you want.
- Add a passkey when the companion asks — same as the macOS steps above, and for the same reason: a packaged install releases no approval until one is enrolled. Keep the one-time recovery code it shows you.
The package ships a self-contained PyInstaller build of the daemon — no python3-* packages
required beyond what a normal Debian/Ubuntu desktop already has. apt remove/dpkg -r leaves
your ~/.privacyfence config, credentials, and audit log untouched; only apt purge is meant to
also clean up anything package-owned, and there's no system-wide config here to purge either. See
Technical Reference for the full details, and
Platform support for how the
package is built.
pip/pipx install privacyfence plus the repo-root privacyfence.service (--user systemd unit)
also works, but is not an answer to "how do I install PrivacyFence on my Linux desktop": it is a
source install, not a packaged one, so it is not privilege-separated and
ADR 0003
decision 6's "a packaged install that finds itself unseparated does not serve" backstop does not
apply to it either — it runs, unprotected, with your policy and audit log readable and writable by
the same account the AI client runs as. That is the right trade for local development and for how
org mode is deployed, and the wrong one for a laptop; use the .deb above for that. See the same
Technical Reference section.
Privilege separation is mandatory for the .deb: debian/postinst separates the install
itself, on every install and upgrade, moving the daemon to a privacyfence system account of its
own — a system systemd unit in place of the autostart entry — which takes the policy, the audit key
and the connector credentials out of the AI client's reach. That machine-level move always runs and
a failure of it fails the package install; the one piece that can be left pending is adding you to
the privacyfence group, when the install can't safely tell who owns it (an unattended upgrade with
no sudo session behind it) — the companion app closes that the first time you actually log in.
A source checkout has no such postinst hook and stays opt-in via
sudo privacyfence-privilege-separation enable (installed by the .deb; from a source checkout
it's sudo ./scripts/linux_privilege_separation.sh enable). ... disable reverses it either way,
and, on a packaged install, stops being a way to keep the daemon running — it refuses to serve once
it finds no marker. Reversible, and worth reading
Security and compliance
before you run it by hand — the migration moves live connector tokens.
Run from source
Needs Python 3.11+ — the plain python/python3 on PATH is often an older system Python
(macOS in particular still ships a 3.9 python3 on many machines), which builds a venv that then
fails install with "Package 'privacyfence' requires a different Python: 3.9.6 not in '>=3.11'".
Point venv at a 3.11+ interpreter explicitly (python3.11, python3.12, etc. — whichever you
have installed) rather than the bare python3.
Also needs pip 21.3+ — this is a pyproject.toml-only project (no setup.py), and editable
installs of those need pip's PEP 660 support, added in 21.3. An older pip fails with "File
'setup.py' or 'setup.cfg' not found... editable mode currently requires a setuptools-based
build"; if you hit that, pip install --upgrade pip first.
git clone https://github.com/privacyfence/privacyfence
cd privacyfence
python3.11 -m venv .venv
source .venv/bin/activate
pip install --upgrade pip
pip install -e .
Continue with the organization configuration and connector authentication steps in the Technical Reference.
Organization mode (centrally managed deployment)
Everything above is local mode: PrivacyFence runs on your own machine, and "the organization
configuration" is an optional config bundle your IT administrator hands you to install yourself.
Organization mode is a different deployment shape entirely — PrivacyFence runs once, centrally,
as a service your whole org's users share, with sign-in through your organization's own identity
provider instead of a one-time local link. If you were handed a URL like
https://pf.your-org.example.com rather than an installer, this is what you're using.
There's nothing to install on your own machine:
- An administrator deploys PrivacyFence centrally (one Linux host, reachable at your org's own HTTPS hostname) — see the org mode setup guide if you're setting this up yourself.
- Point Claude (Desktop, Cowork, or any Streamable HTTP MCP client) at
https://pf.your-org.example.com/mcpas an MCP server — no.mcpb, no token to copy. - The first time it connects, Claude's own OAuth sign-in redirects you to your organization's identity provider. Sign in there the same way you sign in to everything else at your org.
- From
https://pf.your-org.example.com/connect(reached via that same sign-in — there is no one-time link in this mode to begin with), authenticate the connectors you want.
Organization mode has no local /settings surface and no bootstrap-link concept at all — the
companion app's own Open Settings item (above) has nothing to open here, since sign-in is always
through your IdP. See the org mode setup guide for the full deployment
walkthrough.
Documentation
- Getting started — step-by-step install, AI-client setup, and first-run checks for macOS, Windows, and Debian/Ubuntu
- Changelog — what changed in each release, newest first, including how to upgrade from 3.x
- Technical Reference — review model, connectors, policies, installation, configuration, and implementation notes
- Security, Privacy & Compliance — deployment model, data handling, organizational controls, GDPR, and EU AI Act positioning
- Google setup
- Slack setup
- Salesforce setup
- Atlassian setup
- Telegram setup
- Org mode setup guide — Ubuntu server, Caddy, Google identity
- Org mode operational readiness — support/readiness level, backup/restore, upgrade/rollback, persisted-state compatibility, restart and single-daemon availability behaviour
- Connector QA testing
- Release testing
- Approval window content reference — what each approval dialog shows, grouped by dialog shape
- "Always allow" per-tool reference — what clicking Always allow does, tool by tool
- What Claude knows before an approval prompt
- File type support — attachment previews and PII scanning
- PII detection keywords
- Development vs. installed configuration
- Contributing
Status and scope
PrivacyFence has a stable connector and policy interface. It remains under active development, and you should review the limitations and security model before using it with production or regulated data.
Current implementation assumptions:
- local daemon and local approval UI
- MCP-compatible AI client
- per-user connector authentication
- organization-provided OAuth application configuration where required
License
1 maintainer

Release files for privacyfence 4.1.5
For a detailed explanation of source distributions (sdists) and built distributions (wheels), please see the package formats documentation.
Source distribution (sdist)
| File | Size | Uploaded | |
|---|---|---|---|
| privacyfence-4.1.5.tar.gz | 4.2 MB | Details |
Built distribution (wheel)
| File | Interpreter | ABI | Platform | Reset |
|---|---|---|---|---|
| privacyfence-4.1.5-py3-none-any.whl | Python 3 | none | any | Details |
Total release size: 6.0 MB
Release files / privacyfence-4.1.5.tar.gz
| Download URL | privacyfence-4.1.5.tar.gz |
|---|---|
| Size | 4.2 MB |
| Tags | Source |
|
SHA-256 checksum How to use checksums |
f4a605d019201b1af306d9388f8a10339b5c4dd4db0eec157f0d25f576592952
|
|
BLAKE2b-256 checksum How to use checksums |
001b38d10277c32e18c710ba3d5110b67aa9baaa1ba57544eae4f4ffdfa4dee5
|
| Upload date | |
|
Uploaded using Trusted Publishing? What is trusted publishing? |
Yes |
| Uploaded via |
twine/7.0.0 CPython/3.13.14
|
Provenance
Provenance describes where a file came from. On PyPI, provenance is shared via attestations, which provide a verifiable record of the build or publishing details. View details, limitations and caveats.


PyPI Publish Attestation
PyPI verified that this artifact, at this checksum, originated from the publisher listed below.
Signed by GitHub Actions, verified by PyPI on Sep 21, 2026.
Transparency logRelease files / privacyfence-4.1.5-py3-none-any.whl
| Download URL | privacyfence-4.1.5-py3-none-any.whl |
|---|---|
| Size | 1.8 MB |
| Tags | Python 3 |
|
SHA-256 checksum How to use checksums |
7b2bcc0fceedb5fd5dce0e484552bc4ffccddd61ca409246f80357bcf20f429e
|
|
BLAKE2b-256 checksum How to use checksums |
6d7c4abe1405b06e3c1209aea6986ded83e591fd97502de905b64a58606f6fc7
|
| Upload date | |
|
Uploaded using Trusted Publishing? What is trusted publishing? |
Yes |
| Uploaded via |
twine/7.0.0 CPython/3.13.14
|
Provenance
Provenance describes where a file came from. On PyPI, provenance is shared via attestations, which provide a verifiable record of the build or publishing details. View details, limitations and caveats.
PyPI Publish Attestation
PyPI verified that this artifact, at this checksum, originated from the publisher listed below.
Signed by GitHub Actions, verified by PyPI on Sep 21, 2026.
Transparency log













