
ProbFlow




ProbFlow is a Python package for building probabilistic Bayesian models with TensorFlow 2.0 or PyTorch or JAX, performing stochastic variational inference with those models, and evaluating the models' inferences. It provides both high-level modules for building Bayesian neural networks, as well as low-level parameters and distributions for constructing custom Bayesian models.
It's very much still a work in progress.
- Git repository: http://github.com/brendanhasz/probflow
- Documentation: http://probflow.readthedocs.io
- Bug reports: http://github.com/brendanhasz/probflow/issues
Getting Started
ProbFlow allows you to quickly and less painfully build, fit, and evaluate custom Bayesian models (or ready-made ones!) which run on top of either TensorFlow 2.0 and TensorFlow Probability or PyTorch or or JAX.
With ProbFlow, the core building blocks of a Bayesian model are parameters and probability distributions (and, of course, the input data). Parameters define how the independent variables (the features) predict the probability distribution of the dependent variables (the target).
For example, a simple Bayesian linear regression
$$y \sim \text{Normal}(wx + b, \sigma)$$
can be built by creating a ProbFlow Model. This is just a class which inherits pf.Model (or pf.ContinuousModel or pf.CategoricalModel depending on the target type). The __init__ method sets up the parameters, and the __call__ method performs a forward pass of the model, returning the predicted probability distribution of the target:
Tensorflow
import probflow as pf
import tensorflow as tf


class LinearRegression(pf.ContinuousModel):
    def __init__(self):
        self.weight = pf.Parameter(name="weight")
        self.bias = pf.Parameter(name="bias")
        self.std = pf.ScaleParameter(name="sigma")

    def __call__(self, x):
        return pf.Normal(x * self.weight() + self.bias(), self.std())


model = LinearRegression()
PyTorch
import probflow as pf
import torch


class LinearRegression(pf.ContinuousModel):
    def __init__(self):
        self.weight = pf.Parameter(name="weight")
        self.bias = pf.Parameter(name="bias")
        self.std = pf.ScaleParameter(name="sigma")

    def __call__(self, x):
        x = torch.tensor(x)
        return pf.Normal(x * self.weight() + self.bias(), self.std())


model = LinearRegression()
JAX
import probflow as pf


class LinearRegression(pf.ContinuousModel):
    def __init__(self):
        self.weight = pf.Parameter(name="weight")
        self.bias = pf.Parameter(name="bias")
        self.std = pf.ScaleParameter(name="sigma")

    def __call__(self, x):
        return pf.Normal(x * self.weight() + self.bias(), self.std())


model = LinearRegression()
Then, the model can be fit using stochastic variational inference, in one line:
# x and y are Numpy arrays or pandas DataFrame/Series
model.fit(x, y)
You can generate predictions for new data:
# x_test is a Numpy array or pandas DataFrame
>>> model.predict(x_test)
[0.983]
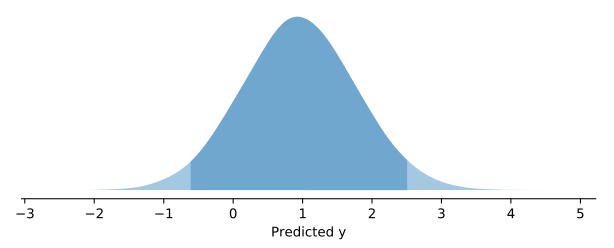
Compute probabilistic predictions for new data, with 95% confidence intervals:
model.pred_dist_plot(x_test, ci=0.95)
Evaluate your model's performance using metrics:
>>> model.metric('mse', x_test, y_test)
0.217
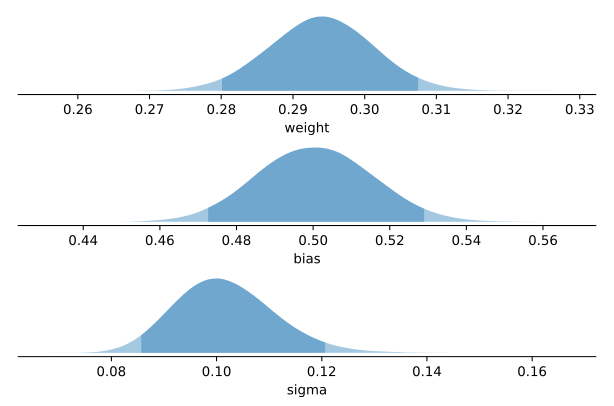
Inspect the posterior distributions of your fit model's parameters, with 95% confidence intervals:
model.posterior_plot(ci=0.95)
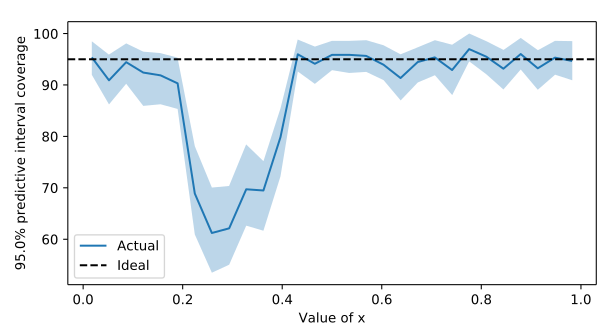
Investigate how well your model is capturing uncertainty by examining how accurate its predictive intervals are:
>>> model.pred_dist_coverage(ci=0.95)
0.903
and diagnose where your model is having problems capturing uncertainty:
model.coverage_by(ci=0.95)
ProbFlow also provides more complex modules, such as those required for building Bayesian neural networks. Also, you can mix ProbFlow with TensorFlow (or PyTorch!) code. For example, even a somewhat complex multi-layer Bayesian neural network like this:
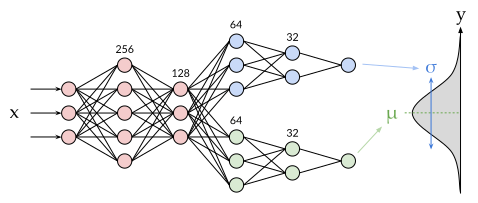
Can be built and fit with ProbFlow in only a few lines:
Tensorflow
import probflow as pf
import tensorflow as tf


class DensityNetwork(pf.ContinuousModel):
    def __init__(self, units, head_units):
        self.core = pf.DenseNetwork(units)
        self.mean = pf.DenseNetwork(head_units)
        self.std = pf.DenseNetwork(head_units)

    def __call__(self, x):
        z = tf.nn.relu(self.core(x))
        return pf.Normal(self.mean(z), tf.exp(self.std(z)))


# Create the model
model = DensityNetwork([x.shape[1], 256, 128], [128, 64, 32, 1])

# Fit it!
model.fit(x, y)
PyTorch
import probflow as pf
import torch


class DensityNetwork(pf.ContinuousModel):
    def __init__(self, units, head_units):
        self.core = pf.DenseNetwork(units)
        self.mean = pf.DenseNetwork(head_units)
        self.std = pf.DenseNetwork(head_units)

    def __call__(self, x):
        x = torch.tensor(x)
        z = torch.nn.ReLU()(self.core(x))
        return pf.Normal(self.mean(z), torch.exp(self.std(z)))


# Create the model
model = DensityNetwork([x.shape[1], 256, 128], [128, 64, 32, 1])

# Fit it!
model.fit(x, y)
JAX
import jax.nn
import jax.numpy as jnp
import probflow as pf


class DensityNetwork(pf.ContinuousModel):
    def __init__(self, units, head_units):
        self.core = pf.DenseNetwork(units)
        self.mean = pf.DenseNetwork(head_units)
        self.std = pf.DenseNetwork(head_units)

    def __call__(self, x):
        z = jax.nn.relu(self.core(x))
        return pf.Normal(self.mean(z), jnp.exp(self.std(z)))


# Create the model
model = DensityNetwork([x.shape[1], 256, 128], [128, 64, 32, 1])

# Fit it!
model.fit(x, y)
For convenience, ProbFlow also includes several pre-built models for standard tasks (such as linear regressions, logistic regressions, and multi-layer dense neural networks). For example, the above linear regression example could have been done with much less work by using ProbFlow's ready-made LinearRegression model:
model = pf.LinearRegression(x.shape[1])
model.fit(x, y)
And a multi-layer Bayesian neural net can be made easily using ProbFlow's ready-made DenseRegression model:
model = pf.DenseRegression([x.shape[1], 128, 64, 1])
model.fit(x, y)
Using parameters and distributions as simple building blocks, ProbFlow allows for the painless creation of more complicated Bayesian models like generalized linear models, deep time-to-event models, neural matrix factorization models, and Gaussian mixture models. You can even mix probabilistic and non-probabilistic models! Take a look at the examples and the user guide for more!
Installation
If you have an existing project, just add probflow to your pyproject.toml
file's dependencies section.
Or, install with pip. if you already have your desired backend installed (i.e. Tensorflow/TFP or PyTorch or JAX), then you can just do:
pip install probflow
Or, to install both ProbFlow and your desired backend,
Tensorflow
pip install probflow[tensorflow]
PyTorch
pip install probflow[pytorch]
JAX
Unlike TensorFlow and PyTorch, JAX requires a GPU-specific installation to run on GPU. If you are only planning on running ProbFlow on the CPU, you can just use the standard JAX installation:
pip install probflow[jax]
But if you want to run on your GPU, also install the appropriate JAX CUDA package:
pip install probflow[jax] jax[cuda13]
Jupyter Notebook
To run ProbFlow code in a Jupyter Notebook, you can either install ProbFlow into your existing kernel environment (see above), or clone the repo and run the notebook server from there. There is a convenient Makefile command for this. You can start a notebook server with ProbFlow and a given backend pre-installed by running:
Tensorflow
git clone git@github.com:brendanhasz/probflow.git
cd probflow
make notebook-server BACKEND=tensorflow
PyTorch
git clone git@github.com:brendanhasz/probflow.git
cd probflow
make notebook-server BACKEND=pytorch
JAX
git clone git@github.com:brendanhasz/probflow.git
cd probflow
make notebook-server BACKEND=jax
Then open your web browser and navigate to http://localhost:8888 to access the Jupyter Notebook server.
Support
Post bug reports, feature requests, and tutorial requests in GitHub issues.
Contributing
Pull requests are totally welcome! Any contribution would be appreciated, from things as minor as pointing out typos to things as major as writing new applications and distributions.
Why the name, ProbFlow?
Because it's a package for probabilistic modeling, and it was built on TensorFlow. ¯\_(ツ)_/¯
1 maintainer

Metadata
1 maintainer
Release files for probflow 2.7.2
For a detailed explanation of source distributions (sdists) and built distributions (wheels), please see the package formats documentation.
Source distribution (sdist)
| File | Size | Uploaded | |
|---|---|---|---|
| probflow-2.7.2.tar.gz | 2.1 MB | Details |
Built distribution (wheel)
| File | Interpreter | ABI | Platform | Reset |
|---|---|---|---|---|
| probflow-2.7.2-py3-none-any.whl | Python 3 | none | any | Details |
Total release size: 2.2 MB
Release files / probflow-2.7.2.tar.gz
| Download URL | probflow-2.7.2.tar.gz |
|---|---|
| Size | 2.1 MB |
| Tags | Source |
|
SHA-256 checksum How to use checksums |
1f22c1abf2df3c223efe4e7a4dfe635a2de61c76273d3d0291e3d4ca8e661b7f
|
|
BLAKE2b-256 checksum How to use checksums |
32805b388047bd08d428c2e3ef05c8eefc7d98922b7cd1f40047ae1d16a245d1
|
| Upload date | |
|
Uploaded using Trusted Publishing? What is trusted publishing? |
Yes |
| Uploaded via |
twine/7.0.0 CPython/3.13.14
|
Provenance
Provenance describes where a file came from. On PyPI, provenance is shared via attestations, which provide a verifiable record of the build or publishing details. View details, limitations and caveats.


PyPI Publish Attestation
PyPI verified that this artifact, at this checksum, originated from the publisher listed below.
Signed by GitHub Actions, verified by PyPI on Sep 26, 2026.
Transparency logRelease files / probflow-2.7.2-py3-none-any.whl
| Download URL | probflow-2.7.2-py3-none-any.whl |
|---|---|
| Size | 106.7 kB |
| Tags | Python 3 |
|
SHA-256 checksum How to use checksums |
d5f72fb8745939155caa381e0f98e54c126a0e6e723144d8773c057a2d055a5d
|
|
BLAKE2b-256 checksum How to use checksums |
9e5c18da6c21523a20028556bc23d048e0fcf38d570c0a24526c9eefd18c59b9
|
| Upload date | |
|
Uploaded using Trusted Publishing? What is trusted publishing? |
Yes |
| Uploaded via |
twine/7.0.0 CPython/3.13.14
|
Provenance
Provenance describes where a file came from. On PyPI, provenance is shared via attestations, which provide a verifiable record of the build or publishing details. View details, limitations and caveats.
PyPI Publish Attestation
PyPI verified that this artifact, at this checksum, originated from the publisher listed below.
Signed by GitHub Actions, verified by PyPI on Sep 26, 2026.
Transparency log













