Prometheus Service Discovery for AWS ECS

Project description
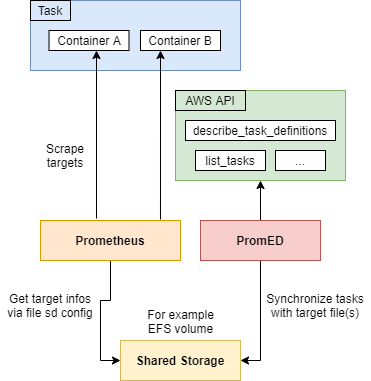
Prometheus ECS Discoverer


Based on prometheus-ecs-sd, this project enables your Prometheus to dynamically scrape targets deployed in AWS ECS. The discoverer is perfect if you don't have a service discovery system like Consul in-place. It provides an easy-to-use alternative and can be used in low- to mid-sized environments with hundreds of tasks running in parallel.
Once the discoverer is up and running, any task can be made visible to Prometheus.
What are the advantages of using this project over prometheus-ecs-sd?
- Modified throttling in combination with the already existing caching allows the usage in environments with hundreds of tasks.
- Every target can expose custom labels via its environment variables. This way you can provide more ways to aggregate metrics. For example by type of API.
- Deploy as container (provided and can be used directly) or Python package. No need to manually install boto3 and so on.
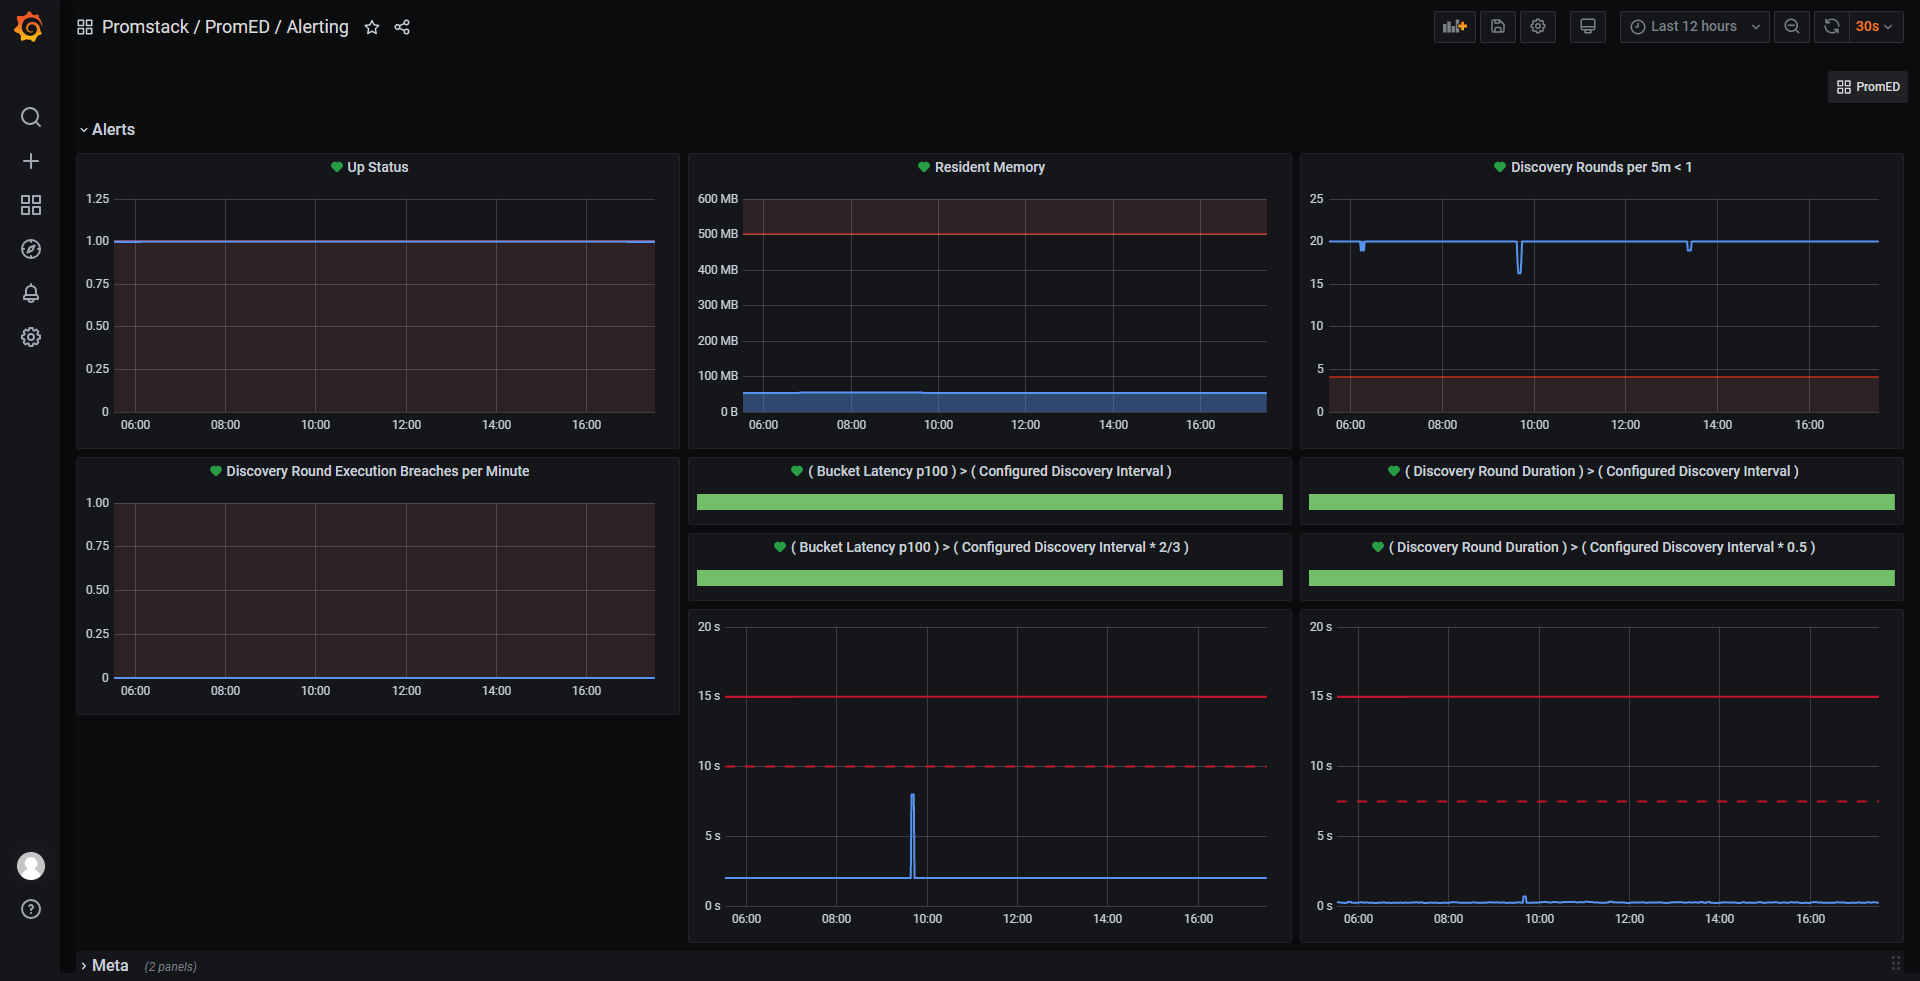
- Instrumented with Prometheus. Allows more insights into the discoverer. You can monitor how long discovery rounds take and stuff like used memory. Dashboard already included and ready to use.
- Extensive testing with high coverage ensures functionality.
- More configuration options. For example structured logs.
Setup
As this project is based on prometheus-ecs-sd, the setup is very similar / exactly the same. The setup consists out of three parts. The targets must be prepared by adding environment variables. Next, PromED itself must be deployed. And finally, the Prometheus configuration must be updated.
Prepare targets
Targets are setup via setting environment variables in the task definitions.
Mark container as target
Set PROMETHEUS_TARGET to true to make PromED consider the container. This
by itself is already enough to make it work with the configured defaults.
Alternatively you can use the dockerLabels in the container definition. For
this you have to set the PromED setting MARKER_TYPE to dockerLabels
instead of the default environment.
Specify metrics endpoint(s)
If your metrics are not exposed on the default /metrics endpoint, you can
specifiy the endpoint with PROMETHEUS_ENDPOINT.
You can also declare multiple endpoints and different intervals. The supported
intervals are 15s, 30s, 1m and 5m. Based on the interval, targets will
end up in different files. The default interval is "generic". Examples for this:
5m:/mymetrics,30s:/mymetrics2/mymetrics/mymetrics,30s:/mymetrics2
By default, all targets will end up in a single file called tasks.json in the
configured directory (defaults to /tmp).
Set custom labels for container
Sometimes you might want to add additonal labels to targets to group them.
For example by the used API type (REST vs. GraphQL). This can be done by adding
environment variables to the container definition in the respective task
definition with the PROMETHEUS_LABEL_ prefix. For example
PROMETHEUS_LABEL_api_type or PROMETHEUS_LABEL_foo. Environment variables
set from within the container are not visible to PromED and are ignored.
"environment": [
  { "name": "PROMETHEUS_LABEL_foo", "value": "bar" },
  { "name": "PROMETHEUS_LABEL_high", "value": "fi" },
]
There is an alternative for this using the dockerLabels attribute instead.
PromED always checks both locations. Unlike with the environment variables,
the additional target labels are all contained in one string. You can configure
the label PromED should look for by setting CUSTOM_LABELS_KEY. It works like
this:
"dockerLabels": {
  "promed.custom_labels": "foo=bar, high=fi,what=ever"
}
The third option is to use the WITH_DOCKER_LABELS setting to give PromED an
array of labels it should always try to map from dockerLabels to target
labels. The PromED config could look like this (notice the config prefix):
"environment": {
  "PROMED_WITH_DOCKER_LABELS": "['com.company.namespace', 'com.company.alias']"
}
A container that uses these labels:
"dockerLabels": {
  "com.company.namespace": "whatever",
  "com-company-alias": "zoomzoom"
}
PromED translates it to com_company_namespace and com_company_alias.
Customize networking
Regarding networking, all network modes are supported (bridge, host
and awsvpc).
If PROMETHEUS_PORT and PROMETHEUS_CONTAINER_PORT are not set, the script
will pick the first port from the container definition (in awsvpc and host
network mode) or the container host network bindings in bridge mode. On
Fargate, if PROMETHEUS_PORT is not set, it will default to port 80.
If PROMETHEUS_CONTAINER_PORT is set, it will look at the container host
network bindings, and find the entry with a matching containerPort. It will
then use the hostPort found there as target port. This is useful when the
container port is known, but the hostPort is randomly picked by ECS (by
setting hostPort to 0 in the task definition).
If your container uses multiple ports, it's recommended to specify
PROMETHEUS_PORT (awsvpc, host) or PROMETHEUS_CONTAINER_PORT (bridge).
Quoted from
prometheus-ecs-sd
commit ece6ca2.
Deploy PromED
You can either use the Python package directly or go for the Docker image. Please note that just running the package / image is not enough. The enviornment must be ready for boto3. This includes credentials and approbiate rights.
Using package from PyPI
Available under the name prometheus_ecs_discoverer. To start PromED:
python -m prometheus_ecs_discoverer.run
To configure PromED you can either provide a settings file or use plain environment variables. Please see Configuration for more info. Please see Configuration for more info.
Using Docker image
The image trallnag/prometheus_ecs_discoverer can be found
here.
The recommended way for configuring the image is to use environment variables.
You will probably want to run the discoverer in ECS. Here, you don't have to provide credentials assuming everything is set up correctly. Boto3 will automatically detect relative credentials URI and retrieve them from AWS. Nevertheless, the region must be set by you.
AWS IAM
The actions that PromED is performing on the AWS API can be found in aws-iam-policy.json. The allowed actions must be attached to an approbiate role. If you deploy PromED in ECS, this should look like in aws-iam-ecs-role.json.
Configure Prometheus
If you want all your targets to be scraped in the same interval, the following job is enough.
- job_name: 'ecs'
  file_sd_configs:
    - files:
        - /tmp/tasks.json
  relabel_configs:
    - source_labels: [metrics_path]
      action: replace
      target_label: __metrics_path__
      regex: (.+)
By default, PromED exposes an /metrics endpoint.
- job_name: discovery
  static_configs:
    - targets: ["discovery:8080"]
Configuration
As this project is based on prometheus-ecs-sd, the configuration is mostly compatible.
PromED uses Dynconf for config management. There
are two main ways you can configure the application. Either by providing a
custom settings file with the env var SETTINGS_FILES_FOR_DYNACONF (see
here)
or directly setting the respective values via env vars with the PROMED_
prefix. All supported settings together with their default values can be found
settings.toml (click me).
Grafana Dashboard
You can find the Grafana dashboards for PromED in the documents folder.

A second dashboard contains panels with Grafana Alerts enabled.
Prerequesites
See pyproject.toml.
Development
Developing and building this package on a local machine requires
Python Poetry. I recommend to run Poetry in
tandem with Pyenv. Once the repository is
cloned, run poetry install and poetry shell. From here you may start the
IDE of your choice.
Release history Release notifications | RSS feed


Download files
Download the file for your platform. If you're not sure which to choose, learn more about installing packages.
Source Distribution
Built Distribution
Filter files by name, interpreter, ABI, and platform.
If you're not sure about the file name format, learn more about wheel file names.
Copy a direct link to the current filters
File details
Details for the file prometheus-ecs-discoverer-3.3.4.tar.gz.
File metadata
- Download URL: prometheus-ecs-discoverer-3.3.4.tar.gz
- Upload date:
- Size: 22.2 kB
- Tags: Source
- Uploaded using Trusted Publishing? No
- Uploaded via: poetry/1.1.8 CPython/3.9.6 Linux/5.8.0-1039-azure
File hashes
| Algorithm | Hash digest | |
|---|---|---|
| SHA256 |
5576cb66d1d0084d02645da13af9b7936e8591a5d13cb1641ca63ff73b6c8bfd
|
|
| MD5 |
c1c59a47db92f5e87a10b16a3d1ac7e4
|
|
| BLAKE2b-256 |
dad28aed4bd86b81af2a4ae9ac63cff4e53992322bf1823e4d0cea8a331965a4
|
File details
Details for the file prometheus_ecs_discoverer-3.3.4-py3-none-any.whl.
File metadata
- Download URL: prometheus_ecs_discoverer-3.3.4-py3-none-any.whl
- Upload date:
- Size: 21.2 kB
- Tags: Python 3
- Uploaded using Trusted Publishing? No
- Uploaded via: poetry/1.1.8 CPython/3.9.6 Linux/5.8.0-1039-azure
File hashes
| Algorithm | Hash digest | |
|---|---|---|
| SHA256 |
75da3475a1022e59dae8264acce5d49c560ca1e14c94b4a2013abed0285a6c14
|
|
| MD5 |
9659883881b4795594b8a367972dbf2d
|
|
| BLAKE2b-256 |
0a76c1aeaa6adae9d3b9b888ee62924a84dc7c92f120f4f739d25221d43ff784
|


