
PromptMask
A local-first privacy layer for Large Language Models.
Cloud AI is smart but sacrifices privacy.
Local AI keeps your secret but is dumb.
What if we can combine the advantages of both sides?





PromptMask ensures your private data never leaves your machines. It redacts and un-redacts sensitive data locally, so that only anonymized data is sent to third-party AI services.(*)
(*): "Local" in this project is used only for terminology distinction, differing from Cloud AI whose privacy protection is questionable. PromptMask is fully compatible with any remote LLM that you trust to process sensitive data.
Table of Contents
- Table of Contents
- How It Works
- Quickstart
- Configuration
- Advanced Usage: PromptMask Class
- Web Server: WebUI & API
- Development & Contribution
- License
How It Works
The core principle is to use a trusted (local) model as a "privacy filter" for a powerful, remote model. The process is fully automated.

Quickstart
Choosing Integration Method and Model
Use this table to find the best way to integrate PromptMask into your workflow:
| For Existing OpenAI-compatible Tools | For Custom Integration / Direct Use | |
|---|---|---|
| Python Developers | from promptmask import OpenAIMasked A drop-in replacement for the openai.OpenAI client. |
from promptmask import PromptMaskFor granular control over mask/unmask operations. |
| General Users (No Python) |
http://localhost:8000/gateway/v1/chat/completions Point your existing apps to a local endpoint. |
Web UI http://localhost:8000/ & Web API http://localhost:8000/docs For interactive testing or non-standard tools. |
Models Benchmark
Choosing the right, capable local model can make data masking efforts twice as effective.
See the benchmark to select a competent one that fits within your hardware limitations. Alternatively, run your own benchmarks using python eval/s[1,2,3]_*.py.
Prerequisites
- A local LLM running with an OpenAI-compatible API endpoint.
By default,PromptMaskwill attempt to connect tohttp://localhost:11434/v1for masking sensitive information.
Ollama is a popular and straightforward option to run a local OpenAI-compatible LLM API. Other options include llama.cpp and vLLM.
Don't worry if you don't have a local LLM. PromptMask won't restrict a local address. You can always set a remote (trusted) endpoint as PromptMask's LLM API, such as a self-hosted GPU cloud or your trusted AI service provider.
For General Users: local OpenAI-compatible API Gateway
Point any existing tool/app at the local gateway. It's the seamless way to add PromptMask layer without coding in Python.
-
Install promptmask-web via pip:
pip install "promptmask[web]"
-
Run the web server:
promptmask-web
The console will display where the web server is launched. For example,
# INFO: Uvicorn running on http://0.0.0.0:8000 (Press CTRL+C to quit) -
Use the gateway endpoint: Simply replace the official OpenAI API base URL with the local gateway's URL in your tool of choice.
curl http://localhost:8000/gateway/v1/chat/completions \
  -H "Authorization: Bearer $YOUR_OPENAI_API_KEY" \
  -H "Content-Type: application/json" \
  -d '{
    "model": "gpt-99-ultra",
    "messages": [
      {
        "role": "user",
        "content": "My name is Ho Shih-Chieh and my appointment ID is Y1a2e87. I booked a dental appointment on Oct 26, but I have to cancel for a meeting. Please help me write a cancellation request email in French."
      }
    ]
  }'
Your sensitive data (
Ho Shih Chieh,Y1a2e87) will be redacted before being sent to the AI company, and then restored in the final response.Besides OpenAI, if you are using other cloud AI providers, such as Google Gemini, you need to add
web.upstream_oai_api_baseto your config file (more detail on configuration section)[web] upstream_oai_api_base = "https://generativelanguage.googleapis.com/v1beta/openai"
For Python Developers: OpenAIMasked
The OpenAIMasked class is a drop-in replacement for the standard openai.OpenAI client.
-
Install the base package:
pip install promptmask
-
Mask the OpenAI client in your code: The adapter automatically handles masking/unmasking for standard and streaming requests.
Simply replace the standard
openai.OpenAIclient as follows:# from openai import OpenAI from promptmask import OpenAIMasked # client = OpenAI() client = OpenAIMasked()
Full example:
from promptmask import OpenAIMasked

# openai.OpenAI client, but with automatic privacy redaction.
client = OpenAIMasked(base_url="https://api.cloud-ai-service.example.com/v1") # reads OPENAI_API_KEY from environment variables by default.

# non-stream
response = client.chat.completions.create(
    model="gpt-100-pro",
    messages=[
        {"role": "user", "content": "My user ID is johndoe and my phone number is 4567890. Please help me write an application letter."}
    ]
)
print(response.choices[0].message.content) # access response.choices[0].message.original_content for original maksed one.

# stream
stream = client.chat.completions.create(
    model="gpt-101-turbo-mini",
    stream=True,
    messages=[
        {"role": "user", "content": "My patient, Jensen Huang (Patient ID: P123456789), is taking metformin and is experiencing nausea. What are the common side effects and management strategies?"}
    ]
)

# response chunks are unmasked on-the-fly
for chunk in stream:
    print(chunk.choices[0].delta.content or "", end="")
See more examples at examples/.
Configuration
To customize, create a promptmask.config.user.toml file in working directory. For example:
# promptmask.config.user.toml

[llm_api]
# Specify a particular local model to use for masking; model name depends on the inference engine
model = "qwen2.5:7b"

# Define what data is considered sensitive.
[sensitive]
include = "personal ID and passwords" # Override the default one
Check promptmask.config.default.toml for a full config file example.
Environment variables to override specific settings:
LOCALAI_API_BASE: The Base URL for your local LLM's API (e.g.,http://192.168.1.234:11434/v1).LOCALAI_API_KEY: The API key for your local LLM, if required.
Configuration Priority Hierarchy
PromptMask is configured through a hierarchy of sources, from highest to lowest priority:
LOCALAI_API_BASEandLOCALAI_API_KEYenvironment variables.- A
dictpassed directly to thePromptMaskconstructor (configparameter). - A path to a TOML file (
config_fileparameter). - A
promptmask.config.user.tomlfile in the current working directory. - The packaged
promptmask.config.default.toml.
Advanced Usage: PromptMask Class
For more granular control, you can import the PromptMask class directly to perform masking and unmasking as separate steps.
import asyncio # PromptMask also runs syncrounously
from promptmask import PromptMask

async def main():
    masker = PromptMask()

    original_text = "Please process the visa application for Jensen Huang, passport number A12345678."

    # 1. Mask your secrets
    masked_text, mask_map = await masker.async_mask_str(original_text)

    print(f"Masked Text: {masked_text}")
    # Expected output (may vary): Masked Text: Please process the visa application for ${PERSON_NAME}, passport number ${PASSPORT_NUMBER}.

    print(f"Mask Map: {mask_map}")
    # Expected output: Mask Map: {"Jensen Huang": "${PERSON_NAME}", "A12345678": "${PASSPORT_NUMBER}"}

    # (Imagine sending masked_text to a remote API and getting a response)
    remote_response_text = "The visa application for ${PERSON_NAME} with passport ${PASSPORT_NUMBER} is now under review."

    # 2. Unmask the response
    unmasked_response = masker.unmask_str(remote_response_text, mask_map)
    print(f"Unmasked Response: {unmasked_response}")
    # Expected output: Unmasked Response: The visa application for Jensen Huang with passport A12345678 is now under review.

if __name__ == "__main__":
    asyncio.run(main())
Web Server: WebUI & API
pip install "promptmask[web]"
promptmask-web
# INFO:     Uvicorn running on http://0.0.0.0:8000 (Press CTRL+C to quit)
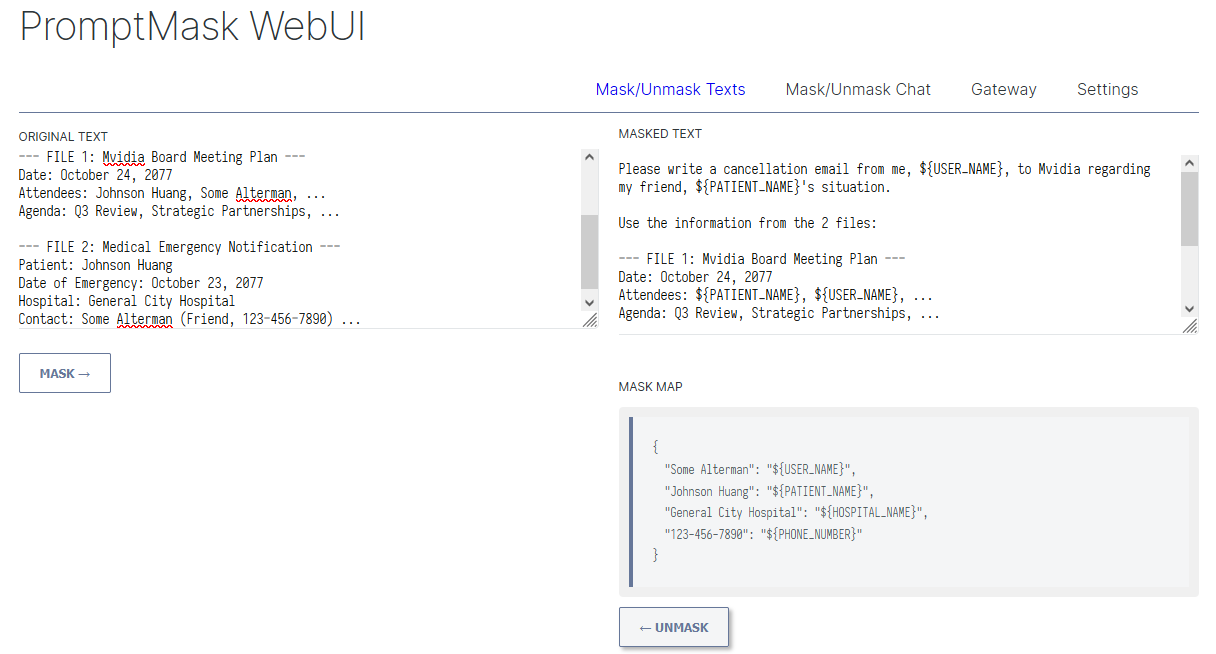
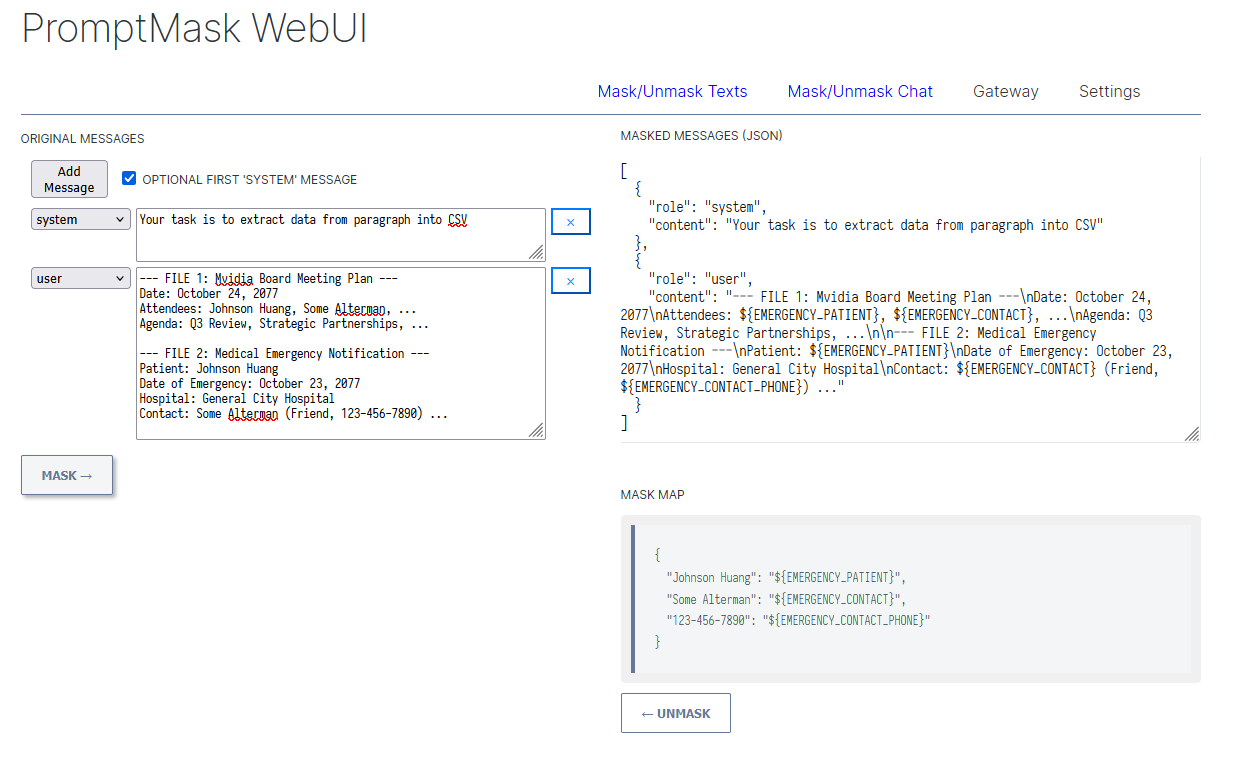
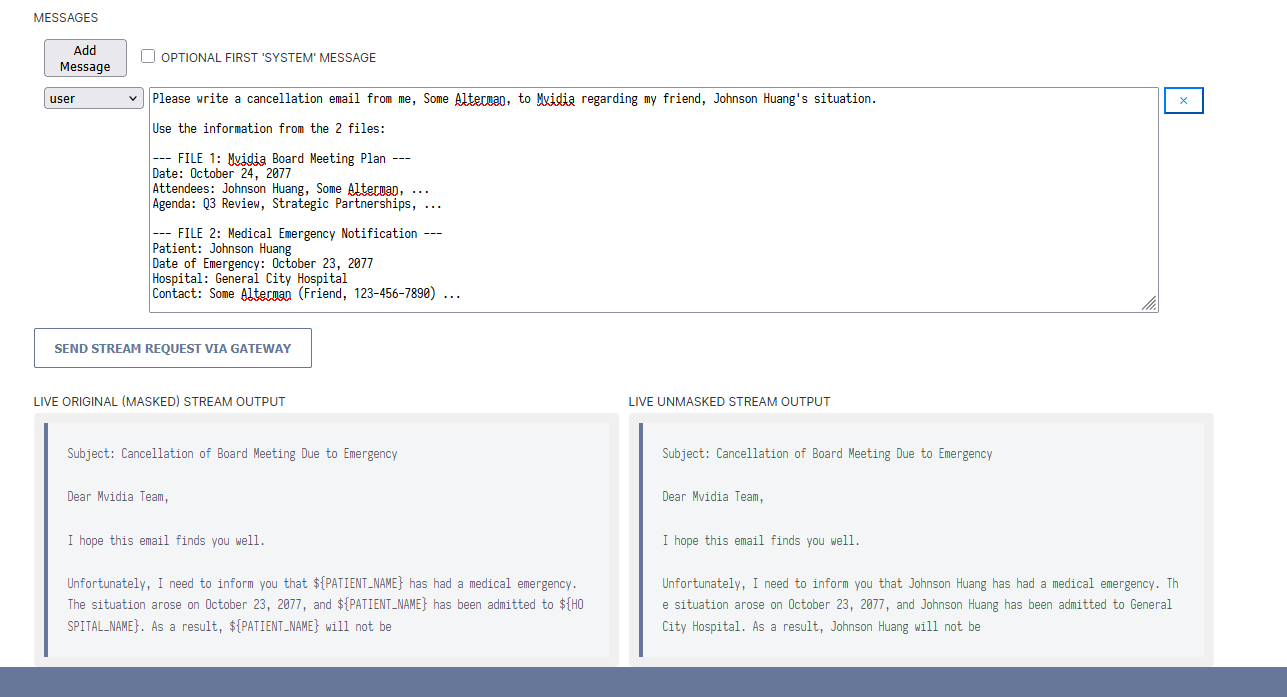
It includes:
- A simple Web UI
- to try out features including masking/unmasking and the gateway
- A Configuration Manager to view and hot-reload settings.
- Interactive API documentation (via Swagger UI) at http://localhost:8000/docs
- API Gateway to take care of your privacy seamlessly.
- Direct Masking/Unmasking API.
- Edit promptmask configuration via Web API.
Web UI Preview
Development & Contribution
Contributions are welcome.
- Clone the repository:
git clone https://github.com/cxumol/promptmask.git
cd promptmask
- Install in editable mode with development dependencies:
pip install -e ".[dev,web]"
- Run tests:
pytest
- Lint and format code (optional):
rufffor linting and formatting, if you want.ruff check . ruff format .
Please open an issue or submit a pull request for any bugs or feature proposals.
License
PromptMask is distributed under the MIT License. See LICENSE for more information.
1 maintainer

Release files for promptmask 0.1.1
For a detailed explanation of source distributions (sdists) and built distributions (wheels), please see the package formats documentation.
Source distribution (sdist)
| File | Size | Uploaded | |
|---|---|---|---|
| promptmask-0.1.1.tar.gz | 23.9 kB | Details |
Built distribution (wheel)
| File | Interpreter | ABI | Platform | Reset |
|---|---|---|---|---|
| promptmask-0.1.1-py3-none-any.whl | Python 3 | none | any | Details |
Total release size: 52.7 kB
Release files / promptmask-0.1.1.tar.gz
| Download URL | promptmask-0.1.1.tar.gz |
|---|---|
| Size | 23.9 kB |
| Tags | Source |
|
SHA-256 checksum How to use checksums |
2f68b4b9f81785fdd47d9ceda19fa38b5d0ba62cc944ca4e443a90ed950c5925
|
|
BLAKE2b-256 checksum How to use checksums |
661bfadd535525f170637c95bf5e7129dbcf7025a98e0c12e543f4c1488d8c31
|
| Upload date | |
|
Uploaded using Trusted Publishing? What is trusted publishing? |
No |
| Uploaded via |
uv/0.8.13
|
Release files / promptmask-0.1.1-py3-none-any.whl
| Download URL | promptmask-0.1.1-py3-none-any.whl |
|---|---|
| Size | 28.9 kB |
| Tags | Python 3 |
|
SHA-256 checksum How to use checksums |
627f915b4f8efd688ec6096751839854f424063b37ee18dd39d0aba8bfed6b96
|
|
BLAKE2b-256 checksum How to use checksums |
f1ddee79f30162f2635ae9fd2ba39a804e0d3d168f4a7e0eca26f6895f31139b
|
| Upload date | |
|
Uploaded using Trusted Publishing? What is trusted publishing? |
No |
| Uploaded via |
uv/0.8.13
|














