
PWA-modeling
Author: Idil Yaktubay (iyaktubay@iisd-ela.org), IISD-ELA
This repository is the orchestrator entry point for the PWA pipeline. Installing it gives you a unified command-line interface (pwa-step0 … pwa-step3) for the four packages that implement the pipeline:
| Package | Step(s) it owns | Source repo |
|---|---|---|
pwa-tools |
Step 0 — hydro-conditioning | PWA-hydro-conditioning-tools |
pwa-raven |
Steps 1 & 2 — NetCDF processing + Raven inputs | PWA / pwa_raven |
pwa-calibration |
Step 3 — calibration | PWA / pwa_calibration |
You can install just this repository and pip will pull the underlying packages along with it.
Unified CLI (Recommended)
After installation, every pipeline step uses the same command shape (pwa-<name> to run, pwa-init-<name> to interactively build its config):
pwa-init-hydrocondition pwa_config.yml
pwa-hydrocondition --config pwa_config.yml      # Step 0 — hydro-conditioning

pwa-init-nc-processing nc_processing.yml
pwa-nc-processing --config nc_processing.yml    # Step 1 — NetCDF / forcing processing

pwa-init-raven-inputs raven_inputs.yml
pwa-raven-inputs --config raven_inputs.yml      # Step 2 — Raven input generation
                                                # (also writes RavenView visualization
                                                #  files when rivers_shapefile is set)

pwa-init-calibration calibration.yml
pwa-calibrate --config calibration.yml          # Step 3 — calibration
RavenView visualization
When rivers_shapefile is set in raven_inputs.yml, pwa-raven-inputs also writes a RavenView-compatible GeoJSON pair into <output_dir>/Raven/RavenView/:
<output_dir>/Raven/RavenView/
    <watershed_name>.json         # subbasins
    <watershed_name>Rivers.json   # rivers
Upload both at https://raven.uwaterloo.ca/RavenView/RavenView.html to render the watershed in the browser. Set write_ravenview: false to opt out, or leave rivers_shapefile unset to skip the export entirely. A standalone pwa-ravenview CLI exists for one-off exports outside the pipeline.
These commands are also available as Python modules (python -m pwa_tools.run_step0, python -m pwa_raven.run_nc_processing, etc.) for users who prefer that style.
Notebook / Python API usage
The CLI is the easiest path for one-shot runs. Inside Jupyter or a custom script you have two equivalent import styles — pick whichever fits your code:
Style A — Umbrella import (recommended for notebooks)
After installing the pwa package, every public callable and config class is available under a single namespace:
import pwa

# Step 0 — hydro-conditioning
config0 = pwa.PwaConfig.from_yaml("pwa_config.yml")
step0 = pwa.run_step0(config0, generate_wetlands=False)

# Step 1 — NetCDF processing
config1 = pwa.NcProcessingConfig.from_yaml("nc_processing.yml")
step1 = pwa.run_nc_processing(config1)

# Step 2 — Raven input generation (also writes RavenView GeoJSON when
# rivers_shapefile is set in the config).
config2 = pwa.RavenInputsConfig.from_yaml("raven_inputs.yml")
step2 = pwa.run_raven_inputs(config2)
# step2.ravenview_subbasins and .ravenview_rivers point at the GeoJSON
# pair, or are None if RavenView export was skipped.

# Or generate a one-off RavenView export from an existing config:
# sub, riv = pwa.export_for_ravenview_from_config(config2)

# Step 3 — calibration
config3 = pwa.CalibrationConfig.from_yaml("calibration.yml")
step3 = pwa.run_calibration(config3, db_suffix="notebook_run", repetitions=10)
Or import only what you need:
from pwa import PwaConfig, run_step0, NcProcessingConfig, run_nc_processing
pwa.__all__ lists every re-exported symbol; dir(pwa) and IDE autocomplete both surface them.
Style B — Source-package imports
Importing directly from the package that defines each function works the same and makes ownership explicit. Useful when reading code that crosses package boundaries, or when a future maintainer wants to know exactly where a callable lives:
from pwa_tools.config import PwaConfig
from pwa_tools.runner import run_step0

from pwa_raven.nc_processing import NcProcessingConfig, run_nc_processing
from pwa_raven.raven_inputs import RavenInputsConfig, run_raven_inputs

from pwa_calibration.setup import CalibrationConfig
from pwa_calibration.runner import run_calibration
Behaviour is identical; the pwa.* symbols are direct re-exports of these.
Common patterns
<Config>.from_yaml(path)loads a YAML file written by the correspondingpwa-init-*command. This is the most ergonomic path for notebooks — generate the config once interactively, then iterate in the notebook by reloading.<Config>.from_dict({...})builds a config without ever touching the filesystem. Useful for parameter sweeps or programmatically generated configs.- All
run_*functions return a result dataclass withPathattributes pointing at the produced files — easy to chain into matplotlib, geopandas, or rasterio for downstream analysis in the same notebook. - The pipeline is logged through Python's standard
loggingmodule. To see progress in a notebook, configure logging once at the top:import logging logging.basicConfig(level=logging.INFO, format="%(message)s")
Quick install
PWA is available on PyPI. Create a Python 3.12 environment, install GDAL through conda-forge, then install PWA and its Python dependencies with a single pip command:
conda create -n pwa python=3.12 -y
conda activate pwa

# Install GDAL separately as a compiled system dependency
conda install -c conda-forge gdal -y

# Install PWA and all Python package dependencies
pip install pwa-modeling
Installing pwa-modeling automatically installs the required Python packages, including pwa-tools, pwa-raven, and pwa-calibration.
Verify the installation:
pwa-hydrocondition --help
Note: The Raven hydrological model executable must be installed separately and available on your system
PATHfor workflows that run Raven. MPI is also required separately if using parallel calibration.
Repository Structure
PWA-modeling/
├── pyproject.toml              # Orchestrator package — declares pwa-tools / pwa-raven / pwa-calibration as deps + console scripts
├── src/pwa/__init__.py         # Empty namespace anchor for the orchestrator package
├── pwa_config.example.yml      # Sample config for Step 0
├── README.md                   # This documentation
├── hydrocon_env.yml            # Conda environment file
└── .gitignore                  # Tells Git to ignore the "Data" folder
Prerequisites
To be able to run this pipeline, the user must do the following:
-
Install Anaconda: You can install the latest version of Anaconda here. While any recent version of Conda should work, this documentation was prepared using Conda version 24.9.2. If you encounter issues that may be related to your Conda version, please reach out to us. We recommend installing the full Anaconda distribution (rather than Miniconda), as the steps in this documentation assume a full Conda installation.
-
Configure Git:
2(a) If you don't already have one, create a GitHub account.
2(b) Download and install Git to your desktop from the official site.
2(c) Connect your local machine to GitHub using SSH. This allows you to securely clone and push repositories without typing your password everytime. For step-by-step instructions, see GitHub's official documentation.
2(d) Install and enable the Python extension in VS Code from the Extensions panel in VS Code:
-
Install GDAL: GDAL is a geospatial data processing software that our hydro-conditioning product utilizes. You can install
GDALby running theconda install -c conda-forge gdalcommand on Anaconda PowerShell Prompt. You can verify the install withgdalinfo --version.
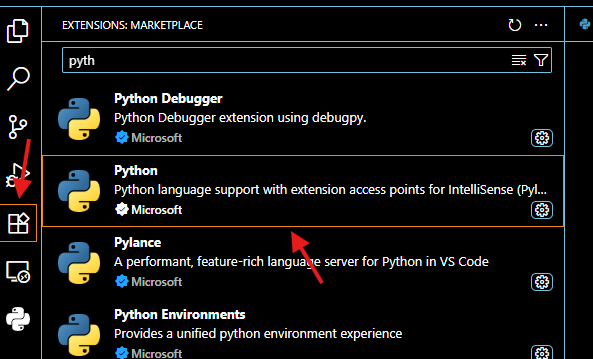
Setup Instructions
1. Clone this repository and the pwa-tools repository
1.1 Open the Visual Studio Code app on your desktop. 1.2 Open a new Powershell terminal by using the toolbar on the top left corner.
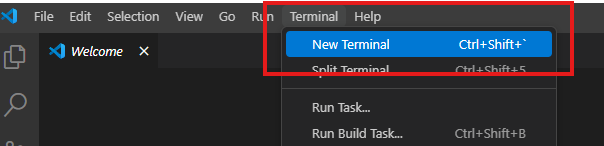
Your terminal should look something like this:
(base) PS C:\Users\iyaktubay>
1.3 Clone this repository to your workspace by running the following command:
(base) PS C:\Users\iyaktubay> git clone https://github.com/IISD-ELA/PWA-modeling.git
1.4 In the same workspace, clone the pwa-tools repository by running the following command:
(base) PS C:\Users\iyaktubay> git clone https://github.com/IISD-ELA/PWA-hydro-conditioning-tools.git
1.5 Close the Visual Studio Code app.
2. Create your environment
2.1 Navigate to the Anaconda PowerShell Prompt App:
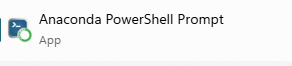
2.2 In the command line, change your working directory to the cloned PWA-hydro-conditioning-tools folder.
You can do this with the cd command, followed by a space and the path to the folder (relative to your current location). For example, if the cloned folder is located C:\Users\iyaktubay\PWA-modeling and your current location is C:\Users\iyaktubay, then the appropriate command would be:
(base) PS C:\Users\iyaktubay> cd PWA-modeling
And, after running the command, your terminal would look like this:
(base) PS C:\Users\iyaktubay\PWA-modeling>
2.3 Now that your working directory is the PWA-hydro-conditioning-tools folder, you can create your environment by running the following command:
(base) PS C:\Users\iyaktubay\PWA-modeling> conda env create -f hydrocon_env.yml
2.4 To confirm that your environment has been successfully created, you can run the following command:
(base) PS C:\Users\iyaktubay\PWA-modeling> conda env list
This should return something like this:
# conda environments:
#
base                  *  C:\Users\iyaktubay\AppData\Local\anaconda3
geotest                  C:\Users\iyaktubay\AppData\Local\anaconda3\envs\geotest
hydrocon_env             C:\Users\iyaktubay\AppData\Local\anaconda3\envs\hydrocon_env
pwa_dev                  C:\Users\iyaktubay\AppData\Local\anaconda3\envs\pwa_dev
test_env                 C:\Users\iyaktubay\AppData\Local\anaconda3\envs\test_env
(base) PS C:\Users\iyaktubay\PWA-modeling>
3. Install the pwa-tools package
3.1 Reopen the Visual Studio Code app and open a new PowerShell terminal just as you did in step 1.2. Your terminal should look like:
(base) PS C:\Users\iyaktubay>
3.2 Activate the hydrocon_env environment you have created in step 2 by running the following command:
(base) PS C:\Users\iyaktubay> conda activate hydrocon_env
Your terminal should now look something like this:
(hydrocon_dev) PS C:\Users\iyaktubay>
3.3 Change your working directory to the cloned PWA-hydro-conditioning-tools folder by running the following command (change the path to match your relative path):
(hydrocon_dev) PS C:\Users\iyaktubay> cd PWA-hydro-conditioning-tools
Your terminal should now look like this:
(hydrocon_dev) PS C:\Users\iyaktubay\PWA-hydro-conditioning-tools>
3.4 Install the custom pwa-tools package in editable mode by running the following command. You must install it in editable mode for the pipeline to work correctly.
(hydrocon_dev) PS C:\Users\iyaktubay\PWA-hydro-conditioning-tools> pip install -e .
3.5 After installation, if the pwa-tools package was updated in the remote repository, you can locally update the package by uninstalling the package and re-installing it in editing mode:
(hydrocon_env) PS C:\Users\iyaktubay\PWA-hydro-conditioning-tools> pip uninstall pwa-tools
(hydrocon_env) PS C:\Users\iyaktubay\PWA-hydro-conditioning-tools> pip install -e .
You can check whether the package was updated in the remote repository by running the following command:
(hydrocon_env) PS C:\Users\iyaktubay\PWA-hydro-conditioning-tools> git status
If the package is up to date, you should see something like this:
(hydrocon_env) PS C:\Users\iyaktubay\PWA-hydro-conditioning-tools> git status
On branch main
Your branch is up to date with 'origin/main'.
4. Prepare the input data
Create a Data/ folder inside the PWA-modeling folder and download and extract the following zip files into it. Do not create any subfolders in the Data/ folder — the Step 0 runner expects all input data files to live at the top level of Data/ and will organize input and output files into subfolders itself.
- Watershed of interest based on outlet point from the CLRH Hydrofabrics website (e.g., ID: 05OE006 for Manning Canal)
- Streams dataset of interest from NHN streams website.
- In the directory, open the folder named with the first two digits of your CLRH station ID (e.g., open the
05/folder if your CLRH station ID is05OE006). - Download the
.zipfile whose name contains the third and fourth digits of your CLRH station ID (e.g., downloadnhn_rhn_05oe000_shp...if your CLRH station ID is05OE006). - If multiple
.zipfiles match, download both and check which shapefile covers the geographic extent of your watershed. You can do this by using a GIS tool such as ArcGIS.
- In the directory, open the folder named with the first two digits of your CLRH station ID (e.g., open the
- Raster DEM(s) of interest from LiDAR DEMs (e.g., Seine & Rat 2016 for Manning Canal)
- Culvert inventory (optional): Prepare your culvert inventory (only Shapefiles in Line format are currently accepted)
Your local workspace should now have the following structure:
your-working-directory/
├── PWA-modeling/
    ├── README.md
    ├── .gitignore
    └── Data
        └──  ...data files you downloaded...
└── PWA-hydro-conditioning-tools/
    └──  ...repository contents...
5. Run the hydroconditioning pipeline
5.1 On Visual Studio Code's welcome page, open the PWA-modeling folder by clicking "Open folder...":
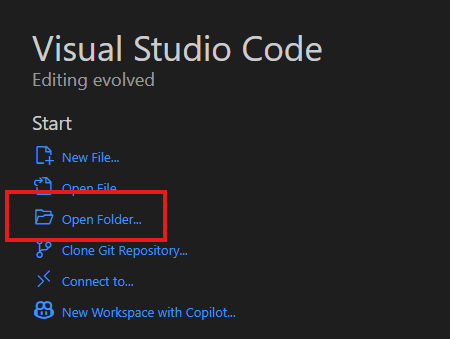
5.2 Open up terminal on Visual Studio Code once again if it's not already open and change your working directory to the PWA-modeling folder if it's not already there.
5.3 Generate a config file once (interactively):
pwa-init-hydrocondition pwa_config.yml
The prompts walk through the inputs. Or copy pwa_config.example.yml to pwa_config.yml and edit by hand.
Then run the pipeline as many times as you like:
pwa-hydrocondition --config pwa_config.yml
pwa-hydrocondition --config pwa_config.yml --wetlands         # also generate wetlands shapefile
pwa-hydrocondition --config pwa_config.yml --log-level DEBUG  # extra diagnostic output
pwa-hydrocondition fails fast (with a clear error listing every missing file) if your Data/ folder is incomplete, instead of crashing partway through a 30-minute LiDAR resample. The same command is also runnable as python -m pwa_tools.run_step0 for environments where executable invocations are restricted.
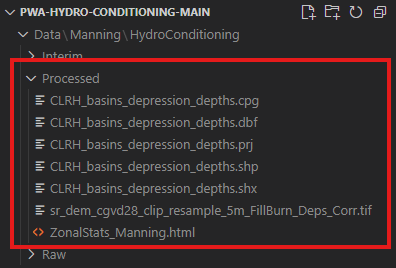
5.4 Once the script has fully run, you will see the output files under the Data\<watershed name you entered when prompted>\HydroConditioning\Processed folder:
You can also see any intermediate files in the ...\Interim folder:
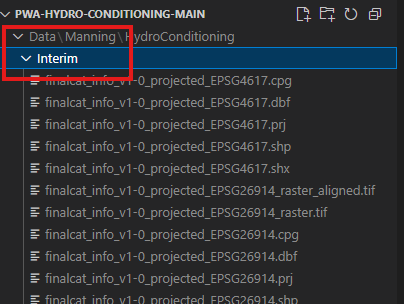
The output files include a depression depths raster .tif, depression depths shapefile, and a zonal statistics file for your watershed by default, as well as a wetland polygons shapefile with statistics (area, total storage, and median depth) if the user chooses to generate it.
Running tests
This project uses pytest. From the repo root with the conda env activated:
python -m pytest -q
Each of the four packages (pwa-tools, pwa-raven, pwa-calibration, and this orchestrator) ships its own test suite. You can run them individually:
cd PWA-hydro-conditioning-tools && python -m pytest -q     # Step 0
cd PWA/pwa_raven                && python -m pytest -q     # Steps 1-2
cd PWA/pwa_calibration          && python -m pytest -q     # Step 3
cd PWA-modeling  && python -m pytest -q     # orchestrator
Useful flags during development:
-q— quiet output (one dot per test, summary at the end)-k <pattern>— run only tests whose name matches the pattern-x— stop on the first failure (fast feedback while iterating)--tb=short— concise tracebacks
Tests live in each package under tests/unit/ and (where applicable) tests/regression/. All tests should pass before opening a pull request.
Contributing
Workflow for adding a feature or fixing a bug:
- Create a feature branch off the default branch in the relevant repo (
mainfor pwa-tools and the orchestrator,masterfor PWA). Usefeat/<short-name>for features andfix/<short-name>for bug fixes — never commit directly to the default branch. - Write a failing test first that describes the desired behavior. Run
python -m pytest -qto confirm the new test fails. For bug fixes, the test should reproduce the bug. - Write code to make the test pass. Run the suite again and confirm green.
- Commit incrementally with focused commit messages that explain why (the motivation, the problem, the trade-off) rather than just what (the diff is the what).
- Open a pull request against the default branch. Tag the relevant reviewer. The PR description should include a short summary, a test plan, and links to any related issues.
Practical notes:
- New features should ship with corresponding tests. If a unit test is hard to write, that's often a signal the design needs refactoring.
- Avoid disabling, skipping, or commenting out tests to make builds pass — investigate the root cause and fix it properly.
- Keep commits small and atomic. If you find yourself making unrelated changes in the same commit, split them.
- Don't add features beyond what the issue/PR scope requires. YAGNI — build for the current need, refactor later when a second use case emerges.
6. Contact and support
For support or any other inquiries, please contact us at eladata@iisd.net.
1 maintainer

Metadata
1 maintainer
Release files for pwa-modeling 0.1.1
For a detailed explanation of source distributions (sdists) and built distributions (wheels), please see the package formats documentation.
Source distribution (sdist)
| File | Size | Uploaded | |
|---|---|---|---|
| pwa_modeling-0.1.1.tar.gz | 22.7 kB | Details |
Built distribution (wheel)
| File | Interpreter | ABI | Platform | Reset |
|---|---|---|---|---|
| pwa_modeling-0.1.1-py3-none-any.whl | Python 3 | none | any | Details |
Total release size: 38.7 kB
Release files / pwa_modeling-0.1.1.tar.gz
| Download URL | pwa_modeling-0.1.1.tar.gz |
|---|---|
| Size | 22.7 kB |
| Tags | Source |
|
SHA-256 checksum How to use checksums |
2a5e38074411b9b45bacd49e2478e325a6755adab3e11884a755b4d2e5c97390
|
|
BLAKE2b-256 checksum How to use checksums |
13d2db84ec71bbbb228551e1fe2b37d754f636328d3113c6a7acf5ab687c3ee7
|
| Upload date | |
|
Uploaded using Trusted Publishing? What is trusted publishing? |
No |
| Uploaded via |
twine/7.0.0 CPython/3.12.13
|
Release files / pwa_modeling-0.1.1-py3-none-any.whl
| Download URL | pwa_modeling-0.1.1-py3-none-any.whl |
|---|---|
| Size | 16.0 kB |
| Tags | Python 3 |
|
SHA-256 checksum How to use checksums |
2f172ea1a8e1eabfdd525ad9765a6fd2b9a57a32e0f929d03d4495997fa84ade
|
|
BLAKE2b-256 checksum How to use checksums |
f2fed87c8f0250e8e56f263356fe6184e96173469c5d793558f631cfde5def9f
|
| Upload date | |
|
Uploaded using Trusted Publishing? What is trusted publishing? |
No |
| Uploaded via |
twine/7.0.0 CPython/3.12.13
|














