

An agentic network pentest tool you talk to.



English · Español · Deutsch · 日本語 · Türkçe
Safety model · Install · First run · Your model · PCI DSS · Documentation
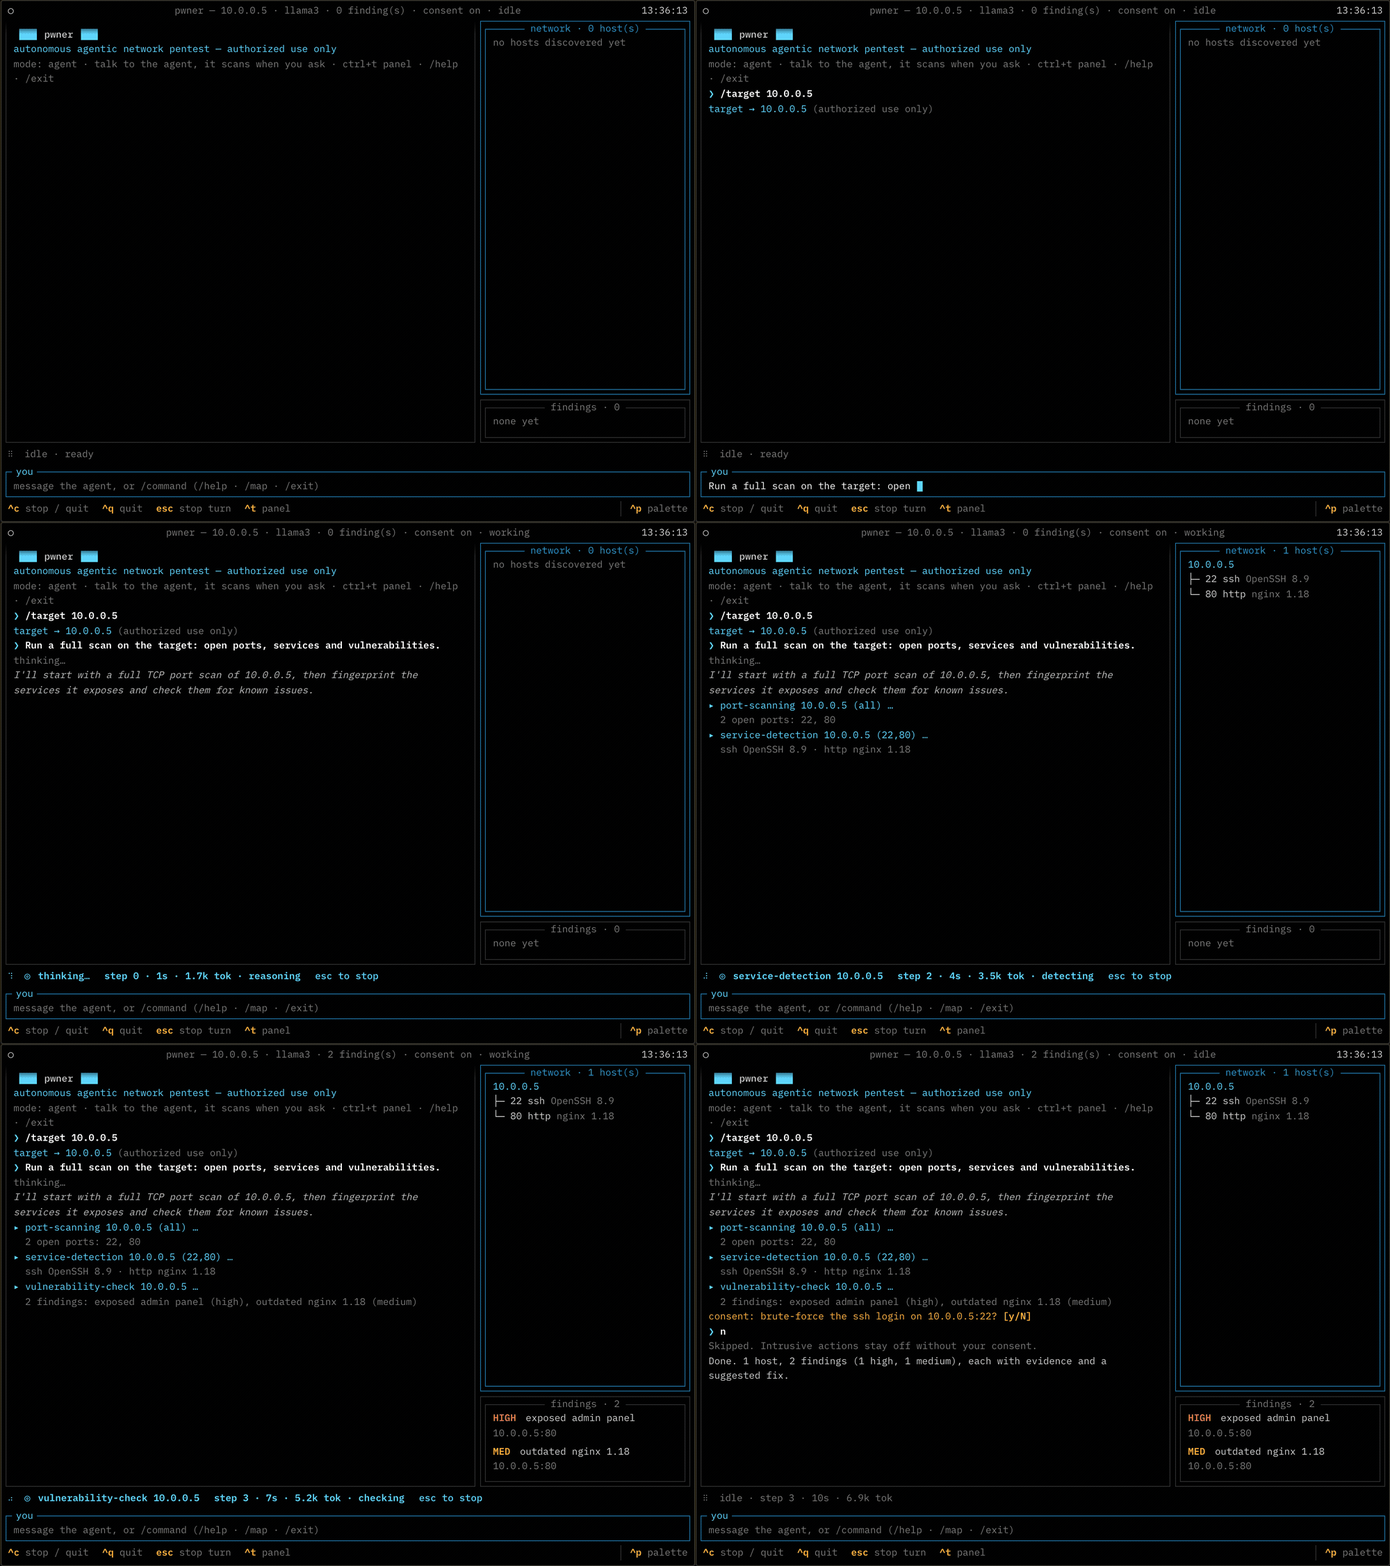
Example session against a fictional lab host. The agent's wording and the counts are illustrative, not a recording of a live run. Note the last four lines: it asks before anything intrusive, and a refusal stops it.
pwner is an LLM-driven agent that plans and runs a network penetration test from your
terminal. It discovers hosts, fingerprints services, checks them against known issues, and —
when the target warrants it and you approve — exploits them to prove impact. It drives
real tools (nmap, nuclei, netexec, impacket, hydra and others) rather than simulating them,
and it reports confirmed findings with severity, evidence and a fix.
It runs on your own model, or on no model at all.
- You talk to it. Not a flag soup: say "scan it, focus on the database" and it decides what to run, shows you its reasoning as it goes, and you can redirect it mid-run.
- Scope is enforced in code. Every tool call is checked against the target you named before it runs — not asked of the model in a prompt. See Safety model.
- Intrusive actions are denied by default. Brute-force, remote command execution, credential dumping and reverse shells need your explicit approval.
- Your model, your machine. OpenAI, Anthropic, Google, DeepSeek, or a server on your own hardware — Ollama, Lemonade, llama.cpp, anything OpenAI-compatible. A local endpoint needs no API key. Nothing is sent anywhere until you configure one.
- Works with no model.
--no-airuns the full discovery → fingerprint → detect pipeline deterministically, with no API key and nothing leaving the machine. - 52 tools across nmap, HTTP, web crawling and parameter probing, per-service probes, Active Directory and credential work, each a thin wrapper over the standard binary rather than a reimplementation.
Safety model
Two mechanisms, both in the tool layer, both outside the model's reach. The model can ask for anything; it cannot widen its own authorization.
flowchart LR
    OP(["operator"]) -->|"plain language"| AG["agent loop"]
    AG -->|"tool call"| SG{"scope guard"}
    SG -->|"host outside<br>the target"| R1["refused"]
    SG -->|"in scope"| CG{"consent gate"}
    CG -->|"intrusive,<br>not approved"| R2["skipped"]
    CG -->|"approved, or<br>not intrusive"| RUN["runs against<br>the target"]
    classDef guard fill:#ffb000,stroke:#8a5f00,color:#140d00,stroke-width:2px
    classDef stop fill:none,stroke:#8b949e,stroke-dasharray:4 4
    class SG,CG guard
    class R1,R2 stop
A refusal is not an error that stops the run: it goes back to the model as a tool result, so the agent learns it overstepped and carries on inside the boundary.
Scope lock. build_dispatch wraps every tool so each
host-carrying argument is checked against your target before the tool body runs. Tools are
in-scope-by-default: one that forgets its own check is still guarded, and an unregistered
tool name fails closed. A network argument has to sit entirely inside the authorization, so
a /24 scope cannot be widened to a /16 by a tool argument.
Changing the scope. The one thing the guard cannot check is set_target, because its
argument is the new scope, so there is nothing to check it against. It carries its own
gate instead: narrowing, or returning to something you already authorized, is free, and
moving anywhere else needs your answer every time. An earlier approval for some other
action does not buy it, --auto-consent does not cover it, and a non-interactive run
refuses it outright.
Consent gate. Anything active is denied unless you approve it in that session. The agent
cannot self-approve — consent is resolved outside the model — and a non-interactive run
refuses it unless you launched it with --auto-consent.
These two are the part of the codebase under the most test: 77 tests on the scope boundary
in tests/test_scope.py, 32 more on the scope-change gate in
tests/test_scope_change.py, and 13 on the consent gate in
tests/test_consent.py, out of 725 overall. If you are going to
read one thing before pointing this at a network, read those.
Intended use:
- Authorized penetration tests, with written permission and an agreed scope
- Bug-bounty work, inside the program's stated rules
- Your own lab, your own hardware, CTFs
- Security research on systems you own
Not this tool's purpose, and not defensible:
- Anything on a host you do not own and have no written permission to test
- "Just checking" a network you happen to be on
- Anything where you cannot name who authorized it
Install
Python 3.10+. nmap is the only hard requirement — everything else enables more tools and is optional.
curl -fsSL https://raw.githubusercontent.com/0x45dd/pwner/main/install.sh | bash
That builds an isolated virtualenv under ~/.local/share/pwner, leaves your system
Python alone, and puts pwner on your PATH so it works from any directory. Add
--with-tools to install nmap and the optional scanners too, and --uninstall to take
it all back out. On macOS there is also a tap:
brew install 0x45dd/tap/pwner
That brings nmap with it. From source instead:
git clone https://github.com/0x45dd/pwner.git
cd pwner
python3 -m venv .venv && source .venv/bin/activate
pip install -e .
Then the external tools, and a check:
./scripts/install-deps.sh   # brew/apt/kali/pacman/dnf
pwner doctor               # what's missing
install-deps.sh installs only what is missing and skips anything your distro does not
package instead of failing. pwner doctor reports every external tool, what each one
enables, and the install command for the system you are on; it exits non-zero only when
nmap is missing, so it works as a setup check in a script.
On Kali there is almost nothing to install. A default Kali image already ships 8 of the
11 external tools pwner drives — nmap, hydra, netexec, impacket, certipy, searchsploit,
hashcat and snmpwalk. sudo apt install nuclei bloodhound.py adds two more, and only
kerbrute is unpackaged. pwner detects Kali as its own ecosystem rather than as Debian, so
pwner doctor hands you apt commands instead of the source builds a plain Debian box needs.
If you are choosing where to run this, run it there.
uv, or just the command
uv venv && uv pip install -e .
pipx install -e .
Docker
The whole toolchain in one image, nothing installed on your host. The base is Kali, so every tool but kerbrute comes from apt:
docker build -t pwner .
docker run --rm -it --net=host \
  --cap-add=NET_RAW --cap-add=NET_ADMIN \
  -v pwner-config:/root/.config/pwner \
  -v pwner-sessions:/root/.local/share/pwner \
  pwner
--net=host and the two capabilities are what let nmap do SYN scans and ICMP/ARP discovery;
without them it quietly falls back to slower connect scans and finds fewer hosts. The
volumes persist your key and your saved transcripts.
The image is ~2.7 GB and carries 10 of the 11 external tools plus nuclei's 14k templates, baked in so the first scan does not stall on a download. kerbrute is the one omission: it has no Kali package and no arm64 release. Built and run on arm64; the package set resolves on amd64 too.
First run
pwner
The first run asks for a provider and an API key once and saves them to
~/.config/pwner/config.json (owner-only). Every run after that drops you straight into a
session. Change it later with pwner --pick for a provider/model menu, pwner setup for the
full prompts, or /model and /provider from inside a running session.
pwner chat 10.0.0.5          # session, target set
pwner 10.0.0.0/24 --no-ai    # sweep, no model
pwner doctor                 # tool status
pwner --pick                 # choose a provider/model, then open a session
In a session you talk to the agent and steer it while it works; /help lists the commands,
/findings and /topology show what it has built so far, and /dump writes the transcript
to ~/.local/share/pwner/sessions/ (owner-only — it contains every credential the
engagement turned up, in cleartext).
Your model
Point it at a provider and give it a key. Presets cover OpenAI, Anthropic, Google and
DeepSeek; anything else that speaks the OpenAI API works via --base-url.
export PWNER_API_KEY=...
pwner chat 10.0.0.5 --provider anthropic
The model has to support tool calling. pwner chat --help lists the presets and every
override; each preset's default model is in pwner/llm.py. Model names move
too fast to be worth pinning in a README.
On your own hardware
ollama and lemonade are presets too, and a local endpoint needs no API key — if
one is given it is still sent, since Lemonade does separate inference from admin keys.
pwner chat 10.0.0.5 --provider ollama
pwner chat 10.0.0.5 --provider lemonade
Local servers are named after whatever that machine has pulled, so there is no sensible
default model. When none is set, pwner asks the server's /models endpoint and uses what
it finds; pwner setup lists them and lets you pick one to save. Any other OpenAI-compatible
server — llama.cpp, LM Studio, vLLM — works the same way with --base-url, and is treated
as keyless whenever the URL points at loopback or a private network.
pwner chat 10.0.0.5 --base-url http://192.168.1.50:13305/api/v1 --model Qwen3-Coder-30B
Running without a model
--no-ai runs the deterministic suite: host discovery, port scan, service detection, OS
fingerprint and known-issue detection, then the same findings report. No API key, no network
calls beyond the scan itself, and reproducible — which makes it the mode to use in CI, on an
air-gapped engagement, or when the data cannot leave the building.
The active tools are the agent's; they need both a model and your consent.
PCI DSS segmentation testing
Two of the things PCI DSS v4.0.1 asks for are pure network-layer work, and pwner pci does
them with no model and no agent:
pwner pci 10.0.0.0/24                       # is the CDE isolated from here?
pwner pci 10.0.0.0/24 --json > evidence.json
Run it from a segment that is out of scope for the CDE. It tries to reach the CDE and
reports whether the boundary held — that is 11.4.5, or 11.4.6 on the six-month cycle
if you are a service provider. Because it is deterministic, re-running it after a fix is the
retest 11.4.4 asks for, and the exit code makes that a gate: 0 isolated, 2 not
isolated, 3 inconclusive.
It is not asking what a port scan asks. A port scan wants to know what is listening; this
wants to know whether a packet can get there at all, so a closed port that answers with a
RST is a failure of isolation rather than a pass — something on the path replied. Whether that
RST came from the host or from a firewall rejecting on its behalf cannot be told from a TCP
connect, so that case is reported as inconclusive rather than guessed in either direction.
Settle those from the segmentation control's own logs.
Documentation
Full command and config reference, the agent loop, the module catalogue and the rules live at pwner.si:
- Docs — install, first session, every command and flag
- Agent — how the loop works and what it can and cannot do
- Modules — all 52 tools and what each one drives
- Rules — scope, consent, responsible use
- Contributing — development setup, the tools package, adding a tool
- Security — reporting a vulnerability in pwner itself
Contact
For anything that does not belong in a public issue — questions, private feedback, or getting in touch directly — email berk@planckproof.ai.
Bugs and feature requests work better as issues, and security vulnerabilities should go through SECURITY.md so they stay private until there is a fix.
License
GNU AGPL-3.0-or-later. Copyright (C) 2026 Berk D.
Strong copyleft, with a network clause: if you modify pwner and let other people use it over a network, you owe them the modified source too.
1 maintainer

Metadata
1 maintainer
Release files for pwner 0.3.2
For a detailed explanation of source distributions (sdists) and built distributions (wheels), please see the package formats documentation.
Source distribution (sdist)
| File | Size | Uploaded | Provenance | Actions |
|---|---|---|---|---|
| pwner-0.3.2.tar.gz | 165.6 kB | With provenance | Details for pwner-0.3.2.tar.gz |
Built distribution (wheel)
| File | Interpreter | ABI | Platform | Actions Reset |
|---|---|---|---|---|
| pwner-0.3.2-py3-none-any.whl | Python 3 | none | any | Details for pwner-0.3.2-py3-none-any.whl |
Total release size: 296.7 kB
Release files / pwner-0.3.2.tar.gz
| Download URL | pwner-0.3.2.tar.gz |
|---|---|
| Size | 165.6 kB |
| Tags | Source |
|
SHA-256 checksum How to use checksums |
a3863d212635bf025ced457ea977b2213f72b23d0f3b1a614cdbf6f66a4b5e99
|
|
BLAKE2b-256 checksum How to use checksums |
5fc4547be45f2eff8f27a7cd9ac0333018ab1b4f397bc750b0d94ca2b36c7139
|
| Upload date | |
|
Uploaded using Trusted Publishing? What is trusted publishing? |
Yes |
| Uploaded via |
twine/7.0.0 CPython/3.13.16
|
Provenance
Provenance describes where a file came from. On PyPI, provenance is shared via attestations, which provide a verifiable record of the build or publishing details. View details, limitations and caveats.


PyPI Publish Attestation
PyPI verified that this artifact, at this checksum, originated from the publisher listed below.
Signed by GitHub Actions, verified by PyPI on Nov 5, 2026.
Transparency logRelease files / pwner-0.3.2-py3-none-any.whl
| Download URL | pwner-0.3.2-py3-none-any.whl |
|---|---|
| Size | 131.1 kB |
| Tags | Python 3 |
|
SHA-256 checksum How to use checksums |
2996d2a8958dcfd4c3424506fc0b077b16868614f0c91a640d6daf24552d3c2b
|
|
BLAKE2b-256 checksum How to use checksums |
fc39b85015bde2ec5d4e7b0825715e46dadabff00cb122a2ea469e6b9d951c5d
|
| Upload date | |
|
Uploaded using Trusted Publishing? What is trusted publishing? |
Yes |
| Uploaded via |
twine/7.0.0 CPython/3.13.16
|
Provenance
Provenance describes where a file came from. On PyPI, provenance is shared via attestations, which provide a verifiable record of the build or publishing details. View details, limitations and caveats.
PyPI Publish Attestation
PyPI verified that this artifact, at this checksum, originated from the publisher listed below.
Signed by GitHub Actions, verified by PyPI on Nov 5, 2026.
Transparency logSecurity for pwner 0.3.2
Provenance
Provenance describes where a file came from. On PyPI, provenance is shared via attestations, which provide a verifiable record of the build or publishing details. View details, limitations and caveats.
Full provenance
All 2 files in this release have been uploaded with provenance metadata.
Attestation for pwner-0.3.2.tar.gz
PyPI Publish Attestation
PyPI verified that this artifact, at this checksum, originated from the publisher listed below.
Signed by GitHub Actions, verified by PyPI on Nov 5, 2026.
Transparency logA note on package security
PyPI is a repository for distributing packages, not a service for auditing them. While third-party security researchers and our staff do their best to detect and remove malicious packages, PyPI cannot guarantee the quality, security or suitability of any given package.
To learn more about protecting yourself from malicious actors, visit our package security documentation.













