pyRootHair, a python package for automated extraction of plant root hair traits from images.

Project description
pyRootHair

Welcome to the pyRootHair github repository - a command line package for extracting root hair traits from agar based images of plant seedling roots.
Here, you will find all necessary information on how to install and setup pyRootHair, detailed information about the various pipelines, flags, arguments, and an in-depth tutorial on how pyRootHair works.
If you have questions or suggestions, feel free to submit a pull-request.
Please ensure you have read all sections of the README document.
A minimal working example:
pyroothair -i path/to/image/folder -b batch_id -o path/to/output/folder
If you have used pyRootHair in your work, please cite the following paper: XXX
Table of Contents
- pyRootHair
Installation Instructions (Linux/MacOS)
Please ensure you have the environment management package conda and CUDA already installed.
If you do not have CUDA installed, please see the pyTorch documentation for instructions on how to install pytorch with CUDA support.
Creating Conda Environment
conda create --no-default-packages -n pyroothair python # create fresh conda environment
conda activate pyroothair # activate environment
Setting Up Environment Variables
This step is optional, the sole purpose it serves is to remove the nnUNet warning messages that print whenever you run pyRootHair. You can either follow the step below to eliminate the warning messages, or see nnUNet's documentation on how set temporary/permanent variables to prevent the warning message, or ignore this step entirely if you don't care about the warning messages each time you run pyRootHair.
# create activate and deactivate directories
mkdir -p $CONDA_PREFIX/etc/conda/activate.d
mkdir -p $CONDA_PREFIX/etc/conda/deactivate.d

# activate.sh
echo '#!/bin/sh' > $CONDA_PREFIX/etc/conda/activate.d/set_env_vars.sh
echo 'export nnUNet_raw=$HOME/nnUNet_raw' >> $CONDA_PREFIX/etc/conda/activate.d/set_env_vars.sh
echo 'export nnUNet_preprocessed=$HOME/nnUNet_preprocessed' >> $CONDA_PREFIX/etc/conda/activate.d/set_env_vars.sh
echo 'export nnUNet_results=$HOME/nnUNet_results' >> $CONDA_PREFIX/etc/conda/activate.d/set_env_vars.sh

# deactivate.sh
echo '#!/bin/sh' > $CONDA_PREFIX/etc/conda/deactivate.d/unset_env_vars.sh
echo 'unset nnUNet_raw' >> $CONDA_PREFIX/etc/conda/deactivate.d/unset_env_vars.sh
echo 'unset nnUNet_preprocessed' >> $CONDA_PREFIX/etc/conda/deactivate.d/unset_env_vars.sh
echo 'unset nnUNet_results' >> $CONDA_PREFIX/etc/conda/deactivate.d/unset_env_vars.sh

# make scripts executable
chmod +x $CONDA_PREFIX/etc/conda/activate.d/set_env_vars.sh
chmod +x $CONDA_PREFIX/etc/conda/deactivate.d/unset_env_vars.sh

# deactivate, then reactivate environment
# nnUNet variables are now bound to this current conda environment
conda deactivate
conda activate pyroothair
Installing pyRootHair
Finally, pyRootHair can now be installed:
python -m pip install pyroothair
After installation, run pyroothair. You should be greeted with this output (if you have not requested a GPU):
#########################################
     Thank you for using pyRootHair!
#########################################


...No GPU Detected...

usage: pyRootHair [-h] [-i [IMG_DIR]] [-b [BATCH_ID]] [-o SAVE_PATH]
                  [--resolution [HEIGHT_BIN_SIZE]] [--conv [CONV]]
                  [--frac [FRAC]] [--plot-segmentation]
                  [--plot-transformation] [--plot-summary]

pyRootHair: error: The following arguments are required for pyRootHair: ['-i/--input', '-b/--batch-id', '-o/--output']
Uninstalling pyRootHair
conda activate pyroothair
pip uninstall pyroothair
This will fully uninstall pyRootHair. If you want to delete the segmentation model, this will delete the 'model' directory in the source installation.
rm -r $CONDA_PREFIX/lib/python3.13/site-packages/pyroothair/model
You can now remove the conda environment:
conda deactivate
conda remove -n pyroothair --all
Installation Instructions (Windows)
pyRootHair was primarily written for Linux OS. Installation and functionality should still work on Windows 11, but please note testing has been limited.
Install Miniconda
Please see the official instructions from miniconda's website on installing miniconda.
Once installed, open 'Anaconda Prompt', which can be located by searching in the task bar.
Setting Environment Variables
Please see the official documentation from nnUNet on how to set environment variables for Windows. This is an optional step which removes the nnUNet warning messages each time you run pyRootHair.
Installing pyTorch from source
If you have a GPU and do not have CUDA installed, please follow these instructions to install pyTorch with CUDA support.
Installing pyRootHair
In Anaconda Prompt, enter the following:
conda create --no-default-packages -n pyroothair python # create fresh conda environment
conda activate pyroothair
Next, we can install pyRootHair:
python -m pip install pyroothair
Uninstalling pyRootHair
conda activate pyroothair
pip uninstall pyroothair
To remove the model, remove the files in: C:\Users\USER\AppData\Local\Programs\Python\Python313\Lib\site-packages\pyroothair\model
You can now remove the conda environment:
conda deactivate
conda remove -n pyroothair --all
Quick Demo
To quickly check whether pyRootHair is working after installation, the pyroothair_run_demo command will run pyRootHair on set of five wheat (cultivar: Gladiator) images that have been automatically pre-installed:
pyroothair_run_demo -o demo
Data will be saved in the folder path provided to -o/--output. For more flag and argument options, please read the user guide. Note that you do not need -i/--input for pyroothair_run_demo, as the input images are already pre-loaded during installation!
User Guide
Default Pipeline
The default segmentation pipeline in pyRootHair uses a CNN to perform image segmentation. As such, a GPU is required to maximize segmentation speed and performance. However, it is still possible to run the default segmentation pipeline without a GPU, if you do not have access to one. Segmentation performance will be extremely slow when using a CPU, and will very likely produce out-of-memory crashes unless your images are very small in size. The following section assumes you are running pyRootHair on a cluster with a GPU. Please check the sections on deploying a random forest model or loading a single binary mask if you don't have this available.
The following arguments are required to run the standard segmentation pipeline:
-i/--input: The filepath to the directory containing the images you want to process. MUST be a folder of images!
-b/--batch-id: A unique ID associated with each batch of images you are processing per run. Can be species/genotype name, or date, or anything that is easily identifiable by you
-o/--output: The filepath to location to store data, plots and segmentation masks. Directory will be automatically created should it not already exist.
If GPUs are available on your cluster, this command this requests a single GPU with 10GB VRAM on a SLURM system:
srsh --partition=gpu --gpus=1 --mem=10G
To verify a GPU has been correctly requested, run nvidia-smi. You should get some information about the GPU printed to your screen.
A basic command example to run pyRootHair is as follows:
pyroothair -i ~/Images/Wheat/Brompton/ -b Brompton -o ~/Output/
In this example, all images in the ~/Images/Wheat/Brompton will be copied to ~/Output/adjusted_images/Brompton and renamed for inference. Inference will then be run on these renamed images, and masks will be saved to ~/Output/masks/Brompton. The value provided to -b/--batch-id is used to name the sub folder in Output, which is 'Brompton' in this case. After inference, pyRootHair will post-process the binary masks, and compute traits. The output data will be stored in ~/Output/data/Brompton.
Flags/Arguments
A list of all available arguments can be found using pyroothair -h
-i/--input
REQUIRED - ARGUMENT - STRING
Filepath to directory/folder containing your input images. You can split your images into folders depending on what makes sense for your inputs. Images can be split by genotype, species, condition, treatment, timestamp etc. Required if using the main pipeline or the random forest pipeline. See more about image requirements.
-o/--output
REQUIRED - ARGUMENT - STRING
Filepath to store outputs. By default, only the raw and summary data tables will be saved to this path. Any additional outputs (e.g. with --plot-segmentation) will be stored here as well. Required if using the main pipeline or the random forest pipeline. The structure of the output directory is as follows:
adjusted_images: A copy of the raw input images provided with-i, but images are renamed with a suffixmasks: Binary segmentation masks corresponding to the input imagesplots: Location of stored plots for--plot-segmentation,--plot-summaryand--plot-transformation.data: Location of stored data tables for each batch of images, including summary and raw tables. See this section for more information on the summary data tables.
--batch-id/-b
REQUIRED - ARGUMENT - STRING/INT/FLOAT
In the above example, the renamed images will be stored in ~/Output/adjusted_images/Brompton, and segmentation masks will be stored in ~/Output/masks/Brompton. The --batch-id/-b argument assigns a unique ID to the entire batch of images given by -i. This could be an ID for a particular genotype (e.g. Brompton, a wheat variety), or a timestamp (e.g. each batch of images are from a specific timepoint). You must assign a unique ID for each run of new images! Required if using the main pipeline or the random forest pipeline.
--conv
OPTIONAL - ARGUMENT - INT
You must ensure that all input images for each batch were taken using at the same magnification setting. You will need to adjust the pixel to mm conversion factor for your input images, which you can determine from measuring a scale bar on your images using the FIJI (ImageJ) 'Analyze' > 'Set Scale' option. You must set the number of pixels per mm using --conv each time you run pyRootHair. If you have images taken at different magnification settings, you will need to split them into separate batches, and manually adjust the value of --conv.
--resolution
OPTIONAL - ARGUMENT - INT
pyRootHair computes a sliding window down the root, and takes measurement from bins. Using --resolution, you can tweak the bin size (in pixels) of the sliding window. For example, if your input images have the shape 800 (width) x 1500 (height), there will be 75 data points ($\frac{1500}{20} = 75$) for RHL and RHD for each side root hair segment using the default --resolution value of 20 pixels. The default value is recommended.
--frac
OPTIONAL - ARGUMENT - FLOAT
Controls the degree of LOWESS smoothing for the lines used to model average RHL and RHD for each image. Since measurements from each bin in the sliding window is noisy, a smoothed line over these points reduces the effect of variation between bin measurements. A smaller value for --frac decreases the smoothing effect, i.e. the line will better fit the RHL/RHD data for each bin, but will fluctuate significantly. A larger value for --frac increases the smoothing effect, i.e the line will be much smoother through the RHL/RHD data for each bin, but be a worse fit. See this for a visual representation of the regression lines. Value must be a floating point number (e.g. 0.15) between 0 and 1. The default value is recommended.
--length-cutoff
OPTIONAL - ARGUMENT - NUMERIC (INT/FLOAT)
Set a length cutoff (value in milimetres) for all images in the input batch. --length-cutoff helps standardize your measurements if you have significant variation in root length in the input batch. The value should not be greater than the length of the shortest root in the batch. It is recommended that you first run pyroothair without --length-cutoff, then check the length of the shortest root in the previous run in the summary.csv file, and set the shortest length as your value for --length-cutoff if you wish. For example, --length-cutoff 10 will extract traits from only the first 10 milimetres from the root tip for all input images. By default, --length-cutoff is set to None (i.e performs no filtering).
--plot-segmentation
OPTIONAL - FLAG
Toggle plotting of segmented masks for each image. For each input image, --plot-segmentation saves the raw mask, straightened mask, and a mask of just the root hair segments. Masks are saved in filepath specified in --output under output/plots/batch_id/. Masks are saved in human viewable format (i.e a normal RGB image).
--plot-transformation
OPTIONAL - FLAG
Toggle plotting of co-ordinates illustrating how each root is warped and straightened. Can be helpful to check if an image has been poorly warped. Plots are saved in filepath specified in --output under output/plots/batch_id/
--plot-summary
OPTIONAL - FLAG
Toggle plotting of summary plots describing RHL and RHD for each input image. Plots are saved in filepath specified in --output under output/plots/batch_id/
A Full Example
Here is a full command example, saving all diagnostic/summary plots, with a pixel:mm conversion factor of 100, 0.1 smoothing factor, and a bin size of 50 px:
pyroothair -i /path/to/image/folder -b batch_id -o /path/to/output/folder --plot-segmentation --plot-summary --plot-transformation --conv 100 --frac 0.1 --resolution 50
Random Forest Pipeline
If you do not have access to a GPU, it is possible to train your own random forest segmentation model. The random forest segmentation model is nowhere near as powerful as the CNN, and as such, will struggle with image anomalies or noise. Please note this is an experimental feature, and should be used with caution.
You will need to ensure that all the images are relatively consistent in terms of lighting, appearance, root hair morphology, and have the same input dimensions. Should your images vary for these traits, you will need to train separate random forest models for different batches of images.
Training the Random Forest Model
To train a random forest model, you will need to train the model on a single representative example of an image, and a corresponding binary mask of the image. See this section for details on how to generate suitable binary masks.
Once you have generated a suitable mask, you can train a random forest model like so:
pyroothair_train_random_forest --train-img /path/to/representative/training/image/example --train-mask /path/to/generated/binary/mask --model-output /path/to/output/rf_model/
If successful, you should see ...RFC model saved as /path/to/output/rf_model.joblib..., indicating the random forest model has been saved in --model-output. There are some additional flags/arguments that allow you to toggle the behaviour of how the random forest model is trained, please see the documentation from scikit-learn on the RandomForestClassifier for more information.
--sigma-min: Minimum sigma (blurring factor) for feature extraction from the input image. Default = 1
--sigma-max: Maximum sigma (blurring factor) for feature extraction from input image. Default = 4
--n-estimators: Number of trees in the Random Forest Classifier. Default = 50
--max-depth: Maximum depth of the Random Forest Classifier. Default = 10
--max-samples: Number of samples extracted from image features to train each estimator. Default = 0.05
Deploying the Random Forest Model
Once your random forest model is trained, you can deploy it like so:
pyroothair_run_random_forest -i /path/to/input/image/folder -b batch_id -o /path/to/output/folder -rfc /path/to/rf_model.joblib
The command is the same as before, but you must provide the path to the trained model using -rfc/--rfc-model-path.
Single Mask Pipeline
If you wish, you can also run pyRootHair on a single, user generated binary mask of an input image. See this for instructions on generating and converting binary masks.
To run pyRootHair on a single binary mask (with classes converted!):
pyroothair_run_single_mask -m /path/to/converted/binary/mask -i /path/to/raw/image/of/binary/mask -b batch_id -o /path/to/output
Generating Binary Masks
pyRootHair will accept binary masks of any images as long as they are arrays of 0s, 1s and 2s. It is recommended that you use the ilastik software to generate the masks, as it is simple and requires minimal expertise to use.
This section is not a tutorial on how to use ilastik, rather, a demonstration on what the masks need to look like if you wish to generate your own masks suitable for pyroothair.
1.) Under the 1. Input Data tab, upload your raw image(s). Ensure that the input image only has 3 channels!
2.) Select all features under the Feature Selection tab.
3.) Specify the following label categories. The label order must be in the exact order as shown here!
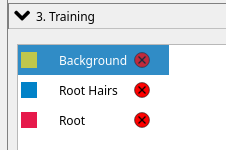
4.) Ensure that the root hairs wrap around the root, especially at the root tip:
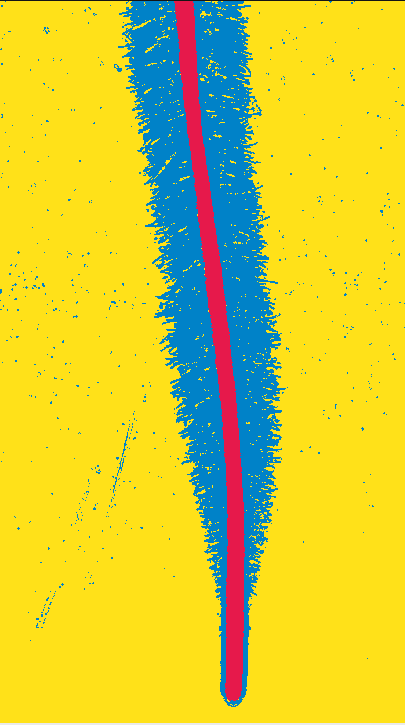
5.) After generating the mask, select Source: Simple Segmentation under 4. Prediction Export. Click on Choose Export Image Settings, and set the output file format to .png, then hit Export All.
6.) Once generated, the mask should be converted such that each pixel is a 0, 1 or 2 in the array. By default, ilastik saves each pixel associated with the background as 1, root hair as 2, and root as 3.
If you are using the generated mask to train a random forest model, IGNORE the rest of this step!. However, if you plan on processing the mask with pyroothair_run_single_mask, please read on:
You will need to convert the pixel classes of the generated binary mask as follows:
pyroothair_convert_mask -i path/to/your/generated/mask
You should see a the following message if the conversion has been successful: ...Saved converted input mask XXX in ZZZ.... You can now process this mask with pyRootHair: pyroothair -p single --input_mask /path/to/converted/mask.
Data Output
pyRootHair will combine all the raw data from each image into a single CSV file, called {batch_id}_raw.csv. The raw data file contains the RHL and RHD measurements from each bin in the sliding window, measured down the root, for each image. The summary data file calculates summary parameters on an individual image basis.
Here is an example of a raw table, where each entry refers to a measurement from an individual bin from the sliding window down each root hair section.
              Name  Distance From Root Tip (mm)     RHL 1     RHL 2     RHD 1     RHD 2
0    brompton_0011                    21.176471  1.950980  1.823529  0.352653  0.181949
1    brompton_0011                    20.980392  1.833333  2.009804  0.298155  0.367263
2    brompton_0011                    20.784314  1.784314  2.107843  0.292580  0.378604
3    brompton_0011                    20.588235  1.862745  2.186275  0.275952  0.382161
4    brompton_0011                    20.392157  1.803922  1.794118  0.311130  0.317186
..             ...                          ...       ...       ...       ...       ...
128  brompton_0007                     0.980392  0.000000  0.000000  0.000000  0.000000
129  brompton_0007                     0.784314  0.000000  0.000000  0.000000  0.000000
130  brompton_0007                     0.588235  0.000000  0.000000  0.000000  0.000000
131  brompton_0007                     0.392157  0.000000  0.000000  0.000000  0.000000
132  brompton_0007                     0.196078  0.000000  0.000000  0.000000  0.000000
Here is an example of a summary table, where traits are calculated at the whole image level.
    Name    Batch_ID  Avg RHL (mm)  Max RHL (mm)  ...  Elongation Zone Stop (mm)  Elongation Zone Gradient  Root Thickness (mm)  Root Length (mm)
0  brompton_0011  Brompton      1.479847      2.058824  ...                   8.235294                  0.281298             0.845811         21.176471
0  brompton_0009  Brompton      1.395408      2.313725  ...                   9.607843                  0.300847             0.795588         18.627451
0  brompton_0005  Brompton      1.801452      2.470588  ...                   6.470588                  0.374728             0.930283         25.686275
0  brompton_0003  Brompton      1.506127      2.063725  ...                  10.588235                  0.211502             0.854809         19.607843
0  brompton_0013  Brompton      1.593682      2.235294  ...                   8.431373                  0.288480             0.907502         22.941176
0  brompton_0006  Brompton      1.801204      2.632353  ...                   5.098039                  0.520718             0.982260         19.803922
0  brompton_0004  Brompton      1.378990      2.053922  ...                   7.450980                  0.299172             0.956427         16.862745
0  brompton_0010  Brompton      1.546985      2.215686  ...                   5.686275                  0.346648             0.863971         20.784314
0  brompton_0014  Brompton      1.603784      2.289216  ...                   7.843137                  0.312141             0.930283         25.098039
0  brompton_0002  Brompton      1.851307      2.862745  ...                   7.647059                  0.349545             1.069853         22.941176
0  brompton_0008  Brompton      1.715365      2.495098  ...                   8.235294                  0.288533             0.994902         23.921569
0  brompton_0007  Brompton      1.624097      2.397059  ...                   9.411765                  0.258051             0.982208         26.078431
Input Images
pyRootHair has been trained on images of varying lighting conditions, contrasts, and species. However, to ensure a better segmentation, please only run pyRootHair on images of good quality! See example images for examples of good and bad images.
- Images must not contain overlapping root hair segments, as the model cannot disentangle the root hairs if they overlap
- Images must have the root oriented downwards, or up to 45 degrees downwards from the vertical
- Images can contain multiple roots as long as they do not overlap. pyRootHair will automatically remove all but the main root/root hair, so please ensure that your root of interest is front and centre in frame!
- Images should be backlit rather than toplit to avoid reflections
- Images with less noise/anomalies will likely result in better segmentation
- Images of straight-ish roots are ideal, as less warping is required to straighten the image. Curved roots are fine as well, but warping can distort the root hairs if the root is extremely curved
Naming Images
Images must be labelled with meaningful information! You can name images with the variety, genotype, species, timestamp etc, as long as it contains information that is meaningful to you. This is because data generated by pyRootHair will refer to the image name, so ensure you provide images with a valid name!
Image Format
Images must be PNG files, as the model will not work with non-PNG file formats. If you have images of other formats, please convert them to PNG.
Image Dimensions
Input images can be of varying shapes as long as they are relatively consistent in size and have only 3 channels (R,G,B). However, it is best to keep the image shapes relatively consistent. Larger images will take more time to segment, and require significantly more GPU VRAM.
Image Examples
Please see examples of acceptable images here and bad images here.
Model
pyRootHair will automatically download the latest segmentation model (model.pth), and all corresponding model JSON files from the this repository when you first run pyroothair. In subsequent runs, pyRootHair will compare the metadata of your local model installation against the metadata of the latest model on Hugging Face. If a mismatch is detected, the latest model is automatically downloaded.
Troubleshooting/FAQ
The plots directory is empty
Please ensure you have specified the any of the following flags: --plot-summary, --plot-segmentation, --plot-transformation along with your pyroothair command.
The binary masks in output/masks/batch_id are black images
The binary masks are arrays of [0s, 1s, 2s], such that when viewed as an RGB image, they appear black. There are a few ways to view the masks. This python snippet will read in the masks and display them interactively (e.g. in a Jupyter Notebook):
import matplotlib.pyplot as plt
import imageio.v3 as iio

mask_file = 'path/to/mask/file' # change the path as necessary

fig, ax = plt.subplots()
ax.imshow(iio.imread(mask_file))
Alternatively, if you specify the --plot-segmentation flag while running pyRootHair, this will save the masks in a normal image format for you to view. See --plot-segmentation for more details.
The output data does not match up to the biology of the plant
Please ensure you have provided a value for --conv, the pixel:mm conversion factor. Without specifying this, the calculations use the default value of 102pixels:1mm.
Re-running a batch of images with fresh prediction
To force re-prediction of input images, you will need to remove the directories associated with the run. Given the example run pyroothair -i images -b test -o output, if you have stored data from multiple different runs in output, you will need to remove the test folder from output/plots/, output/masks, and output/data. Afterwards, you can re run the same command.
Workflow
If you are interested in learning how pyRootHair works behind the scenes, please check out this in-depth walk through with code breakdown.
Release history Release notifications | RSS feed


Download files
Download the file for your platform. If you're not sure which to choose, learn more about installing packages.
Source Distribution
Built Distribution
Filter files by name, interpreter, ABI, and platform.
If you're not sure about the file name format, learn more about wheel file names.
Copy a direct link to the current filters
File details
Details for the file pyroothair-0.0.4.tar.gz.
File metadata
- Download URL: pyroothair-0.0.4.tar.gz
- Upload date:
- Size: 10.0 MB
- Tags: Source
- Uploaded using Trusted Publishing? No
- Uploaded via: twine/6.1.0 CPython/3.12.3
File hashes
| Algorithm | Hash digest | |
|---|---|---|
| SHA256 |
0fae4399cdec12e7b2883eec1c7a6a49ba40c6753f62c3046ab132d0b7c2ca3a
|
|
| MD5 |
fab2504b4cad8953cac6212410fa9d4a
|
|
| BLAKE2b-256 |
043aa94f9c26266e108a5339d280317edfc73eebc8db83152f76680035c41cc0
|
File details
Details for the file pyroothair-0.0.4-py3-none-any.whl.
File metadata
- Download URL: pyroothair-0.0.4-py3-none-any.whl
- Upload date:
- Size: 9.9 MB
- Tags: Python 3
- Uploaded using Trusted Publishing? No
- Uploaded via: twine/6.1.0 CPython/3.12.3
File hashes
| Algorithm | Hash digest | |
|---|---|---|
| SHA256 |
bf6e26fe6f444e46245dd73be8dfb25af833502a596a3b4b621562d6915cf618
|
|
| MD5 |
3d12b06d652212ac425774cd180164db
|
|
| BLAKE2b-256 |
1159da8506c53a6deaff6e54941bacbebd387fa583be6e3f117a5de31dec2f4f
|


