A Business Capability Modeler built with Python and ttkbootstrap
Verified details
These details have been verified by PyPIProject links
GitHub Statistics
Maintainers

Project description
PyBCM - Python Business Capability Modeler
NOTICE: The
pybcm-noaibranch does not include built-in LLM generation or chat features, and AI-powered capability generation is supported exclusively through smart copy/paste features, allowing integration with browser-based AI chat agents like ChatGPT. If you do not have access to common API powered LLM services supported by PydanticAI, then choose thepybcm-noaibranch.
PyBCM is a powerful and user-friendly Business Capability Modeling (BCM) application built with Python. It provides an intuitive graphical interface for creating, visualizing, and managing hierarchical business capability models. This tool is designed to help business architects, analysts, and strategists map and understand their organization's capabilities effectively.
Key Features
PyBCM offers a comprehensive set of features to support various aspects of business capability modeling:
Core Capability Management
- Hierarchical Tree View: Visualize and navigate your capability model in an intuitive tree structure.
- Drag-and-Drop Reordering: Easily rearrange capabilities within the hierarchy by simply dragging and dropping them.
- CRUD Operations: Create, read, update, and delete capabilities seamlessly.
- Rich Text Descriptions: Add detailed descriptions to capabilities using Markdown, with real-time preview and automatic saving.
- Persistent Storage: Utilizes a robust SQLite database to store your capability model reliably.
- Search Functionality: Quickly find capabilities by name or description using the built-in search bar.
- Import/Export: Import and export your entire capability model in JSON format for easy sharing and backup.
Advanced AI Assistance
- AI-Powered Expansion: Leverage the power of large language models (LLMs) to automatically generate sub-capabilities based on selected capabilities.
- First-Level Capability Generation: Use AI to create initial high-level capabilities from an organization name and description.
- Customizable AI Settings: Configure the maximum number of AI-generated capabilities and adjust settings for initial capability creation.
- AI Chat Interface: Interact with an AI assistant to explore your capability model, search capabilities, and get insights.
Interactive Visualization
- Dynamic Visualizer: Generate interactive visualizations of your capability model within a dedicated window.
- Zoom and Pan: Easily navigate the visualization using zoom (Ctrl + Mouse Wheel) and pan (click and drag).
- Color-Coded Levels: Visually distinguish different levels of the capability hierarchy with customizable color schemes.
- Tooltips: Hover over capabilities to view their detailed descriptions.
- Auto-Layout: Intelligent layout algorithms automatically arrange capabilities for optimal clarity and readability.
- Standard Layout: A balanced layout algorithm suitable for most models.
- High-Quality (HQ) Layout: An advanced algorithm that optimizes for aspect ratio and space utilization, especially useful for complex models.
- Customizable Visualization Settings: Adjust layout parameters, colors, font sizes, and more to tailor the visualization to your preferences.
Export Options
- SVG Export: Generate high-quality vector graphics (SVG) of your capability model for use in documentation, presentations, and web pages.
- PowerPoint Export: Export your capability model directly to a PowerPoint presentation, preserving layout and styling for seamless integration into your reports.
- Archimate Open Exchange Format: Export your capability model in Archimate Open Exchange format, making it compatible with popular enterprise architecture tools like Archi.
- Audit Log Export: Export detailed audit logs of all changes made to your capability model in Excel format.
Audit Logging and Security
- Detailed Audit Trail: Track all changes to your capability model, including creation, updates, deletions, and moves, with timestamps and details of old and new values.
- Audit Log Viewer: A dedicated interface to view, search, and filter audit logs.
- Excel Export: Export audit logs to an Excel file for further analysis and reporting.
- Secure Database: The application uses SQLite with foreign key constraints enabled by default to ensure data integrity and prevent unauthorized modifications.
Installation
Prerequisites
- Python 3.11 or higher
uvpackage manager (recommended for faster dependency management)
Steps
-
Clone the repository:
git clone https://github.com/yourusername/pybcm.git
cd pybcm
-
Install dependencies using
uv:uv pip install -e .
-
Alternative: Run as a uv tool:
You can install bcm directly as a uv tool:
uv tool install pybcm
bcm
-
Updating the Project:
To update PyBCM to the latest version from GitHub:
-
Navigate to your local repository:
cd path/to/pybcm
-
Pull the latest changes:
git pull origin master
-
Update dependencies:
uv pip install -e .
Note: Before updating, it's recommended to:
- Back up your
.pybcmdirectory in case you've made custom template modifications - Check the release notes on GitHub for any breaking changes
- Export your capability models if you want to be extra cautious
-
-
Configure LLM API Keys:
PyBCM uses PydanticAI to interact with various LLM providers. You'll need to:
-
Copy the sample environment file to your user directory:
mkdir -p ~/.pybcm
cp .env.sample ~/.pybcm/.env
-
Edit
~/.pybcm/.envand configure your environment:Required variables:
OPENAI_API_KEY: Your OpenAI API key (required for default setup)
Optional LLM providers:
ANTHROPIC_API_KEY: For Claude modelsGOOGLE_API_KEY: For Gemini modelsGROQ_API_KEY: For Groq modelsMISTRAL_API_KEY: For Mistral models
Model settings:
DEFAULT_MODEL: Model to use (default: gpt-4-turbo-preview)MAX_TOKENS: Maximum response length (default: 2000)TEMPERATURE: Response creativity 0.0-1.0 (default: 0.7)
See the Logfire documentation for setting environment variables for logging.
The application validates these settings on startup and will show an error if required variables are missing.
-
-
Configure Logfire logging (first time only):
PyBCM uses Logfire for advanced logging and monitoring. On first run, you'll need to:
- Create a Logfire account at logfire.pydantic.dev
- Install the Logfire CLI:
uv pip install logfire
- Authenticate with Logfire:
logfire auth - Create and select a project:
logfire projects new pybcm
logfire projects use pybcm
This only needs to be done once. Credentials are stored in
~/.logfire/default.toml.
Usage
Launching the Application
Run the application from the command line:
bcm
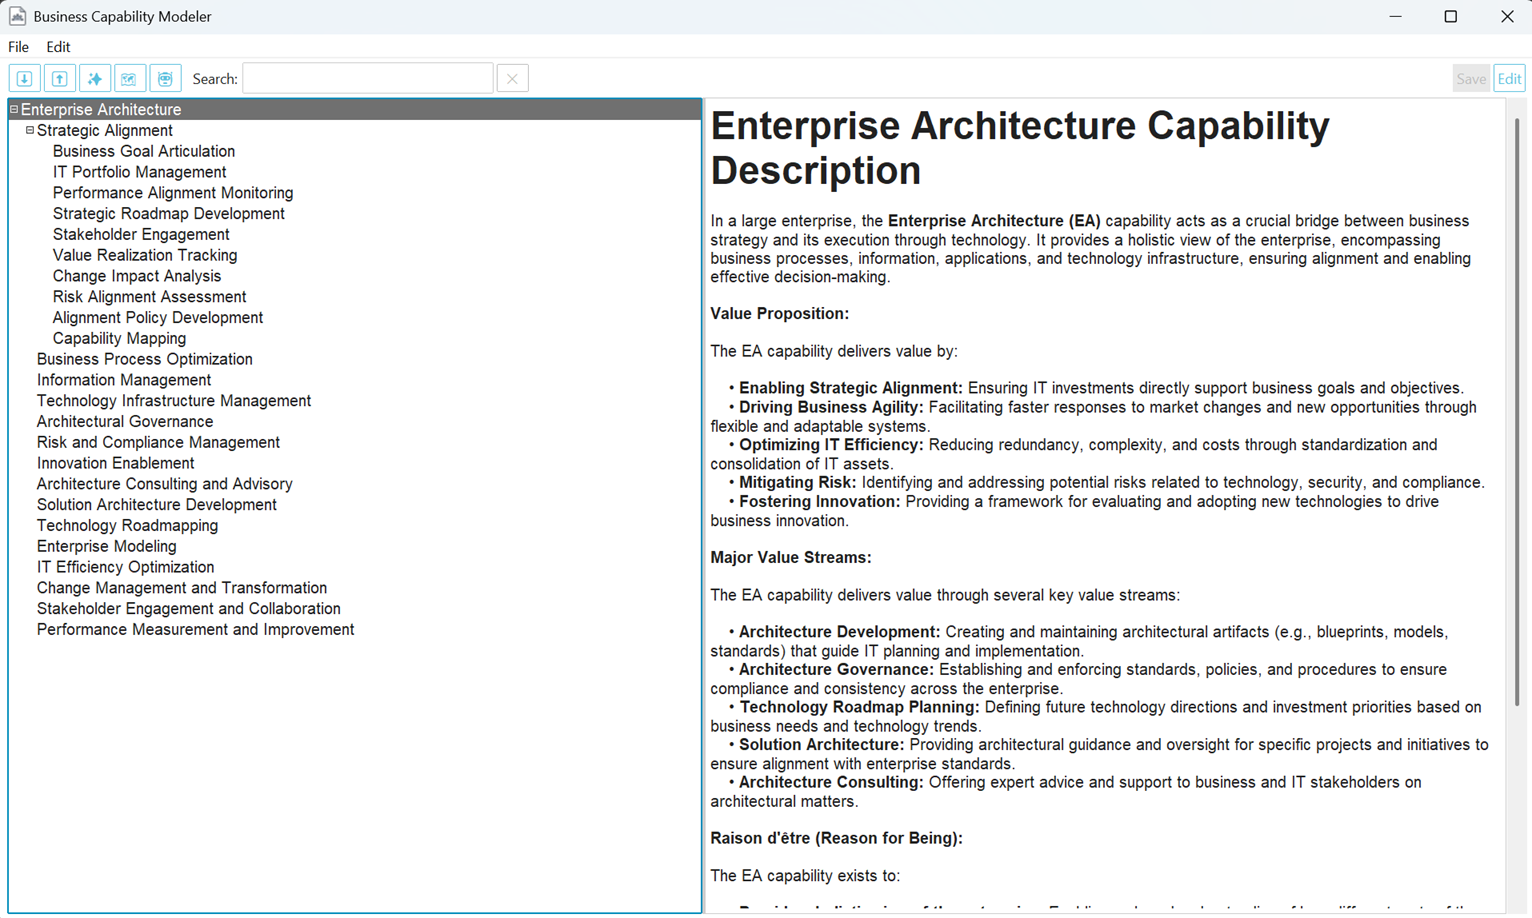
Basic Navigation
- Tree View: The left panel displays the hierarchical capability tree.
- Description: The right panel shows the description of the selected capability.
- Toolbar: Provides quick access to common actions like expand/collapse, AI expansion, visualization, search, and editing.
- Menu Bar: Offers more advanced options, including import/export, settings, and audit log management.
Managing Capabilities
-
Adding a Capability:
- Right-click on the desired parent in the tree view and select "New Child."
- Enter the capability name and an optional description.
- Click "OK."
-
Updating a Capability:
- Select a capability in the tree view.
- Click "Edit" in the toolbar to switch to edit mode.
- Modify the name or description in the right panel.
- Click "View" to see a markdown preview or "Save" to save changes to the database.
-
Deleting a Capability:
- Right-click on the capability in the tree view and select "Delete."
- Confirm the deletion.
-
Reordering Capabilities:
- Drag and drop capabilities within the tree view to change their order or parent.
-
Copy/Paste Capabilities:
- Copy (Ctrl+C): Select a capability and press Ctrl+C to copy its context to the clipboard in a format suitable for AI expansion.
- Paste (Ctrl+V): Select a parent capability, then press Ctrl+V to paste a JSON array of sub-capabilities. Each capability in the array must have
nameanddescriptionfields. - This allows you to:
- Copy capability context for use with external AI tools
- Paste pre-defined sets of capabilities from JSON
- Share capability structures between models
Using AI Features
-
AI Capability Expansion:
- Select a capability in the tree view.
- Click the "✨" (sparkles) button in the toolbar.
- Review the AI-generated sub-capabilities.
- Check the boxes next to the capabilities you want to add.
- Click "OK."
-
AI Chat:
- Click the "🤖" (robot) button in the toolbar.
- A new browser window will open, allowing you to interact with the AI assistant.
- Ask questions about your capability model, search for capabilities, and get insights using natural language.
Working with Visualizations
-
Opening the Visualizer:
- Click the "🗺️" (map) button in the toolbar or select "Visualize Model" from the "Edit" menu.
- A new window opens displaying the interactive visualization.
-
Navigation:
- Zoom: Use Ctrl + Mouse Wheel to zoom in and out.
- Pan: Click and drag to move around the canvas.
-
Tooltips:
- Hover your mouse over a capability to view its description in a tooltip.
-
Exporting:
- SVG: Select "File" > "Export to SVG..." to save the visualization as an SVG file.
- PowerPoint: Select "File" > "Export to PowerPoint..." to generate a PowerPoint presentation.
- Archimate: Select "File" > "Export to Archimate..." to create an Archimate Open Exchange file.
-
Customization:
- Access visualization settings through "File" > "Settings."
- Customize colors, layout parameters, font sizes, and more.
Settings
Access the application settings through "File" > "Settings." Here you can customize:
- Visual Theme: Choose from a variety of ttkbootstrap themes.
- AI Generation: Configure the maximum number of AI-generated capabilities, range for first-level capabilities, and select prompt templates for different operations.
- Model Selection: Select the LLM model to be used for AI features.
- Layout: Adjust layout algorithm, root font size, box dimensions, gaps, padding, target aspect ratio, and maximum level for visualization.
- Coloring: Customize the color scheme for different capability levels and leaf nodes in the visualizer.
User Directory and Template Customization
PyBCM creates a .pybcm directory in your home folder to store user-specific data and customizations:
~/.pybcm/
├── .env              # Environment configuration
├── settings.json     # User settings
├── templates/        # Customizable templates
│   ├── chat.html            # Chat interface template
│   ├── expansion_prompt.j2  # AI capability expansion prompt
│   ├── first_level_prompt.j2# First-level capabilities prompt
│   └── system_prompt.j2     # AI system prompt
Template Customization
You can customize how PyBCM generates capabilities and displays the chat interface by modifying the templates in ~/.pybcm/templates/:
-
AI Prompts:
expansion_prompt.j2: Customize how the AI generates sub-capabilitiesfirst_level_prompt.j2: Modify the prompt for generating first-level capabilitiessystem_prompt.j2: Adjust the AI system prompt for better domain-specific responses
-
Chat Interface:
chat.html: Customize the appearance and behavior of the AI chat interface
The application will:
- Create these templates automatically on first run
- Use your customized versions if they exist
- Fall back to the built-in templates if a customized version doesn't exist
You can select which templates to use for different operations through the Settings dialog:
- Open Settings (File > Settings)
- Go to the "AI Generation" tab
- Choose templates from the dropdown menus:
- "First-level generation template": Template for generating initial capabilities
- "Normal generation template": Template for expanding existing capabilities
This allows you to:
- Tailor the AI prompts for your specific industry or use case
- Customize the chat interface appearance
- Experiment with different prompt strategies
- Switch between different prompt templates without editing files
- Maintain multiple template versions for different use cases
- Maintain your customizations across application updates
Development
Technologies Used
- Frontend:
- ttkbootstrap: Modern, themed Tkinter widgets.
- tkinterweb: HTML rendering for rich text display.
- Backend:
- SQLAlchemy: Database ORM for interacting with SQLite.
- Pydantic: Data validation and settings management.
- PydanticAI: AI agent based on Pydantic models.
- AI:
- PydanticAI: Agent framework for LLM interactions
- Supported LLM providers:
- OpenAI (default)
- Anthropic
- Google AI (Gemini)
- Groq
- Mistral
- Ollama
- Visualization:
- Custom layout algorithms implemented in
layout.pyandhq_layout.py. tkinterCanvas for rendering.
- Custom layout algorithms implemented in
- Export:
svgwrite(implicitly used for SVG generation)python-pptxfor PowerPoint generation.xml.etree.ElementTreefor Archimate XML generation.
- Other:
uv: Fast package manager for installing dependencies.jinja2: Templating engine for generating prompts and reports.markdown: For Markdown rendering in descriptions and AI chat.logfire: For logging and instrumentation.
Contributing
Contributions are welcome! If you want to contribute to PyBCM, please follow these steps:
- Fork the repository.
- Create a new branch for your feature or bug fix.
- Make your changes and write unit tests if applicable.
- Ensure all tests pass and the code follows the project's style guide (we use
black). - Submit a pull request with a clear description of your changes.
License
PyBCM is released under the MIT License.
Acknowledgements
- Thanks to the developers of all the open-source libraries used in this project.
- Special thanks to ttkbootstrap for providing a fantastic set of modern Tkinter themes and widgets.
Contact
For any questions or feedback, please open an issue on the GitHub repository.
Project details
Verified details
These details have been verified by PyPIProject links
GitHub Statistics
Maintainers
Release history Release notifications | RSS feed


Download files
Download the file for your platform. If you're not sure which to choose, learn more about installing packages.
Source Distribution
Built Distribution
Filter files by name, interpreter, ABI, and platform.
If you're not sure about the file name format, learn more about wheel file names.
Copy a direct link to the current filters
File details
Details for the file pybcm-0.1.14.tar.gz.
File metadata
- Download URL: pybcm-0.1.14.tar.gz
- Upload date:
- Size: 827.4 kB
- Tags: Source
- Uploaded using Trusted Publishing? Yes
- Uploaded via: uv/0.5.23
File hashes
| Algorithm | Hash digest | |
|---|---|---|
| SHA256 |
7c5327d5e983bddb8b72c153150553b174e9c0f44a217973ca66b359acb1bf71
|
|
| MD5 |
e4a9c2c2d505602092c18a142e87c1af
|
|
| BLAKE2b-256 |
477bce252e1e6721bcbbf3eb844cc1c9d79bf78a4b74fabffac7c86e98346c86
|
File details
Details for the file pybcm-0.1.14-py3-none-any.whl.
File metadata
- Download URL: pybcm-0.1.14-py3-none-any.whl
- Upload date:
- Size: 156.5 kB
- Tags: Python 3
- Uploaded using Trusted Publishing? Yes
- Uploaded via: uv/0.5.23
File hashes
| Algorithm | Hash digest | |
|---|---|---|
| SHA256 |
20d8e6e23ee15a0f8da28b5e95a3c01c9dd13e0260bccb7643ace266962a716a
|
|
| MD5 |
4a16bdc071581ad88821b6ee6254dcfa
|
|
| BLAKE2b-256 |
89750e288fa1989b416f87113340a1ec268ba184ff45bb342cf154bc10c0e51a
|


