For generating a virtual grid to map pixels against and generate shapes from for a pygame display.

Project description
pygame-gridcalculator
A tool that creates a custom-sized virtual grid for helping place objects on the screen and the ability to create shapes based on the grid.
Contents
- Purpose
- How it works
- Install
- GridCalculator
- ShapeFactory
- Examples
- Requesting Features or Reporting Bugs
Purpose
This tool is designed to easily map positions on a pygame display without relying on fixed pixel values. This is done by mapping the window to a grid, and allowing for the providing of grid co-ordinates to get the actual pixel value on the screen.
This is designed for people getting started with pygame, or people wanting to create uniform menu elements that scale with the display size.
How it works
To utilise this tool, you should initialise it to a variable and pass in the current screen size and the size of the grid you wish to use.
Once the grid has been created, you use the GridCalculator to provide co-ordinates to the position on the screen you want to reference. You can then also use the ShapeFactory to place shapes on the screen based on the created GridCalculator.
Created grids will always have a starting left and top position of 0, unless the optional pixel start position arguments have been provided. Grids are designed to be utilized against the whole pygame Surface, however it is possible to specify a grid for a specific area of the screen or even place a grid within a grid if needed.
Install
To install the Grid Calculator, you can download it using PIP:
pip install pygame-gridcalculator
GridCalculator
Import GridCalculator
To import the Grid Calculator use the following statement:
from pygame_gridcalculator import GridCalculator
Initialize GridCalculator
To initialize a grid Calculator, use the following logic to assign to a variable:
grid = GridCalculator(display_width, display_height, grid_width, grid_height)
The arguments to specify are as follows:
- pixel_end_left: The far right point of the grid in pixels
- pixel_end_top: The bottom point of the grid in pixels
- grid_width: The total number of points you want in your grid from left to right
- grid_height: The total number of points you want in your grid from top to bottom
The following additional arguments can be provided if needed:
- pixel_start_left: The far left point of the grid in pixels (defaults to 0)
- pixel_start_top: The top point of the grid in pixels (defaults to 0)
So if you want to initialize a grid that is 8x6 for your display of 800x600, the code would look something like:
display = pygame.display.set_mode((800, 600), pygame.RESIZABLE)
grid = Grid(display.get_width(), display.get_height(), 8, 6)
Or if you want to initialize a grid that is 2x2 for your display of 200x200, but you want the grid to start 100 pixels in from the left and top, the code would look something like:
display = pygame.display.set_mode((200, 200), pygame.RESIZABLE)
grid = Grid(display.get_width(), display.get_height(), 2, 2, 100, 100)
GridCalculator Methods and Functions
The grid calculator has the following methods and functions:
| Method | Description |
|---|---|
| size | Returns the total number of points in the grid (width, height). |
| pixel_size | Returns the size of the grid in pixels (width, height). |
| update_grid(grid_width_max: int, grid_height_max: int) | Resizes the grid points based on the values provided. |
| update_pixel_positions(pixel_end_left: int, pixel_end_top: int, pixel_start_left: int (Optional), pixel_start_top: int (Optional)) | Resizes the grid based on the pixel points provided. |
| top_point(point: int) | Returns the pixel value for the point selected from the top of the grid. |
| left_point(point: int) | Returns the pixel value for the point selected from the left of the grid. |
| position(left_point: int, top_point: int) | Returns the pixel values for the point co-ordinates selected from the grid (left, top). |
| height_gap(top_point1: int, top_point2: int) | Returns the pixel height between the two top grid points specified. |
| width_gap(left_point1: int, left_point2: int) | Returns the pixel width between the two left grid points specified. |
| square(left_start: int, top_start: int, left_end: int, top_end: int) | Returns the pixel height and width of a square based on the grid position of the top left corner and the bottom right corner (width, height). |
| points_from_left(points: int) | Returns the pixel value for the amount of grid points away from the left border. |
| points_from_top(points: int) | Returns the pixel value for the amount of grid points away from the top border. |
| points_from_right(points: int) | Returns the pixel value for the amount of grid points away from the right border. |
| points_from_bottom(points: int) | Returns the pixel value for the amount of grid points away from the bottom border. |
| draw_grid_to_surface(surface: pygame.Surface, color: tuple (Optional)) | Draws the lines of the grid onto the pygame display provided (does not update display). |
ShapeFactory
Import ShapeFactory
To import the shape factory use the following statement:
from pygame_gridcalculator import ShapeFactory
Initialize ShapeFactory
To initialize a Shape Factory, you need to pass in a valid GridCalculator to work with. You can use the following logic to assign to a variable:
grid = GridCalculator(display_width, display_height, grid_width, grid_height)
shapefactory = ShapeFactory(grid)
The arguments to specify are as follows:
- grid_calculator: The GridCalculator to use to generate shapes
ShapeFactory Methods and Functions
The shape factory has the following methods and functions:
| Method | Description |
|---|---|
| Rect(grid_left: int, grid_top: int, width: float, height: float) | Returns a pygame.Rect object with its position based off grid locators. |
| draw_line(surface: pygame.Surface, color: tuple, grid_start_pos: tuple, grid_end_pos: tuple, width: int (Optional)) | Draws a pygame.draw.line on the pygame.Surface based off grid locators. |
| draw_lines(surface: pygame.Surface, color: tuple, closed: bool, grid_points: list, width: int (Optional)) | Draws a pygame.draw.lines on the pygame.Surface based off grid locators. |
| draw_aaline(surface: pygame.Surface, color: tuple, grid_start_pos: tuple, grid_end_pos: tuple, blend: int (Optional)) | Draws a pygame.draw.aaline on the pygame.Surface based off grid locators. |
| draw_aalines(surface: pygame.Surface, color: tuple, closed: bool, grid_points: list, blend: int (Optional)) | Draws a pygame.draw.aalines on the pygame.Surface based off grid locators. |
| draw_polygon(surface: pygame.Surface, color: tuple, grid_points: list, width: int (Optional)) | Draws a pygame.draw.polygon on the pygame.Surface based off grid locators. |
| draw_circle(surface: pygame.Surface, color: tuple, grid_center: tuple, radius: float, width: int (Optional), draw_top_right: bool (Optional), draw_top_left: bool (Optional), draw_bottom_left: bool (Optional), draw_bottom_right: bool (Optional)) | Draws a pygame.draw.circle on the pygame.Surface based off grid locators. |
The shape factory currently only creates shapes where positions are explicitly specified. Any other shapes should be generated using the Rect method (as you generally pass in a Rect as part of the shape being drawn). Further information on this can be found directly in the pygame draw documentation.
Examples
Basic usage
Setting the variable and creating a new rect using a grid calculator:
display = pygame.display.set_mode((200, 100), pygame.RESIZABLE)
display.fill((255, 255, 255))
grid = GridCalculator(display.get_width(), display.get_height(), 10, 5)

rect = pygame.Rect(grid.left_point(1), grid.top_point(1),
                   grid.width_gap(1, 3), grid.height_gap(1, 4))
pygame.draw.rect(display, (255, 0, 0), rect)
So in this example, a pygame display is created of 200x100 pixels, and a grid is created splitting this into a 10x5 grid, where each square is a 20x20 grid point, like so:
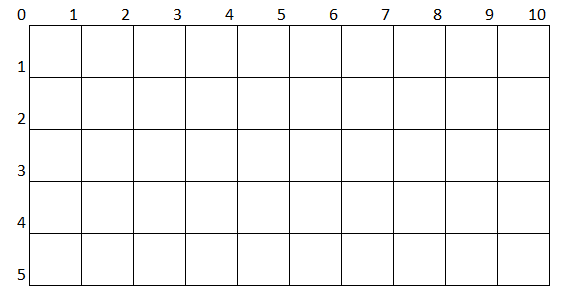
When it comes to drawing the Rect, the calculator identifies that it requires the following:
- Left grid point 1 as the start left position, which in this scenario returns 20
- Logic used: (200 / 10) * 1 = 20 pixels from left
- Top grid point 1 as the start top position, which in this scenario also returns 20
- Logic used: (100 / 5) * 1 = 20 pixels from top
- The gap between left grid point 1 and 3 for the width, which returns 40
- Logic used:
- Point 1 = (200 / 10) * 1 = 20 pixels from left
- Point 3 = (200 / 10) * 3 = 60 pixels from left
- 60 - 20 = 40 pixels width
- Logic used:
- The gap between top grid point 1 and 4 for the height, which returns 60
- Logic used:
- Point 1 = (100 / 5) * 1 = 20 pixels from top
- Point 3 = (100 / 5) * 4 = 80 pixels from top
- 80 - 20 = 60 pixels height
- Logic used:
Using this information creates a rectangle on the screen like so:
Full Scalable Example
The following creates an initial display with a rect and a grid that can scale with the display.
def example():
    running = True
    display = pygame.display.set_mode((300, 300), pygame.RESIZABLE)
    display_height, display_width = display.get_height(), display.get_width()
    grid = GridCalculator(display_width, display_height, 20, 20)

    pygame.init()

    while running:
        display.fill((200, 200, 200))

        for event in pygame.event.get():
            if event.type == pygame.QUIT:
                running = False
                break
            if event.type == pygame.VIDEORESIZE:
                display_height = event.h
                display_width = event.w
                grid = GridCalculator(display_width, display_height, 20, 20)

        # Draw face
        pygame.draw.rect(display, (255, 0, 0),
                         pygame.Rect(grid.left_point(5), grid.top_point(5),
                         grid.width_gap(5, 15), grid.height_gap(5, 15)))
        pygame.draw.rect(display, (0, 0, 255),
                         pygame.Rect(grid.left_point(7), grid.top_point(11),
                         grid.width_gap(7, 13), grid.height_gap(11, 14)))
        pygame.draw.rect(display, (0, 255, 0),
                         pygame.Rect(grid.left_point(7), grid.top_point(7),
                         grid.width_gap(7, 9), grid.height_gap(7, 9)))
        pygame.draw.rect(display, (0, 255, 0),
                         pygame.Rect(grid.left_point(7), grid.top_point(7),
                         grid.width_gap(7, 9), grid.height_gap(7, 9)))
        pygame.draw.rect(display, (0, 255, 0),
                         pygame.Rect(grid.left_point(11), grid.top_point(7),
                         grid.width_gap(11, 13), grid.height_gap(7, 9)))

        # Draw corner squares
        sq_width, sq_height = grid.width_gap(1, 2), grid.height_gap(1, 2)

        pygame.draw.rect(display, (0, 0, 0),
                         pygame.Rect(grid.points_from_left(1),
                                     grid.points_from_top(1),
                                     sq_width, sq_height))
        pygame.draw.rect(display, (0, 0, 0),
                         pygame.Rect(grid.points_from_right(2),
                                     grid.points_from_top(1),
                                     sq_width, sq_height))
        pygame.draw.rect(display, (0, 0, 0),
                         pygame.Rect(grid.points_from_left(1),
                                     grid.points_from_bottom(2),
                                     sq_width, sq_height))
        pygame.draw.rect(display, (0, 0, 0),
                         pygame.Rect(grid.points_from_right(2),
                                     grid.points_from_bottom(2),
                                     sq_width, sq_height))
        pygame.display.update()
This splits the screen into a 20x20 grid, and is able to rescale dependent on the size of the window. If the size is changed, the rectangles will scale based on the new size of the window, still in a 20x20 grid.
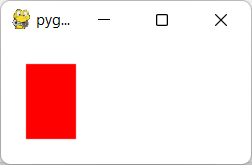
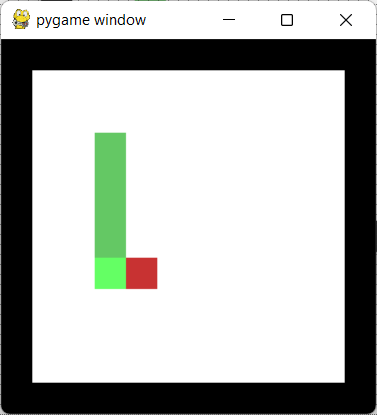
When the window initially loads, the shapes display like so:
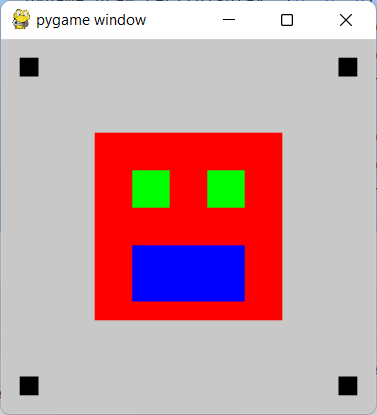
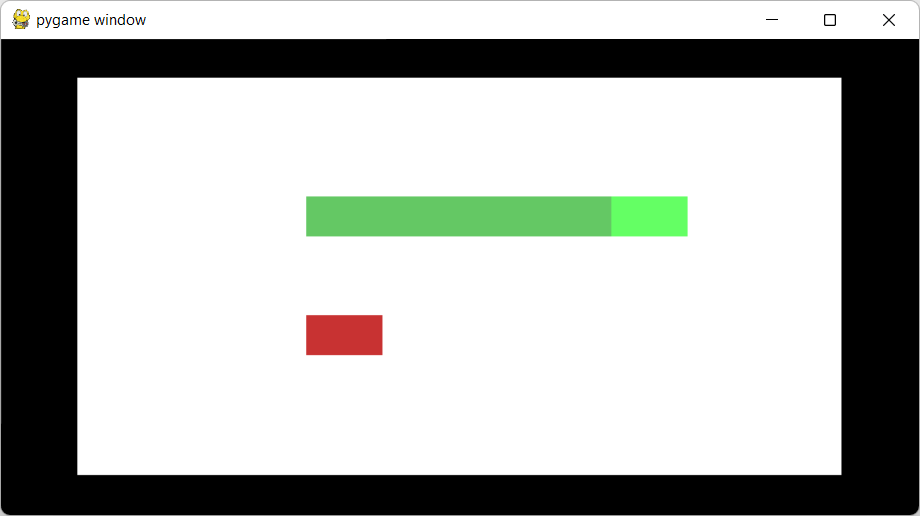
If the window is resized, the shapes adjust with the size of the grid:

Dependent on the situation, you may want to modify the grid based on the window size and rescale the grid appropriately. Because the grid is repopulated on the resize an if statement could be added if needed to check the screen width/height and modify the grid as needed.
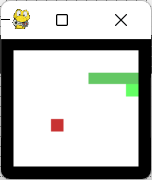
Snake Example
The full code for this example can be found in the examples/snake_example.py file, which shows the use of the ShapeFactory to create the snake and fruit along with using the GridCalculator to house the positioning of the objects on the screen. This example also utilises a grid-in-grid to display a border around the outside of the display. This example is fully scalable, so the window can also be resized as the game is in-play.
Screenshots
Default Size:
Smaller Size:
Wider Size:
Additional Examples
A number of examples are also present in the /examples directory of the project.
Requesting Features or Reporting Bugs
If you have any ideas for additional functionality or need to report a bug, please raise an issue.
Release history Release notifications | RSS feed


Download files
Download the file for your platform. If you're not sure which to choose, learn more about installing packages.
Source Distribution
Built Distribution
Filter files by name, interpreter, ABI, and platform.
If you're not sure about the file name format, learn more about wheel file names.
Copy a direct link to the current filters
File details
Details for the file pygame_gridcalculator-2.1.0.tar.gz.
File metadata
- Download URL: pygame_gridcalculator-2.1.0.tar.gz
- Upload date:
- Size: 16.9 kB
- Tags: Source
- Uploaded using Trusted Publishing? No
- Uploaded via: twine/5.1.1 CPython/3.9.20
File hashes
| Algorithm | Hash digest | |
|---|---|---|
| SHA256 |
888219e326da657df978a3c3c7eda17c385c46af55c1618c7f6ce0372e004886
|
|
| MD5 |
96825df11f7b0b49bc257e15e2d42502
|
|
| BLAKE2b-256 |
85e41464da283ec0c9645288ed85202402fb85707c4181dd6b8f3620d84c408d
|
File details
Details for the file pygame_gridcalculator-2.1.0-py3-none-any.whl.
File metadata
- Download URL: pygame_gridcalculator-2.1.0-py3-none-any.whl
- Upload date:
- Size: 10.9 kB
- Tags: Python 3
- Uploaded using Trusted Publishing? No
- Uploaded via: twine/5.1.1 CPython/3.9.20
File hashes
| Algorithm | Hash digest | |
|---|---|---|
| SHA256 |
e5d3eb038e2334f4b618bbe081e997c8a6c3e1b6b1cdfe76e6aec13b0e290198
|
|
| MD5 |
4f07e01ebe9ec726969aab1e42de4b16
|
|
| BLAKE2b-256 |
87908ae8db76fa8302a85bfe4e41f4979ead3eb1ae844d249ebfe54e08d55f65
|


