GNSS Diagnostic and UBX Configuration GUI Application
Project description
PyGPSClient
Current Status | Installation | Instructions | UBX Configuration | NMEA Configuration | TTY Commands | Load/Save/Record Commands | NTRIP Client | NTRIP Caster/Socket Server | GPX Track Viewer | RINEX Conversion | Mapquest API Key | User-defined Presets | CLI Utilities | Troubleshooting | License | Author Information
PyGPSClient is a free, open-source, multi-platform graphical GNSS/GPS testing, diagnostic and configuration application written entirely by volunteers in Python and tkinter.
- Runs on any platform which supports a Python 3 interpreter (>=3.10) and tkinter (>=8.6) GUI framework, including Windows, MacOS and Linux.
- Supports NMEA, UBX (u-blox binary), SBF (Septentrio binary), UNI (Unicore binary), QGC (Quectel binary), RTCM3, NTRIP, SPARTN, MQTT and TTY (ASCII text) protocols¹.
- Capable of reading from a variety of GNSS data streams: Serial (USB / UART), Socket (TCP / UDP), binary data stream (terminal or file capture) and binary recording (e.g. u-center *.ubx).
- Provides NTRIP client facilities for both RTCM3 and SPARTN NTRIP services.
- Can serve as an NTRIP base station with an RTK-compatible receiver (e.g. u-blox ZED-F9P/ZED-X20P, Quectel LG/LC Series, Septentrio Mosaic Series or Unicore UM9** Series).
- Supports GNSS (and related) device configuration via proprietary UBX, NMEA and ASCII TTY protocols, including most u-blox, Quectel, Septentrio, Unicore and Feyman GNSS devices.
- New in version >= 1.6.7 - Experimental support for RINEX conversion of raw observation, navigation and meteorology data.
- Can be installed using the standard
pipPython package manager - see installation instructions below.
This is an independent project and we have no affiliation whatsoever with any GNSS manufacturer or distributor.
¹ specific message support subject to underlying parser implementation and open-source permissions
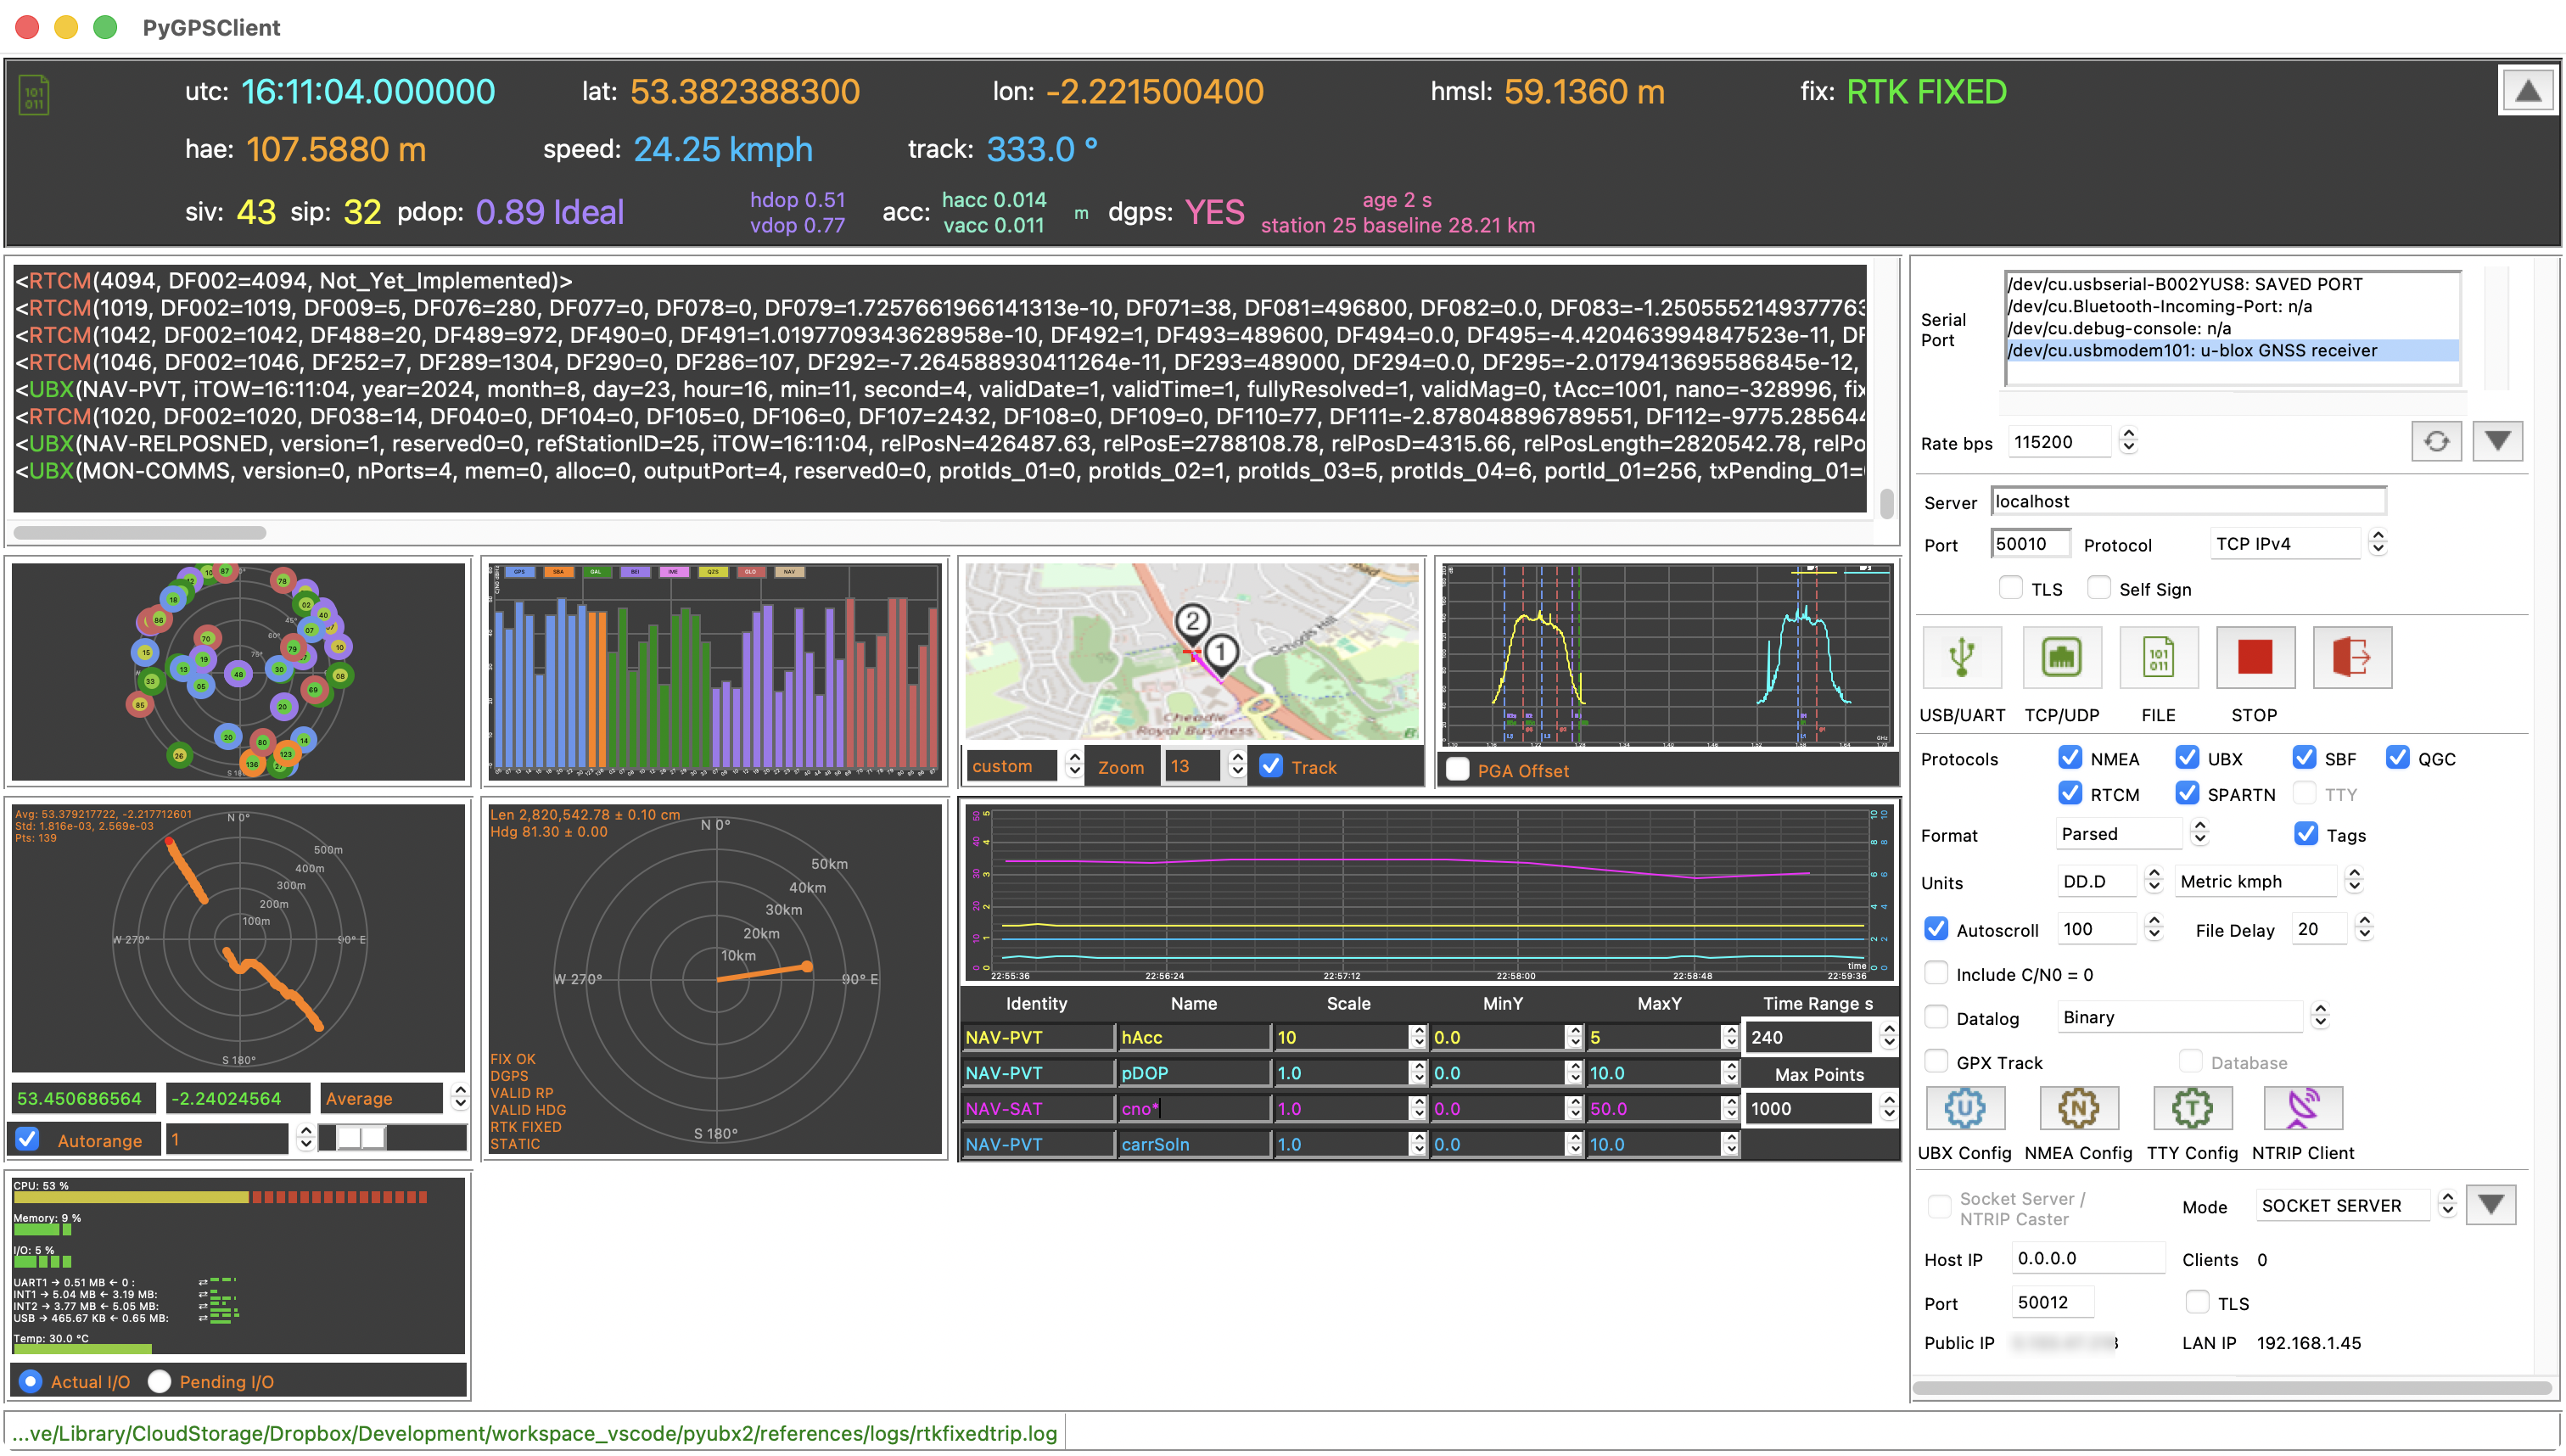
Screenshot showing mixed-protocol stream from u-blox ZED-F9P receiver, using PyGPSClient's NTRIP Client with a base station 26 km to the west to achieve better than 2 cm accuracy
References
- Glossary of GNSS Terms and Abbreviations.
- GNSS Positioning - A Reviser - a general overview of GNSS, OSR, SSR, RTK, NTRIP and SPARTN positioning and error correction technologies and terminology.
- Achieving cm Level GNSS Accuracy using RTK - practical tips on high precision RTK using PyGPSClient.
- From time to time, instructional videos may be posted to the semuadmin YouTube channel. Sparkfun have also published a number of RTK tutorial YouTube videos using PyGPSClient running on a Raspberry Pi.
- Sphinx API Documentation in HTML format.
Current Status


The PyGPSClient home page is at PyGPSClient.
Contributions welcome - please refer to CONTRIBUTING.MD.
For Bug reports, please use the template provided. For feature requests and general queries and advice, post a message to one of the PyGPSClient Discussions channels in the first instance.

Installation


The Quick Version
If you have an official Python >=3.10 with tkinter >=8.6 installed and the Python binaries folder is in your PATH, you can install PyGPSClient using pip:
python3 -m pip install --upgrade pygpsclient
and then run it by typing:
pygpsclient
To install into a virtual environment (which may be necessary if you have an externally-managed-environment):
python3 -m venv pygpsclient
source pygpsclient/bin/activate # (or .\pygpsclient\Scripts\activate on Windows)
python3 -m pip install --upgrade pygpsclient
deactivate
Quick installation shell scripts are available for Linux and MacOS platforms.
The Longer Version
For more comprehensive installation instructions, please refer to INSTALLATION.md.
Instructions
Settings panel
- By default, the Settings panel is displayed to the right of the main application window. It can be hidden or shown via Menu..View..Hide/Show Settings. The panel can also be 'undocked' from the main application window via Menu..View..Undock Settings and - if non-transient (
transient_dialog_b: 0) - minimized independently of the main window. Exiting the undocked dialog, or selecting Menu..View..Dock Settings, will 'dock' the panel. - Protocols Shown - Select which message protocols to display in the console; NMEA, UBX (u-blox binary), SBF (Septentrio binary), UNI (Unicore binary), QGC (Quectel binary), RTCM3, SPARTN or TTY (terminal). NB: this only changes the displayed protocols - to change the actual protocols output by the receiver, use the relevant configuration command(s).
- NB: Serial connection must be stopped before changing to or from TTY (terminal) protocol. Enabling TTY (terminal) mode will disable all other protocols.
- To connect to a GNSS receiver via USB or UART port, select the device from the listbox, set the appropriate serial connection parameters and click
. The application will endeavour to pre-select a recognised GNSS/GPS device but this is platform and device dependent. Press the
button to refresh the list of connected devices at any point.
Rate bps(baud rate) is typically the only setting that might need adjusting, but tweaking thetimeoutsetting may improve performance on certain platforms.- If you get a permissions error on attempting to connect to a serial port e.g.
[Errno 13] permission denied /dev/ttyACM0, refer to the Installation Guidelines - User Privileges. - When the connection is first established, PyGPSClient will poll various hardware information messages (one for each selected protocol) in an attempt to establish the receiver's manufacturer, model and firmware version. You may see a handful of 'unknown protocol' warnings in response to some of these queries - these can be disregarded. NB: Some receivers will not output hardware information messages at low baud rates (<38,400).
- The
Msg Modeparameter defaults toGETi.e., periodic or poll response messages from a receiver. If you wish to parse streams of command or poll messages being sent to a receiver, set theMsg ModetoSETorPOLL. An optional serial or socket stream inactivity timeout can also be set (in seconds; 0 = no timeout).
- A custom user-defined serial port can also be passed via the json configuration file setting
"userport_s":, via environment variablePYGPSCLIENT_USERPORTor as a command line argument--userport. A special userport value of "ubxsimulator" invokes the experimentalpyubxutils.UBXSimulatorutility to emulate a GNSS NMEA/UBX serial stream. - To connect to a TCP or UDP socket, enter the server URL and port, select the protocol (defaults to TCP) and click
. For encrypted TLS connections, tick the 'TLS' checkbox. Tick the 'Self Sign' checkbox to accommodate self-signed TLS certification (typically for test or demonstration services).
- To stream from a previously-saved binary datalog file, click
and select the file type (
*.log, *.ubx, *.*) and path. PyGPSClient datalog files will be named e.g.pygpsdata-20220427114802.log, but any binary dump of an GNSS receiver output is acceptable, including*.ubxfiles produced by u-center. The 'File Delay' spinbox sets the delay in milliseconds between individual file reads, acting as a throttle on file readback. - To disconnect from the data stream, click
.
- To immediately disconnect and terminate all running threads, click Ctrl-K ("Kill Switch").
- To exit the application, click
, or press Ctrl-Q, or click the application window's close window icon.
- Console Display - Select console display format (Parsed, Binary, Hex Tabular, Hex String, Parsed+Hex Tabular - see Console Widget below).
- Maxlines - Select number of scrollable lines retained in console.
- File Delay - Select delay in milliseconds between individual reads when streaming from binary file (default 20 milliseconds).
- Tags - Enable color tags in console (see Console Widget below).
- Position Format and Units - Change the displayed position (D.DD / D.M.S / D.M.MM / ECEF) and unit (metric / imperial / maritime) formats.
Saving and loading configuration settings
- Configuration settings for PyGPSClient can be saved and recalled via the Menu..File..Save/Load Configuration options. By default, PyGPSClient will look for a file named
pygpsclient.jsonin the user's home directory. Certain configuration settings require manual editing e.g. custom preset UBX, NMEA and TTY commands and tag colour schemes - see details below.- It is recommended to re-save the configuration settings after each PyGPSClient version update, or if you see the warning "Consider re-saving" on startup.
- PyGPSClient will prompt you to stop all running input and output streams before loading a new configuration.
- Any active serial or RTK connection must be stopped before loading a new configuration.
Checking for the latest version
- The About dialog (Menu..Help..About) includes a facility to check the latest available versions of PyGPSClient and its subsidiary modules, and initiate an automatic update. Tick the 'Check on startup' box to perform this check on startup (note that this requires internet access, which may result in slower startup times on platforms with low bandwidth / high latency internet connections). The facility may be unavailable in certain Homebrew-installed Python environments due to technical constraints.
- The application must be closed and restarted for any update to take effect.
Datalogging, GPX Track Recording and Database
- DataLogging - Turn Data logging in the selected format (Binary, Parsed, Hex Tabular, Hex String, Parsed+Hex Tabular) on or off. On first selection, you will be prompted to select the directory into which timestamped log files are saved. Log files are cycled when a maximum size is reached (default is 10 MB, manually configurable via
logsize_nsetting). - GPX Track - Turn track recording (in GPX format) on or off. On first selection, you will be prompted to select the directory into which timestamped GPX track files are saved. See also GPX Track Viewer.
- Database - Turn spatialite database recording (where available) on or off. On first selection, you will be prompted to select the directory into which the
pygpsclient.sqlitedatabase is saved. Note that, when first created, the database's spatial metadata may take up to a minute or so to initialise.- Database logging is dependent on your Python environment supporting the requisite sqlite3
mod_spatialiteextension - see INSTALLATION.md for further details. If not supported, the option will be greyed out. Check the Menu..Help..About dialog for an indication of the current spatialite support status -no-extmeans the spatialite extension is not supported;no-msmeans spatialite is supported but the necessarymod_spatialiteextension module cannot be found in the PATH; a numeric version number like3.51.2indicates spatialite is fully supported. - Spatialite databases can be utilised by a wide range of GIS analysis and visualisation tools, including GRASS, QGIS, MapInfo, ArcGIS, etc.
- A helper method
retrieve_data()is available to retrieve data from this database - see Sphinx documentation and retrieve_data.py example for details.
- Database logging is dependent on your Python environment supporting the requisite sqlite3
Pop-up Configuration Dialogs
- UBX Configuration Dialog, with the ability to send a variety of UBX CFG configuration commands to any u-blox GNSS device. This includes the facility to add user-defined commands or command sequences - see instructions under user-defined presets below. To display the UBX Configuration Dialog (only functional when connected to a UBX GNSS device via serial port), click
, or go to Menu..Options..UBX Configuration Dialog.
- NMEA Configuration Dialog, with the ability to send a variety of NMEA configuration commands to compatible GNSS devices (e.g. Quectel LG or LC Series). This includes the facility to add user-defined commands or command sequences - see instructions under user-defined presets below. To display the NMEA Configuration Dialog (only functional when connected to a compatible GNSS device via serial port), click
, or go to Menu..Options..NMEA Configuration Dialog.
- TTY Config Dialog, with the ability to send a variety of TTY (ASCII) configuration commands to compatible GNSS and related devices (e.g. Septentrio Mosaic Series, Unicore UM9** Series). This includes the facility to add user-defined commands or command sequences - see instructions under user-defined presets below. To display the TTY Configuration Dialog (only functional when connected to a compatible GNSS device via serial port), click
, or go to Menu..Options..TTY Configuration.
- NTRIP Client facility with the ability to connect to a specified NTRIP caster, parse the incoming RTCM3 or SPARTN data and feed this data to a compatible GNSS receiver (requires an Internet connection and access to an NTRIP caster and local mountpoint). To display the NTRIP Client Configuration Dialog, click
, or go to Menu..Options..NTRIP Configuration Dialog.
- Server Config facility with the ability to act as an NTRIP caster (mountpoint =
pygnssutils) or generic socket server. To display the Server Configuration Dialog, click, or go to Menu..Options..Server Configuration Dialog.
- GPX Track Viewer facility with the ability to map GPX files containing track, route or waypoint data and show elevation and speed profiles and other metadata. To display the GPX Track viewer, go to Menu..Options..GPX Track Viewer.
- RINEX Conversion facility which supports conversion of previously-saved binary datalogs to RINEX observation and navigation format. To display the RINEX Conversion dialog, go to Menu..Options..RINEX Conversion.
- Import Custom Map facility which allows the user to import geo-referenced images for use as background maps. To display the Import Custom Map dialog, go to Menu..Options..Import Custom Map.
- Configuration Command Recorder facility which allows the user to record, save, load, import (as a preset) and replay UBX, NMEA or TTY configuration commands sent to a receiver. To display the Command Record Facility dialog, go to Menu..Options..Configuration Command Recorder.
- SPARTN Client facility with the ability to configure an IP or L-Band SPARTN Correction source and SPARTN-compatible GNSS receiver (e.g. ZED-F9P) and pass the incoming correction data to the GNSS receiver (requires an Internet connection and access to a SPARTN location service). To display the SPARTN Client Configuration Dialog, go to Menu..Options..SPARTN Configuration Dialog.
GUI refresh rate setting
- PyGPSClient processes all incoming GNSS data in 'real time' but, by default, the GUI is only refreshed every 0.5 seconds. The refresh rate can be manually configured via the
guiupdateinterval_fsetting in the json configuration file. NB: PyGPSClient may become unresponsive on slower platforms (e.g. Raspberry Pi) at high message rates if the GUI update interval is less than 0.1 seconds, though lower intervals (<= 0.1 secs) can be accommodated on more powerful platforms.
Toplevel ('pop-up') dialog setting
- The behaviour of Toplevel ('pop-up') dialogs will depend on the screen resolution and 'transient' setting. If the width or height of a Toplevel dialog exceeds the screen resolution, the dialog will be displayed in a scrollable, resizeable window. Otherwise, the dialog is displayed as a fixed, non-resizeable panel.
- A boolean configuration setting
transient_dialog_bgoverns whether Toplevel dialogs are 'transient' (i.e. always on top of main application dialog) or not. Changing this setting to0allows Toplevel dialogs to be minimised independently of the main application window, but be mindful that some dialogs may end up hidden behind others e.g. "Open file/folder" dialogs. If a file open button appears unresponsive, check that the "Open file/folder" panel isn't already open but obscured. - If you're accessing the desktop via a VNC session (e.g. to a headless Raspberry Pi) it is recommended to keep the setting at the default
1, as VNC may not recognise keystrokes on overlaid non-transient windows. - A boolean configuration setting
resizeable_dialog_bgoverns whether all Toplevel dialogs are resizeable, irrespective of the default setting inDialogState.
- A boolean configuration setting
User-selectable widgets
| Widget | To show or hide the various widgets, go to Menu..View and click on the relevant hide/show option. |
|---|---|
 |
Expandable banner showing key navigation status information based on messages received from receiver. To expand or collapse the banner or serial port configuration widgets, click the  / / buttons. Double-click the "hae" label or value to toggle between hae (height above ellipsoid) and sep (separation) values. NB: some fields (e.g. hdop/vdop, hacc/vacc) are only available from proprietary NMEA or UBX messages and may not be output by default. The minimum messages required to populate all available fields are: NMEA: GGA, GSA, GSV, RMC, UBX00 (proprietary); UBX: NAV-DOP, NAV-PVT, NAV-SAT; UNI: BESTNAV, SATSINFO, STADOP. buttons. Double-click the "hae" label or value to toggle between hae (height above ellipsoid) and sep (separation) values. NB: some fields (e.g. hdop/vdop, hacc/vacc) are only available from proprietary NMEA or UBX messages and may not be output by default. The minimum messages required to populate all available fields are: NMEA: GGA, GSA, GSV, RMC, UBX00 (proprietary); UBX: NAV-DOP, NAV-PVT, NAV-SAT; UNI: BESTNAV, SATSINFO, STADOP. |
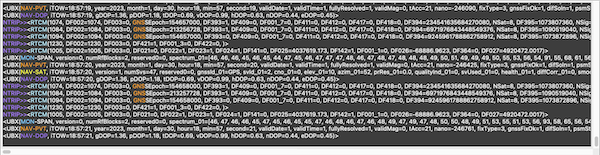 |
Configurable serial console widget showing incoming GNSS data streams in either parsed, binary or tabular hexadecimal formats. Double-right-click to copy contents of console to the clipboard. The scroll behaviour and number of lines retained in the console can be configured via the settings panel. Supports user-configurable color tagging of selected strings for easy identification. Color tags are loaded from the "colortag_b": value (0 = disable, 1 = enable) and "colortags_l": list ([string, color] pairs) in your json configuration file (see example provided). If color is set to "HALT", streaming will halt on any match and a warning displayed. NB: color tagging does impose a small performance overhead - turning it off will improve console response times at very high transaction rates. |
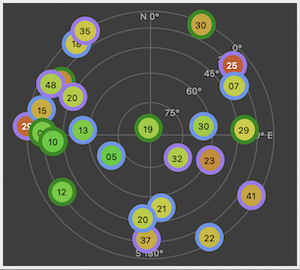 |
Skyview widget showing current satellite visibility and position (elevation / azimuth). Satellite icon borders are colour-coded to distinguish between different GNSS constellations. For consistency between NMEA and UBX data sources, will display GLONASS NMEA SVID (65-96) rather than slot (1-24). |
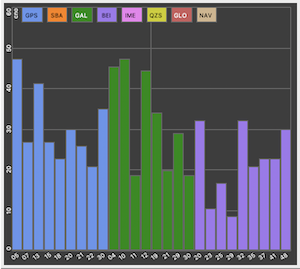 |
Levels view widget showing current satellite carrier-to-noise (C/No) levels for each GNSS constellation. Double-click to toggle legend. Double-right-click to toggle levels where C/No = 0 dbHz. |
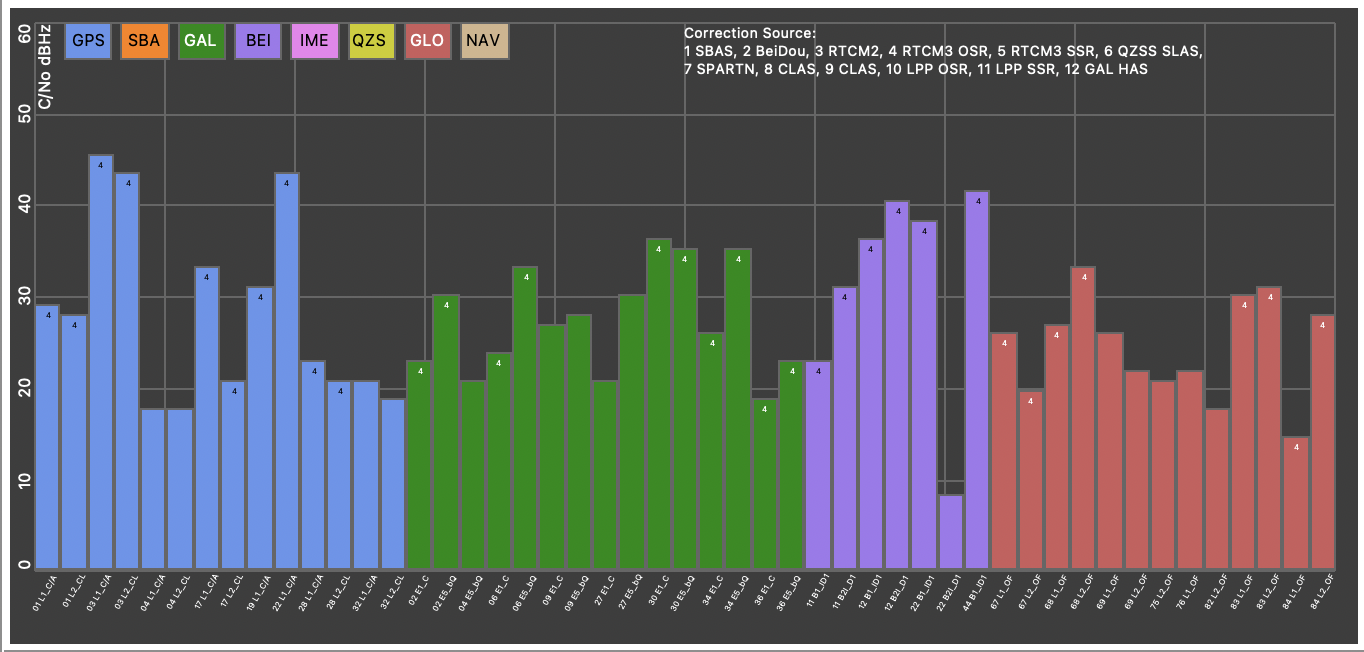 |
Signals view widget showing current svid/signal carrier-to-noise (C/No) level and (where applicable) correction source for each GNSS svid/signal received (GNSS receiver must be capable of outputting UBX NAV-SIG messages). Signal identifiers are in RINEX format e.g. L1_C/A, E5_aQ, etc. Double-click to toggle legend. Double-right-click to toggle signals where C/No = 0 dbHz. |
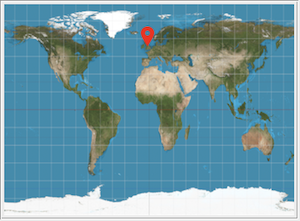 |
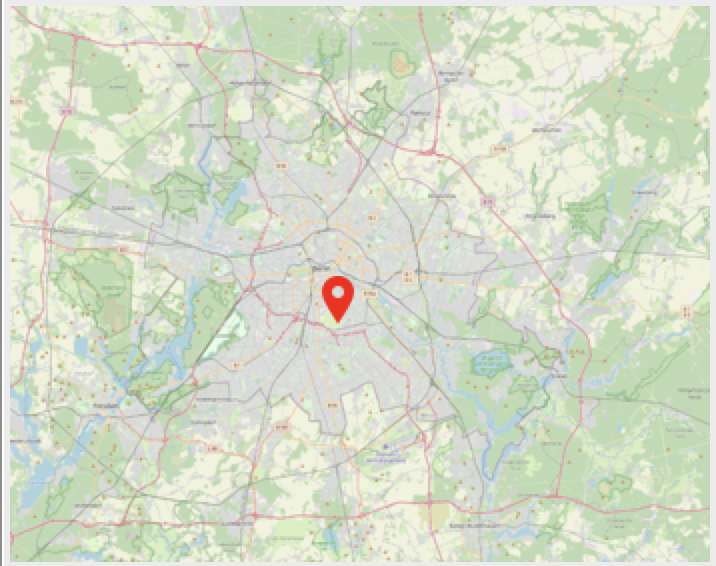
Map widget with various modes of display - select from "map" / "sat" (online) or "world" / "custom" (offline). Select zoom level 1 - 20. Double-click the zoom level label to reset the zoom to 10. Double-right-click the zoom label to maximise zoom to 20. Tick Track to show track (track will only be recorded while this box is checked). Double-Right-click will clear the map. Map Type = 'world': a static offline Mercator world map showing current global location. |
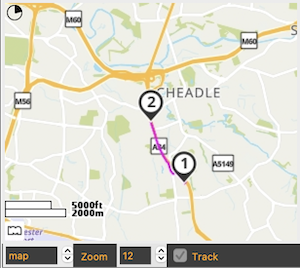 |
Map Type = 'map', 'sat' or 'hyb' (hybrid): Dynamic, online web map or satellite image via MapQuest API (requires an Internet connection and free Mapquest API Key). By default, the web map will automatically refresh every 60 seconds (indicated by a small timer icon at the top left). The default refresh rate can be amended by changing the "mapupdateinterval_n": value in your json configuration file, but NB the facility is not intended to be used for real-time navigation. Double-click anywhere in the map to immediately refresh. |
 |
Map Type = 'custom': One or more user-defined offline geo-referenced map images can be imported using the Menu..Options..Import Custom Map facility, or by manually setting the usermaps_l field in the json configuration file. The usermaps_l setting represents a list of map paths and extents in the format ["path to map image", [minlat, minlon, maxlat, maxlon]] - see example configuration file. Map images must be a supported format and use a standard WGS84 Web Mercator projection e.g. EPSG:4326. PyGPSClient will automatically select the first map whose extents encompass the current location, based on the order in which the maps appear in usermaps_l. NB: The minimum and maximum viable 'zoom' levels depend on the resolution and extents of the imported image and the user's display - if the zoom bounds exceed the image extents, the Zoom spinbox will be highlighted. Offline and online zoom levels will not necessarily correspond. |
 |
Import Custom Map dialog. Click  to open the custom map image location (the default file suffix is to open the custom map image location (the default file suffix is *.tif - select Show Options to select any file suffix *.*). If the rasterio library is installed and the image is geo-referenced (e.g. using QGIS), the map extents will be automatically extracted - otherwise they must be entered manually. Import the custom map path and extent settings by clicking  . By default, the imported map will be appended to the existing list - click 'First?' to insert the map at the top of the list instead. See Creating Custom Maps for PyGPSClient for tips on how to create a suitable geo-referenced map image. . By default, the imported map will be appended to the existing list - click 'First?' to insert the map at the top of the list instead. See Creating Custom Maps for PyGPSClient for tips on how to create a suitable geo-referenced map image. |
 |
Spectrum widget showing a spectrum analysis chart (GNSS receiver must be capable of outputting UBX MON-SPAN messages). Clicking anywhere in the spectrum chart will display the frequency and decibel reading at that point. Double-clicking anywhere in the chart will toggle the GNSS frequency band markers (L1, G2, etc.) on or off. Right-click anywhere in the chart to capture a snapshot of the spectrum data, which will then be superimposed on the live data (this can, for example, be used to compare reception with different antenna configurations). Double-right-click to clear snapshot. NB: Some receivers (e.g. NEO-F10N) will not output the requisite MON-SPAN messages unless the port baud rate is at least 57,600. |
 |
System Monitor widget showing device cpu, memory and I/O utilisation (GNSS receiver must be capable of outputting UBX MON-SYS/MON-COMMS or SBF ReceiverStatus messages). Tick checkbox to toggle between actual (cumulative) I/O stats and pending I/O. Primarily intended for u-blox modules, but can display limited system information for other devices. |
 |
Scatterplot widget showing variability in position reporting over time. (Optional) Enter fixed reference position. Select Average to center plot on dynamic average position (displayed at top left), or Fixed to center on fixed reference position (if entered). Check Autorange to set plot range automatically. Set the update interval (e.g. 4 = every 4th navigation solution). Use the range slider or mouse wheel to adjust plot range. Right-click to set fixed reference point to the current mouse cursor position. Double-click to clear the existing data. |
 |
Rover widget plots the relative 2D position, track and status information for the roving receiver in a fixed or moving base / rover RTK configuration. Can also display relative position of NTRIP mountpoint and receiver in a static RTK configuration. Double-click to clear existing plot. |
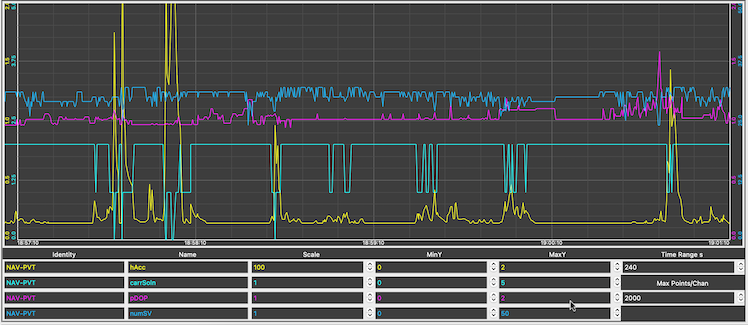 |
Chart widget acts as a multi-channel "plotter", allowing the user to plot a series of named numeric data attributes from any parsed GNSS data source, with configurable y (value) and x (time) axes. By default, the number of channels is set to 4, but this can be manually edited by the user via the json configuration file setting chartsettings_d["numchn_n"]. For each channel, user can select: (optional) identity of message source e.g. NAV-PVT; attribute name e.g. hAcc; scaling factor (divisor) e.g. 1000; y axis range e.g. 0 - 5. Wildcards are available for attribute groups - "*" (average of group values), "+" (maximum of group values), "-" (minimum of group values) e.g. cno* will plot the average cno value for a group of satellites. Double-click to clear the existing data. Double-right-click to save the current chart data to the clipboard in CSV format, which can be directly pasted into a spreadsheet application. |
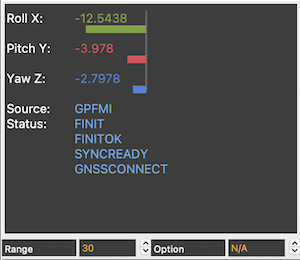 |
Attitude Monitor widget (formerly "IMU Monitor") showing current orientation/attitude (roll, pitch, yaw aka 'static heading') and status from a variety of IMU, Dead Reckoning, Dual Antenna or other 2D/3D attitude message sources. Select range in degrees (from ±1 to ±180 degrees). |
UBX Configuration Facilities

Pre-Requisites:
- u-blox GNSS receiver connected to the workstation via USB or UART port¹².
- NOTE: u-blox introduced a new configuration mechanism in 9th generation devices (ROM protocol >=23.01). Some UBX configuration commands (e.g.
CFG-PRT,CFG-RATE,CFG-MSG) will only work with legacy devices (e.g. NEO-M6S, NEO-M8P); others (e.g.CFG-VALSET,CFG-VALDEL) will only work with newer devices (e.g. NEO-M9, ZED-F9P, ZED-X20P). - NOTE: The UBX protocol does not support synchronous command acknowledgement or unique confirmation IDs. Asynchronous command and poll acknowledgements and responses can take several seconds at high message transmission rates, or be discarded altogether if the device's transmit buffer is full (txbuff-alloc error). To ensure timely responses, try increasing the baud rate and/or temporarily reducing transmitted message rates using the configuration commands provided.
- A warning icon (typically accompanied by an ACK-NAK response) is usually an indication that one or more of the commands sent is not supported by your receiver (e.g. mismatched protocol).
¹ Configuration commands can be sent via TCP socket, but a third-party or bespoke TCP-UART converter would be required at the receiving end.
² I2C (QWIIC) is not directly supported, but third-party I2C-UART adapters are available.
Instructions:
The UBX Configuration Dialog currently provides the following UBX configuration panels:
- Version panel shows current device hardware/firmware versions (Double-left-click to refresh).
- Protocol Configuration panel (CFG-PRT) sets baud rate and inbound/outbound protocols across all available ports (legacy protocols only).
- Solution Rate panel (CFG-RATE) sets navigation solution interval in ms (e.g. 1000 = 1/second) and measurement ratio (ratio between the number of measurements and the number of navigation solutions, e.g. 5 = five measurements per navigation solution) (legacy protocols only).
- For each of the panels above, clicking anywhere in the panel background will refresh the displayed information with the current configuration.
- Message Rate panel (CFG-MSG) sets message rates per port for UBX and NMEA messages (legacy protocols only). Message rate is relative to navigation solution frequency e.g. a message rate of '4' means 'every 4th navigation solution' (higher = less frequent).
- Configuration Interface widget (CFG-VALSET, CFG-VALDEL and CFG-VALGET) queries and sets configuration for modern protocols only.
- UBX Legacy Command configuration panel providing structured updates for a range of legacy CFG-* configuration commands (legacy protocols only). Note: 'X' (byte) type attributes can be entered as integers or hexadecimal strings e.g. 522125312 or 0x1f1f0000. Once a command is selected, the configuration is polled and the current values displayed. The user can then amend these values as required and send the updated configuration. Some polls require input arguments (e.g. portID) - these are highlighted and will be set at default values initially (e.g. portID = 0), but can be amended by the user and re-polled using the
button.
- Preset Commands widget supports a variety of user-defined UBX commands and queries - see user-defined presets.
Configuring u-blox receivers for Post-Processing Kinematics (PPK)
PyGPSClient can be used to enable and log the necessary raw observation and navigation data for input into either PYGPSClient's experimental RINEX Conversion dialog or RTKLIB's RINEX conversion utility RTKCONV:
- Set the output baud rate to at least 115200 to ensure there is sufficient serial port bandwidth.
- Enable UBX RXM-RAWX and RXM-SFRBX message types at a rate of 1 Hz (a preset CFG-VALSET command is provided for this purpose). Optionally, disable all other message types and protocols.
- Enable PyGPSClient's binary data log option (alternatively, use RTKLIB's STRSVR utility to create a similar log file).
- Record at least 15 to 30 minutes of data (approximately 3.4 MB).
- Open PyGPSClient's RINEX Conversion dialog and select the binary log file from (4) above, or...
- Open RTKLIB's RTKCONV conversion utility and select the binary log file from (4) above. Click 'Options...' and select the required satellite, frequency and observation types, then click OK. Finally, click 'Convert'.
- The various RINEX output files (*.rnx or *.obs, *.nav, etc.) can then be used as inputs to RTKLIB's RTKPOST PPK utility.
NMEA Configuration Facilities
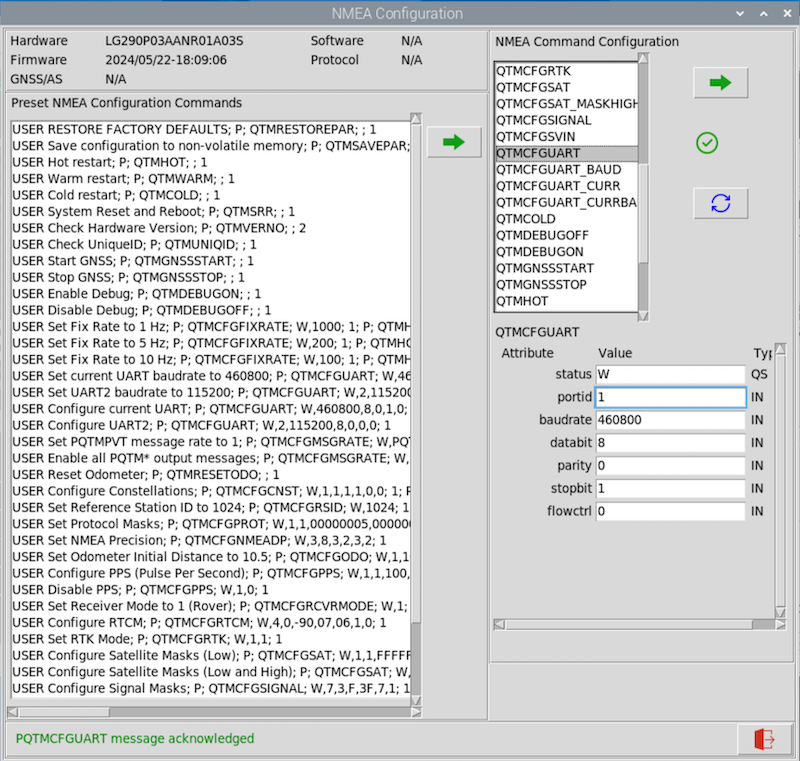
Pre-Requisites:
-
Receiver capable of being configured via proprietary NMEA sentences, connected to the workstation via USB or UART port. The facility includes support for a wide range of Quectel LG and LC series receivers via
PQTM*,PSTM*andPAIR*sentences¹ ². Additional types may be supported in the underlying NMEA parser library pynmeagps in later releases (contributions welcome).¹ Note that Quectel receivers implement a bewildering array of different configuration protocols, based on a mixture of proprietary NMEA
PQTM*,PSTM*andPAIR*message types. Implementation depends on the specific model variant and firmware version, and several models (e.g. LG290 and LC29) exist in a wide range of variants. Refer to the GNSS Protocol Guide for your specific variant for details on the available configuration commands.² Note that several Quectel configuration commands require a Hot Restart (PQTMHOT) or Save (PQTMSAVEPAR or PAIR513) and Reset (PQTMSRR) before taking effect, including for example PQTMCFGCNST (Enable/Disable Constellations), PQTMCFGFIX (Configure Fix Rate), PQTMCFGSAT (Configure Satellite Masks), PQTMCFGSIGNAL (Configure Signal Masks), PAIR050 (Set Fix Rate) and PAIR864 (Set Baud Rate). Devices (e.g. some LC variants) that don't implement a software reset command may have to be physically disconnected and reconnected.
Instructions:
The NMEA Configuration Dialog currently provides the following NMEA configuration panels:
- Version panel shows current device hardware/firmware versions (Double-left-click to refresh).
- Dynamic configuration panel providing structured updates for supported receivers e.g. Quectel LGSERIES via PQTM* sentences, or LCSERIES via PAIR* sentences. Once a command is selected, the configuration is polled and the current values displayed. The user can then amend these values as required and send the updated configuration. Some polls require input arguments (e.g. portid or msgname) - these are highlighted and will be set at default values initially (e.g. portid = 1), but can be amended by the user and re-polled using the
- Preset Commands widget supports a variety of user-defined NMEA commands and queries - see user defined presets.
- Preset commands, once selected, can be edited or overwritten in the 'Commands' field before sending, but commands must observe the format
<talker>; <message id>; <payload as comma-separated string>; <msgmode>(e.g.P; QTMCFGUART; W,115200; 1- see user-defined presets).
TTY Configuration Facilities
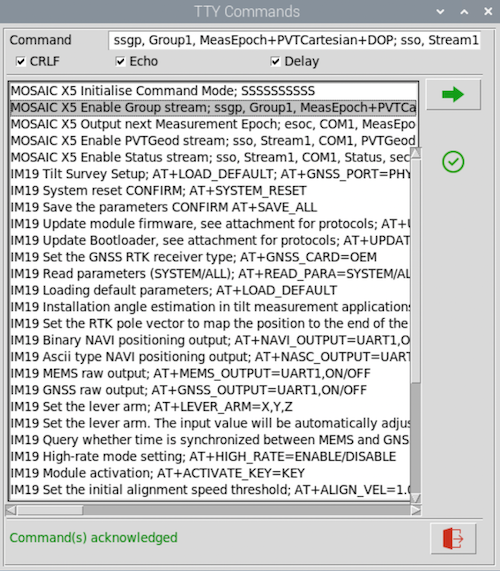
Pre-Requisites:
- Receiver capable of being configured via ASCII text messages over a USB or UART port. This includes, for example, most Septentrio and Unicore GNSS devices.
- Some GNSS devices (e.g. Septentrio X5 or Unicore UM980) can use separate UART ports for configuration and navigation/monitoring - ensure you are using the appropriate UART port when sending TTY commands. Septentrio devices also require an 'Initialise Command Mode' sequence (
SSSSSSSSSS) to be sent before accepting TTY commands.
Instructions:
-
Version panel shows current device hardware/firmware versions (Double-left-click to refresh).
-
The TTY Commands dialog provides a facility to send user-defined ASCII TTY configuration commands (e.g.
AT+style commands) to the connected serial device. Commands can be entered manually or selected from a list of user-defined presets. The dialog can be accessed via the TTY Config button or Menu..Options..TTY Commands.- CRLF checkbox - if ticked, a CRLF (
b"\x0d\x0a") terminator will be added to the command string. - Echo checkbox - if ticked, outgoing TTY commands will be echoed on the console with the marker
"TTY<<". - Delay checkbox - if ticked, a small delay will be added between each outgoing command to allow time for the receiving device to process the command.
- CRLF checkbox - if ticked, a CRLF (
-
Preset commands can be set up by adding appropriate semicolon-delimited message descriptions and payload definitions to the
"ttypresets_l":list in your json configuration file. See User Defined Presets above and example provided.
Configuration Command Load/Save/Record Facility
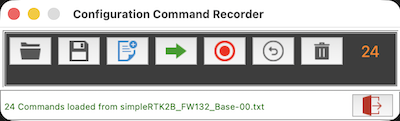
To display the Configuration Command Load/Save/Record Dialog, select Menu..Options..Configuration Commmand Recorder.
- The Configuration Command Load/Save/Record facility allows users to record
a sequence of UBX, NMEA or TTY configuration commands as they are sent to a device, and to save
this recording to a binary file.
- Saved recordings can be reloaded
- Recorded commands of a similar type (UBX, NMEA or TTY) can also be imported
into PyGPSClient's json configuration file as user defined presets - you will be prompted to enter a preset description (defaults to current timestamp if blank). The preset can then be replayed from the Presets panel via a single click.
- The Configuration Load facility can accept configuration files in either UBX/NMEA binary (*.bin), TTY (*.tty) or u-center UBX text format (*.txt) (as also used by Ardusimple).
- Files saved using the ubxsave CLI utility (installed via the
pyubxutilslibrary) can also be reloaded and replayed.
Tip: The contents of a binary (*.bin) config file can be reviewed using PyGPSClient's file streaming facility, BUT remember to set the Msg Mode in the Settings panel to SET rather than the default GET 
NTRIP Client Facilities
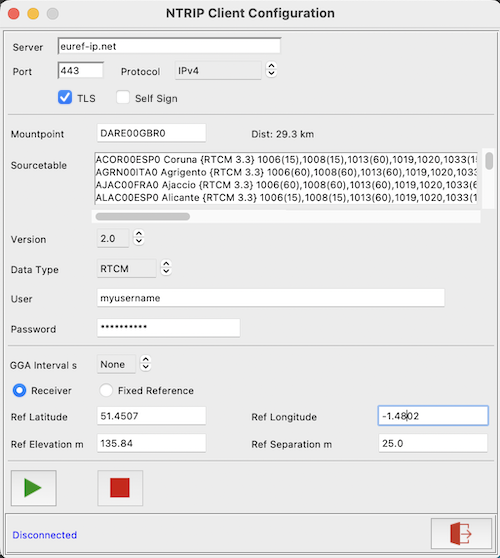
The NTRIP Configuration utility allows users to receive and process NTRIP RTK Correction data from an NTRIP caster to achieve cm level location accuracy. The facility can be accessed by clicking
Pre-Requisites:
- NTRIP-compatible GNSS receiver e.g. u-blox ZED-F9P/X20P, Septentrio X5, Unicore UM980, Quectel LG290, etc.
- Internet access
- URL of NTRIP caster
- Login credentials for the NTRIP caster (where required)
- Name of local MOUNTPOINT (if not using PyGPSClient's automatic mountpoint locator)
- Data type (normally RTCM but some services output data in SPARTN format)
Instructions:
- Enter the required NTRIP server URL (or IP address) and port (defaults to 2101). For SSL/TLS (HTTPS) connections (typically on ports *443 or 2102), tick the TLS checkbox. Tick the Self-Sign checkbox to tolerate self-signed TLS certification (typically for test or demonstration services); the path to the self-sign TLS certificate can be set via environment variable
PYGNSSUTILS_CRTPATH; the default is$HOME\pygnssutils.crt. - For services which require authorisation, enter your assigned login username and password.
- Select the Data Type (defaults to RTCM3, but can be set to SPARTN).
- To retrieve the sourcetable, leave the mountpoint field blank and click connect (response may take a few seconds). The required mountpoint may then be selected from the list, or entered manually. Where possible,
PyGPSClientwill automatically identify the closest mountpoint to the current location. - For NTRIP services which require client position data via NMEA GGA sentences, select the appropriate sentence transmission interval in seconds. The default is 'None' (no GGA sentences sent). A value of 10 or 60 seconds is typical.
- If GGA sentence transmission is enabled, GGA sentences can either be populated from live navigation data (assuming a receiver is connected and outputting valid position data) or from fixed reference settings entered in the NTRIP configuration panel (latitude, longitude, elevation and geoid separation - all four reference settings must be provided).
- To connect to the NTRIP server, click
. To disconnect, click
- If NTRIP data is being successfully received, the banner 'corr:' status indicator should change to '✓' and indicate the age and reference station of the correction data (where available)
. Note that CORR status is typically maintained for up to 60 seconds after loss of correction signal.
- Some NTRIP services may output RTCM3 or SPARTN correction messages at a high rate, flooding the GUI console display. To suppress these messages in the console, de-select the 'RTCM' or'SPARTN' options in 'Protocols Shown' - the RTCM3 or SPARTN messages will continue to be processed in the background.
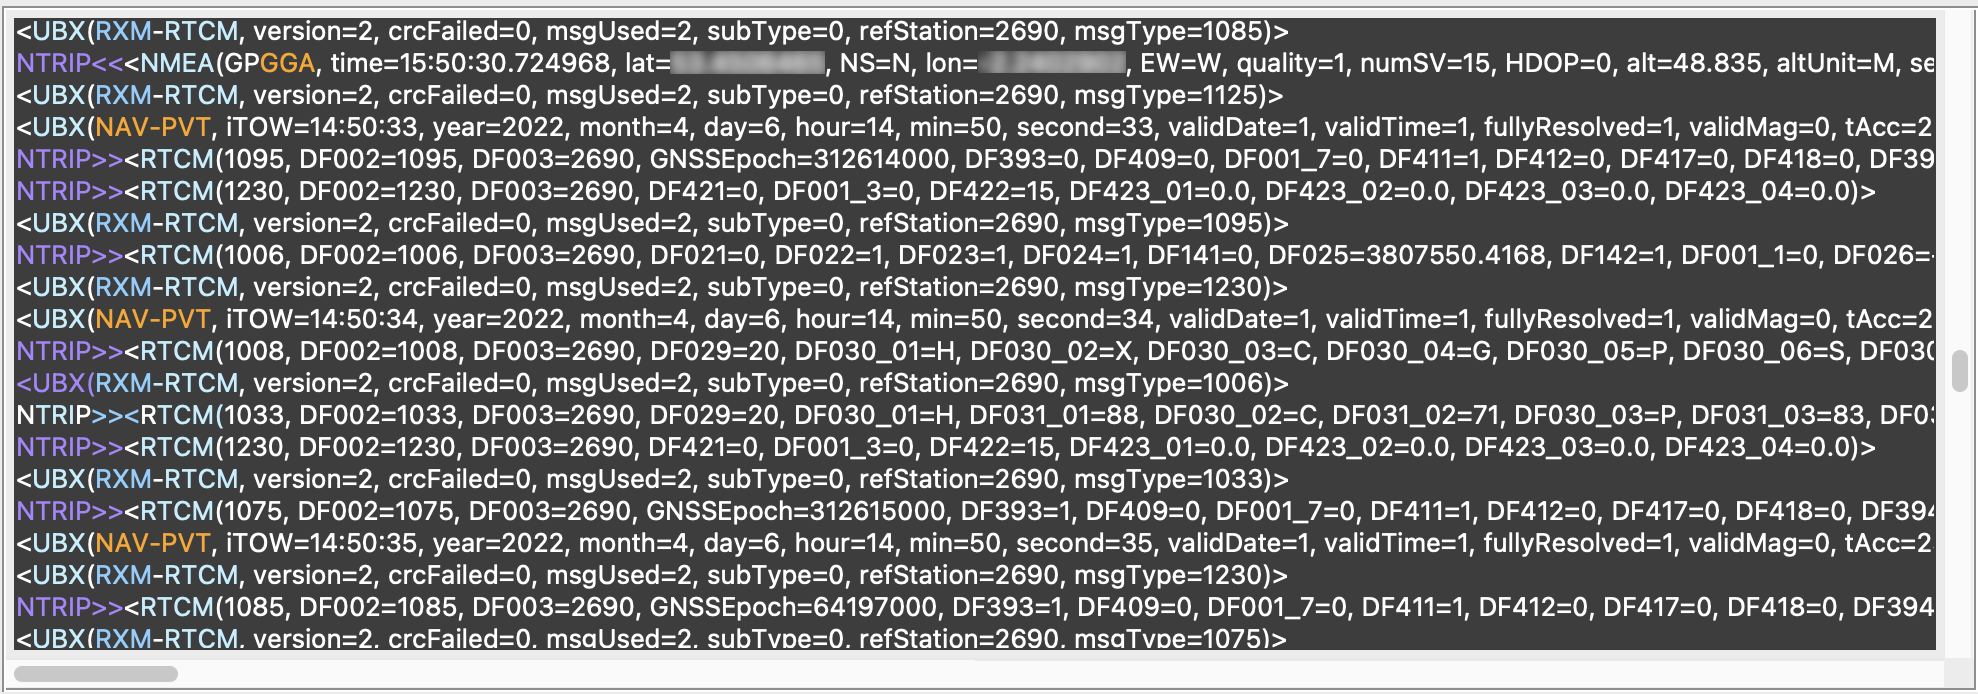
Below is a illustrative NTRIP DGPS data log, showing:
- Outgoing NMEA GPGGA (client position) sentence.
- Incoming RTCM3 correction messages; in this case - 1006 (Ref station ARP (DF003=2690) with antenna height), 1008 (Antenna descriptor), 1033 (Receiver descriptor), 1075 (GPS MSM5), 1085 (GLONASS MSM5), 1095 (Galileo MSM5), 1125 (BeiDou MSM5) and 1230 (GLONASS Code-Phase Biases)
- Corresponding UBX RXM-RTCM acknowledgements generated by the u-blox ZED-F9P receiver, confirming message type, valid checksum (crcFailed=0), successful use (msgUsed=2) and reference station ARP (refStation=2690).
NB: Please respect the terms and conditions of any remote NTRIP service used with this facility. For testing or evaluation purposes, consider deploying a local SNIP LITE server. Inappropriate use of an NTRIP service may result in your account being blocked.
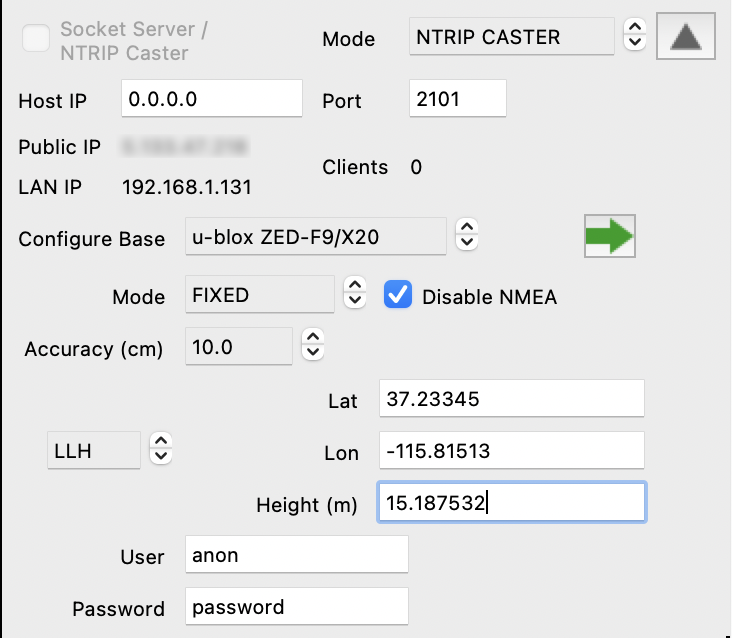
NTRIP Caster / Socket Server Facilities
To display the Server Configuration Dialog, click
The NTRIP Caster / Socket Server facility is capable of operating in either of two modes;
- SOCKET SERVER - an open, unauthenticated TCP socket server available to any socket client including, for example, another instance of PyGPSClient or the
gnssstreamerCLI utility. In this mode it will broadcast the host's currently connected GNSS data stream. The default port is 50012. - NTRIP CASTER - a simple implementation of an authenticated NTRIP caster available to any NTRIP client. Login credentials for the NTRIP caster are set via the
"ntripcasteruser_s":and"ntripcasterpassword_s":settings in the *.json confirmation file (they can also be set via PyGPSClient command line arguments--ntripcasteruser,--ntripcasterpassword, or by setting environment variablesNTRIPCASTER_USER,NTRIPCASTER_PASSWORD). Default settings are as follows: bind address: 0.0.0.0, port: 2101, mountpoint: pygnssutils, user: anon, password: password.
By default, the server/caster binds to the host address '0.0.0.0' (IPv4) or '::' (IPv6) i.e. all available IP addresses on the host machine. This can be overridden via the settings panel or a host environment variable PYGPSCLIENT_BINDADDRESS. The server/caster status is indicated: running with no clients: 
Pre-Requisites:
- Running in NTRIP CASTER mode is predicated on the host being connected to an RTK-compatible GNSS receiver operating in Base Station mode (either
FIXEDorSURVEY_IN) and outputting the requisite RTCM3 message types (1005/6, 1077, 1087, 1097, etc.). PyGPSClient supports 'one click' base station configuration for the following receiver types:- u-blox - any modern u-blox RTK model (e.g. ZED-F9P, ZED-X20P) configured by binary UBX CFG-VALSET commands.
- Septentrio - most Septentrio Mosaic series (e.g. Mosaic X5) configured by ASCII TTY commands.
- Unicore - most UM9* series (e.g. UM981S) configured by ASCII TTY commands.
- Quectel LG Series - most LG series (e.g. LG290, LG580) configured by NMEA PQTM commands.
- Quectel LC Series - most LC series (e.g. LC29H) configured by NMEA PAIR commands.
- It may be necessary to add a firewall rule and/or enable port-forwarding on the host machine or router to allow remote traffic on the specified address:port.
- The server supports encrypted TLS (HTTPS) connections. The TLS server private key / certificate location can be set via environment variable
PYGNSSUTILS_PEMPATH; the default is$HOME/pygnssutils.pem. A self-signed pem file suitable for test and demonstration purposes can be created interactively thus:openssl req -x509 -newkey rsa:4096 -keyout pygnssutils.pem -out pygnssutils.pem -sha256 -days 3650 -nodes
The TLS Client will only require the certificate from this file, which can be set via environment variablePYGNSSUTILS_CRTPATH; the default is$HOME/pygnssutils.crt.
Instructions:
SOCKET SERVER MODE
- Select SOCKET SERVER mode and (if necessary) enter the host IP address and port.
- Select 'TLS' to enable an encrypted TLS connection.
- Check the Socket Server/NTRIP Caster checkbox to activate the server.
- To stop the server, uncheck the checkbox.
NTRIP CASTER MODE
- Select NTRIP CASTER mode and (if necessary) enter the host IP address and port.
- Select 'TLS' to enable an encrypted TLS (HTTPS) connection.
- An additional expandable panel is made available to allow the user to configure a connected RTK-compatible receiver to operate in either
BASE FIXED,BASE SVIN(Survey In) orROVERmode (NB: parameters can only be amended while the caster is stopped). - Select the receiver type and click the Send button to send the appropriate configuration commands to the receiver.
- Where supported by the receiver, NMEA messages can be suppressed by checking 'Disable NMEA'.
- NTRIP client login credentials are set via the user and password fields.
- Check the Socket Server/NTRIP Caster checkbox to activate the caster.
- To stop the caster, uncheck the checkbox.
Base Station Configuration
NOTE:
- Some receivers (e.g. Quectel LG Series) will require one or more restarts to enable or disable Base Station mode. This may take several seconds.
- Different receiver models support different RTCM3 message cohorts, as indicated by the pygnssutils sourcetable entry e.g.
1006(5),1013(5),1019(5),1020(5),1033(5),1077(1),1087(1),1097(1),1127(1),1230(1) - To monitor ASCII TTY command responses, set the console protocol to "TTY" (remember to set it back to RTCM when monitoring the RTCM3 output). Note also that the input (ASCII command) UART port may be different to the output (RTCM3) UART port - make sure to select the appropriate port(s) when configuring the device and monitoring the RTCM3 output.
| Configuration Settings | Base Station Mode |
|---|---|
 |
BASE FIXED. In this mode, the known base station coordinates (Antenna Reference Point or ARP) are specified in either LLH or ECEF (X,Y,Z) format. The coordinates are pre-populated with the receiver's current navigation solution (if available), but these can (and normally should) be overridden with accurately surveyed values. If the coordinates are accepted, the receiver will start outputting RTCM 1005 or 1006 (Antenna Reference Point or ARP) messages containing the base station location in ECEF (X,Y,Z) format. |
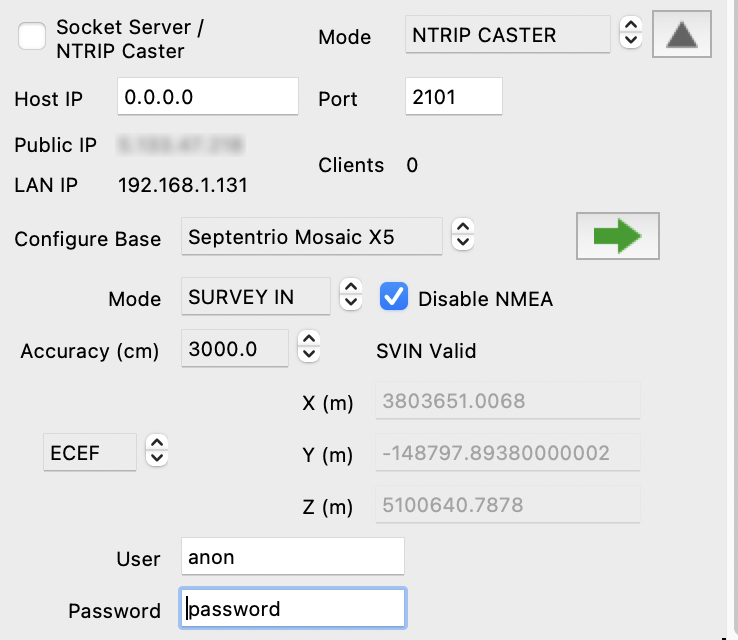 |
BASE SVIN (Survey In). In this mode, the base station coordinates are derived from a series of observations made by the receiver over a specified survey duration. The minimum duration is 60 seconds, but a longer survey may yield more accurate results. Where supported by the receiver¹ in the form of SVIN status messages, survey progress can be monitored via a progress bar. If the survey is successful (i.e. the requisite level of accuracy is achieved within the specified survey duration), the receiver will start outputting RTCM 1005 or 1006 messages containing the base station location in ECEF (X,Y,Z) format. The surveyed base station location will be updated from the position provided by these RTCM 1005 or 1006 messages. |
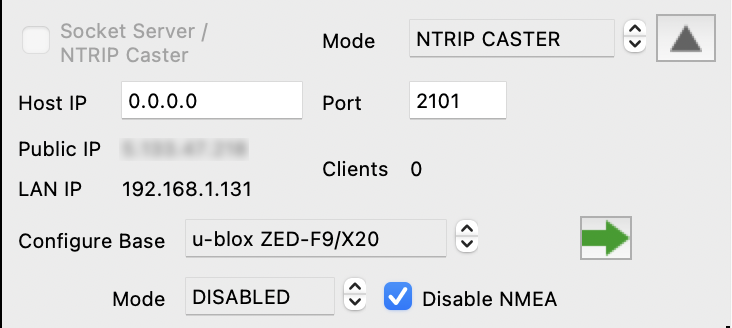 |
ROVER. Disable base station and resume standard Rover operation. |
NB: To operate effectively as an RTK Base Station, antenna positioning is of paramount importance. Refer to the following links for advice:
¹ Unicore and Septentrio devices do not appear to support an SVIN status output message, so Survey-in % completion is not available.
SPARTN Client Facilities
NB: As of October 2025, u-blox have discontinued both their L-Band and MQTT encrypted SPARTN correction services, so the SPARTN Client functionality is effectively redundant and may be removed in a subsequent version of PyGPSClient.
The SPARTN MQTT and L-Band configuration panels are now disabled by default, though the L-Band panel can in theory still be used for other generic L-Band modem configuration purposes and can be re-enabled by setting json configuration parameter lband_enabled_b to 1.
Please refer to SPARTN.md for instructions.
GPX Track Viewer
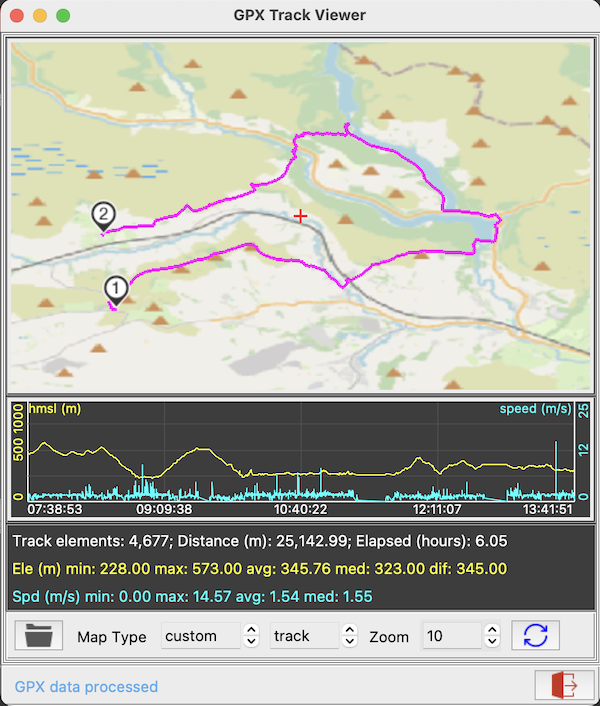
To display the GPX Track Viewer Dialog, select Menu..Options..GPX Track Viewer.
The GPX Track Viewer can display any valid GPX file containing track point (trkpt), route point (rtept) or waypoint (wpt) elements against either an "custom" offline map image, or an online MapQuest "map", "sat" or "hyb" view. The "map", "sat" and "hyb" options require a free MapQuest API key. The Y axis scales will reflect the current choice of units (metric or imperial). If the GPX track omits a time element, the time and speed axes will be flagged as nominal. GPX track metadata, including min, max, average (mean) and median elevation and speed values, is displayed in the selected units.
Click
RINEX Conversion
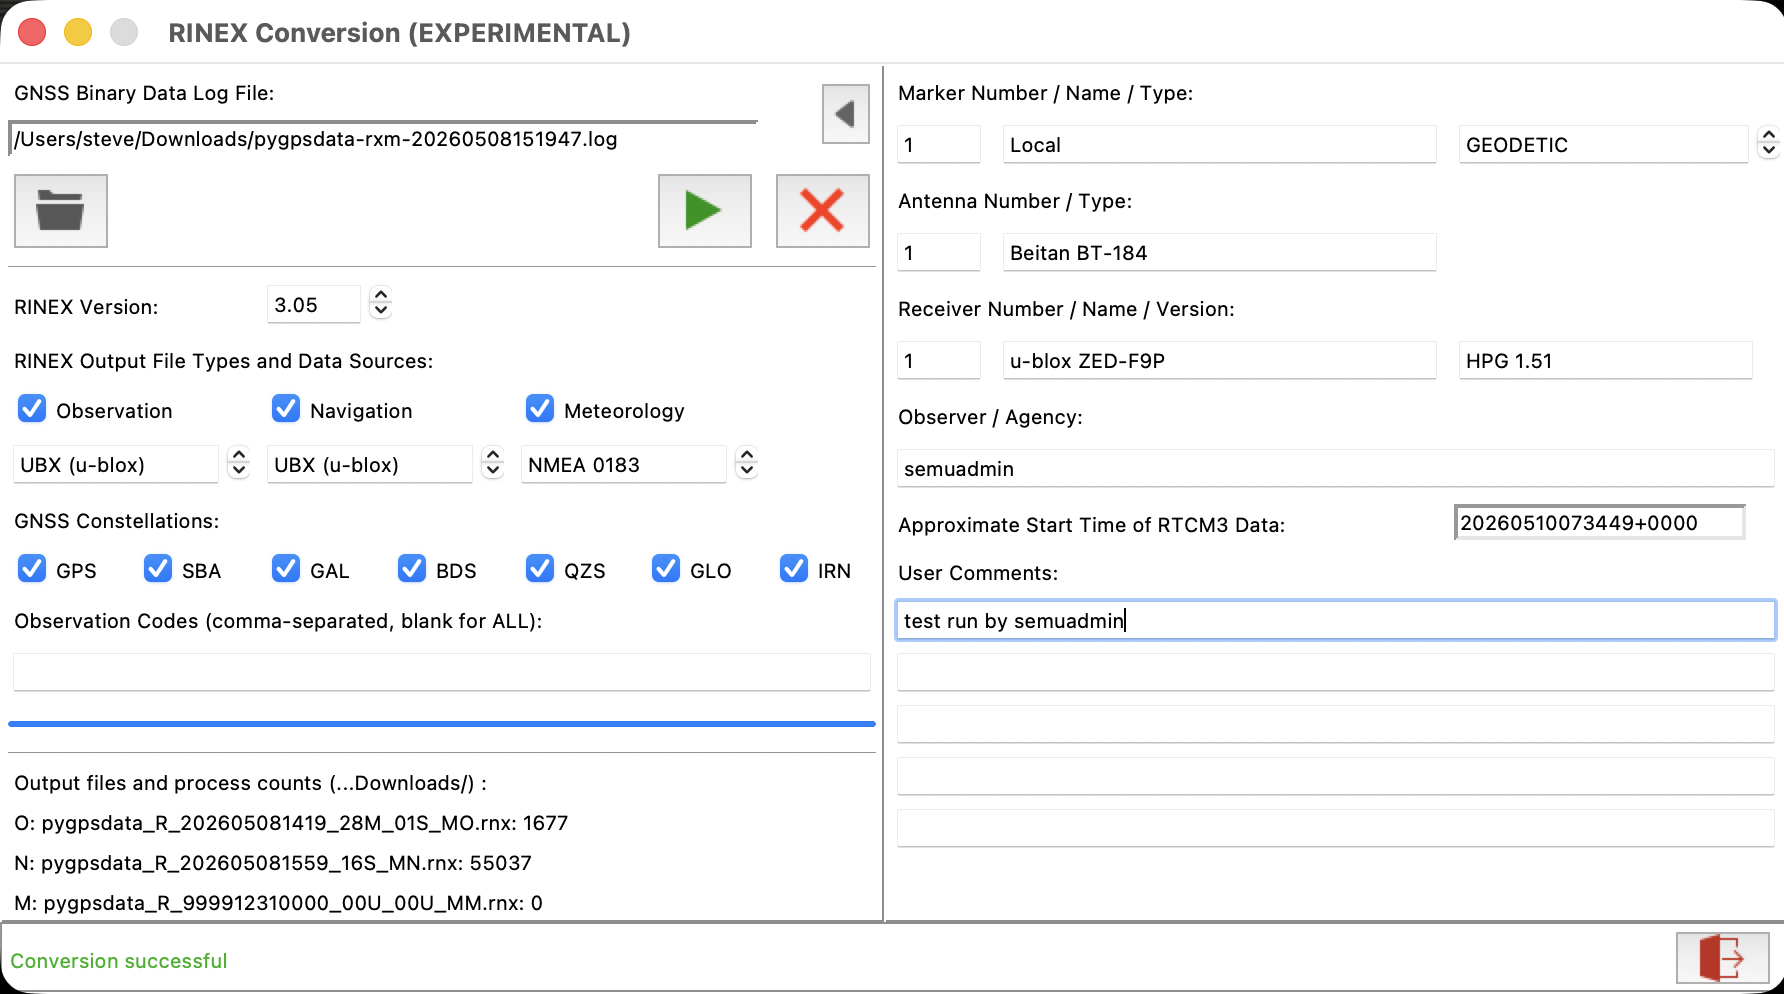
The RINEX Conversion Dialog supports the conversion of raw observation, navigation and meteorology data from a variety of sources.
Pre-Requisites:
- A previously-saved binary datalog containing raw observation (UBX RXM-RAWX), navigation (UBX RXM-SFRBX) and/or meteorology (NMEA) data or RTCM3 ephemerides (1019, 1020, 1041-1046) messages. A suitable datalog can be recorded using PyGPSClient's binary datalogging facility. NB: The file should contain at least 15-30 minutes of continuous data.
Instructions:
- Click the
- Select the required RINEX protocol version (3.05 or 4.02).
- Select the required RINEX output file types - O observation, N navigation or M meteorology.
- Select the datasource for each RINEX output type e.g. UBX (u-blox), RTCM3, NMEA 0183.
- (Optional) Select the GNSS to be included e.g. GPS, GAL, BDS, etc.
- (Optional) Select the RINEX observation (frequency / signal) codes to be included e.g. 1C, 2L, 5I, etc.
- (Optional) Expand the advanced panel
to enter details of the marker, antenna, receiver, observer and any user-defined comments.
- Click
- Processing can be cancelled by clicking
.
MapQuest API Key
Pre-Requisites:
To use the optional dynamic web-based mapview or GPX Track Viewer facilities, you need to request and install a MapQuest API key.
Note that, from January 15th 2024, MapQuest require payment card details for the use of this API, but the first 15,000 transactions/month remain free. Usage above 15,000 transactions/month is charged at $.0045 per transaction. See FAQ for further information.
For this reason, the map refresh rate is intentionally limited to 1/minute* to avoid exceeding the free transaction limit under normal use. NB: this facility is not intended to be used for real time navigational purposes.
Instructions:
Once you have received the API key (a 32-character alphanumeric string), you can (in order of precedence):
- Copy it to the
"mqapikey_s":value in your json configuration file (see example provided). - Create an environment variable named
MQAPIKEY(all upper case) and set this to the API key value. It is recommended that this is a User variable rather than a System/Global variable. - Pass it via command line argument
--mqapikey.
*The web map refresh rate can be amended if required by changing the mapupdateinterval_n: value in your json configuration file.
User Defined Presets
The UBX, NMEA and TTY Configuration Dialogs include the facility to send user-defined configuration messages or message sequences to a compatible receiver. These can be set up as follows:
-
By manually adding appropriate comma- or semicolon-delimited message descriptions and payload definitions to the
"ubxpresets_l","nmeapresets_l"or"ttypresets_l"sections of your json configuration file (see example provided). The message definition comprises a free-format text description (avoid embedded commas or semi-colons) followed by one or more pyubx2 (UBX), pynmeagps (NMEA) or tty (ASCII) message constructors, e.g.- UBX -
<description>, [<message class>, <message id>, <payload as hexadecimal string>, <msgmode>, ...] - NMEA -
<description>; [<talker>; <message id>; <payload as comma-separated string>; <msgmode>; ...] - TTY -
<description>; [<tty command>; ...]
- UBX -
-
By using the Configuration Command Load/Save/Record facility to record commands as they are sent to the receiver, and automatically import these recorded commands into the relevant
"...presets_l"section of the json configuration file.
If the command description contains the term CONFIRM, a pop-up confirmation box will appear before the command is actioned.
When PyGPSClient is first started, the preset command sections are pre-populated in-memory with an initial set of preset commands, which can be saved to a json configuration file and then manually edited in accordance with the user's preferences. To reinstate this initial set at a later date, insert the line "INIT_PRESETS" at the top of the relevant "ubxpresets_l", "nmeapresets_l" or "ttypresets_l" configuration section.
The pygpsclient.ubx2preset(), pygpsclient.nmea2preset() and pygpsclient.tty2preset() helper functions may be used to convert a UBXMessage, NMEAMessage or ASCII text object into a string suitable for copying and pasting into the "ubxpresets_l":, "nmeapresets_l": or "ttypresets_l": configuration file sections:
from pygpsclient import ubx2preset, nmea2preset, tty2preset
from pyubx2 import UBXMessage
from pynmeagps import NMEAMessage, SET

ubx = UBXMessage("CFG", "CFG-MSG", SET, msgClass=0x01, msgID=0x03, rateUART1=1)
print(ubx2preset(ubx, "Configure NAV-STATUS Message Rate on ZED-F9P"))

nmea = NMEAMessage("P", "QTMCFGUART", SET, baudrate=460800)
print(nmea2preset(nmea, "Configure UART baud rate on LGSERIES"))

tty = b"AT+SYSTEM_RESET\r\n"
print(tty2preset(tty, "IM19 System Reset CONFIRM"))
Configure NAV-STATUS Message Rate on ZED-F9P, CFG, CFG-MSG, 0103000100000000, 1
Configure UART baud rate on LGSERIES; P; QTMCFGUART; W,460800; 1
IM19 System reset CONFIRM; AT+SYSTEM_RESET
Multiple commands can be concatenated on a single line. Illustrative examples are shown in the sample pygpsclient.json file.
Command Line Utilities
The pygnssutils and pyubxutils libraries which underpin many of the functions in PyGPSClient also incorporate command line versions of these functions.
For further details, refer to the pygnssutils homepage at https://github.com/semuconsulting/pygnssutils or pyubxutils homepage at https://github.com/semuconsulting/pyubxutils.
Troubleshooting
-
If you encounter persistent
WARNING>>Error parsing data stream Serial stream terminated unexpectedlymessages in the console, this may be indicative of insufficient serial port bandwidth (baudrate or timeout) for the current output message cohort (particularly if this includes Ephemera or Observation data). Try increasing the baudrate in the first instance. -
Most budget USB-UART adapters (e.g. FT232, CH345, CP2102, including those embedded on development boards) have a bandwidth limit of around 3Mbps (≈ 375000 baud) and may not work reliably above 230600 baud, even if the receiver supports higher baud rates. If you're using an adapter and notice significant message corruption (e.g. frequent
WARNING>>..invalid checksummessages), try reducing the baud rate to a maximum 230600. -
Some Linux Wayland platforms appear to require Toplevel dialog windows to be non-transient (
transient_dialog_b: 0) for the window 'maximise' icon to work properly. -
Some Homebrew-installed Python environments on MacOS can give rise to critical segmentation errors (illegal memory access) when shell subprocesses are invoked, due to the way permissions are implemented. This may, for example, affect About..Update functionality; the workaround is to update via a standard CLI
pip install --upgradecommand. -
Installing the optional
cryptographypackage on some 32-bit Linux platforms (e.g. Raspberry Pi OS 32) may require Rust compiler support and some additional build dependencies (see pyspartn cryptography installation notes):curl --proto '=https' --tlsv1.2 -sSf https://sh.rustup.rs | sh sudo apt-get install build-essential libssl-dev libffi-dev python3-dev pkg-config
-
As of October 2025, u-blox have discontinued their PointPerfect SPARTN L-Band and MQTT services. As a result, PyGPSClient's SPARTN Configuration panel is largely redundant and is disabled by default in version>=1.5.17, though it can be re-enabled by manually setting the
lband_enabled_bconfiguration setting to 1.
License

Copyright © 2020-2026, semuadmin (Steve Smith)
Application icons from iconmonstr ©.
Author Information
PyGPSClient is maintained entirely by unpaid volunteers. It receives no funding from advertising or corporate sponsorship. If you find the utility useful, please consider sponsoring the project with the price of a coffee...


Project details
Release history Release notifications | RSS feed


Download files
Download the file for your platform. If you're not sure which to choose, learn more about installing packages.
Source Distribution
Built Distribution
Filter files by name, interpreter, ABI, and platform.
If you're not sure about the file name format, learn more about wheel file names.
Copy a direct link to the current filters
File details
Details for the file pygpsclient-1.7.0.tar.gz.
File metadata
- Download URL: pygpsclient-1.7.0.tar.gz
- Upload date:
- Size: 687.2 kB
- Tags: Source
- Uploaded using Trusted Publishing? Yes
- Uploaded via: twine/6.1.0 CPython/3.13.12
File hashes
| Algorithm | Hash digest | |
|---|---|---|
| SHA256 |
4a55e9064ad46a65733f4c4b29e96d2ef7981ab96f36a5d8ba78ae662bdca240
|
|
| MD5 |
3090eabded532f90b5d86114e33d36f1
|
|
| BLAKE2b-256 |
a5a396cf3afccc7c57b0c00d9e7814002619fc440fcd63a9bb5d955f88f56e17
|
Provenance
The following attestation bundles were made for pygpsclient-1.7.0.tar.gz:
Publisher:
deploy.yml on semuconsulting/PyGPSClient
-
Statement:
-
Statement type:
https://in-toto.io/Statement/v1 -
Predicate type:
https://docs.pypi.org/attestations/publish/v1 -
Subject name:
pygpsclient-1.7.0.tar.gz -
Subject digest:
4a55e9064ad46a65733f4c4b29e96d2ef7981ab96f36a5d8ba78ae662bdca240 - Sigstore transparency entry: 1935676029
- Sigstore integration time:
-
Permalink:
semuconsulting/PyGPSClient@3c621956064101a5b9da56b5354a5d3eb45c3d10 -
Branch / Tag:
refs/tags/v1.7.0 - Owner: https://github.com/semuconsulting
-
Access:
public
-
Token Issuer:
https://token.actions.githubusercontent.com -
Runner Environment:
github-hosted -
Publication workflow:
deploy.yml@3c621956064101a5b9da56b5354a5d3eb45c3d10 -
Trigger Event:
release
-
Statement type:
File details
Details for the file pygpsclient-1.7.0-py3-none-any.whl.
File metadata
- Download URL: pygpsclient-1.7.0-py3-none-any.whl
- Upload date:
- Size: 692.3 kB
- Tags: Python 3
- Uploaded using Trusted Publishing? Yes
- Uploaded via: twine/6.1.0 CPython/3.13.12
File hashes
| Algorithm | Hash digest | |
|---|---|---|
| SHA256 |
73b28d8f6cfda45b44941633afd25bad8be83f741a63aba8d8c57bfca26d834e
|
|
| MD5 |
42f8e199388317047dd1e6c5177bee91
|
|
| BLAKE2b-256 |
3d10cddd64d68c6876a03b8ea25abfda00f5c7332f71d55fe690379b5c43acf2
|
Provenance
The following attestation bundles were made for pygpsclient-1.7.0-py3-none-any.whl:
Publisher:
deploy.yml on semuconsulting/PyGPSClient
-
Statement:
-
Statement type:
https://in-toto.io/Statement/v1 -
Predicate type:
https://docs.pypi.org/attestations/publish/v1 -
Subject name:
pygpsclient-1.7.0-py3-none-any.whl -
Subject digest:
73b28d8f6cfda45b44941633afd25bad8be83f741a63aba8d8c57bfca26d834e - Sigstore transparency entry: 1935676068
- Sigstore integration time:
-
Permalink:
semuconsulting/PyGPSClient@3c621956064101a5b9da56b5354a5d3eb45c3d10 -
Branch / Tag:
refs/tags/v1.7.0 - Owner: https://github.com/semuconsulting
-
Access:
public
-
Token Issuer:
https://token.actions.githubusercontent.com -
Runner Environment:
github-hosted -
Publication workflow:
deploy.yml@3c621956064101a5b9da56b5354a5d3eb45c3d10 -
Trigger Event:
release
-
Statement type:


