PyMLpipe is a Python library for ease Machine Learning Model monitering and Deployment.

Project description


PyMLpipe
PyMLpipe is a Python library for ease Machine Learning Model monitoring and Deployment.
- Simple
- Intuative
- Easy to use
Please Find the Full documentation here!
Installation
Use the package manager pip to install PyMLpipe.
pip install pymlpipe
or
pip3 install pymlpipe
Frame Work Supports
- Scikit-Learn
- XGBoost
- LightGBM
- Pytorch
- Tensorflow
- Keras
Tutorial (Scikit-Learn|XGBoost|LightGBM)
- Load the python package
from pymlpipe.tabular import PyMLPipe
- Initiate the
PyMLPipeclass
mlp=PyMLPipe()
- Set an Experiment Name
[Optional]-Default experiment name is'0'
mlp.set_experiment("IrisDataV2")
- Set a version
[Optional]-Default there is no version
mlp.set_version(0.1)
- Initiate the context manager - This is create a unique ID for each model run.
- when
.run()is used - Automatic unique ID is generated - you can also provide
runidargument in the.run()this will the use the givenrunidfor next storing.
- when
with mlp.run():
Or
with mlp.run(runid='mlopstest'):
- Set a Tag
[Optional]by usingset_tag()-Default there is no tags
mlp.set_tag('tag')
Or
- Set multiple Tags
[Optional]by usingset_tags()-Default there is no tags
mlp.set_tags(["Classification","test run","logisticRegression"])
- Set Metrics values
[Optional]by usinglog_matric(metric_name,metric_value)-Default there is no metrics This will help in comparing performance of different models and model versions
mlp.log_metric("Accuracy", accuracy_score(testy,predictions))


mlp.log_metric("Accuracy", .92)
- Set multiple Metrics values
[Optional]by usinglog_matrics({metric_name:metric_value})-Default there is no metrics
mlp.log_metrics(
    {
        "Accuracy": accuracy_score(testy,predictions),
        "Precision": precision_score(testy,predictions,average='macro'),
        "Recall", recall_score(testy,predictions,average='macro'),
    }
)


mlp.log_metrics(
    {
        "Accuracy": .92,
        "Precision": .87,
        "Recall", .98,
    }
)
- Save an artifact
[Optional]- You can save training/testing/validation/dev/prod data for monitoring and comparison- This will also help in generating
DATA SCHEMA register_artifact()-takes 3 arguments- name of artifact
- Pandas Dataframe
- type of artifact -
[training, testing, validation, dev, prod]
- You can also use
register_artifact_with_path()- This will save the artifact from the disk.- Path for the file
- type of artifact -
[training, testing, validation, dev, prod]
- This will also help in generating
    mlp.register_artifact("train.csv", trainx)

    mlp.register_artifact("train.csv", trainx)
- Register Model
[Optional]- You can register the model. This will help in Quick deployment
mlp.scikit_learn.register_model("logistic regression", model)
Quick Start (Scikit-Learn|XGBoost|LightGBM)
from sklearn.datasets import  load_iris
import pandas as pd
from sklearn.model_selection import train_test_split
from sklearn.linear_model import LogisticRegression
from sklearn.metrics import accuracy_score,precision_score,recall_score,f1_score
#import PyMLPipe from tabular
from pymlpipe.tabular import PyMLPipe


# Initiate the class
mlp=PyMLPipe()
# Set experiment name
mlp.set_experiment("IrisDataV2")
# Set Version name
mlp.set_version(0.2)

iris_data=load_iris()
data=iris_data["data"]
target=iris_data["target"]
df=pd.DataFrame(data,columns=iris_data["feature_names"])
trainx,testx,trainy,testy=train_test_split(df,target)


# to start monitering use mlp.run()
with mlp.run():
    # set tags
    mlp.set_tags(["Classification","test run","logisticRegression"])
    model=LogisticRegression()
    model.fit(trainx, trainy)
    predictions=model.predict(testx)
    # log performace metrics
    mlp.log_metric("Accuracy", accuracy_score(testy,predictions))
    mlp.log_metric("Precision", precision_score(testy,predictions,average='macro'))
    mlp.log_metric("Recall", recall_score(testy,predictions,average='macro'))
    mlp.log_metric("F1", f1_score(testy,predictions,average='macro'))

    # Save train data and test data
    mlp.register_artifact("train", trainx)
    mlp.register_artifact("test", testx,artifact_type="testing")
    # Save the model
    mlp.scikit_learn.register_model("logistic regression", model)
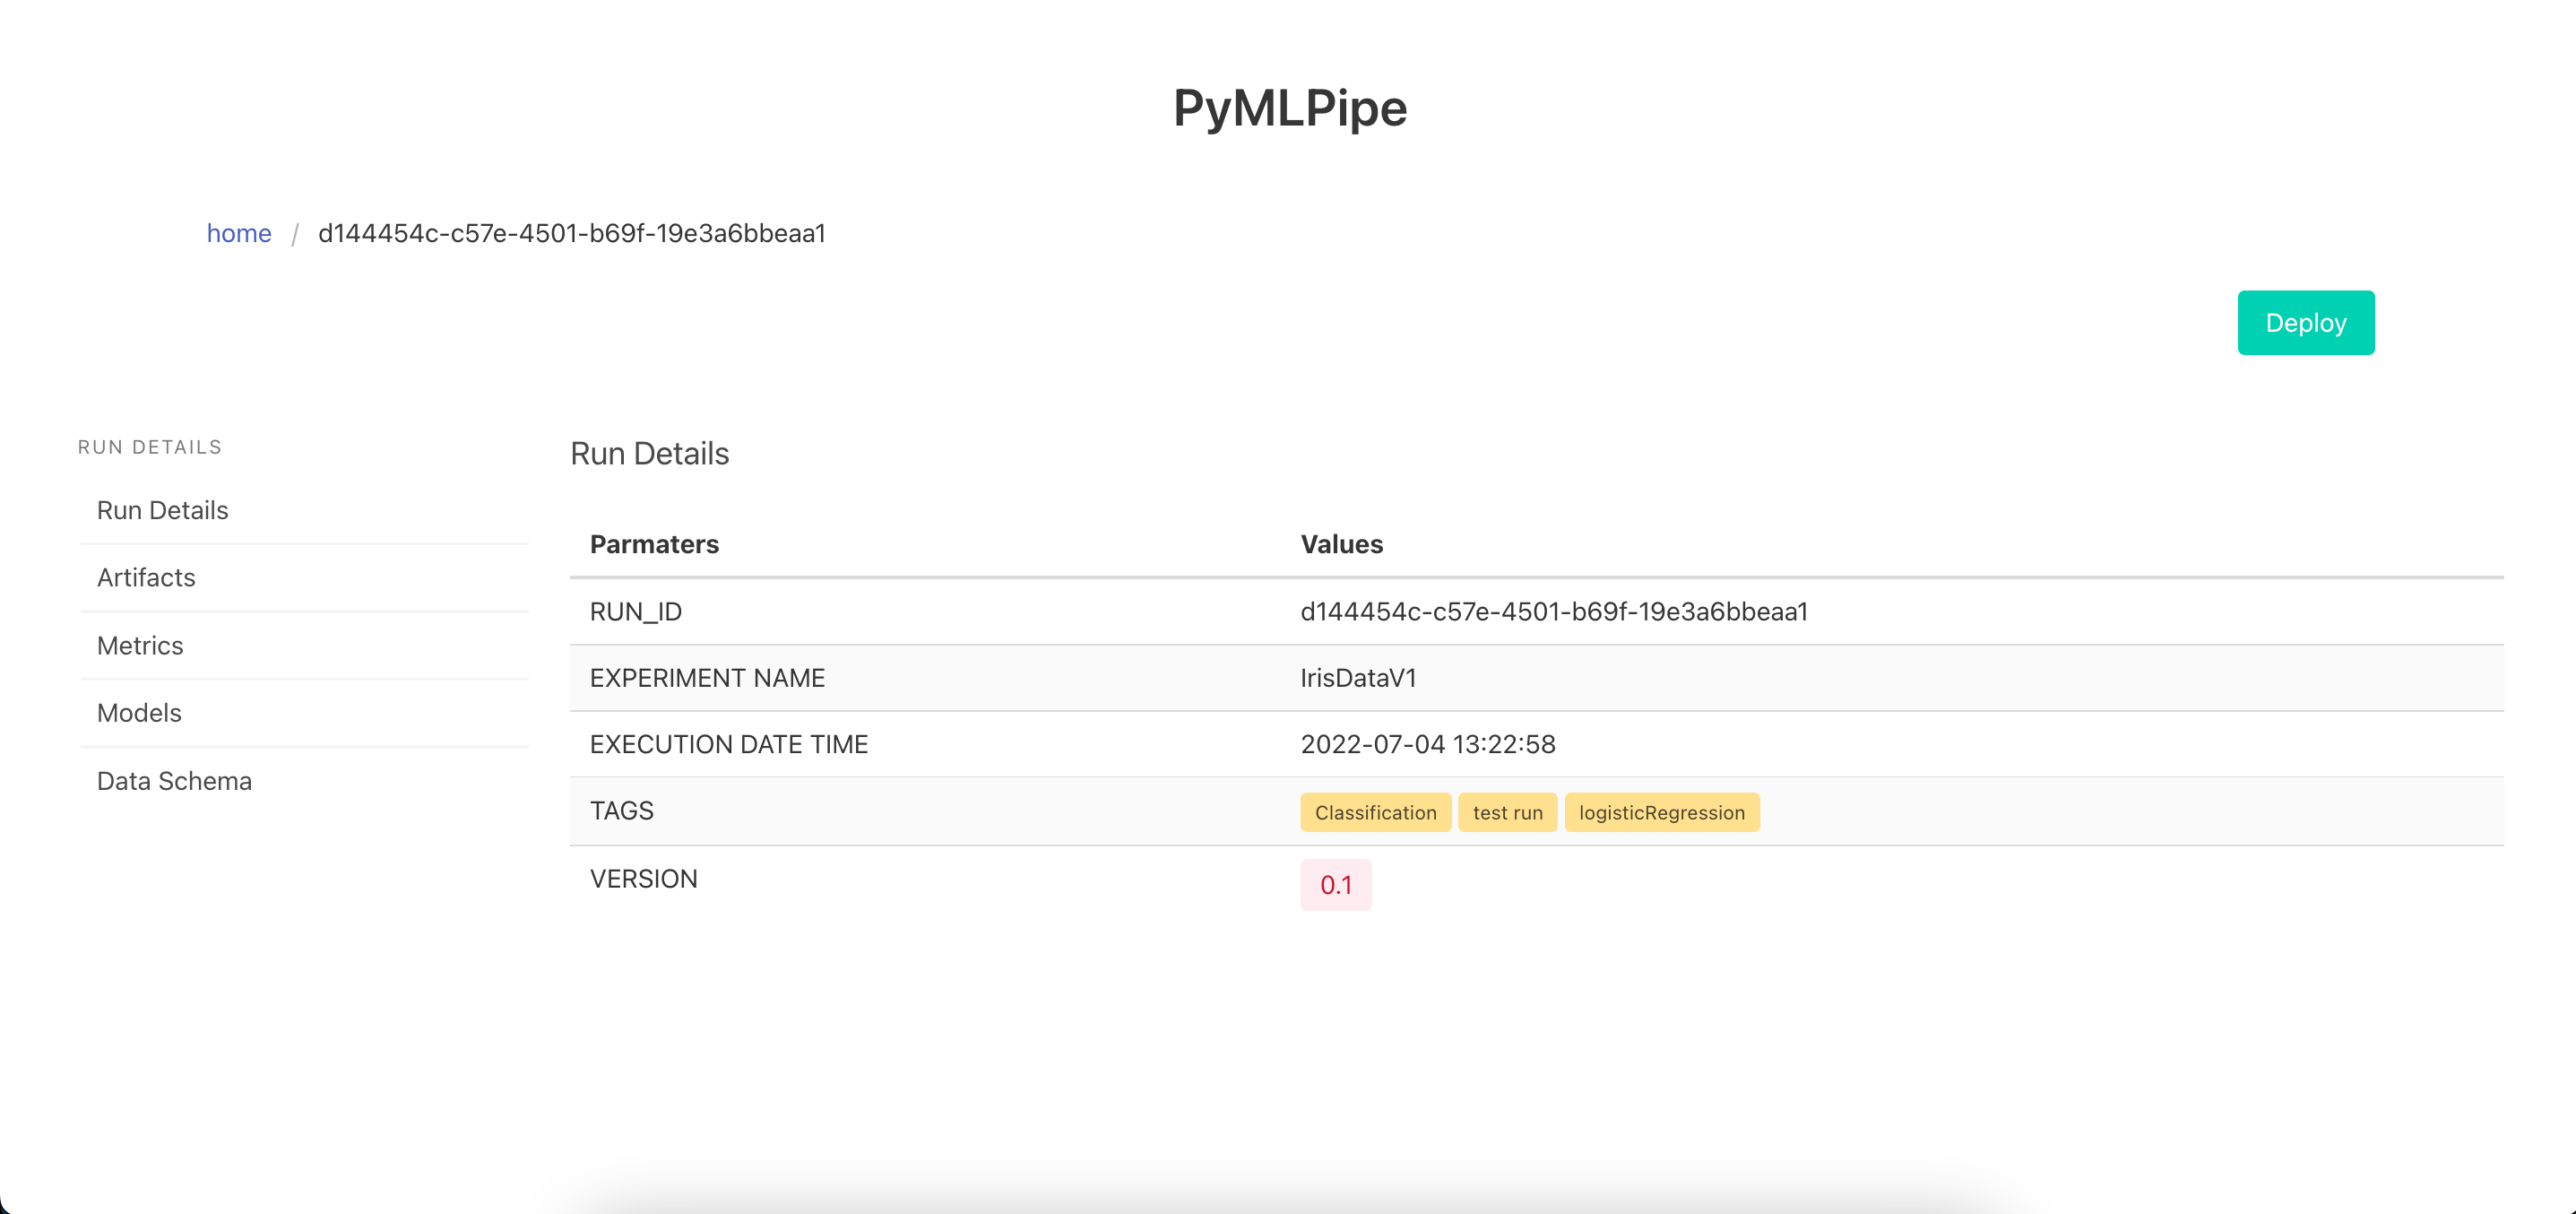
Launch UI
To start the UI
pymlpipeui
or
from pymlpipe.pymlpipeUI import start_ui


start_ui(host='0.0.0.0', port=8085)
Sample UI
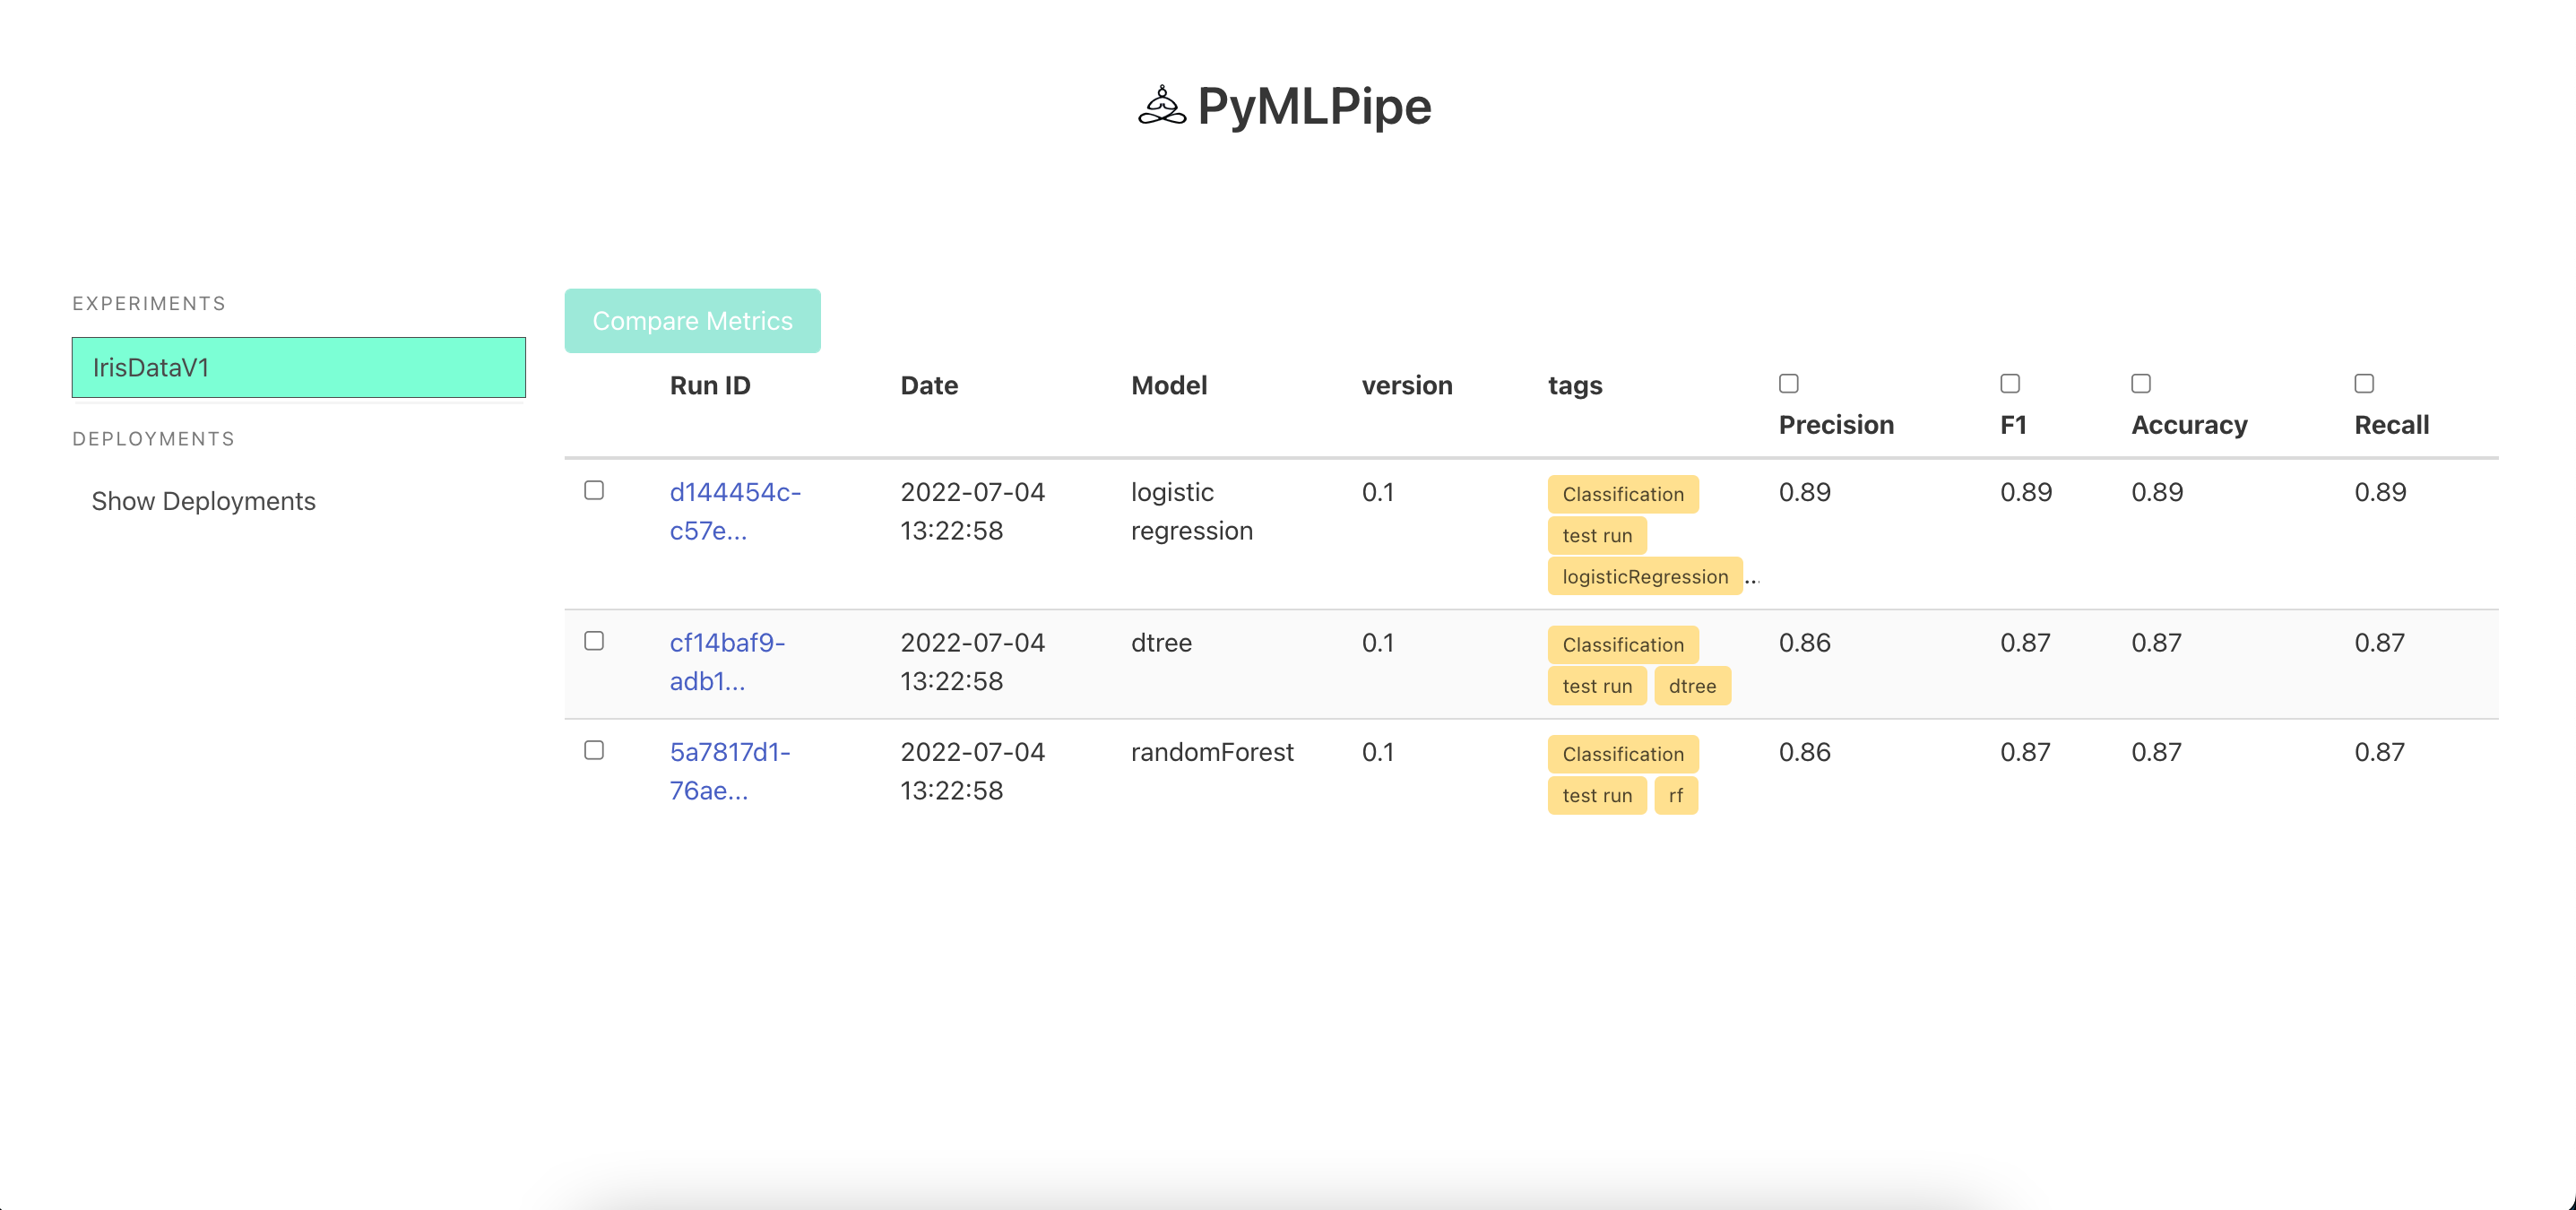
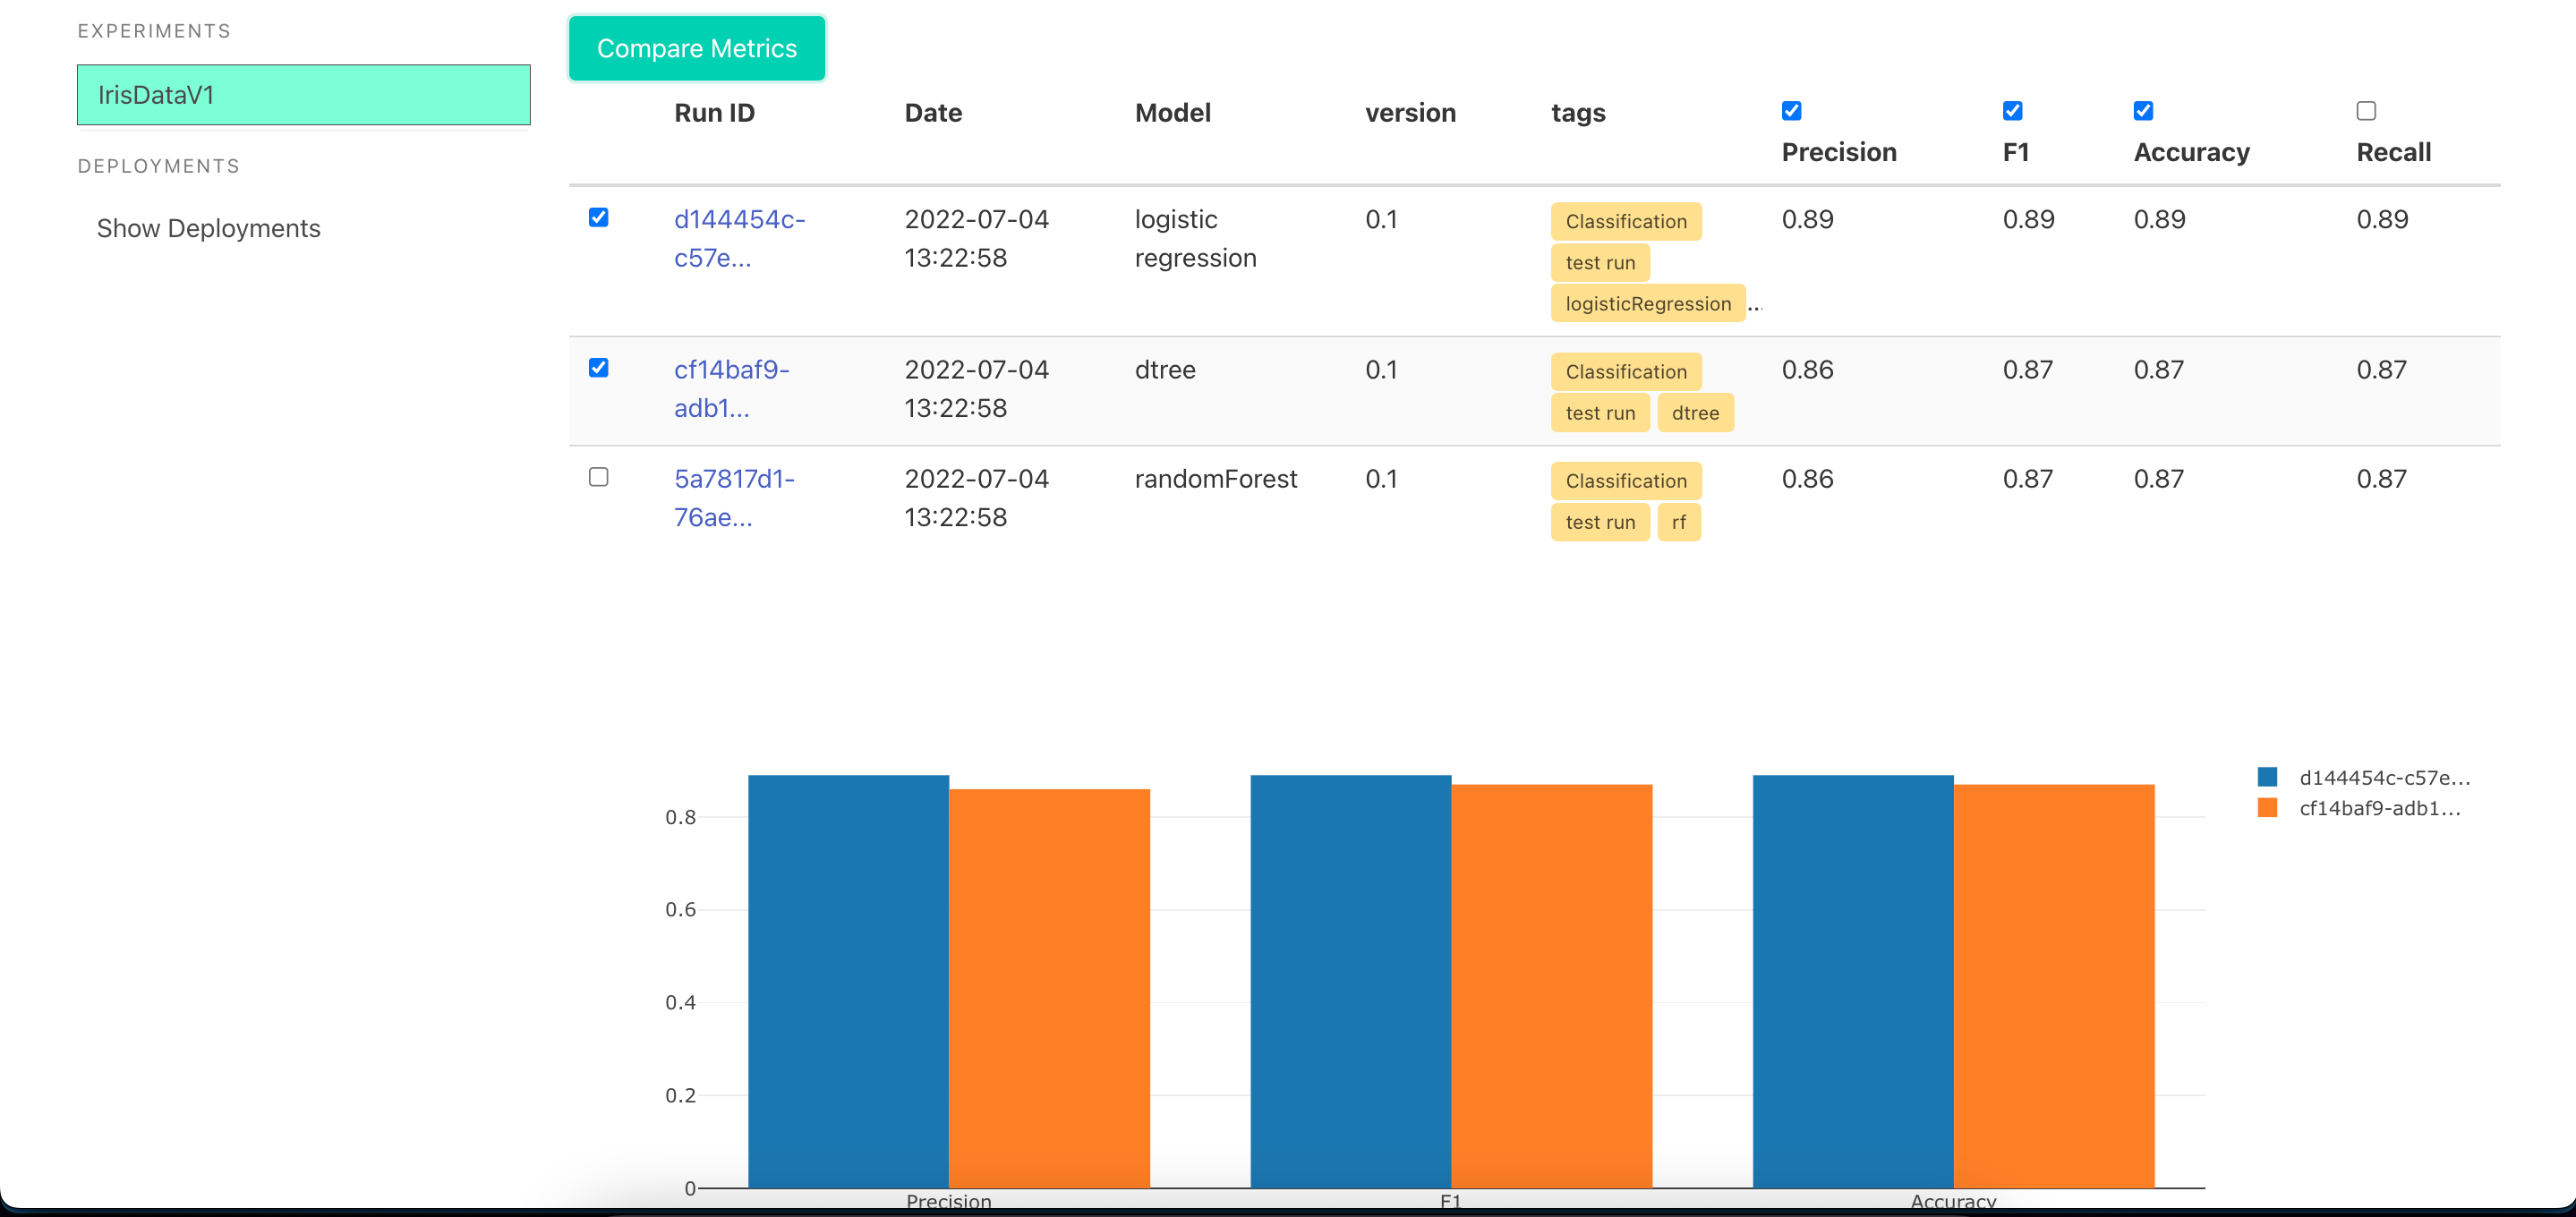
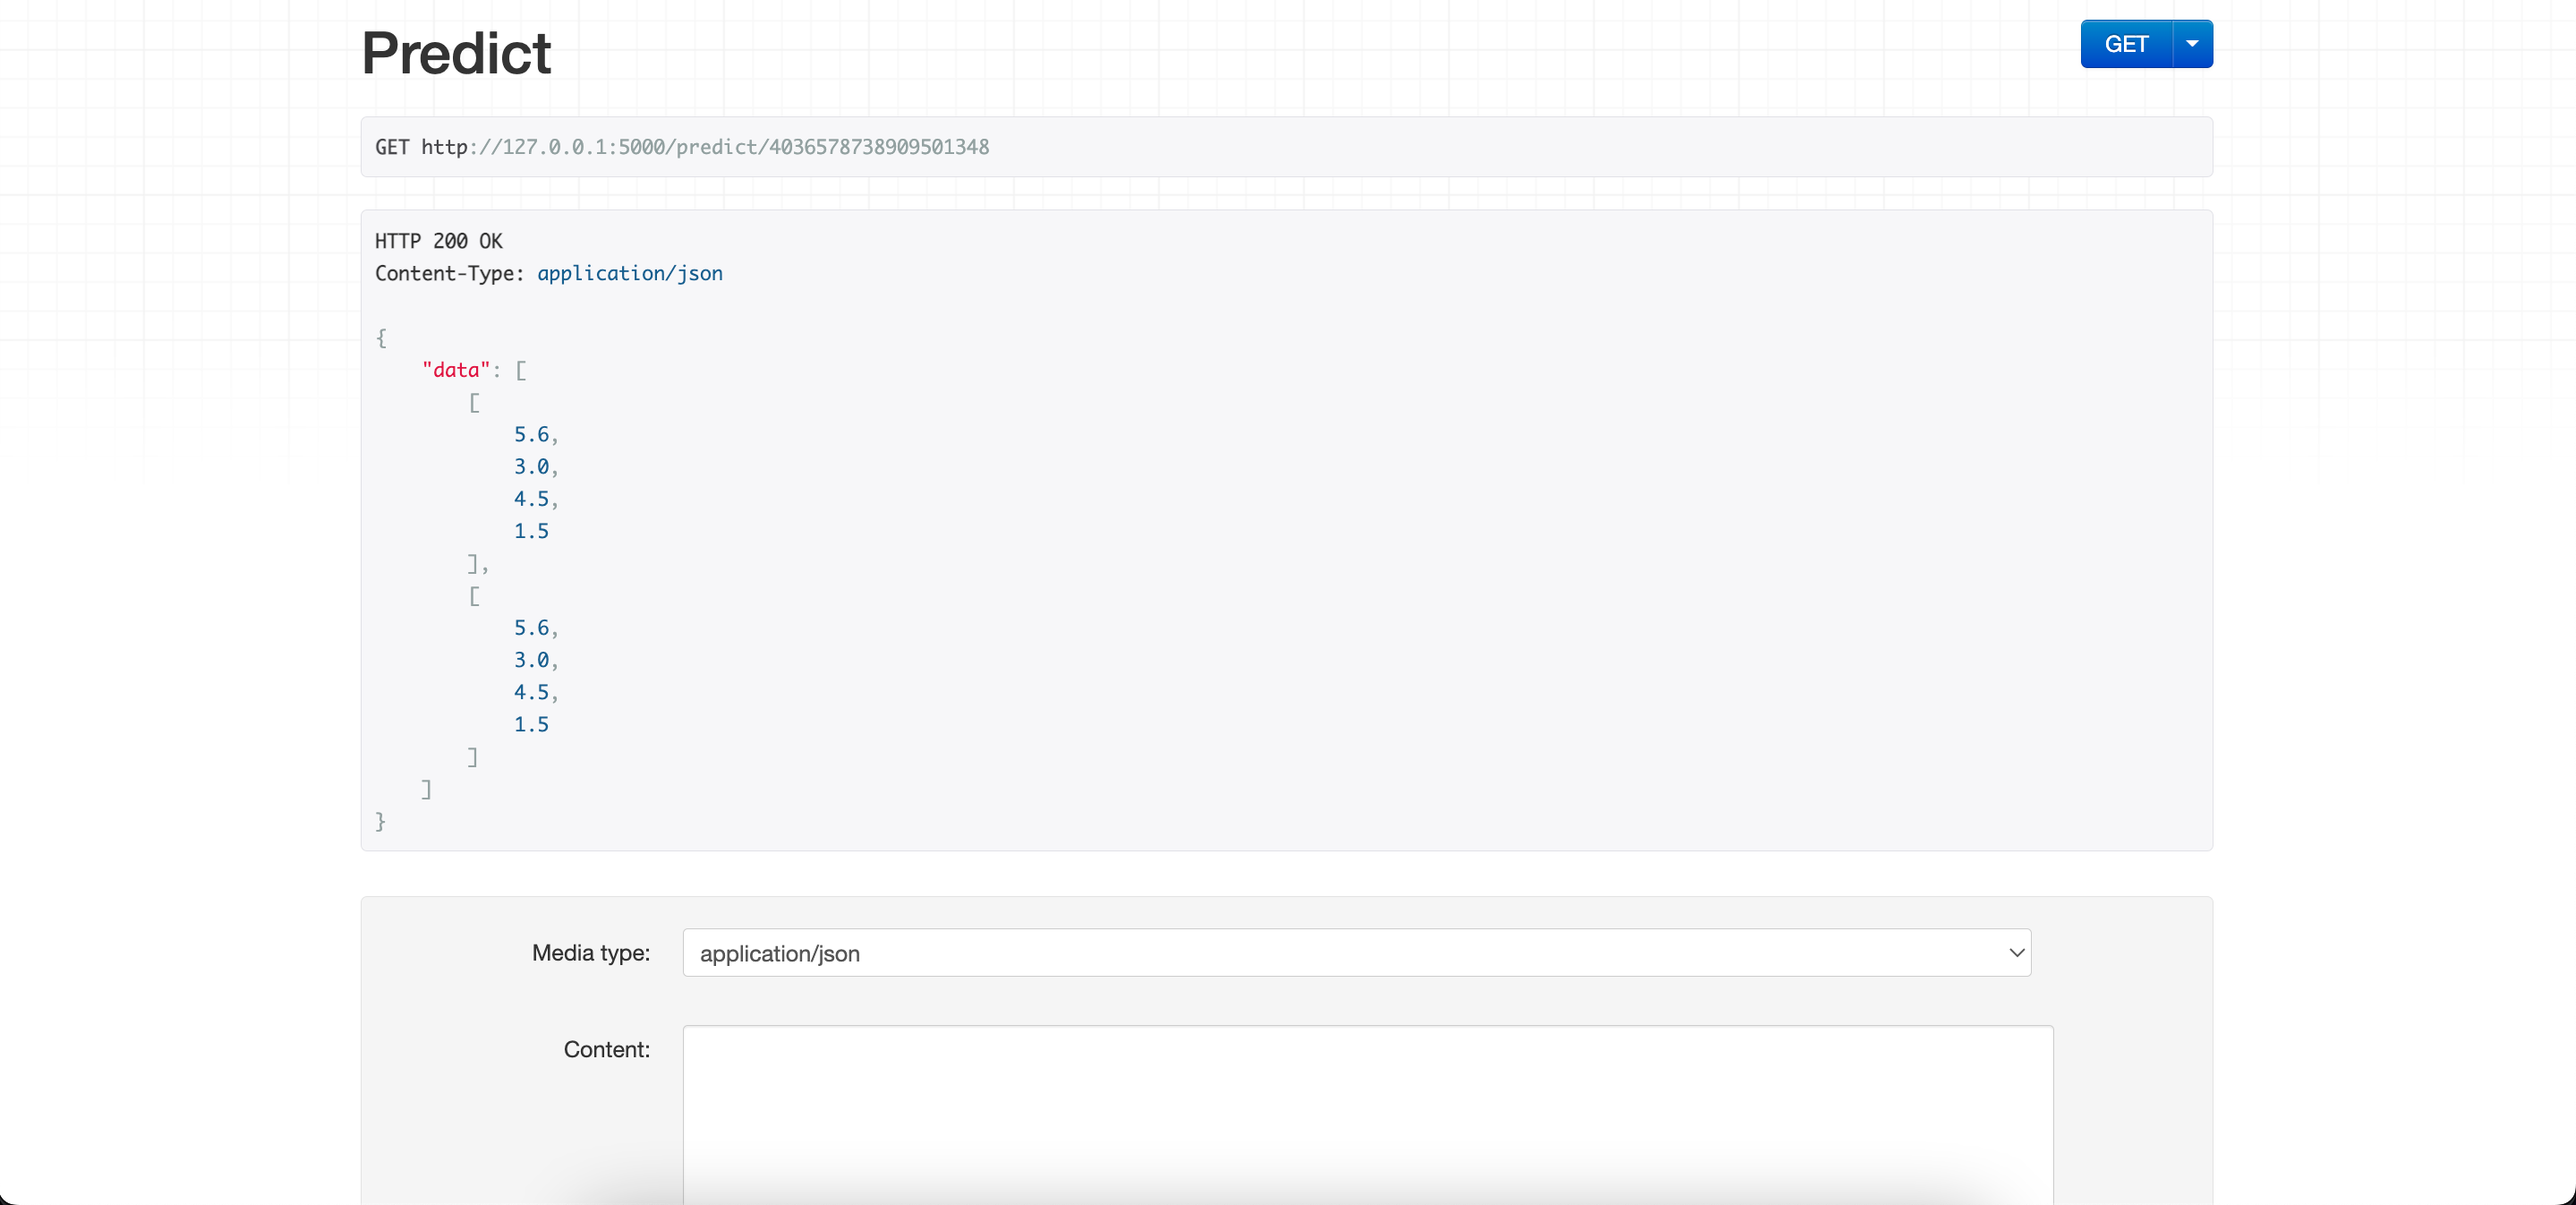
One Click Deployment -click the deploy button to deploy the model and get a endpoint
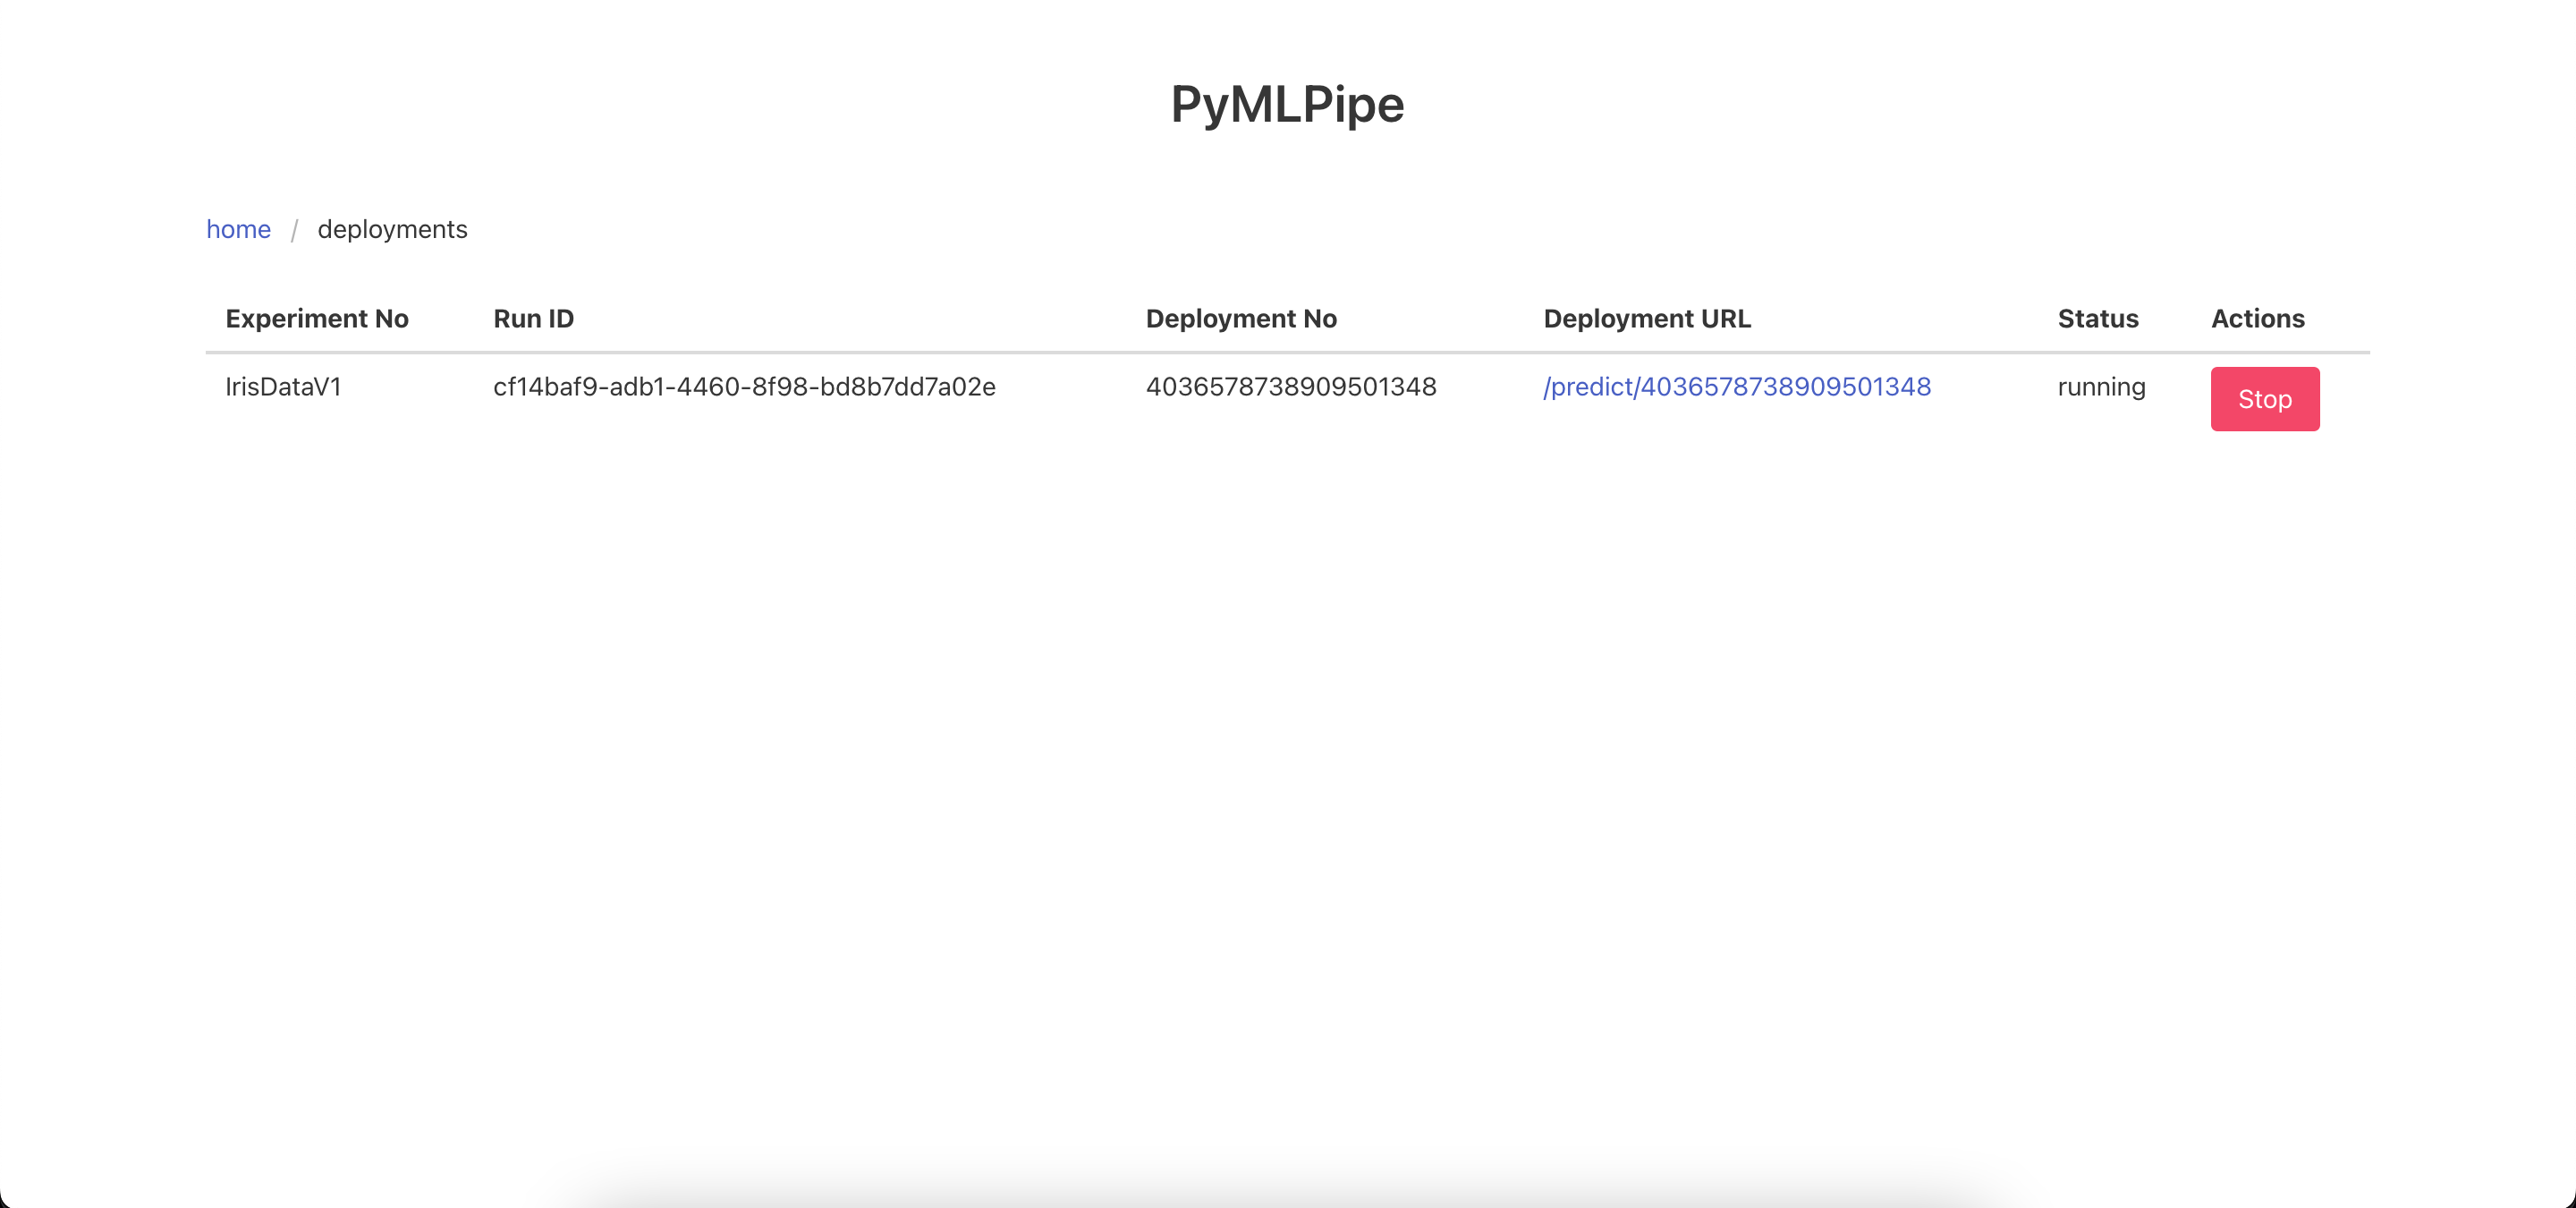
Send the data to the Prediction end point in the format
- Each list is a row of data
{
        "data":[
            [
                5.6,
                3.0,
                4.5,
                1.5
            ],
            [
                5.6,
                3.0,
                4.5,
                1.5
            ]
        ]
    }
Tutorial (Pytorch)
The previous methods can be used as it is. New methods are shown below
- Log continious Metrics
.log_metrics_continious(dict)--> dict of metrics\
- logs the metrics in a continious manner for each epoch
mlp.log_metrics_continious({
    "accuracy": .9,
    "precision": .8,
    "recall": .7
})
- To register a pytorch model use
.pytorch.register_model(modelname, modelobject)- this will Save the model in a .pt file as a
torch.jitformat for serveing and prediction
- this will Save the model in a .pt file as a
mlp.pytorch.register_model("pytorch_example1", model)
-
To register a pytorch model use
.pytorch.register_model_with_runtime(modelname, modelobject, train_data_sample)train_data_sample- is a sample of input data. it can be random numbers but needs tensor dimension- This method is
preferredas infuture releasesthis models can be then converted to other formats as well ex: "onnx", "hd5"
mlp.pytorch.register_model_with_runtime("pytorch_example1", model, train_x)
Quick Start (Pytorch)
import torch
import pandas as pd
from sklearn.preprocessing import LabelEncoder
from sklearn.model_selection import train_test_split
from sklearn.metrics import accuracy_score,f1_score
from pymlpipe.tabular import PyMLPipe
df=pd.read_csv("train.csv")
encoders=["area_code","state","international_plan","voice_mail_plan","churn"]

for i in encoders:
    le=LabelEncoder()
    df[i]=le.fit_transform(df[i])


trainy=df["churn"]
trainx=df[['state', 'account_length', 'area_code', 'international_plan',
       'voice_mail_plan', 'number_vmail_messages', 'total_day_minutes',
       'total_day_calls', 'total_day_charge', 'total_eve_minutes',
       'total_eve_calls', 'total_eve_charge', 'total_night_minutes',
       'total_night_calls', 'total_night_charge', 'total_intl_minutes',
       'total_intl_calls', 'total_intl_charge',
       'number_customer_service_calls']]


class Model(torch.nn.Module):
    def __init__(self,col_size):
        super().__init__()
        # using sequencial
        self.seq=torch.nn.Sequential(
            torch.nn.Linear(col_size,15),
            torch.nn.ReLU(),
            torch.nn.Linear(15,10),
            torch.nn.ReLU(),
            torch.nn.Linear(10,1)
        )
        #using torch layers
        '''
        self.linear_layer_1=torch.nn.Linear(col_size,15)
        self.relu_1=torch.nn.ReLU()
        self.linear_layer_2=torch.nn.Linear(15,10)
        self.relu_2=torch.nn.ReLU()
        self.linear_layer_3=torch.nn.Linear(10,1)

        '''


    def forward(self,x):
        out=self.seq(x)
        '''
        out=self.relu_1(self.linear_layer_1(x))
        out=self.relu_12self.linear_layer_3(out))
        out=self.linear_layer_3(out)
        '''

        return torch.sigmoid(out)

model=Model(len(trainx.columns))

train_x,test_x,train_y,test_y=train_test_split(trainx,trainy)

train_x=torch.from_numpy(train_x.values)
train_x=train_x.type(torch.FloatTensor)
train_y=torch.from_numpy(train_y.values)
train_y=train_y.type(torch.FloatTensor)

test_x=torch.from_numpy(test_x.values)
test_x=test_x.type(torch.FloatTensor)
test_y=torch.from_numpy(test_y.values)
test_y=test_y.type(torch.FloatTensor)


optimizer=torch.optim.SGD(model.parameters(),lr=0.001)

criterion=torch.nn.BCELoss()


def validate(model,testx,testy):
    prediction=model(testx)
    prediction=torch.where(prediction>.5,1,0)
    accu=accuracy_score(prediction.detach().numpy(),test_y.unsqueeze(1).detach().numpy())
    f1=f1_score(prediction.detach().numpy(),test_y.unsqueeze(1).detach().numpy())
    return {"accuracy":accu,"f1":f1}


epochs=100
batch_size=1000

mlp=PyMLPipe()
mlp.set_experiment("Pytorch")
mlp.set_version(0.2)

with mlp.run():
    mlp.register_artifact("churndata.csv",df)
    mlp.log_params({
        "lr":0.01,
        "optimizer":"SGD",
        "loss_fuction":"BCEloss"
    })
    for epoch in range(epochs):
        loss_batch=0
        for batch in range(1000,5000,1000):
            optimizer.zero_grad()
            train_data=train_x[batch-1000:batch]
            output=model(train_data)
            loss=criterion(output,train_y[batch-1000:batch].unsqueeze(1))
            loss.backward()
            optimizer.step()
            loss_batch+=loss.item()

        metrics=validate(model,test_x,test_y)
        metrics["loss"]=loss_batch
        metrics["epoch"]=epoch
        mlp.log_metrics_continious(metrics)
    mlp.pytorch.register_model("pytorch_example1", model)
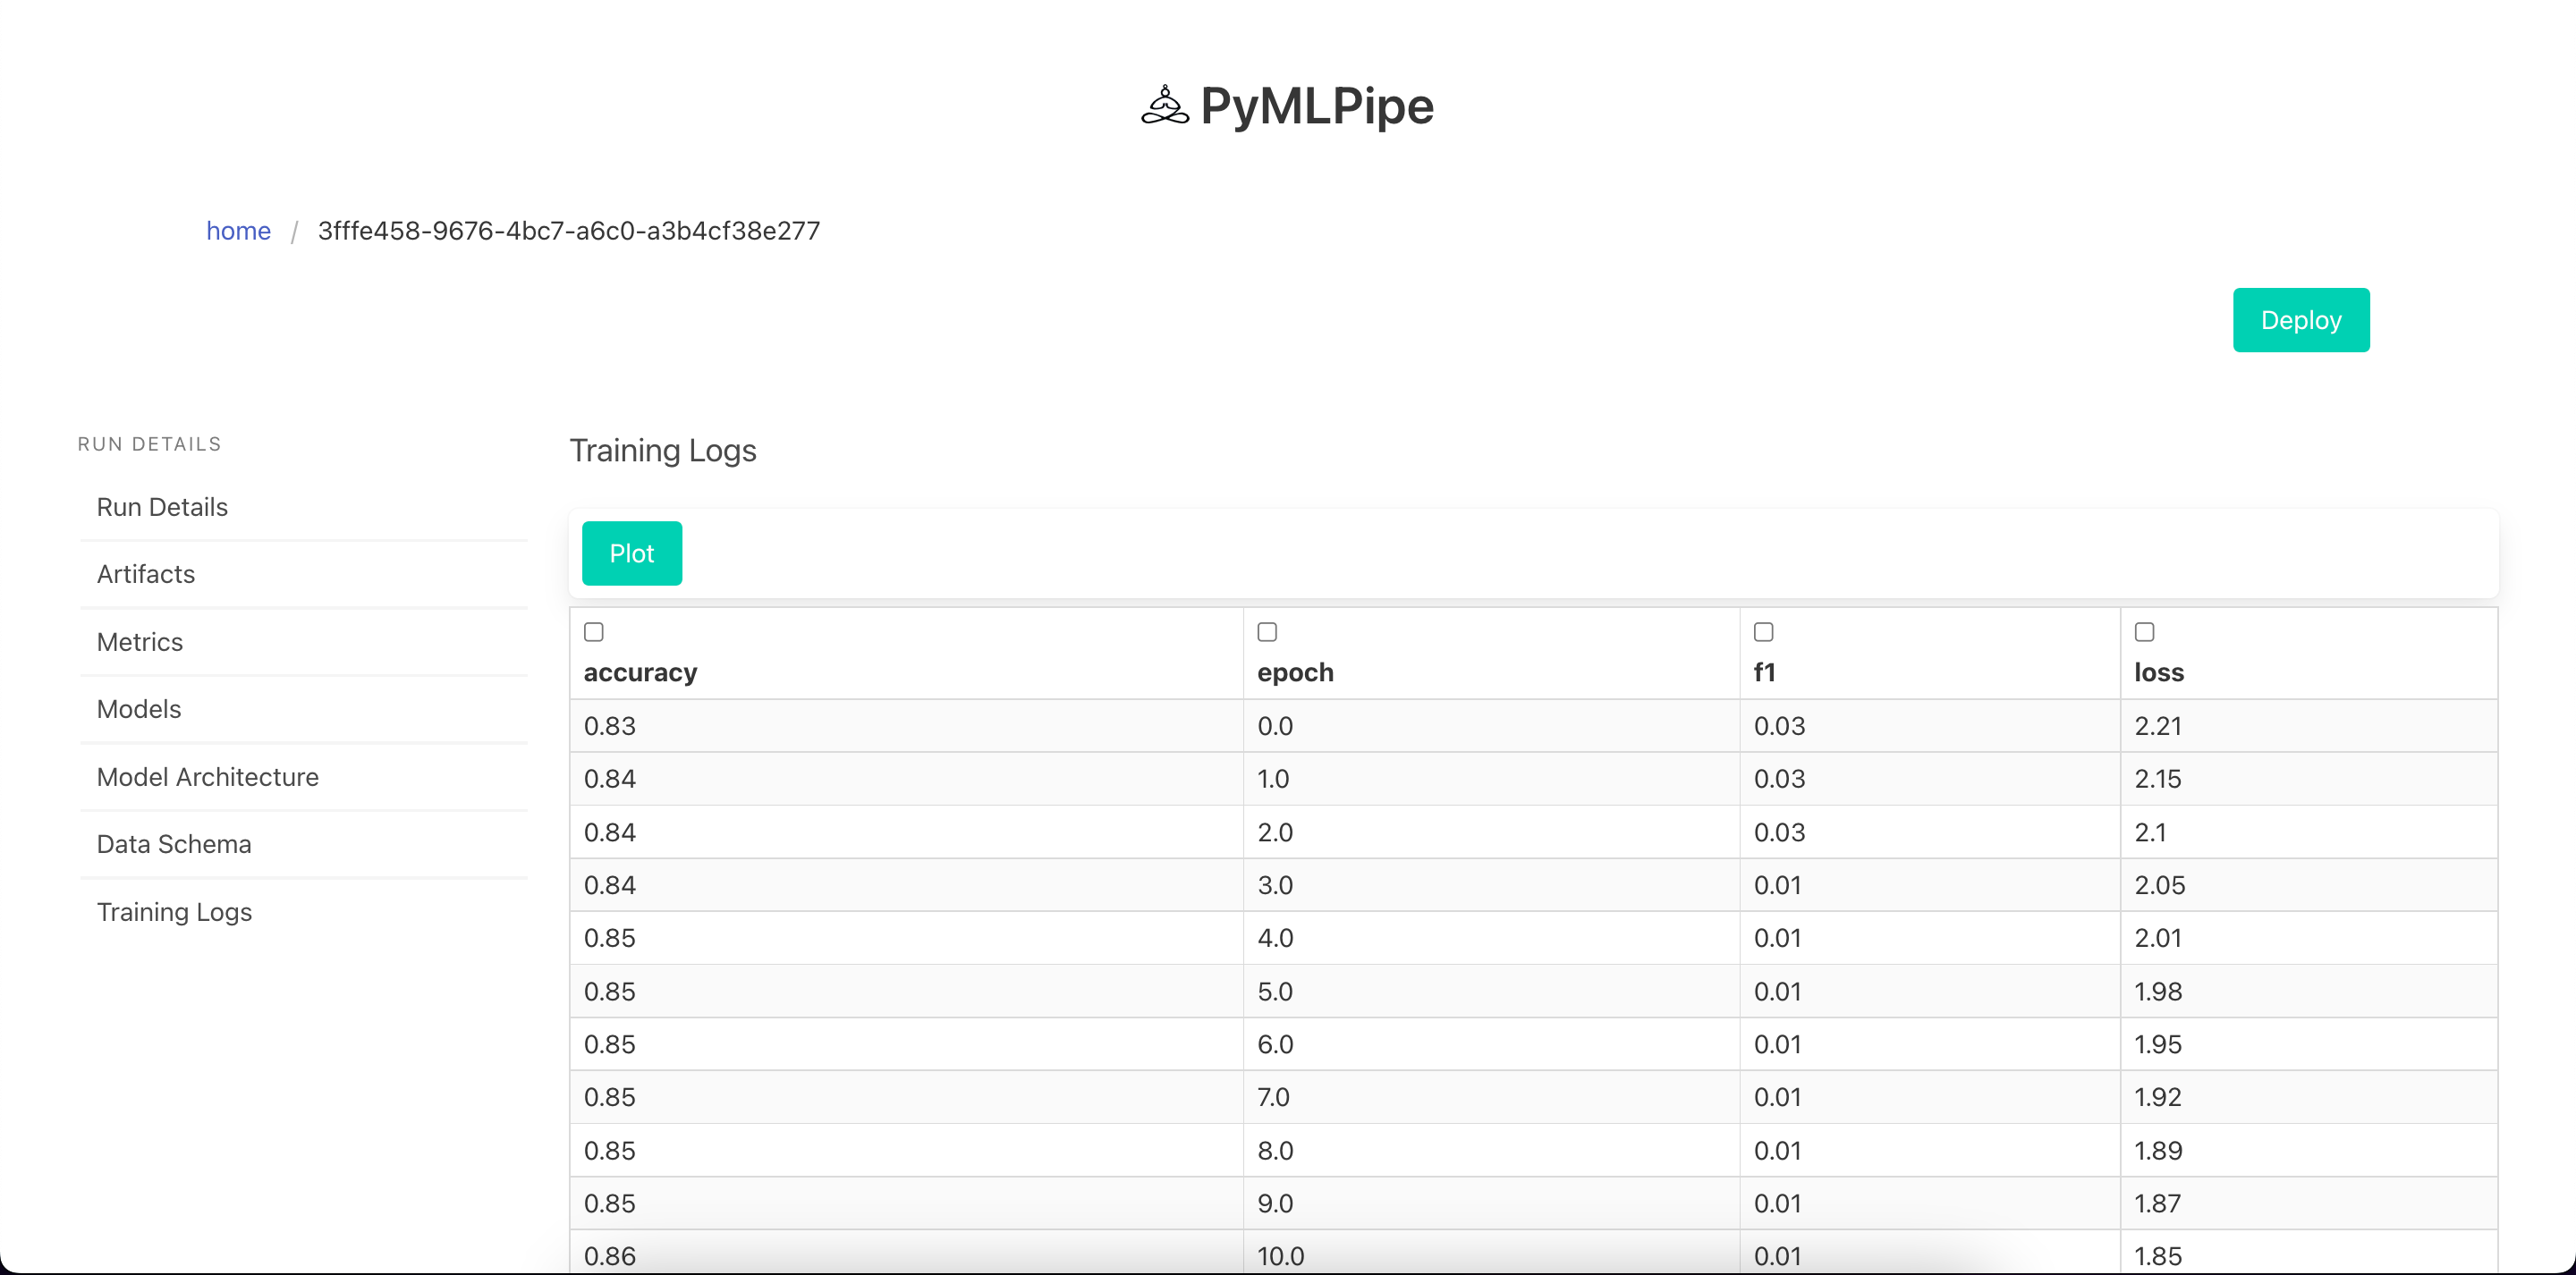
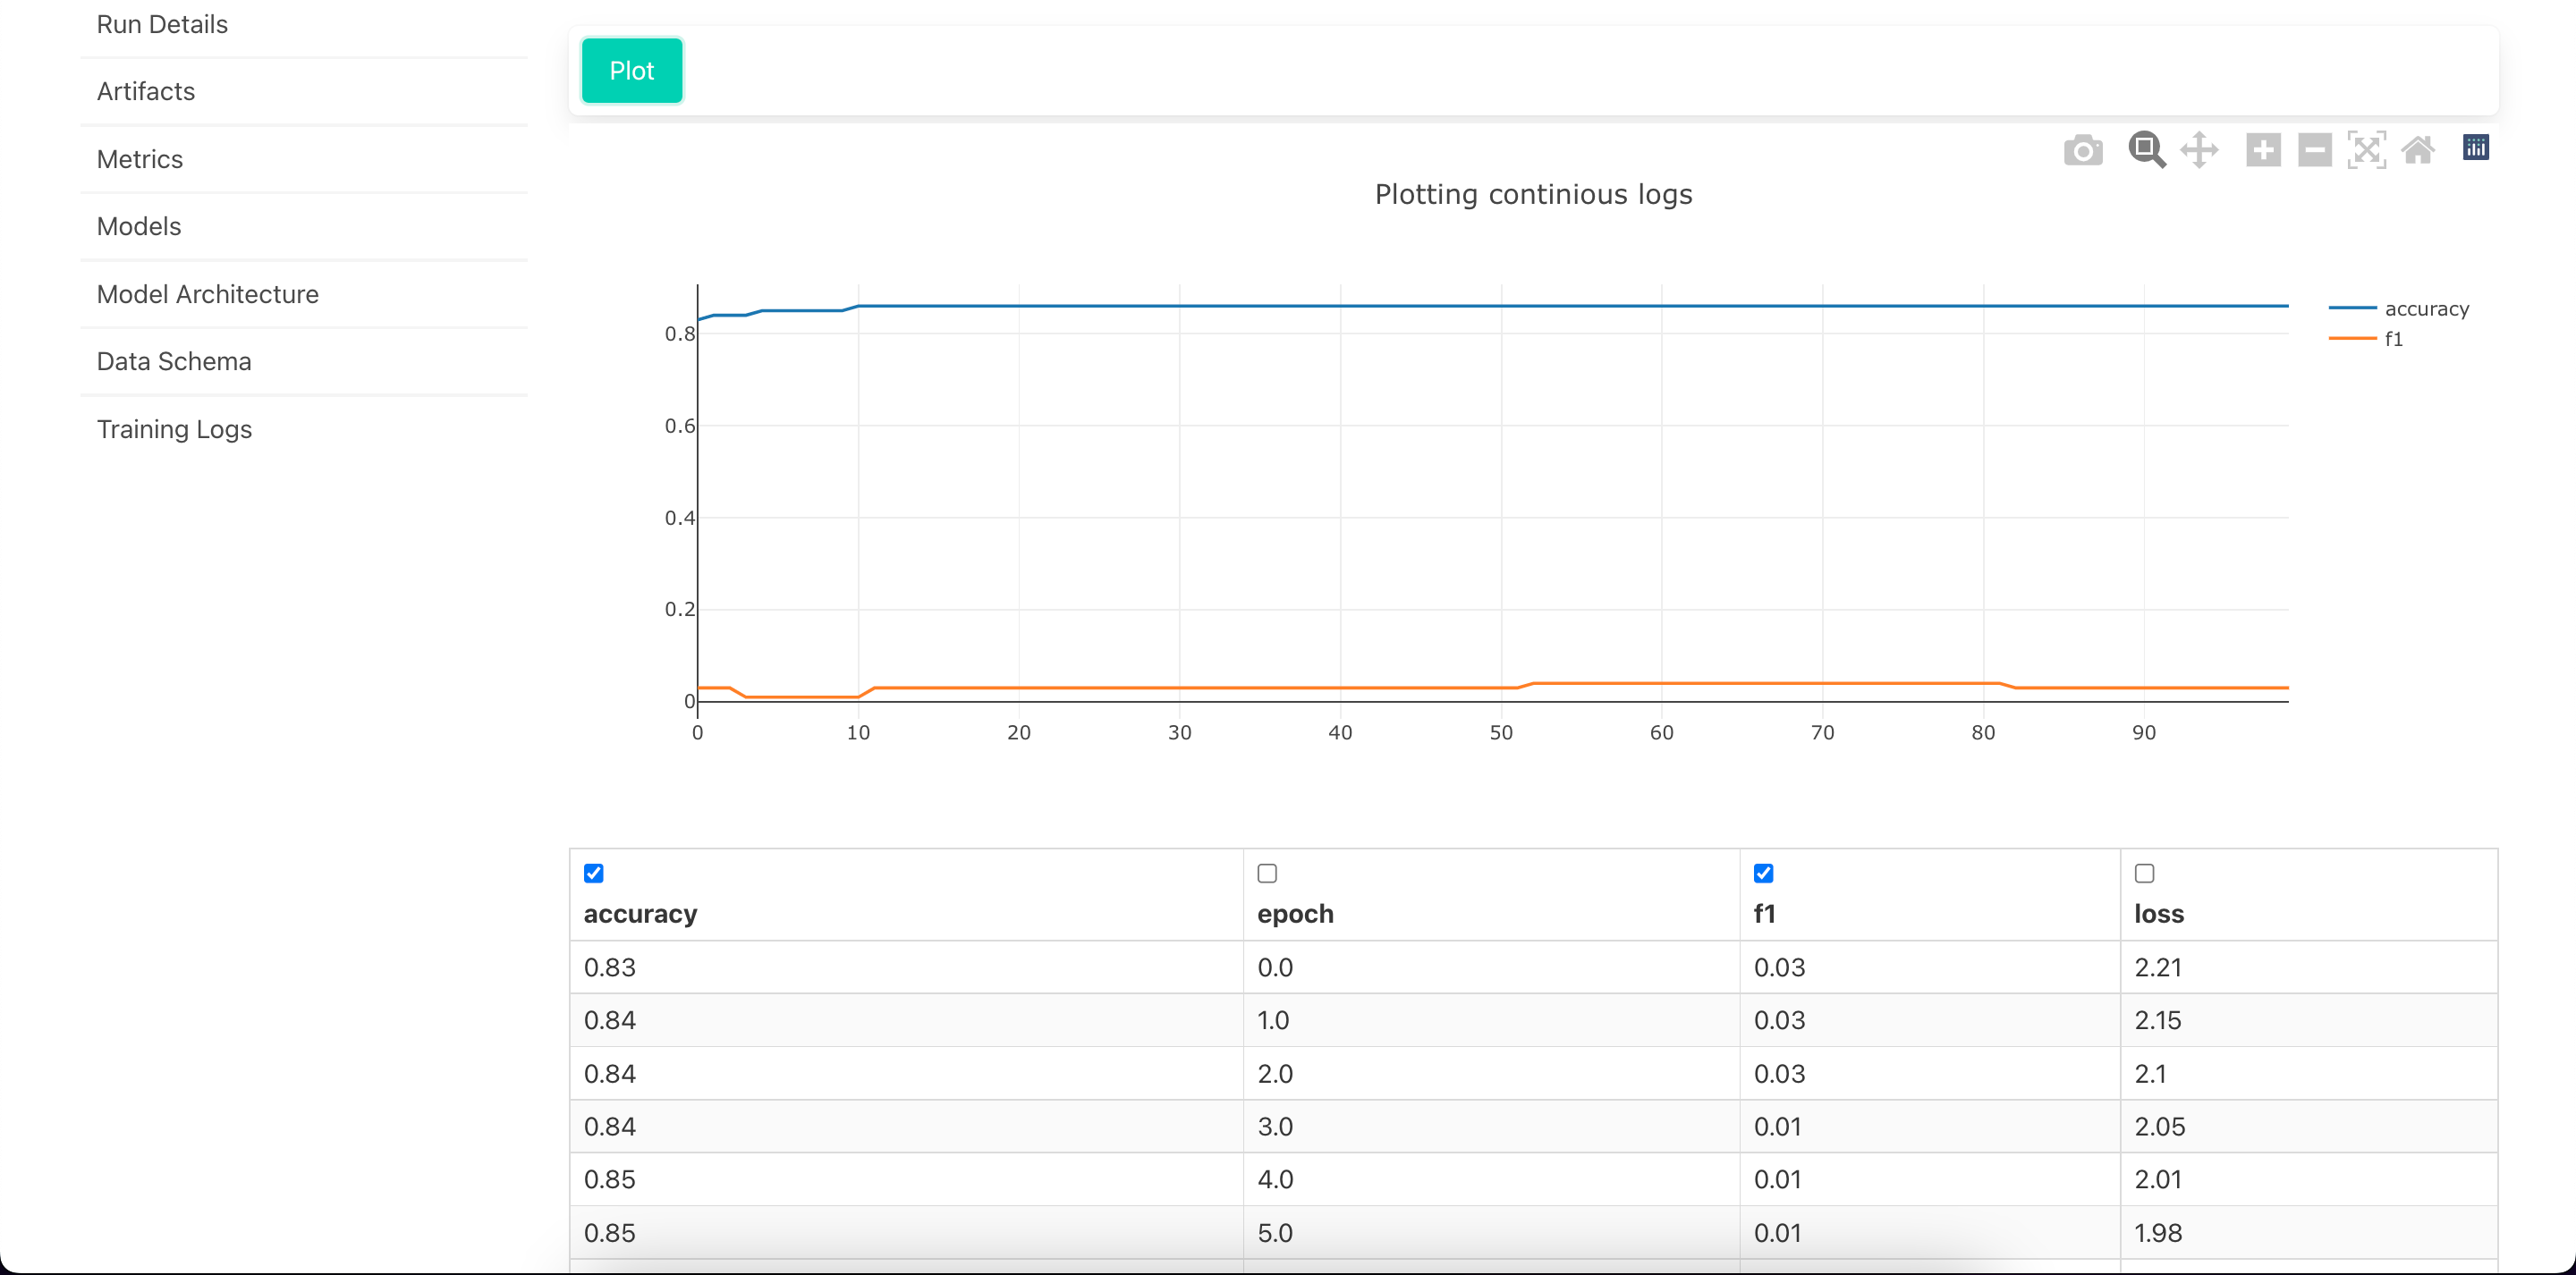
UI for Pytorch Models
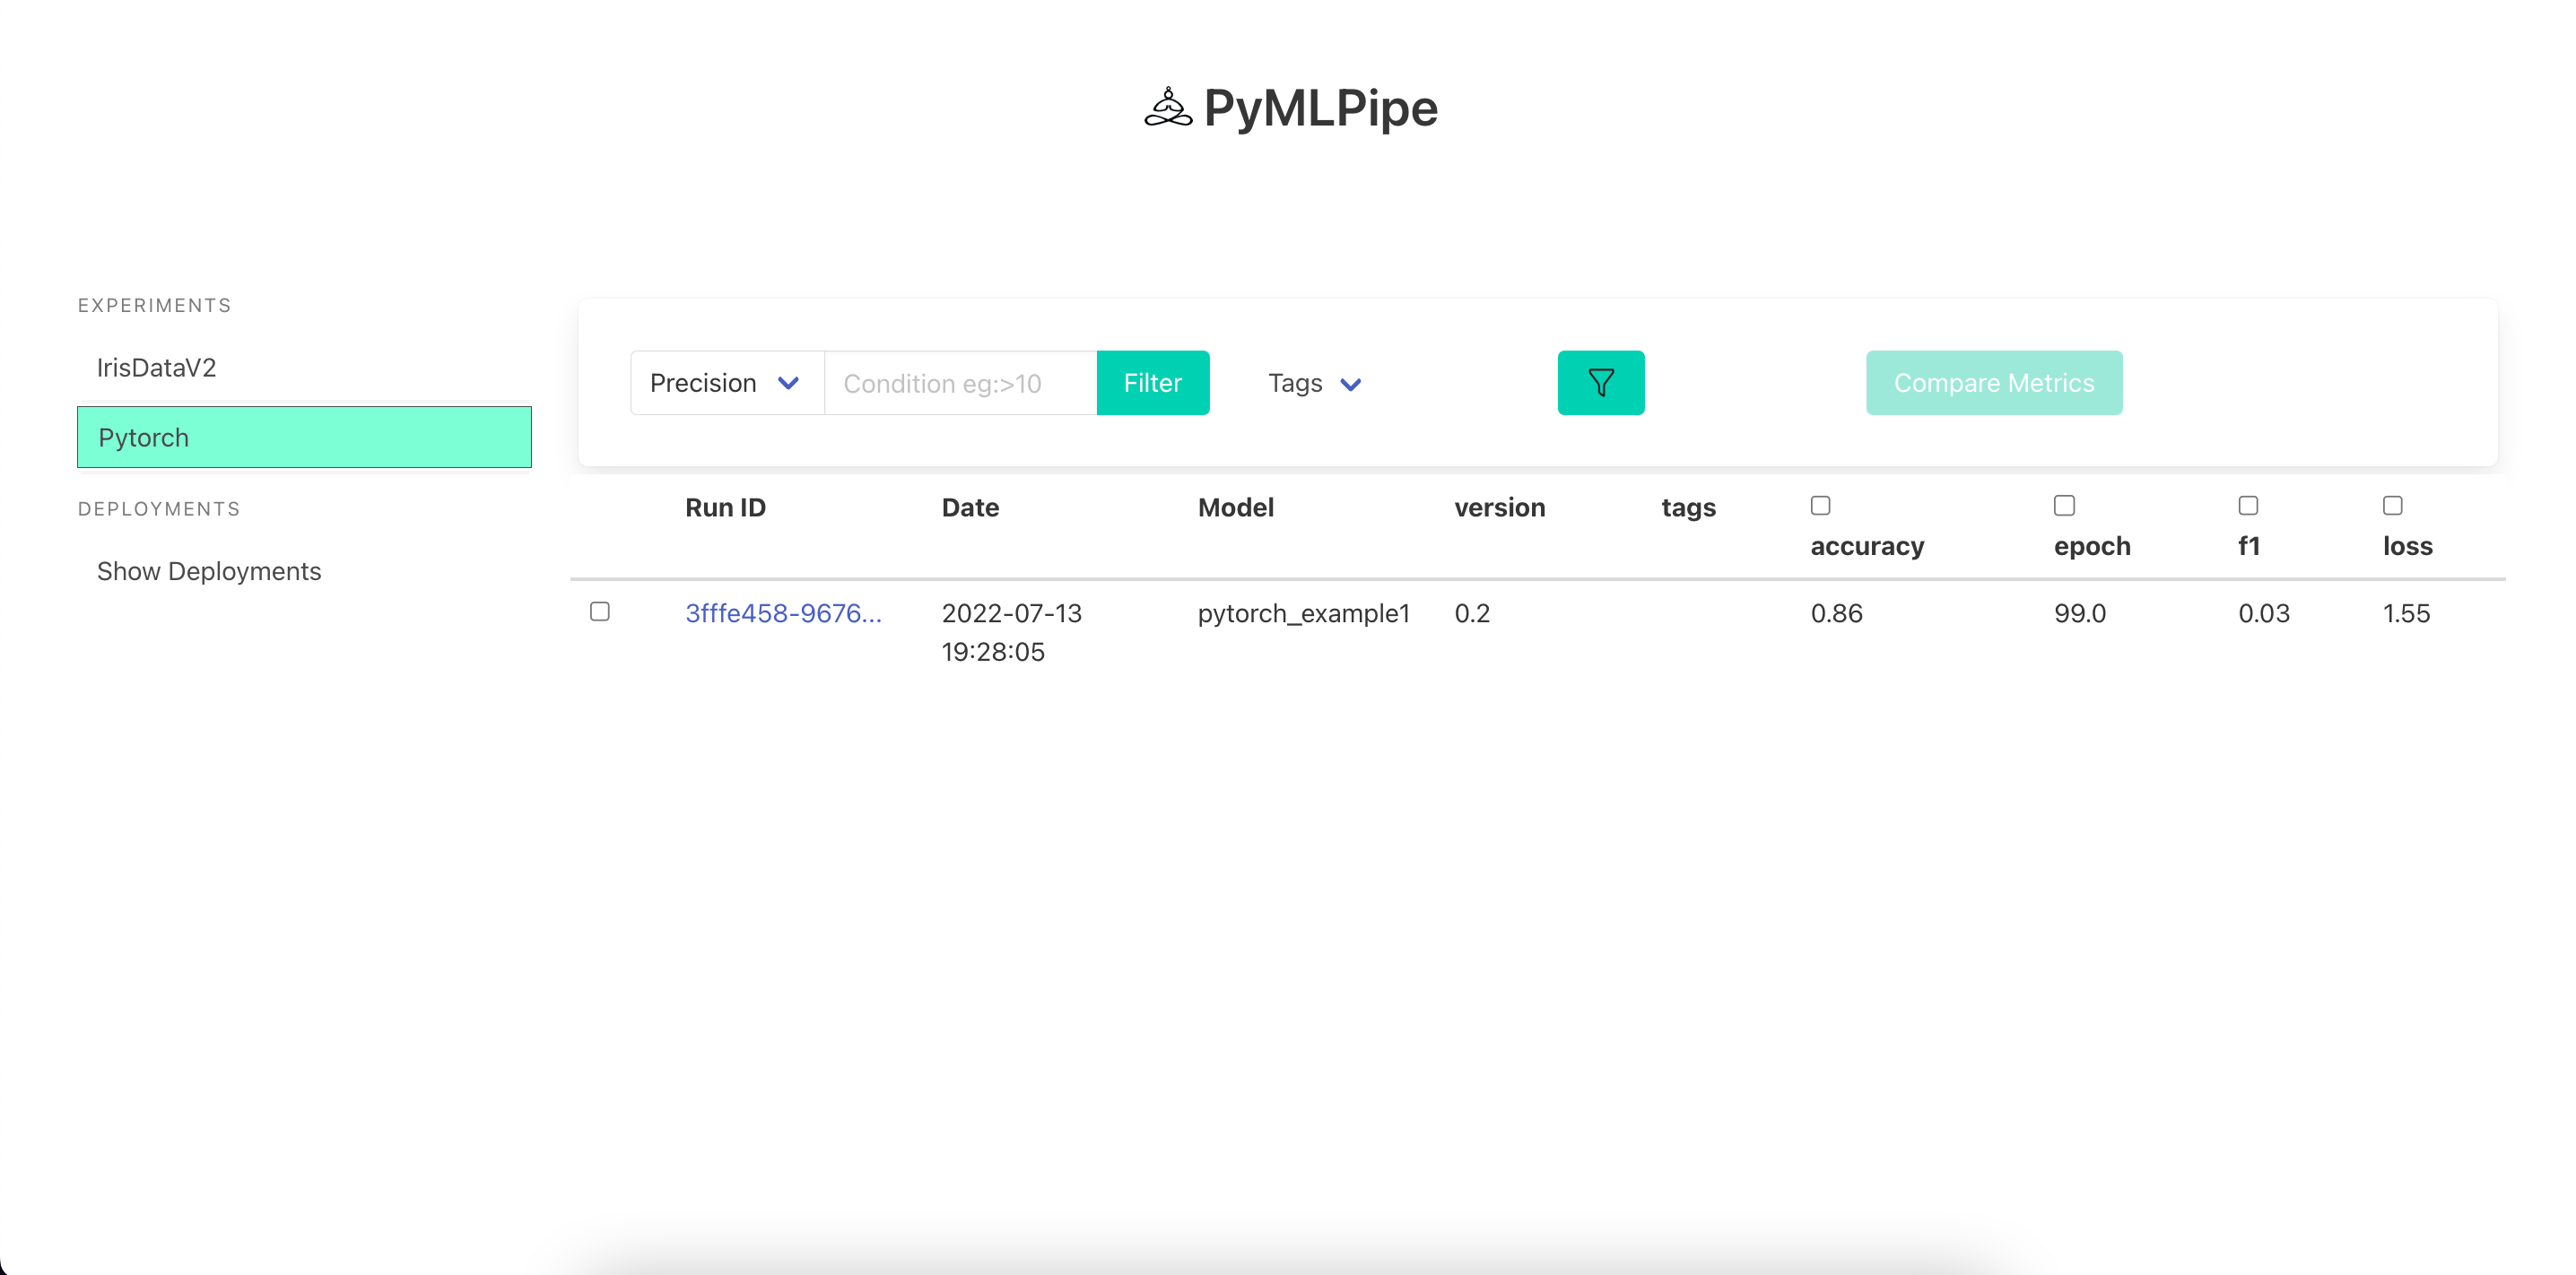
Visualize the Model details
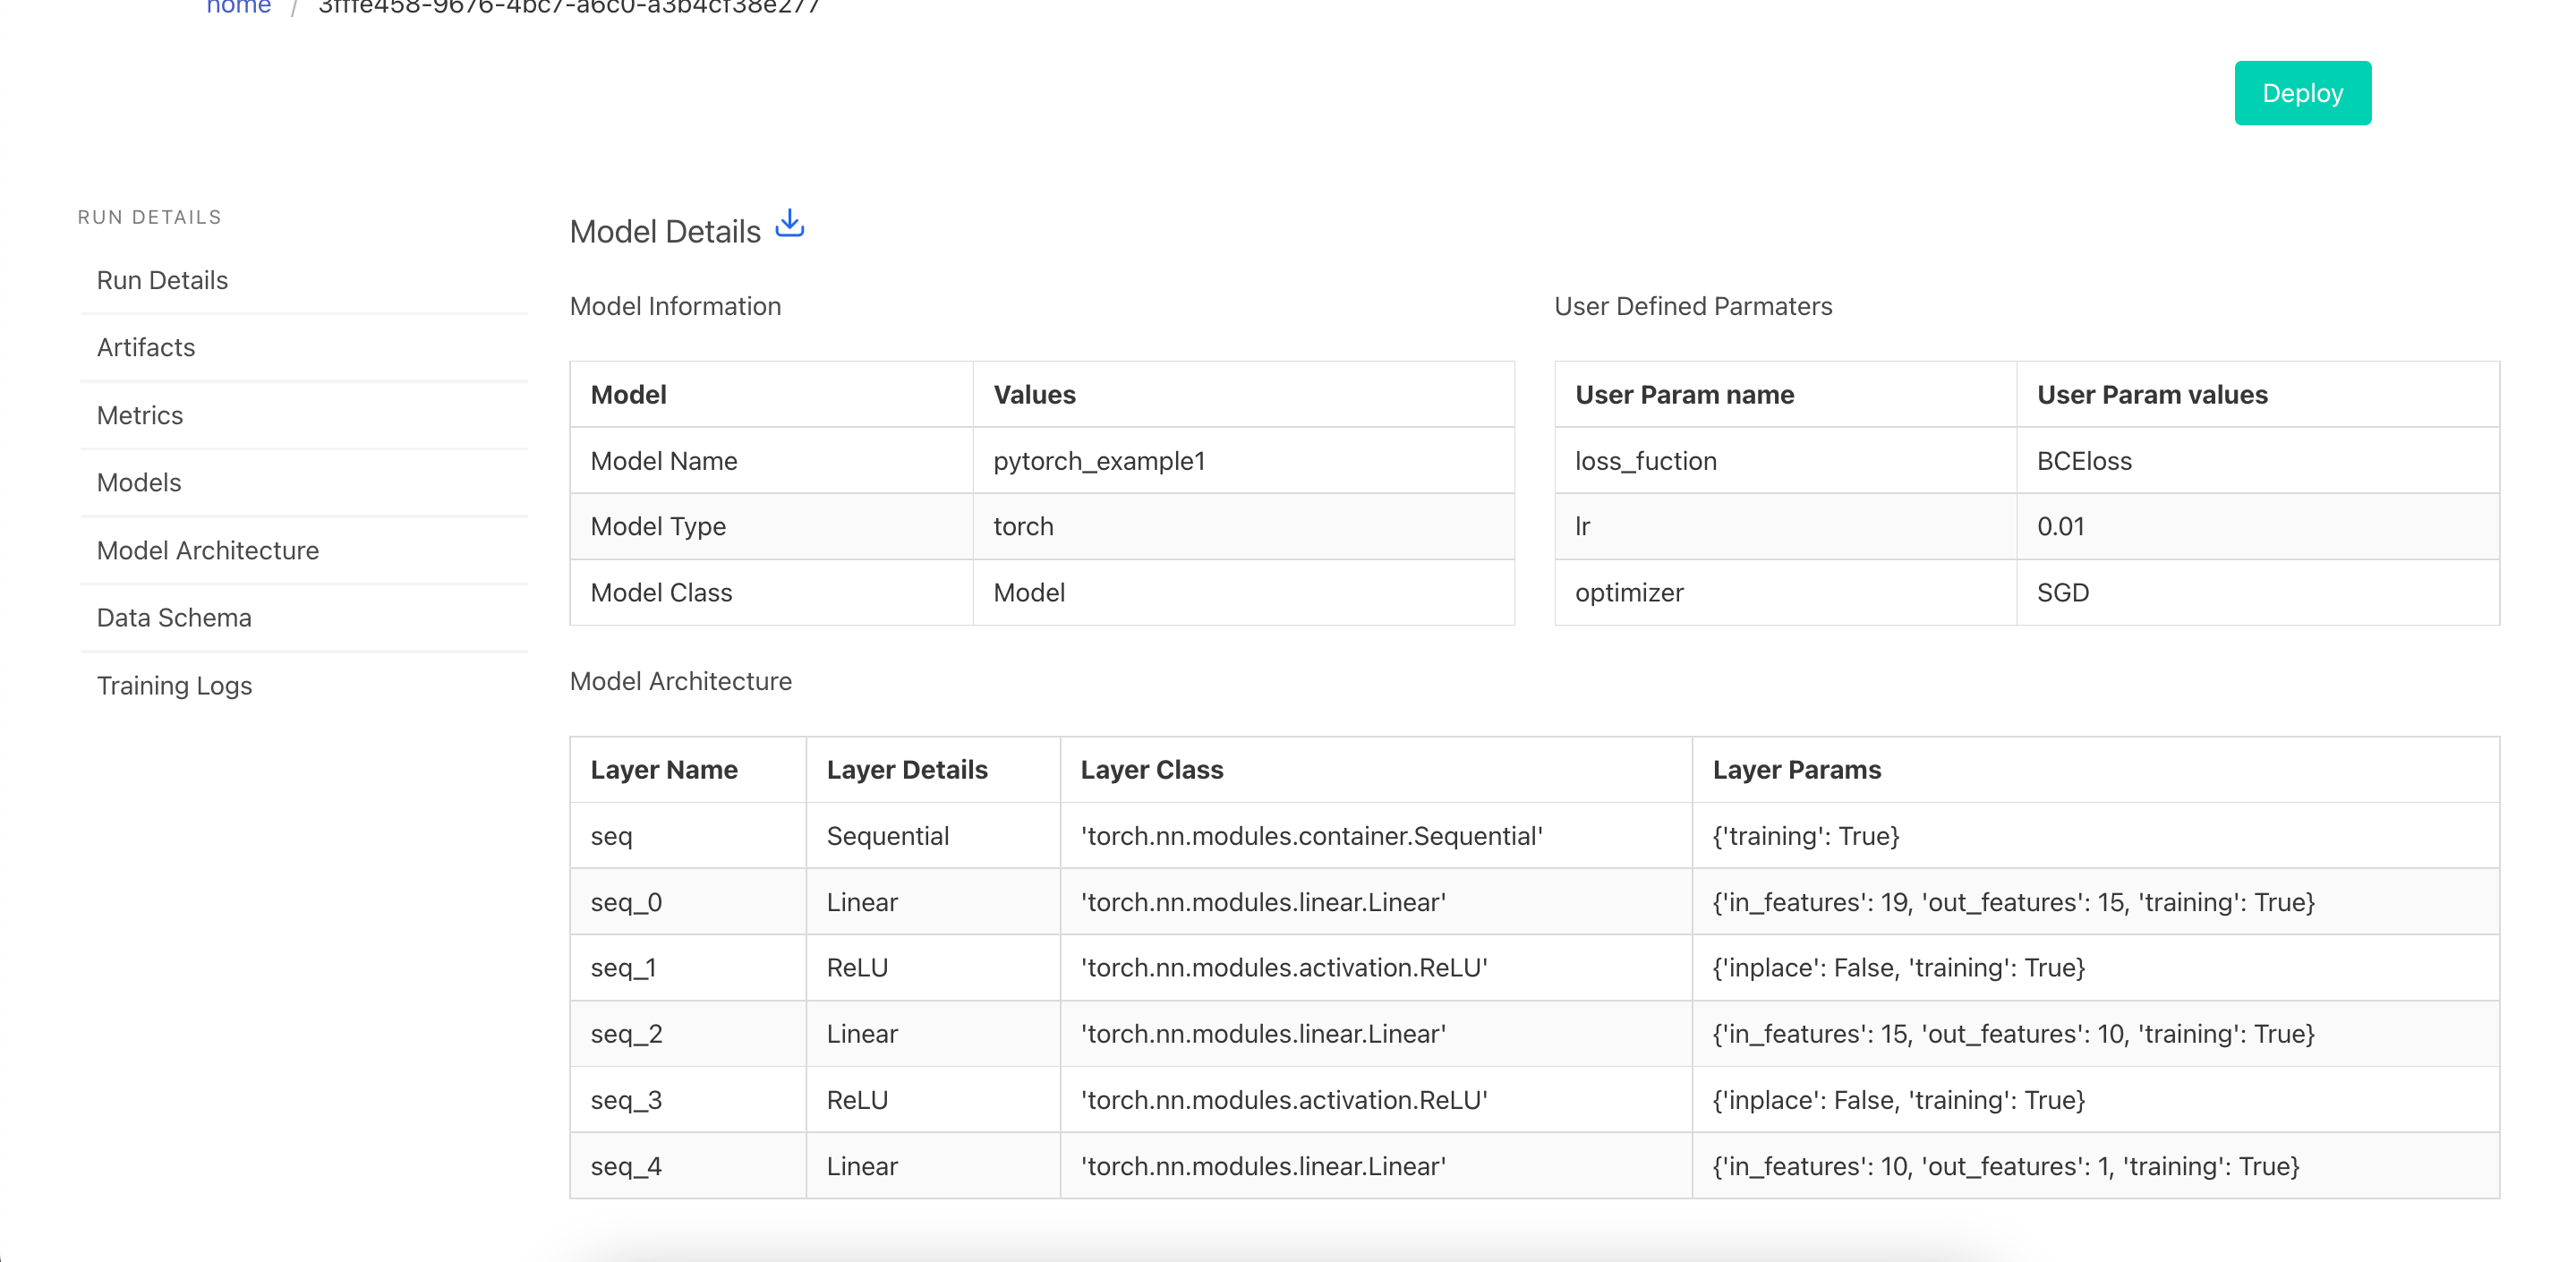
Visualize the Model Architecture
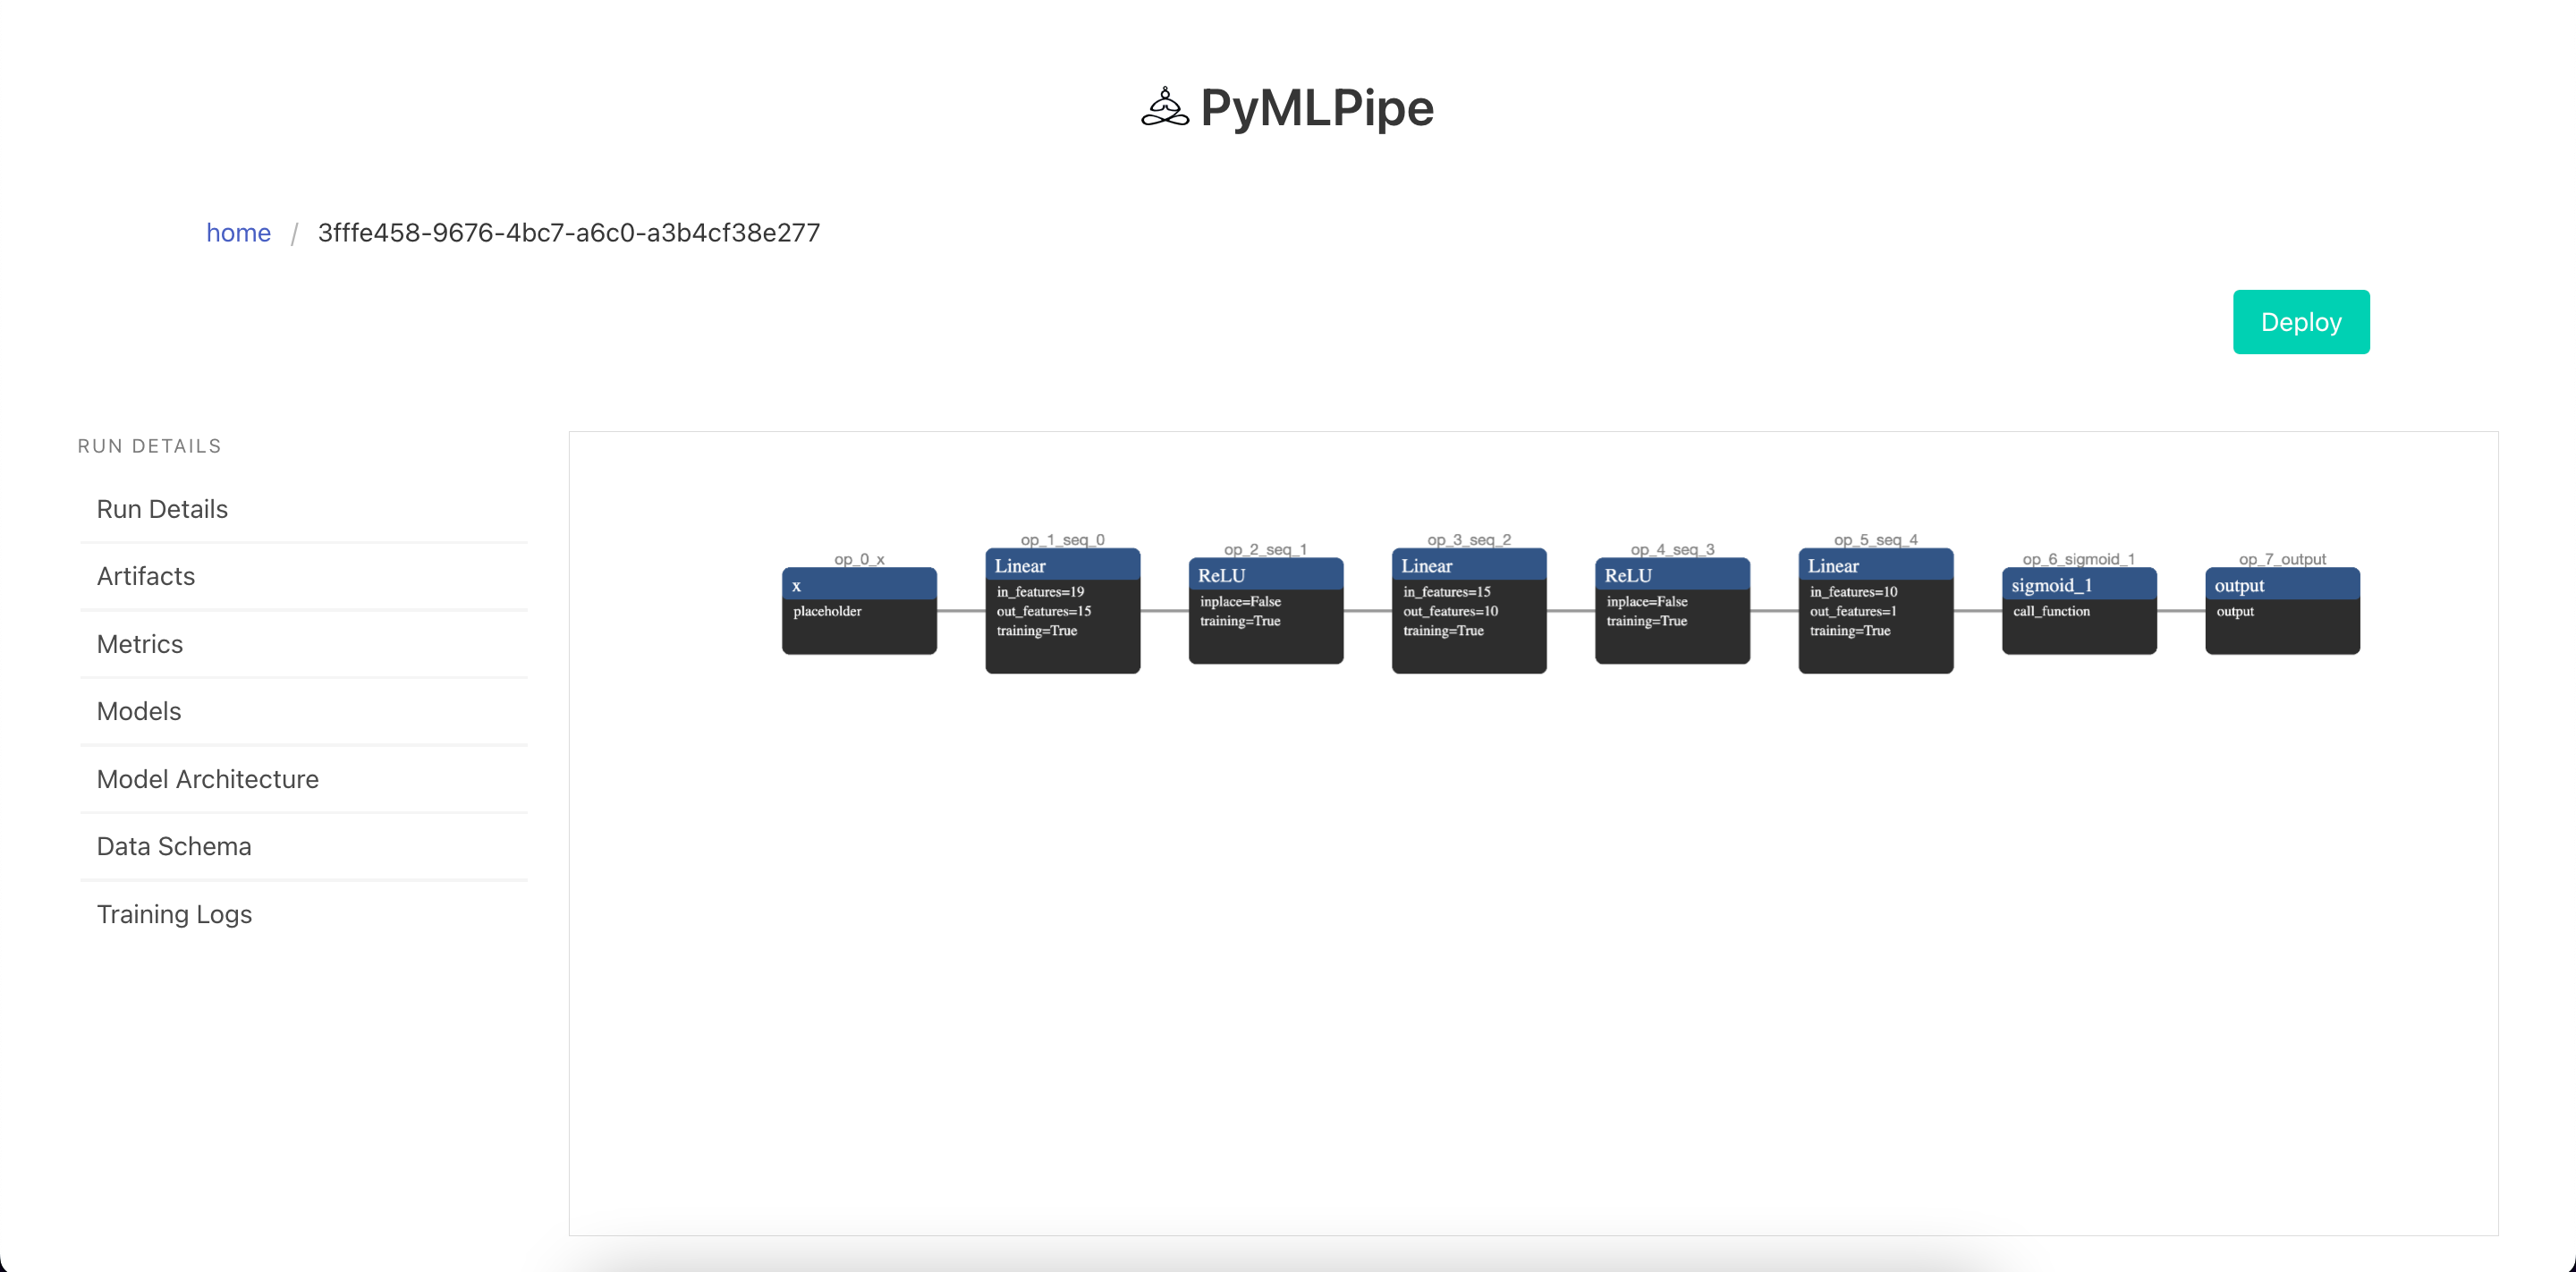
View Training Logs
Visualize Training Logs
Sample input for prediction
GET REQUEST - to get info for the model
- info : Contains model information
- request_body: Sample post Request
{
    "info": {
        "experiment_id": "Pytorch",
        "model_deployment_number": "51c186ddd125386c",
        "model_mode": "non_runtime",
        "model_type": "torch",
        "model_url": "/predict/51c186ddd125386c",
        "run_id": "3fffe458-9676-4bc7-a6c0-a3b4cf38e277",
        "status": "running"
    },
    "request_body": {
        "data": [
            [
                42.0,
                120.0,
                1.0,
                0.0,
                0.0,
                0.0,
                185.7,
                133.0,
                31.57,
                235.1,
                149.0,
                19.98,
                256.4,
                78.0,
                11.54,
                16.9,
                6.0,
                4.56,
                0.0
            ]
        ],
        "dtype": "float"
    }
}
For POST REQUEST
-data--> list: contains data rows for prediction supports both batch prediction and single instance ex: data --> [ [ 0,1,2,3],[3,4,56 ] ]
-dtype--> str: for type conversion converts the data into required data type tensor
 {
        "data": [
            [
                42.0,
                120.0,
                1.0,
                0.0,
                0.0,
                0.0,
                185.7,
                133.0,
                31.57,
                235.1,
                149.0,
                19.98,
                256.4,
                78.0,
                11.54,
                16.9,
                6.0,
                4.56,
                0.0
            ]
        ],
        "dtype": "float"
    }
Contributing
Pull requests are welcome. For major changes, please open an issue first to discuss what you would like to change.
Please make sure to update tests as appropriate.
License
Release history Release notifications | RSS feed


Download files
Download the file for your platform. If you're not sure which to choose, learn more about installing packages.
Source Distribution
Built Distribution
Filter files by name, interpreter, ABI, and platform.
If you're not sure about the file name format, learn more about wheel file names.
Copy a direct link to the current filters
File details
Details for the file pymlpipe-0.2.9.tar.gz.
File metadata
- Download URL: pymlpipe-0.2.9.tar.gz
- Upload date:
- Size: 5.7 MB
- Tags: Source
- Uploaded using Trusted Publishing? No
- Uploaded via: poetry/1.1.13 CPython/3.9.4 Darwin/22.2.0
File hashes
| Algorithm | Hash digest | |
|---|---|---|
| SHA256 |
9b2a048a4963fd4566924cb73cd7598cbc847c8ef8c3d442bbe73a284edf1f09
|
|
| MD5 |
e4872c1f2201543010bb2048b2df46bb
|
|
| BLAKE2b-256 |
28d2c2c103f2ad7221840ec74e03734a51686112e0447da98d6b861aa69dbdfc
|
File details
Details for the file pymlpipe-0.2.9-py3-none-any.whl.
File metadata
- Download URL: pymlpipe-0.2.9-py3-none-any.whl
- Upload date:
- Size: 5.7 MB
- Tags: Python 3
- Uploaded using Trusted Publishing? No
- Uploaded via: poetry/1.1.13 CPython/3.9.4 Darwin/22.2.0
File hashes
| Algorithm | Hash digest | |
|---|---|---|
| SHA256 |
8d733463c3b4055025034b3c642dbcd312abf8002c1c87fe6ec63a22c2c7504c
|
|
| MD5 |
4495b835b96f01e48f40078b65c4778e
|
|
| BLAKE2b-256 |
98792250affef1ab8d0fa87d5c27fda7d688cdab42e1f0e2154c9a905cb56730
|


