
pyofw


Python package for OpenFlowsWater module from Bentley that mainly contains the stub (*.pyi) files and a few py files to get started.
Must Create python.exe.config File [NOT needed for 10.4 or higher]
Bentley's WaterObjects.NET API contains a mixed mode (managed/unmanaged) assemblies as a result, a python configuration file has to placed where the python.exe is location (in your environment). The contents of the file can be copied from below or use from here.
Note: Filename is important. For "python.exe" create "python.exe.config"
<?xml version="1.0"?>
<configuration>
  <startup useLegacyV2RuntimeActivationPolicy="true">
    <supportedRuntime version="v4.0" sku=".NETFramework,Version=v4.0"/>
  </startup>
</configuration>
Installation
Run the following to install:
pip install pyofw
Failed to install? One of the requirements package is pythonnet which might not get installed directly. In such case, follow the steps how to install pythonnet.
Note: The package itself will not add any value without the Bentley's OpenFlows application like WaterGEMS, or WaterCAD. And the package assumes the application is installed at the default location. For WaterGEMS it is C:\Program Files (x86)\Bentley\WaterGEMS\x64.
Usage
# -------------------- VERY FIRST STEP ---------------------
# | Navigate to the folder where you are about to create your *.py files
# | In this folder/workspace, bring up the console/terminal and run:
# | newofw
# | --------------------------------------------------------
# | Above command will add "typings" folder to the workspace
# | then ONLY the IntelliSense will work
# | --------------------------------------------------------


from pyofw.config import OFWConfig

config = OFWConfig() # by default, prepare things for WaterGEMS

model = config.open_model(
         r"C:\Program Files (x86)\Bentley\WaterGEMS\Samples\Example5.wtg")

print(f"Active scenario is: {model.ActiveScenario.Label}")
print(f"And there are '{model.Scenarios.Count}' scenarios in the '{model}' model")

config.end_session() # close the model and end the session
'newofw' command is showing error?
Are you getting errors like below?
- newofw : The term 'newofw' is not recognized as the name of a cmdlet
- 'newofw' is not recognized as an internal or external command
This could be possible depending on how python is installed. To troubleshoot, make sure you are using the right python.exe.
- Find out where the python.exe is. Run
where pythonin the console. This will display the full path of the python.exe. Note Thewhere pythoncommand will not give any results in PowerShell terminal. In PowerShell, the command isGet-Command python.D:\SDK\python\3_10\python.exe
- Modify the path like the below:
D:\SDK\python\3_10\Scripts\newofw.exe
- Check if the above file
newofw.exeexists.- Does NOT exists: reinstall the module again by running
python -m pip install pyofw - Exits: run the exe from the command line. Make sure to be in the right directory.
D:\My\Correct\Folder>
D:\SDK\python\3_10\Scripts\newofw.exe
- Does NOT exists: reinstall the module again by running
IntelliSense not working?
For IntelliSense to work properly, we have to make sure certain settings are configured properly.
VSCode IDE
If VSCode is the IDE of choice,
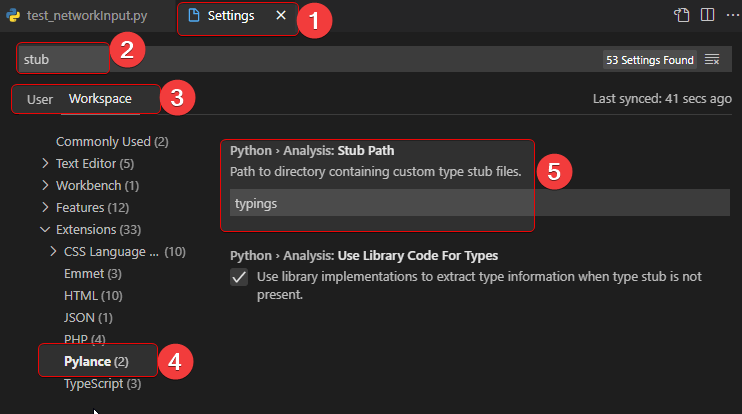
- Press Ctrl + Shift + P and type in
Settings. - Select
Preferences: Open User[/Workspace] Settings, which will open up the Settings. - In the search type,
stub - Either on User or Workspace tab, select
pylance - Under
Python • Analysis: Stub Path, make suretypingsis selected
How to install pythonnet?
pythonnetmay not get installed bypip install pythonnetas a result follow this alternative.
Common Error message
ERROR: Could not build wheels for pythonnet which use PEP 517 and cannot be installed directly
Steps to install pythonnet
-
Download the wheel file from https://www.lfd.uci.edu/~gohlke/pythonlibs/#pythonnet
- For 3.9 version of python, on windows, download
pythonnet-2.5.2-cp39-cp39-win_amd64.whl.
- For 3.9 version of python, on windows, download
-
run
pip install "path\to\the\downloaded\pythonnet.whl" -
Test if pythonnet got installed. If
import clrdoesn't return any error thenpythonnetis ready to usec:\>python Python 3.9.2 (tags/v3.9.2:1a79785, Feb 19 2021, 13:44:55) [MSC v.1928 64 bit (AMD64)] on win32 Type "help", "copyright", "credits" or "license" for more information. >>> import clr >>>
ERROR at Run Time?
clr ERROR
AttributeError: module 'clr' has no attribute 'AddReference'error that most likely due the installed package calledclr. Simply uninstall this package and the error should go away.pip uninstall clr
No module named 'OpenFlows'
ModuleNotFoundError: No module named 'OpenFlows'Make sure the OpenFlows*.dll files are in the x64 directory of the Water products You could also pass in the custom locationofw_config = OpenFlowsWaterConfig(dlls_dir="C:\Path\To\WaterGEMS\x64")
More Examples
py Files
-
Very minimal with no comments: Example_Minimal
-
[Recommended] Good example to get started: Example_with_comments
-
Example with minimal uses of
pyofwmodule: Similar to .NET
Jupyter Notebook (DataFrames for Elements)
For more details, navigate to Network Input Notebook
from pyofw.network_input import NetworkInput
ni: NetworkInput = NetworkInput(model)

# Links
ni.pipe_df.head(2)
ni.lateral_df.head(2)

# Nodes
ni.junction_df.head(2)
ni.hydrant_df.head(2)
ni.tank_df.head(2)
ni.reservoir_df.head(2)
ni.tap_df.head(2)
ni.pump_df.head(2)
ni.customer_meter_df.head(2)
ni.scada_elem_df.head(2)
ni.pump_stn_df.head(2)
ni.vspb_df.head(2)

ni.prv_df.head(2)
ni.psv_df.head(2)
ni.pbv_df.head(2)
ni.fcv_df.head(2)
ni.tcv_df.head(2)
ni.pbv_df.head(2)
ni.iso_valve_df.head(2)

ni.hydro_tank_df.head(2)
ni.check_valve_df.head(2)
Jupyter Notebook Showing Results
Please navigate to: Getting_Started.
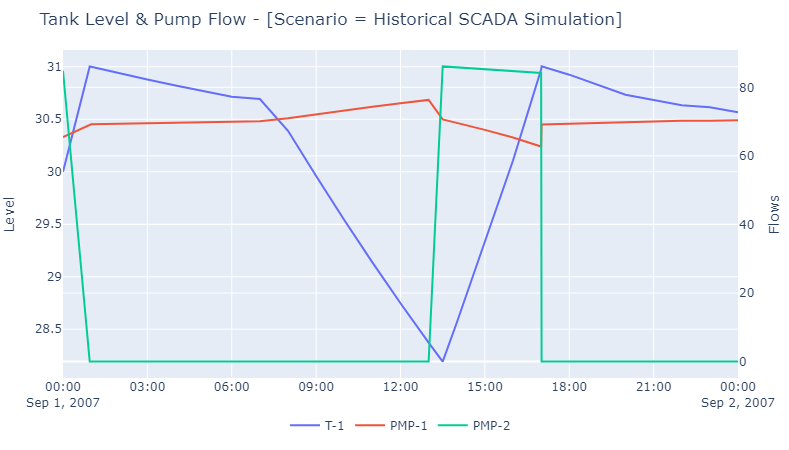
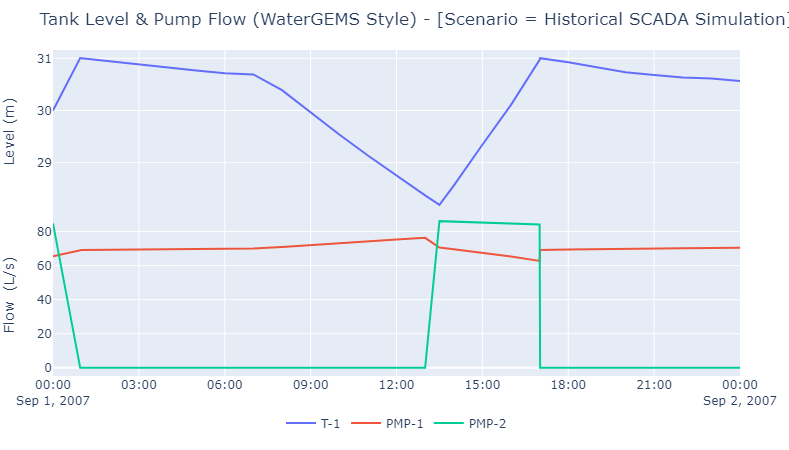
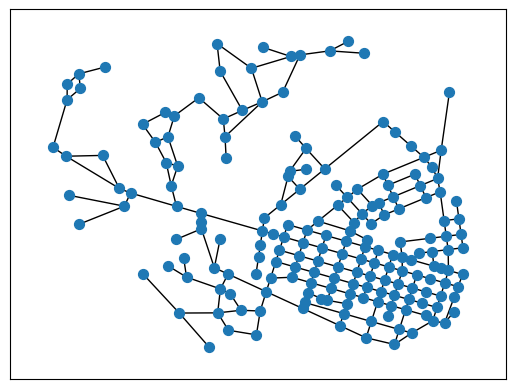
This notebook also shows some charts using plotly library. A few of Images..
Tank Level and Pump Flows (using secondary axis)
Tank Level and Pump Flows (just like in WaterGEMS)
Network display (using networkx module)
1 maintainer

Metadata
1 maintainer
Release files for pyofw 10.4
For a detailed explanation of source distributions (sdists) and built distributions (wheels), please see the package formats documentation.
Built distribution (wheel)
| File | Interpreter | ABI | Platform | Actions Reset |
|---|---|---|---|---|
| pyofw-10.4-py3-none-any.whl | Python 3 | none | any | Details for pyofw-10.4-py3-none-any.whl |
Release files / pyofw-10.4-py3-none-any.whl
| Download URL | pyofw-10.4-py3-none-any.whl |
|---|---|
| Size | 771.7 kB |
| Tags | Python 3 |
|
SHA-256 checksum How to use checksums |
ec88b8d12f0ee9df53e9f5eb1464a2532b5797223b314f2e0830fcf0b6848e2c
|
|
BLAKE2b-256 checksum How to use checksums |
2bc4bb7d3a3d312fc14e6b612f28aec03722b4020e0b295eeed14219c217404c
|
| Upload date | |
|
Uploaded using Trusted Publishing? What is trusted publishing? |
No |
| Uploaded via |
twine/4.0.2 CPython/3.11.4
|
Security for pyofw 10.4
Provenance
Provenance describes where a file came from. On PyPI, provenance is shared via attestations, which provide a verifiable record of the build or publishing details. View details, limitations and caveats.
No provenance found
None of the files in this release were uploaded with provenance metadata.
A note on package security
PyPI is a repository for distributing packages, not a service for auditing them. While third-party security researchers and our staff do their best to detect and remove malicious packages, PyPI cannot guarantee the quality, security or suitability of any given package.
To learn more about protecting yourself from malicious actors, visit our package security documentation.














