Collect data from Hichi Smartmeter and expose it via MQTT

Project description
pysmartmeter


Collect data from Hichi Smartmeter aka volkszaehler.org (USB Version) and expose it via MQTT.
Discussion: https://www.photovoltaikforum.com/thread/188160-pysmartmeter (de)
In the end it can looks like the following Home Assistant dashboard screenshot, using MQTT integration:
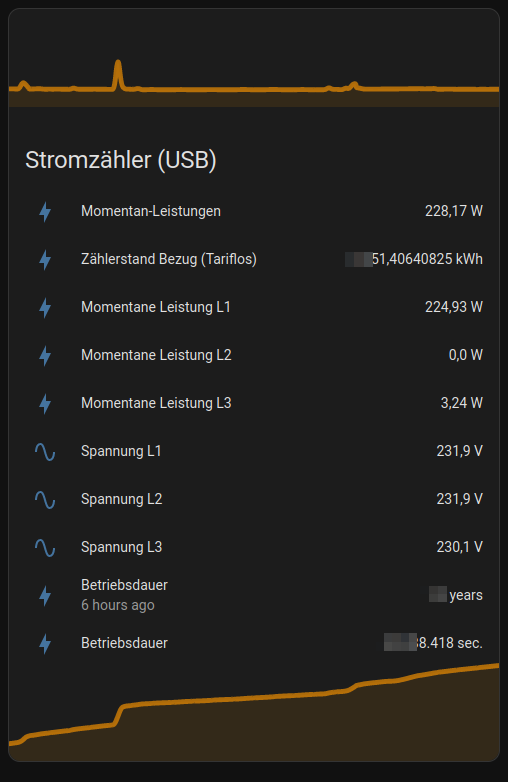
With my "eBZ DD3" energy meter by eBZ GmbH the values update live every second ;)
Currently only energy meters that send OBIS text protocol are supported! (Test this with ./cli.py dump)
TODO: #37 - Add support for SML (Smart Message Language) binary protocol
quickstart
prepare
Install minimum requirements, e.g.:
~$ sudo apt install python3-venv
Note: If you using a Raspberry Pi: Check that https://www.piwheels.org/ are in use.
For this, just look into etc/pip.conf it should be looked like this:
~/pysmartmeter$ cat /etc/pip.conf
[global]
extra-index-url=https://www.piwheels.org/simple
clone and start
Clone sources and install project:
~$ git clone https://github.com/jedie/pysmartmeter.git
~$ cd pysmartmeter
~/pysmartmeter$ ./cli.py --help
The output of ./cli.py --help looks like:
usage: ./cli.py [-h]
                {debug-settings,dump,edit-settings,print-definitions,print-detect-serial,publish-loop,systemd-debug,sy
stemd-logs,systemd-remove,systemd-setup,systemd-status,systemd-stop,version}


╭─ options ──────────────────────────────────────────────────────────────────────────────────────────────────────────╮
│ -h, --help        show this help message and exit                                                                  │
╰────────────────────────────────────────────────────────────────────────────────────────────────────────────────────╯
╭─ subcommands ──────────────────────────────────────────────────────────────────────────────────────────────────────╮
│ {debug-settings,dump,edit-settings,print-definitions,print-detect-serial,publish-loop,systemd-debug,systemd-logs,s │
│ ystemd-remove,systemd-setup,systemd-status,systemd-stop,version}                                                   │
│     debug-settings                                                                                                 │
│                   Display (anonymized) MQTT server username and password                                           │
│     dump          Dump the output of the first working serial port.                                                │
│     edit-settings                                                                                                  │
│                   Edit the settings file. On first call: Create the default one.                                   │
│     print-definitions                                                                                              │
│                   Print the used definitions                                                                       │
│     print-detect-serial                                                                                            │
│                   Tries to find a working serial port and display RAW data from it.                                │
│     publish-loop  Publish all values via MQTT to Home Assistant in a endless loop.                                 │
│     systemd-debug                                                                                                  │
│                   Print Systemd service template + context + rendered file content.                                │
│     systemd-logs  Show systemd service logs. (May need sudo)                                                       │
│     systemd-remove                                                                                                 │
│                   Stops the systemd service and removed the service file. (May need sudo)                          │
│     systemd-setup                                                                                                  │
│                   Write Systemd service file, enable it and (re-)start the service. (May need sudo)                │
│     systemd-status                                                                                                 │
│                   Display status of systemd service. (May need sudo)                                               │
│     systemd-stop  Stops the systemd service. (May need sudo)                                                       │
│     version       Print version and exit                                                                           │
╰────────────────────────────────────────────────────────────────────────────────────────────────────────────────────╯
Test if you Hichi Smartmeter with CP2102 USB to UART Bridge Controller will be found, e.g.:
~/pysmartmeter$ ./cli.py detect-serial
Note: It's a good idea to use the /dev/serial/by-id/{your-device-id} path as serial port, instead of /dev/ttyUSB1
Call udevadm info -n /dev/ttyUSB* to get information about all USB serial devices and ls -l /dev/serial/by-id/ to see the existing links.
Maybe you didn't have permissions to access the port, e.g.:
~/pysmartmeter$ ./cli.py dump
...
try: /dev/ttyUSB0 CP2102 USB to UART Bridge Controller - CP2102 USB to UART Bridge Controller USB VID:PID=10C4:EA60
/dev/ttyUSB0 file mode: 0o20660
/dev/ttyUSB0 user ID: 0
/dev/ttyUSB0 user group ID: 20
/dev/ttyUSB0 user group: 'dialout'
ERROR: [Errno 13] could not open port /dev/ttyUSB0: [Errno 13] Permission denied: '/dev/ttyUSB0'
...
Fix fiy by add the user to the group, e.g.:
sudo usermod -a -G dialout $USER
publish smartmeter data via MQTT
You have to store your MQTT settings (host, port, username, password) one time, e.g.:
~/pysmartmeter$ ./cli.py store-settings
This will create a JSON file here: ~/.pysmartmeter
You can test reading this settings file with:
~/pysmartmeter$ ./cli.py debug-settings
Test your MQTT settings with:
~/pysmartmeter$ ./cli.py test-mqtt-connection
Setup systemd service:
~/pysmartmeter$ sudo ./cli.py setup-systemd-service
This will create a systemd service that automaticly starts on every boot.
Note: Before you start the systemd service, check if everything works correctly with ./cli.py dump and ./cli.py publish-loop
Otherwise you may start a services that will just deal wie gabage (e.g.: your energy meters speaks no OBIS text protocol) and restarts on and on again ;)
Check if service is running:
~/pysmartmeter$ sudo ./cli.py systemd-status
If everything is fine: Go to your Home Assistant and check the MQTT integration The device discovery will be made automaticly.
Troubleshooting
If you have any trouble, try to recreate the Python Virtual Environment first. For this, just delete it and start the CLI to recreate it, e.g.:
~/pysmartmeter$ rm -Rf .venv-app/
~/pysmartmeter$ ./cli.py
Start hacking
~$ git clone https://github.com/jedie/pysmartmeter.git
~$ cd pysmartmeter
~/pysmartmeter$ ./dev-cli.py --help
usage: ./dev-cli.py [-h]
                    {coverage,create-default-settings,install,lint,mypy,nox,pip-audit,publish,test,update,update-readm
e-history,update-test-snapshot-files,version}


╭─ options ──────────────────────────────────────────────────────────────────────────────────────────────────────────╮
│ -h, --help        show this help message and exit                                                                  │
╰────────────────────────────────────────────────────────────────────────────────────────────────────────────────────╯
╭─ subcommands ──────────────────────────────────────────────────────────────────────────────────────────────────────╮
│ {coverage,create-default-settings,install,lint,mypy,nox,pip-audit,publish,test,update,update-readme-history,update │
│ -test-snapshot-files,version}                                                                                      │
│     coverage      Run tests and show coverage report.                                                              │
│     create-default-settings                                                                                        │
│                   Create a default user settings file. (Used by CI pipeline ;)                                     │
│     install       Install requirements and 'pysmartmeter' via pip as editable.                                     │
│     lint          Check/fix code style by run: "ruff check --fix"                                                  │
│     mypy          Run Mypy (configured in pyproject.toml)                                                          │
│     nox           Run nox                                                                                          │
│     pip-audit     Run pip-audit check against current requirements files                                           │
│     publish       Build and upload this project to PyPi                                                            │
│     test          Run unittests                                                                                    │
│     update        Update dependencies (uv.lock) and git pre-commit hooks                                           │
│     update-readme-history                                                                                          │
│                   Update project history base on git commits/tags in README.md Will be exited with 1 if the        │
│                   README.md was updated otherwise with 0.                                                          │
│                                                                                                                    │
│                   Also, callable via e.g.:                                                                         │
│                       python -m cli_base update-readme-history -v                                                  │
│     update-test-snapshot-files                                                                                     │
│                   Update all test snapshot files (by remove and recreate all snapshot files)                       │
│     version       Print version and exit                                                                           │
╰────────────────────────────────────────────────────────────────────────────────────────────────────────────────────╯
various links
- Discussion: https://www.photovoltaikforum.com/thread/188160-pysmartmeter (de)
- https://github.com/pyserial/pyserial
- https://github.com/eclipse/paho.mqtt.python
- https://github.com/eclipse/mosquitto
- https://dewiki.de/Lexikon/OBIS-Kennzahlen (de) | https://www.promotic.eu/en/pmdoc/Subsystems/Comm/PmDrivers/IEC62056_OBIS.htm (en)
- https://www.photovoltaikforum.com/thread/145886-habe-lesk%C3%B6pfe-mit-usb-%C3%BCber/ (de)
- https://www.heise.de/tests/Ausprobiert-Guenstiger-IR-Lesekopf-fuer-Smart-Meter-mit-Tastmota-Firmware-7065559.html (de)
- https://www.home-assistant.io
Backwards-incompatible changes
v0.4.x -> v0.5.x
We split the CLI files into:
./cli.py- Commands for end users./dev-cli.py- Commands for developers
v0.2.x -> v0.3.x
Packages changes:
- We switched from
poetrytopip-tools Makefilewas removed- "Renamed"
cli.shtocli.py
The Makefile is no longer needed, because "Bootstrapping" will be made, just by call cli.py
To migrate, just remove the existing .venv and create a fresh one, e.g.:
~$ cd pysmartmeter
~/pysmartmeter$ git pull origin main
~/pysmartmeter$ rm -Rf .venv
~/pysmartmeter$ ./cli.py --help
History
- v0.7.0
- 2025-10-08 - Update to ha-services>=2.15.0
- 2025-10-08 - Use serial port from user settings
- 2025-09-30 - Refactoring using new ha-services version
- 2025-04-25 - Modernize Project
- 2024-01-17 - +typeguard
- 2024-01-17 - +"flake8-bugbear"
- 2024-01-01 - Update README.md
- 2023-12-29 - +# Troubleshooting
- 2023-12-29 - Add a note about https://www.piwheels.org/
- v0.5.0
- 2023-12-29 - cleanup pyproject.toml and cli scripts
- 2023-12-29 - Move BaseTestCase
- 2023-12-29 - Apply manageprojects updates
- 2023-06-05 - Update README.md
- 2023-05-27 - Split CLI into: cli.py and dev-cli.py
- v0.4.1
- 2023-03-09 - Ignore empty input lines and add expand OBIS map
- v0.4.0
- 2023-03-08 - mock version
- 2023-03-08 - update requirements
- 2023-03-08 - Bump version to 0.4.0
- 2023-03-07 - Fix#32 add "test-mqtt-connection" CLI command
Expand older history entries ...
- v0.3.4
- 2023-02-26 - Update README.md
- 2023-02-26 - Set HA device class "voltage" for voltage entries
- 2023-02-26 - Add test with HomeAssistantMqtt + ObisParser
- 2023-02-26 - Add a test snapshot with the full RAW_TEST_DATA_BIG
- v0.3.3
- 2023-02-26 - Enhance "detect-serial"
- 2023-02-26 - Update README.md
- v0.3.2
- 2023-02-26 - Bugfix "publish-loop" CLI command and add tests for it
- 2023-02-26 - Display systemd config file, after create / before status
- v0.3.1
- 2023-02-26 - Use publish_package() from manageprojects
- v0.3.0
- 2023-02-26 - README: How to migrate from v0.2 to v0.3
- 2023-02-26 - Display systemd status after commands
- 2023-02-26 - unify systemd command error handling
- 2023-02-26 - Update README
- 2023-02-26 - Add "systemd-restart" to CLI
- 2023-02-26 - sudo info for systemd command
- 2023-02-24 - migrate form poetry to piptools via manageprojects
- 2023-02-26 - update tests
- 2023-02-25 - Update obis_map.py
- 2023-02-24 - Update README.md
- 2023-02-24 - +manageprojects
- 2023-02-24 - manageprojects updates
- 2023-02-24 - fix CI
- 2023-02-24 - Update requirements
- 2023-02-24 - Test credentials utilities
- 2023-02-24 - Bugfix Error store-settings #17
- v0.2.0
- 2022-12-18 - Fix #13: "last_reset" is missing (for Home Assistant)
- 2022-12-20 - Snapshot a complete configs/data MQTT payload for Home Assistant
- v0.1.0
- 2022-12-10 - Update README.md
- 2022-11-24 - Fix #11 by disable logging in systemd daemon mode
- 2022-11-23 - fix typo: '1-0:76.7.0*255' is 'Momentane Leistung L3' ;)
- 2022-11-21 - Update README
- 2022-11-21 - Fix typo "Hitchi" -> "Hichi"
- 2022-11-18 - Hit about permission errors
- 2022-11-18 - fix publish to PyPi
- 2022-11-18 - CLI: Build and upload this project to PyPi
- 2022-11-18 - fix tests
- 2022-11-18 - Implement MQTT publishing via systemd service
- 2022-11-14 - test code style + mypy
- 2022-11-14 - fix code style
- 2022-11-14 - setup CI
- 2022-11-14 - Bugfix 'identifier'
- 2022-11-14 - Don't use poetry in cli.sh
- 2022-11-14 - Add a way to setup the project without poetry
- 2022-11-13 - Add cli.sh
- 2022-11-13 - switch to poetry
- 2022-11-13 - cleanup
- 2022-11-13 - Add OBIS Parser
- 2022-11-10 - make serial-dump
- 2022-11-10 - switch to https://github.com/jedie/cookiecutter_templates/tree/main/pipenv-python
- 2022-11-10 - Add a simple dump serial output script
- 2022-11-10 - update project
- 2022-11-10 - init project
- 2022-11-10 - Initial commit
Release history Release notifications | RSS feed


Download files
Download the file for your platform. If you're not sure which to choose, learn more about installing packages.
Source Distribution
Built Distribution
Filter files by name, interpreter, ABI, and platform.
If you're not sure about the file name format, learn more about wheel file names.
Copy a direct link to the current filters
File details
Details for the file pysmartmeter-0.7.0.tar.gz.
File metadata
- Download URL: pysmartmeter-0.7.0.tar.gz
- Upload date:
- Size: 110.0 kB
- Tags: Source
- Uploaded using Trusted Publishing? No
- Uploaded via: twine/6.2.0 CPython/3.12.3
File hashes
| Algorithm | Hash digest | |
|---|---|---|
| SHA256 |
e359f9f2f4b972841a47476b3ade8c545f39336a0732ca380d1f94fa3f12f953
|
|
| MD5 |
0da0584370ced318425ea0fb0cf0e4d9
|
|
| BLAKE2b-256 |
0f832abbb3dc15493aaa309c6d9c268d78946e67f513e659413c8fabaa1830af
|
File details
Details for the file pysmartmeter-0.7.0-py3-none-any.whl.
File metadata
- Download URL: pysmartmeter-0.7.0-py3-none-any.whl
- Upload date:
- Size: 49.5 kB
- Tags: Python 3
- Uploaded using Trusted Publishing? No
- Uploaded via: twine/6.2.0 CPython/3.12.3
File hashes
| Algorithm | Hash digest | |
|---|---|---|
| SHA256 |
3151bf4ed0606954490336ad136911de5a0bc498f7f868112ff783ac6cb13478
|
|
| MD5 |
14f37c46f3d71017522d9316dd9ed274
|
|
| BLAKE2b-256 |
d00940ee3ec77eeb2ffe1a65a6e9750ee46787f1894b966d9137151f580571fb
|


