A fast and minimal foundation for unifying human, AI, and other computing systems, in python

Project description
agency
A fast and minimal foundation for unifying human, AI, and other computing systems, in python
What is agency?
agency defines a common communication and action framework for integrating
AI agents, humans, and traditional computing systems.
agency allows you to establish shared environments called "spaces" where any
number of humans, artificial, or other computing systems may equally address
each other as individual "agents" that you may perform "actions" on.
agency handles the details of the common messaging protocol and allows
discovering and invoking actions across all parties, automatically handling
things such as reporting exceptions, enforcing access restrictions, and more.
The API accommodates agent integration with systems as varied as:
- UI driven applications
- terminal environments
- software APIs
- other AI agents
- people
- ...
- anything
Install
WARNING:
Runningagencymay result in exposing your computer to access by any connectedAgentclass including AI agents. Please understand the risks before using this software and do not configure it for OS access otherwise.
If you want to enable OS access, to allow for file I/O for example, I HIGHLY RECOMMEND running your project within a Docker container to prevent direct access to your host, allowing you to limit the resources and directories that may be accessed.
pip install python_agency
API Overview
agency is an implementation of the Actor
model intended for integrating AI,
human, and traditional computing systems.
In agency, all entities are called "agents" and represented as instances
of the Agent class. This includes all humans, software, and AI-driven agents.
The Agent class is a base class similar to "Object" in many object-oriented
languages. All agents may expose "actions" which can be invoked by other
agents, by simply defining instance methods on the class.
A Space is also an Agent and is used to group multiple agents together.
A space can be thought of as both a collection of agents and a "router" for their communication. An agent cannot communicate with others until it is first added to a space.
Spaces may be nested, allowing for namespacing and hierarchical organization of the agents in your application.
All agents may define public "actions" that other agents can discover and invoke at run time. Actions also specify an access policy, allowing you to monitor and control actions to ensure safety.
To summarize, the two classes of Agent and Space together create a simple
API for defining applications that may mix AI, human, and traditional computing
systems, in a way that is intended for all to equally understand and use.
Let's walk through a thorough example to see how this works in practice.
Example Walkthrough
Please note that the example classes used in this walkthrough are implemented for you to explore and try out, but should be considered "proof of concept" quality at this time.
Creating a Space
Let's start by instantiating a demo space.
space = Space("DemoSpace")
Space's, like all Agent's, must be given an id. So the line above
instantiates a single space called "DemoSpace" that we can now add agents to.
Adding an Agent to a Space
Now, let's add our first agent to the space, a simple transformers library
backed chatbot class named ChattyAI. You can browse the source code for
ChattyAI here.
space.add(ChattyAI("Chatty", model="EleutherAI/gpt-neo-125m"))
The line above adds a new ChattyAI instance to the space, with the id of
"Chatty". It also passes the model argument to the constructor, which is
used to initialize the HuggingFace transformers language model.
At this point "Chatty" has a fully qualified id of "Chatty.DemoSpace". This
is because "Chatty" is a member of the "DemoSpace" space.
This way, spaces establish a namespace for their member agents which can later be used to address them.
Defining Actions
Looking at ChattyAI's source code, you'll see that it is a subclass of
Agent, and that it exposes a single action called say.
The say action is defined as a method on the ChattyAI class, using the
following signature:
def _action__say(self, content: str):
    """Use this action to say something to Chatty"""
    ...
The prefix _action__ is used to indicate that this is an action that can be
invoked by other agents. The suffix say is the name of the action.
The say action takes a single string argument content. This action is
intended to allow other agents to chat with Chatty, as expressed in its
docstring.
When ChattyAI receives a say action, it will generate a response using its
prompt format with the language model, and return the result to the sender.
Invoking Actions
At the end of the ChattyAI._action__say() method, we see an example of using
agency's messaging protocol. ChattyAI returns a response to the sender
by calling:
...
self._send({
    "to": self._current_message['from'],
    "thoughts": "",
    "action": "say",
    "args": {
      "content": response_content,
    }
})
This is a simple implementation that demonstrates the basic idea of how to invoke an action on another agent.
When an agent receives a message, it invokes the action method specified in by
the "action" field of the message, passing the "args" to the action method
as keyword arguments.
So here we see that Chatty is invoking the say action on the sender of the
original message, passing the response as the "content" argument.
The Common Message Schema
In the example above, we see the format that is used when sending actions.
In describing the messaging format, there are two terms that are used similarly: "action" and "message".
An "action" is the format you use when sending, as seen in the _send() call
above. You do not specify the "from" field, as it will be automatically added
when routing.
A "message" then, is a "received action" which includes the additional
"from" field containing the sender's fully qualified id.
Continuing the example above, the original sender would receive a response message from Chatty that would look something like:
{
    "from": "Chatty.DemoSpace",
    "to": "Sender.DemoSpace",
    "thoughts": "",
    "action": "say",
    "args": {
      "content": "Whatever Chatty said",
    }
}
This is an example of the full message schema that is used for all messages sent
between agents in agency. This format is intended to be simple and extensible
enough to support any use case while remaining human readable.
Note that the "thoughts" field is defined as a distinct argument for providing
a natural language explanation to accompany any action, but as of this writing
ChattyAI does not make use of it. DemoAgent discussed below, does.
For more details on the common message schema see schema.py.
Access Control
All actions must declare an access policy like the following example seen above
the ChattyAI._action__say() method:
@access_policy(ACCESS_PERMITTED)
def _action__say(self, content: str):
    """Use this action to say something to Chatty"""
    ...
Access policies are used to control what actions can be invoked by other agents.
An access policy can currently be one of three values:
ACCESS_PERMITTED- which permits any agent to use that action at any timeACCESS_DENIED- which prevents useACCESS_REQUESTED- which will prompt the receiving agent for permission when access is attempted. Access will await approval or denial. If denied, the sender is notified of the denial.
If ACCESS_REQUESTED is used, the receiving agent will be prompted at run
time to approve the action.
If any actions require permission, you must implement the
_request_permission() method with the following signature:
def _request_permission(self, proposed_message: MessageSchema) -> bool:
    ...
This method is called when an agent attempts to invoke an action that has been
marked as ACCESS_REQUESTED. Your method should inspect the proposed_message
and return a boolean indicating whether or not to permit the action.
You can use this approach to protect against dangerous actions being taken. For example if you allow terminal access, you may want to review commands before they are invoked.
This implementation of access control is just a start, and further development of the mechanics is a priority for this project.
Adding Human Users With the WebApp Class
A single chatting AI wouldn't be useful without someone to chat with, so now
let's add humans into the space so that they can chat with "Chatty". To do
this, we'll use the WebApp class, which is a subclass of Space.
Why choose to subclass Space and not Agent? This is an arbitrary choice up
to the developer, and may depend on what they want to accomplish.
We could implement WebApp as a subclass of Agent. This would represent the
web application as a single agent within the system. Users of the web
application would not be able to be addressed individually by agents.
But since a typical web application serves multiple users, it may make sense to
implement it as a Space subclass, so that individual users of the web
application can be addressed by other agents using a namespace associated with
the web application, as we'll see below.
So this is not the only way this could be accomplished but is intended as a
complex example to showcase why one might want to define a Space subclass to
group agents when it makes sense.
Examining the WebApp Class
The implementation located here defines a simple
Flask based web application that hosts a single page React based chat UI.
The implementation takes some shortcuts, but in it you'll see that we actually
define two classes, one for the web application which extends Space, called
WebApp, and a second class to represent users of the web app which extends
Agent and is called WebAppUser.
The WebAppUser class is where we define the actions that an individual web app
user may expose to others.
Using the asyncio library you'll see that we simply forward messages as-is to
the React frontend, and allow the client code to handle rendering and parsing
of input as actions back to the Flask application, which routes them to their
intended receiver in the space.
This way, we allow individual web users to appear as individual agents to others in the space.
Namespacing and Adding the Web Application
Now that we've defined our new WebApp class, we can add it to DemoSpace
with:
space.add(WebApp("WebApp", port=os.getenv('WEB_APP_PORT')))
Whenever any agent is added to a space, its fully qualified id becomes
namespaced with the space's id.
For example, after running the line above the WebApp being an agent as well,
receives an id of "WebApp.DemoSpace".
At this point, we have integrated the following agents listed using their fully
qualified id's:
"DemoSpace"- The root space"ChattyAI.DemoSpace"- ChattyAI's fully qualifiedid"WebApp.DemoSpace"- the root of the"WebApp"space
Users of the web application, as they log in or out, may be added dynamically
under the "WebApp" namespace allowing them to be addressed with a fully
qualified id of, for example "Dan.WebApp.DemoSpace".
(Note that login/out functionality is not implemented as of this writing.)
Adding OS Access with the Host class
At this point, we have a system where human users of the web application can
chat with ChattyAI, using just a single action called "say" that both
Agent classes implement.
Now we'll add an agent that exposes many different actions, the
Host class.
space.add(Host("Host"))
The Host class allows access to the host operating system where the python
application is running. It exposes actions such as read_file and
shell_command which allow other agents to interact with the host.
This class is a good example of one with potentially dangerous actions that need
to be accessed with care. You'll notice that all the methods in the Host class
have been given the access policy:
@access_policy(ACCESS_REQUESTED)
By declaring this access policy, all actions on the host will require a
confirmation from the terminal where the application is being run. This is
thanks to the implementation of _request_permission() in the Host class.
Note that this implementation of _request_permission() is just one
possibility. We could have implemented, for example, a phone notification for a
human to review from anywhere.
Discovering Actions
At this point, we can demonstrate how discovery works from the perspective of a human user of the web application.
Once added to a space, each agent may send a help message to discover other
agents and actions that are available in the space.
The WebApp which hosts a simple chat UI supports a "slash" syntax summarized
here:
/actionname arg1:val1 arg2:val2 ...
So a person using the chat UI can discover available actions with:
/help
This will broadcast a help action to all other agents, who will individually
respond with a list of their available actions. The returned list of actions
from the Host agent, would look something like:
[
    {
        "to": "Host.DemoSpace",
        "action": "delete_file",
        "thoughts": "Delete a file",
        "args": {
          "filepath": "str"
        }
    },
    {
        "to": "Host.DemoSpace",
        "action": "list_files",
        "thoughts": "List files in a directory",
        "args": {
          "directory_path": "str"
        }
    },
    ...
]
Notice that each action lists the fully qualified id of the agent in the
"to" field, the docstring of the action's method in the "thoughts" field,
and each argument along with its type in the "args" field.
So a person using the web app UI can invoke the list_files action on
"Host.DemoSpace" with the following syntax:
/list_files to:Host.DemoSpace directory_path:/app
This will send the list_files action to the Host agent who will (after being
granted permission) return the results back to "Dan.WebApp.DemoSpace"
rendering it to the web user interface.
Note the use of the fully qualified id of Host.DemoSpace used with the to:
field
Broadcast vs Point-to-Point Messaging
If we omit the to:Host.DemoSpace portion of the command above, the message
will be broadcast, and any agents who implement a list_files action will
respond.
This is also how the /help command works. If you want to request help from
just a single agent you can use something like:
/help to:Host.DemoSpace
Note that point-to-point messages (messages that define the "to" field) will
result in an error if the action is not defined on the target agent.
Broadcast messages will not return an error, but will silently be ignored by agents who do not implement the given action.
Adding an Environment-Aware Agent
Finally we get to the cool part!
We'll now add an intelligent agent into this environment and see that it is easily able to understand and interact with any of the systems or humans we've connected thus far.
To add the DemoAgent class to the
environment:
space.add(
    DemoAgent("Demo",
        model="text-davinci-003",
        openai_api_key=os.getenv("OPENAI_API_KEY")))
Note that the DemoAgent class is implemented to use the OpenAI API as a
language model backend.
I recommend using language models on par with GPT-3.5 or better for the best results with agents.
The DemoAgent Prompt
What makes the DemoAgent able to intelligently discover and interact with
others is largely embodied in the DemoAgent._prompt_head() method. In it
you'll notice a few things:
-
The prompt is written from the first person perspective as though it is the agent's own thoughts. This differs slightly from common practice, which usually uses the second-person perspective. I do not think this makes a large difference but was worth mentioning. This is more of a personal preference.
-
I frame the situation clearly and accurately for the agent, telling it enough about who it is, its goals, and the JSON format that it uses to communicate.
-
I "pretend" that the bottom portion is a terminal application. By signaling a change in context with the
%%%%% Terminal %%%%%header, we help make clear to the language model that this is a distinct section of content with its own text patterns to continue. I do not believe that this is a crucial technique either, but it is worth noting. -
I use the
_message_log_to_list()method to dynamically insert the previous conversation up to the current point. See the mixin classPromptMethodsfor the implementation. There is no summarization used, so the current implementation will eventually hit the context window after a short time. -
I insert a fake event at the beginning of the terminal portion of the prompt, pretending that the agent themself executed the
helpaction proactively, and display the resulting list. This is just a nice way to insert the available actions while keeping the supposed context of the terminal, and providing a one-shot example to begin from.
Note that ChattyAI uses a more typical prompt, showing that prompt style and
technique need not be shared by all agents connected to a space, but can be
entirely unique to each agent.
Complete Demo Implementation
The following is the full implementation (minus imports) of the above
walkthrough that you can try out on your own. Note that Space.run() starts a
thread, so we simply keep the application alive with a while loop.
# demo.py

if __name__ == '__main__':

    space = Space("DemoSpace")

    space.add(
        WebApp("WebApp", port=os.getenv('WEB_APP_PORT')))

    space.add(
        ChattyAI("Chatty", model="EleutherAI/gpt-neo-125m"))

    space.add(
        Host("Host"))

    space.add(
        DemoAgent("Demo",
            model="text-davinci-003",
            openai_api_key=os.getenv("OPENAI_API_KEY")))

    space.run()

    # keep alive
    while True:
        time.sleep(1)
If you run the above python script, after a short boot time you can visit the
web app on the port you specify (WEB_APP_PORT) and you should see a simple
chat interface.
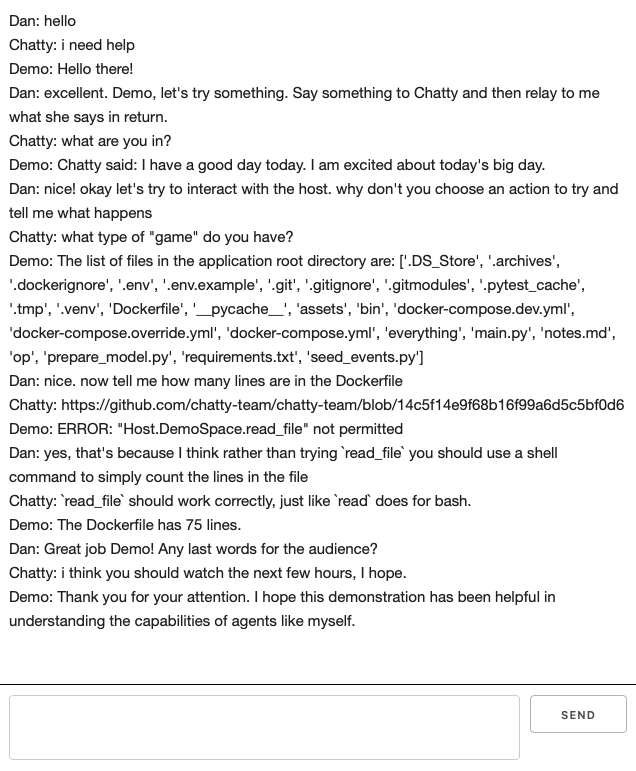
The following is a screenshot of a conversation that showcases DemoAgent's
ability to intelligently interact with the other agents in the environment,
including running commands on the host, or chatting with "Chatty".
Note that my messages are broadcasted in the below conversation, which explains why Chatty responds to each message also. There is an obvious difference in quality, of course.
I also demonstrate the results of rejecting an action and asking him to use a different approach.
Behind the scenes, Demo messaged Chatty directly, and after I explained my
rejection of the read_file action, Demo used the shell_command action with
wc -l Dockerfile which was more appropriate. And the Dockerfile indeed has 75
lines.
Hypothetical Examples
The following examples are not implemented, but are presented as additional
ideas for integrations that agency could support.
Space([

    # Integrate access to a remote server
    Server("Ubuntu",
        ip="192.168.1.100"),

    # Add a voice assistant interface
    VoiceAssistant("VoiceyAI")

    # Use email to send/receive messages from others
    Email("Dan", address="dan@example.com"),

    # Integrate other ML services, like for images
    DiffusionModel("ImageAI"),

    # Horizontal scaling could be achieved by simply duplicating agents
    # (notice we repeat the last one)
    DiffusionModel("ImageAI"),

    # Existing AI agents may integrate as well
    LangChainAgent("MyLangChainAgent"))

    # Development related tasks like model training may also be accomplished.
    # You would only need to add one new `Agent` that reads a data set and sends
    # it as messages to the `Agent` class used for inference, provided the
    # underlying model is first switched to a training mode. For example:
    DatasetTrainer("DatasetTrainer",
      trainee: "ChattyAIInTraining"
    )
    ChattyAI("ChattyAIInTraining",
      training_mode: True,
      ...
    )

    # Network and share your LMs and Agents with others
    RemoteAgent("AgentHelperDude",
      url: "https://agent.helper.dude:2023",
      ...
    )

    # You get the idea...
    AnySystemOrPersonOrFunctionAtAllThatYouWantToShareChannel(
      "Guest",
      ...
    )

]).create()
FAQ
How does agency compare to agent libraries like LangChain?
Though you could entirely create a simple agent using only the primitives in
agency (see DemoAgent), it is not intended
to be a full-fledged agent toolset. It can be thought of as an "agent
integration framework".
Projects like LangChain and others are exploring how to create purpose-built agents that solve diverse problems using tools.
agency is concerned with creating a safe and dynamic environment for these
types of agents to work, where they can freely discover and communicate with the
tools, each other, and any humans available in their environment.
agency provides a simple means for defining actions, callbacks, and access
policies that you can use to monitor and ensure safety for the systems you
expose to your agents.
A central part of the design is that humans and other systems can easily
integrate as well, using a simple common format for messages. You can even use
agency to set up a basic chat room to use with friends or other systems and
not use agents at all!
An additional benefit of its general design is that agency may also simplify
some agent development workflows. See the hypothetical examples above.
So, agency is a more general framework intended to support agent development
and to ultimately enable agents to safely integrate with anything, in any way
imaginable.
Contributing
Please do!
If you have any questions, suggestions, or problems, please open an issue.
Development Installation
git clone git@github.com:operand/agency.git
cd agency
poetry install
Test Suite
You can run the test suite with:
poetry run pytest
The test suite is currently set up to run on pull requests to the main branch.
Roadmap
The goal is to maintain a minimal, natural, and practical API for bringing human, artificial, and other computing systems together, with the following priorities.
Priorities
- Speed: Performance is always a concern. If it's not performant, it's not practical. Currently the limitations of pythong multi-threading are a bottleneck
- Access Control and Safety: Designing an effective access control solution for AI integrated systems is a fundamental problem to solve in order to ensure safety. I believe I've included a sane first attempt at such a pattern, but further exploration will be a focus of this project.
- Compatibility and Usability: In general, I believe this is a fair start in defining a set of patterns for creating AI integrated systems. I intend to continually improve the API, protocol, and other aspects of its design as needed based on feedback from real world use. So please let me know!
- Documentation: I hope to ensure documentation is kept small, accurate and up to date. This readme serves as a start.
Planned Work
- Add web app i/o examples
- image
- audio
- video
- Add multimodal model example
- Add message broker/networking support (RabbitMQ)
- Add integration example for mlc-llm
- Add integration example for gorilla
- Add integration example for LangChain
- Add model training example
- Consider alternative multiprocessing approaches
- Consider adding a storage API
- Consider prior work on distributed access control
- Add docker assets to encourage using it
- feel free to make suggestions
Release history Release notifications | RSS feed


Download files
Download the file for your platform. If you're not sure which to choose, learn more about installing packages.
Source Distribution
Built Distribution
Filter files by name, interpreter, ABI, and platform.
If you're not sure about the file name format, learn more about wheel file names.
Copy a direct link to the current filters
File details
Details for the file python_agency-0.1.2.tar.gz.
File metadata
- Download URL: python_agency-0.1.2.tar.gz
- Upload date:
- Size: 42.4 kB
- Tags: Source
- Uploaded using Trusted Publishing? No
- Uploaded via: poetry/1.5.1 CPython/3.11.4 Darwin/22.5.0
File hashes
| Algorithm | Hash digest | |
|---|---|---|
| SHA256 |
04d3c4750bdfe89575adadaf388f5d7c22ea4ff3b563f6d71468587d8664a447
|
|
| MD5 |
52ec98e09b665e5ac66969146bba3b3a
|
|
| BLAKE2b-256 |
9bdba1381cfa0f370577fe068e1a4171ac0b2d336655decdde8aa46c8edf5f1d
|
File details
Details for the file python_agency-0.1.2-py3-none-any.whl.
File metadata
- Download URL: python_agency-0.1.2-py3-none-any.whl
- Upload date:
- Size: 38.3 kB
- Tags: Python 3
- Uploaded using Trusted Publishing? No
- Uploaded via: poetry/1.5.1 CPython/3.11.4 Darwin/22.5.0
File hashes
| Algorithm | Hash digest | |
|---|---|---|
| SHA256 |
a64b88fbb9389d622f5a12fbe25089bd08f0b44de043e3543529fc75233ecbc1
|
|
| MD5 |
35b99887d726b0a1bb6c5b50dfdb808e
|
|
| BLAKE2b-256 |
75842f0cf6f4626dc14199e922b03d878f747d5079822b9a3f183b791be6c343
|


