
PyVisionAuto



PyVisionAuto is an end-to-end desktop automation toolkit. It is centered on visual image matching and also includes screen recording, mouse automation, and keyboard automation capabilities.
Note: This package is currently developed mainly for internal test automation needs. It is still evolving and not fully polished yet. We appreciate your understanding.
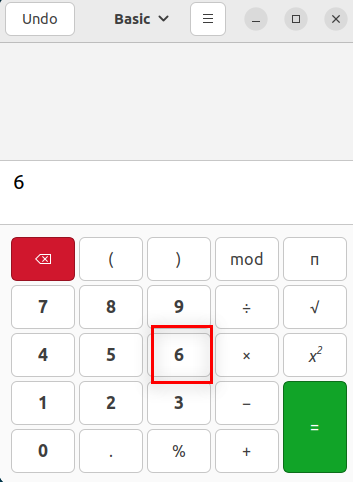
Runtime screenshot
Highlighted match region during runtime:
Scope
- Linux (X11 session) and Windows
- Real physical display required
Install
pip install pyvisionauto
Main APIs
Screen
Screen.find(image, confidence=None, region=None)→MatchHandle | NoneScreen.wait(image, timeout, confidence=None, poll=None, region=None)→MatchHandleScreen.click(image, timeout=10, confidence=None, poll=None, highlight=False, region=None)→MatchHandleScreen.wait_vanish(image, timeout, confidence=None, poll=None, region=None, strict=True)→boolScreen.click_and_wait_vanish(click_image, vanish_image=None, timeout=10, ...)→boolScreen.activate_window(title_substring)→boolScreen.region(x, y, w, h)— returns aRegionScreenthat scopes all operations to a sub-areaScreen.check_env(strict=True)— validates platform, display, and required tools
MatchHandle (fluent chaining)
.highlight(duration=None, color=None, thickness=None, show_center=False)→MatchHandle.click(button="left", highlight=False)→MatchHandle.double_click(highlight=False)→MatchHandle.right_click(highlight=False)→MatchHandle.hover(highlight=True, duration=None)→MatchHandle— moves pointer;durationholds it in place (seconds).wait_vanish(timeout, confidence=None, poll=None, strict=True)→bool.center—(x, y)absolute screen coordinates of the match center.score— normalized match confidence[0.0, 1.0]
Input
Input.type_text(text, human_like=None, delay_min=None, delay_max=None)Input.press(key, human_like=None)Input.hotkey(*keys, human_like=None)Input.click(x, y, button="left")Input.move_to(x, y)/Input.hover(x, y)Input.clear_text()— Ctrl+A then Backspace
Recorder
Recorder.start(output_file, fps=15)Recorder.stop()
System dependencies
Linux
- python3-tk — Required for border overlay highlight
- xdotool — Preferred for window activation
- wmctrl — Fallback for window activation
- ffmpeg — Required for screen recording; install via
sudo apt install ffmpeg
Windows
- tkinter — Bundled with most Python installations
- ffmpeg — Required for screen recording; download from ffmpeg.org, extract archive, and add the
binfolder to systemPATH
Verify ffmpeg installation
# Check if ffmpeg is installed and accessible
ffmpeg -version
Note: Screen recording (via
RecorderAPI) requires ffmpeg. On Linux, it usesx11grabcodec; on Windows, it usesgdigrabcodec. Both are built into ffmpeg by default.
Quick start
Basic usage: Find and click
from pyvisionauto import Screen

screen = Screen()
# Wait for image to appear on screen, highlight it, then click
screen.wait("login_button.png", timeout=10).highlight().click()

# Highlight the match and mark its center with a short cross
screen.wait("login_button.png", timeout=10).highlight(show_center=True)
Advanced example: Record automation with screen capture
This example demonstrates screen recording combined with visual automation:
from pyvisionauto import Screen, Recorder
from pathlib import Path

screen = Screen()
recorder = Recorder()

recorder.start(output_file=Path("automation_demo.mp4"))
try:
    screen.activate_window("Calculator")
    screen.wait("button_1.png", timeout=10).highlight().click()
    screen.click("button_plus.png", timeout=5)
    screen.type_text("5")
    screen.wait("button_equals.png", timeout=5).highlight().click()
    screen.wait("result_7.png", timeout=3).highlight()
finally:
    recorder.stop()
Activate a window before matching
screen.activate_window("Calculator")
screen.click("button.png")
Platform differences
| Feature | Linux | Windows |
|---|---|---|
| Screen capture & template matching | Supported | Supported |
| Mouse / keyboard automation | Supported | Supported |
| Highlight overlay | Supported | Supported |
| Window activation | xdotool / wmctrl | pyautogui (pygetwindow) |
| Screen recording | ffmpeg + x11grab | ffmpeg + gdigrab |
Screen recording requires ffmpeg installed and added to system PATH. Linux uses
x11grab, Windows usesgdigrab.
Window focus on Linux (X11)
On X11 systems, mouse clicks alone do not automatically change keyboard focus. The window manager only reassigns focus in response to real hardware events or explicit window activation requests. This means:
click()moves the cursor to the correct coordinates and clicks, but the keyboard focus stays wherever it was before.- Any subsequent keyboard action (
press(),type_text(), hotkeys) is delivered to whichever window currently has focus — which may not be the window you just clicked.
Rule of thumb: always call activate_window() before any keyboard action, targeting the exact window that should receive it.
Use xdotool to find the precise window name while the application is running:
xdotool search --name "" 2>/dev/null | while read id; do
    printf "ID=%-12s %s\n" "$id" "$(xdotool getwindowname "$id" 2>/dev/null)"
done
Pick the shortest substring that uniquely identifies the target window and use it in activate_window().
Main window vs. dialogs
When a modal dialog is open, activate the dialog directly — do not activate the main window and rely on the WM to forward focus:
from pyvisionauto import Screen

screen = Screen()

# --- Interacting with a dialog ---
# 1. Wait for the dialog image to appear and click it
screen.wait("open_project_dialog.png", timeout=30).click()
# 2. Activate the dialog window so keyboard input goes to it
screen.activate_window("Open Project")   # activate the dialog, not the main window
# 3. Now keyboard actions are reliably delivered to the dialog
screen.input.press("esc")

# --- Interacting with the main window ---
screen.activate_window("My App 2026")
screen.wait("toolbar_button.png", timeout=10).click()
Why not just activate the main window? On GNOME/Mutter, activating the main window does propagate focus to a modal child dialog — but this is WM-specific behaviour. Activating the dialog directly is explicit, portable, and not dependent on WM modal-focus rules.
highlight() and focus
highlight() launches a temporary tkinter overlay window. On some window managers this overlay can briefly steal keyboard focus. To avoid side effects:
- Prefer
.click()before.highlight(), not after — the API supports chaining in both directions. - Do not rely on focus being intact after
.highlight()returns; callactivate_window()again if keyboard actions follow. - Pass
show_center=Truewhen you want the overlay to draw a short center cross using the same color and thickness as the border.showCenter=Trueis also accepted as a compatibility alias.
# Safer pattern: click first, highlight after (for visual feedback only)
screen.wait("button.png", timeout=10).click().highlight()

# Risky pattern: highlight steals focus, click lands on wrong window
# screen.wait("button.png", timeout=10).highlight().click()  # avoid
Notes
- Wayland-only and headless environments are not currently supported.
- On Windows with high-DPI scaling, coordinate accuracy may be affected.
Acknowledgments
This project is inspired by Sikulix and built with:
1 maintainer

Download files
Download the file for your platform. If you're not sure which to choose, learn more about installing packages.
Source Distribution
Built Distribution
Filter files by name, interpreter, ABI, and platform.
If you're not sure about the file name format, learn more about wheel file names.
Copy a direct link to the current filters
File details
Details for the file pyvisionauto-0.1.12.tar.gz.
File metadata
- Download URL: pyvisionauto-0.1.12.tar.gz
- Upload date:
- Size: 22.1 kB
- Tags: Source
- Uploaded using Trusted Publishing? No
- Uploaded via:
twine/6.2.0 CPython/3.12.13
File hashes
| Algorithm | Hash digest | |
|---|---|---|
| SHA256 |
2cb1990e9f422bf7240b1837edc09f063a6090f782e30ee71c5ab698436f9fc1
|
|
| MD5 |
958d39617ea297b445651fb94e54c8e3
|
|
| BLAKE2b-256 |
e3741a5bef34a0bf3a060f5024c2a562ffd30e642ba0a3afd697939c185dd17d
|
File details
Details for the file pyvisionauto-0.1.12-py3-none-any.whl.
File metadata
- Download URL: pyvisionauto-0.1.12-py3-none-any.whl
- Upload date:
- Size: 20.5 kB
- Tags: Python 3
- Uploaded using Trusted Publishing? No
- Uploaded via:
twine/6.2.0 CPython/3.12.13
File hashes
| Algorithm | Hash digest | |
|---|---|---|
| SHA256 |
25f25dcd27bce543cedf3b7473a302300fafb128263d4e084f9ced9d95eedf10
|
|
| MD5 |
36ef38afaea470a40cab469d053c307d
|
|
| BLAKE2b-256 |
05685fd74d969b888bfcf0215a9e9b9092f6f25e65d3104bef28a04da346cc98
|














