
PyxelWidgets
Build your own instruments and controllers for grid controllers like the Launchpad, APC, Push and Launchkey, in a visual designer or in Python. Faders, drum pads, sequencers, keyboards, clip launchers and more, wired to your DAW, synths, OSC apps or each other.
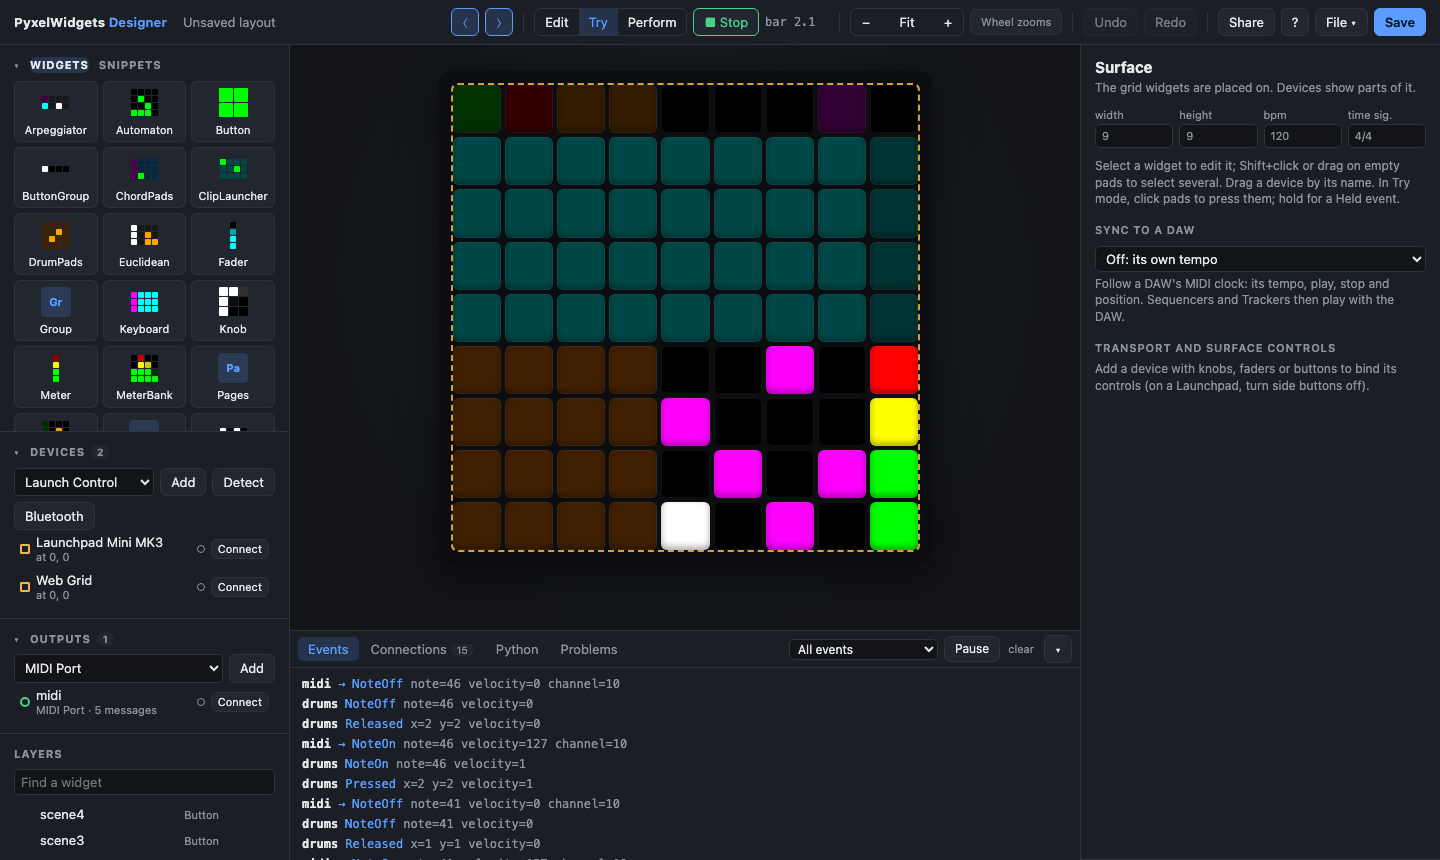
- Design without code: drag widgets onto the grid, try them on your controller as you edit, connect them to your DAW, save a layout file.
- Play it anywhere:
pyxelwidgets runplays a layout without the designer, on a computer or a Raspberry Pi. Apps are available for macOS, Windows, Linux and Android. - Talk to your music software: MIDI, Mackie Control and HUI (with plug-in parameters by name in Logic, Cubase, REAPER and Pro Tools), OSC, network MIDI, Bluetooth MIDI, MIDI clock in and out, and your computer's keyboard and mouse.
- Grow into code: the designer writes the Python for your layout, and every piece (widgets, devices, the transport) works on its own.
Install
Python 3.10 or newer:
pip install pyxelwidgets
pyxelwidgets designer my-layout.json
The designer opens in your browser. my-layout.json is created the first time
you save.
On Linux, pip builds the MIDI library (python-rtmidi) from source, which
needs a compiler and the ALSA headers first: on Debian, Ubuntu and Raspberry
Pi OS, run sudo apt install build-essential libasound2-dev.
Optional extras add more connections. "pyxelwidgets[all]" installs every
extra except test.
| Extra | Adds |
|---|---|
osc |
OSC and REAPER outputs |
network |
announcing network MIDI sessions (Bonjour) |
bluetooth |
Bluetooth MIDI devices, and the computer as one (Linux) |
desktop |
keyboard and mouse output (macro boards) |
app |
the designer in a window of its own (pyxelwidgets app) |
Prefer an app? Download it for macOS, Windows, Linux or Android from the releases page. The apps guide has the details.
Commands
| Command | What it does |
|---|---|
pyxelwidgets designer [layout.json] |
The designer, in your browser |
pyxelwidgets app [layout.json] |
The designer in its own window (extra app) |
pyxelwidgets run layout.json |
Plays a layout on its devices and outputs, without the designer |
pyxelwidgets-designer is the same as pyxelwidgets designer. Useful options:
designer --offline: don't connect devices and outputs on start (connect them one by one in the page).designer --host 0.0.0.0: edit from another computer, a tablet or a phone on your network. The Share button in the designer does the same while it runs.run --play: start the transport, so sequencers play right away.run --fps 30: send fewer frames, e.g. on a Raspberry Pi Zero.app --perform --play: player mode. It opens the layout ready to play, without the editing grid.app --headless layout.json: play without a window, likerun.--import my_widgets.py: load widgets or devices of your own (see writing a widget).
pyxelwidgets <command> --help lists them all.
The designer
Start from a template (drum controller, MIDI keyboard, DAW mixer, performance, macro board) or an empty grid. Then:
- Add your controller. Detect finds what's plugged in. The grid takes its size, and the device shows the layout as you edit and plays it when you press its pads.
- Place widgets by dragging them from the palette, or pick a snippet: ready-made pieces for 8x8, 8x2, 9x9 and other grids, from a drum machine to 16 switchable sequencers.
- Send to your software. Add an output (a MIDI port, Mackie Control, REAPER, network or Bluetooth MIDI, keyboard and mouse), then give widgets messages. Learn fills a message in from what the DAW sends. Feedback lets the DAW light the pads.
- Wire widgets together with links: a button switches pages, a fader sets the tempo, a knob changes a keyboard's scale. Formulas keep options computed from other widgets.
- Try it in Try mode: click pads, watch events and messages in the log, hover a pad to see what it sends.
- Play it in Perform mode, follow a DAW's MIDI clock, or turn a phone or tablet into a touch grid.
- Take the code. The Python tab shows a program for the layout, either one that loads the file or one that builds it all in code.
Getting started builds a first controller step by step, and the designer guide covers the rest.
In Python
A layout file from the designer, with your own code attached by widget name:
from pyxelwidgets import Changed, parser

ui = parser.load('my-layout.json')
ui['volume'].on(Changed, lambda event: print('volume', event.value))
app = ui.app()
app.transport.play()
app.run()           # until Ctrl+C
Or everything in code. This example puts a fader and a button on an on-screen
grid; use LaunchpadMiniMK3.find() or another device class for real
hardware:
from pyxelwidgets import App, Button, Changed, Colors, Fader, Surface
from pyxelwidgets.devices.virtual import Virtual

surface = Surface(8, 8)
volume = surface.add(Fader(0, 0, 1, 8, active_color = Colors.Cyan))
record = surface.add(Button(7, 0, 1, 1, active_color = Colors.Red))
volume.on(Changed, lambda event: print('volume', event.value))

grid = Virtual(8, 8)
grid.connect()
surface.add_device(grid)
App(surface).run()
The Python guide covers widgets, devices, musical time, animations, bindings and links. The outputs guide covers sending to other software.
Hardware
| Maker | Devices |
|---|---|
| Novation | Launchpad (MK1, S, Mini MK1/MK2, MK2, Pro, X, Mini MK3, Pro MK3), Launchkey (MK1-3), Launch Control, Launch Control XL |
| Akai | APC Mini, APC40 MK2 |
| Ableton | Push 2 |
| Arturia | MiniLab mkII, MiniLab 3 |
| PreSonus | ATOM |
| No hardware | Web Grid (any browser, multi-touch), Virtual (a window) |
So far only the Launchpad Mini MK3 has been tried on hardware. The others follow their makers' documentation and earlier drivers, and need owners to try them. Hardware lists what's been checked. The designer's Check this device walks you through a test and makes a report to send back.
Documentation
- Getting started: a first controller in the designer, no code
- The designer: everything it does, and its shortcuts
- Apps: the desktop apps and the Android app
- Outputs: DAWs, Mackie Control, HUI, OSC, network and Bluetooth MIDI, MIDI clock, keyboard and mouse
- Python guide: the library itself
- Hardware: supported devices and what's been tested
- Snippets, writing a widget, writing a driver, threads, API reference
- Examples and the changelog
License
MIT. PyxelWidgets started as Malik Enes Şafak's 2022 master's thesis
(tag thesis-2022) and was redesigned for 1.0.
1 maintainer

Metadata
1 maintainer
Release files for pyxelwidgets 1.0.0
For a detailed explanation of source distributions (sdists) and built distributions (wheels), please see the package formats documentation.
Source distribution (sdist)
| File | Size | Uploaded | |
|---|---|---|---|
| pyxelwidgets-1.0.0.tar.gz | 446.5 kB | Details |
Built distribution (wheel)
| File | Interpreter | ABI | Platform | Reset |
|---|---|---|---|---|
| pyxelwidgets-1.0.0-py3-none-any.whl | Python 3 | none | any | Details |
Total release size: 832.9 kB
Release files / pyxelwidgets-1.0.0.tar.gz
| Download URL | pyxelwidgets-1.0.0.tar.gz |
|---|---|
| Size | 446.5 kB |
| Tags | Source |
|
SHA-256 checksum How to use checksums |
2ca74deae02aa11475c62556568b59fd87dc18b29deaf6927a10d16bd8282bb3
|
|
BLAKE2b-256 checksum How to use checksums |
22d5351845bb15dd89d354a56d5f324c71dca1a305e67220ab3f76b7becdcbf3
|
| Upload date | |
|
Uploaded using Trusted Publishing? What is trusted publishing? |
Yes |
| Uploaded via |
twine/7.0.0 CPython/3.13.14
|
Provenance
Provenance describes where a file came from. On PyPI, provenance is shared via attestations, which provide a verifiable record of the build or publishing details. View details, limitations and caveats.


PyPI Publish Attestation
PyPI verified that this artifact, at this checksum, originated from the publisher listed below.
Signed by GitHub Actions, verified by PyPI on Oct 15, 2026.
Transparency logRelease files / pyxelwidgets-1.0.0-py3-none-any.whl
| Download URL | pyxelwidgets-1.0.0-py3-none-any.whl |
|---|---|
| Size | 386.4 kB |
| Tags | Python 3 |
|
SHA-256 checksum How to use checksums |
cc527be0097205f9a0e779d064edd2db744cb490c658be7675c1e2805dc62a97
|
|
BLAKE2b-256 checksum How to use checksums |
c902e26a5a2345a85c532e447f93c6dfb8eefcd118dfac03f1bc903339f5b01b
|
| Upload date | |
|
Uploaded using Trusted Publishing? What is trusted publishing? |
Yes |
| Uploaded via |
twine/7.0.0 CPython/3.13.14
|
Provenance
Provenance describes where a file came from. On PyPI, provenance is shared via attestations, which provide a verifiable record of the build or publishing details. View details, limitations and caveats.
PyPI Publish Attestation
PyPI verified that this artifact, at this checksum, originated from the publisher listed below.
Signed by GitHub Actions, verified by PyPI on Oct 15, 2026.
Transparency log












