
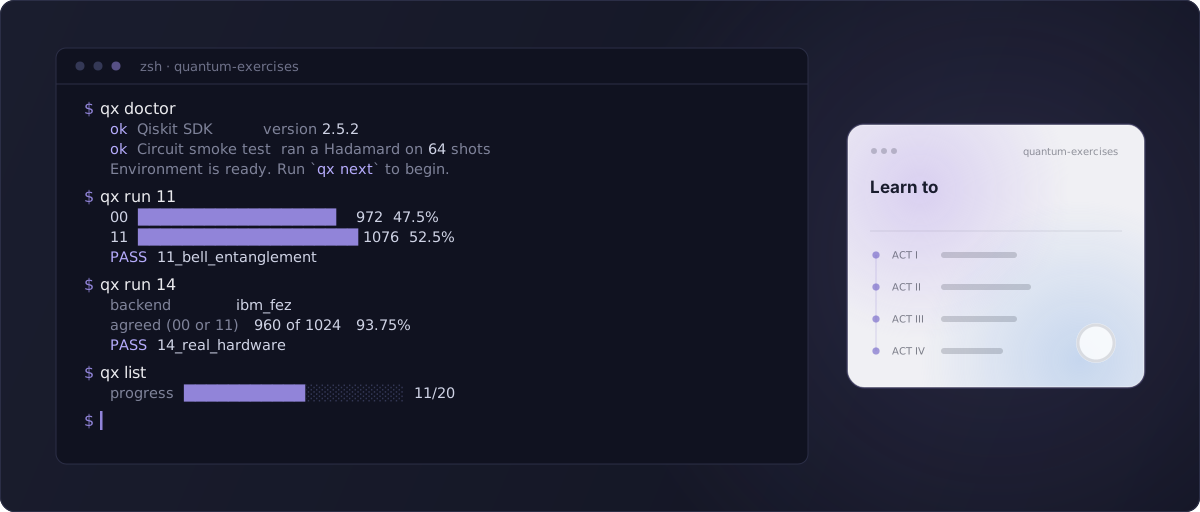










Twenty hands-on exercises that take you from an empty laptop to a quantum circuit on real IBM hardware, and then to the Bell inequality that no shared coin can reach.
You edit a file, you run one command, and it tells you exactly what is wrong in the language of the problem rather than as a Python traceback.
What it looks like
You get something wrong
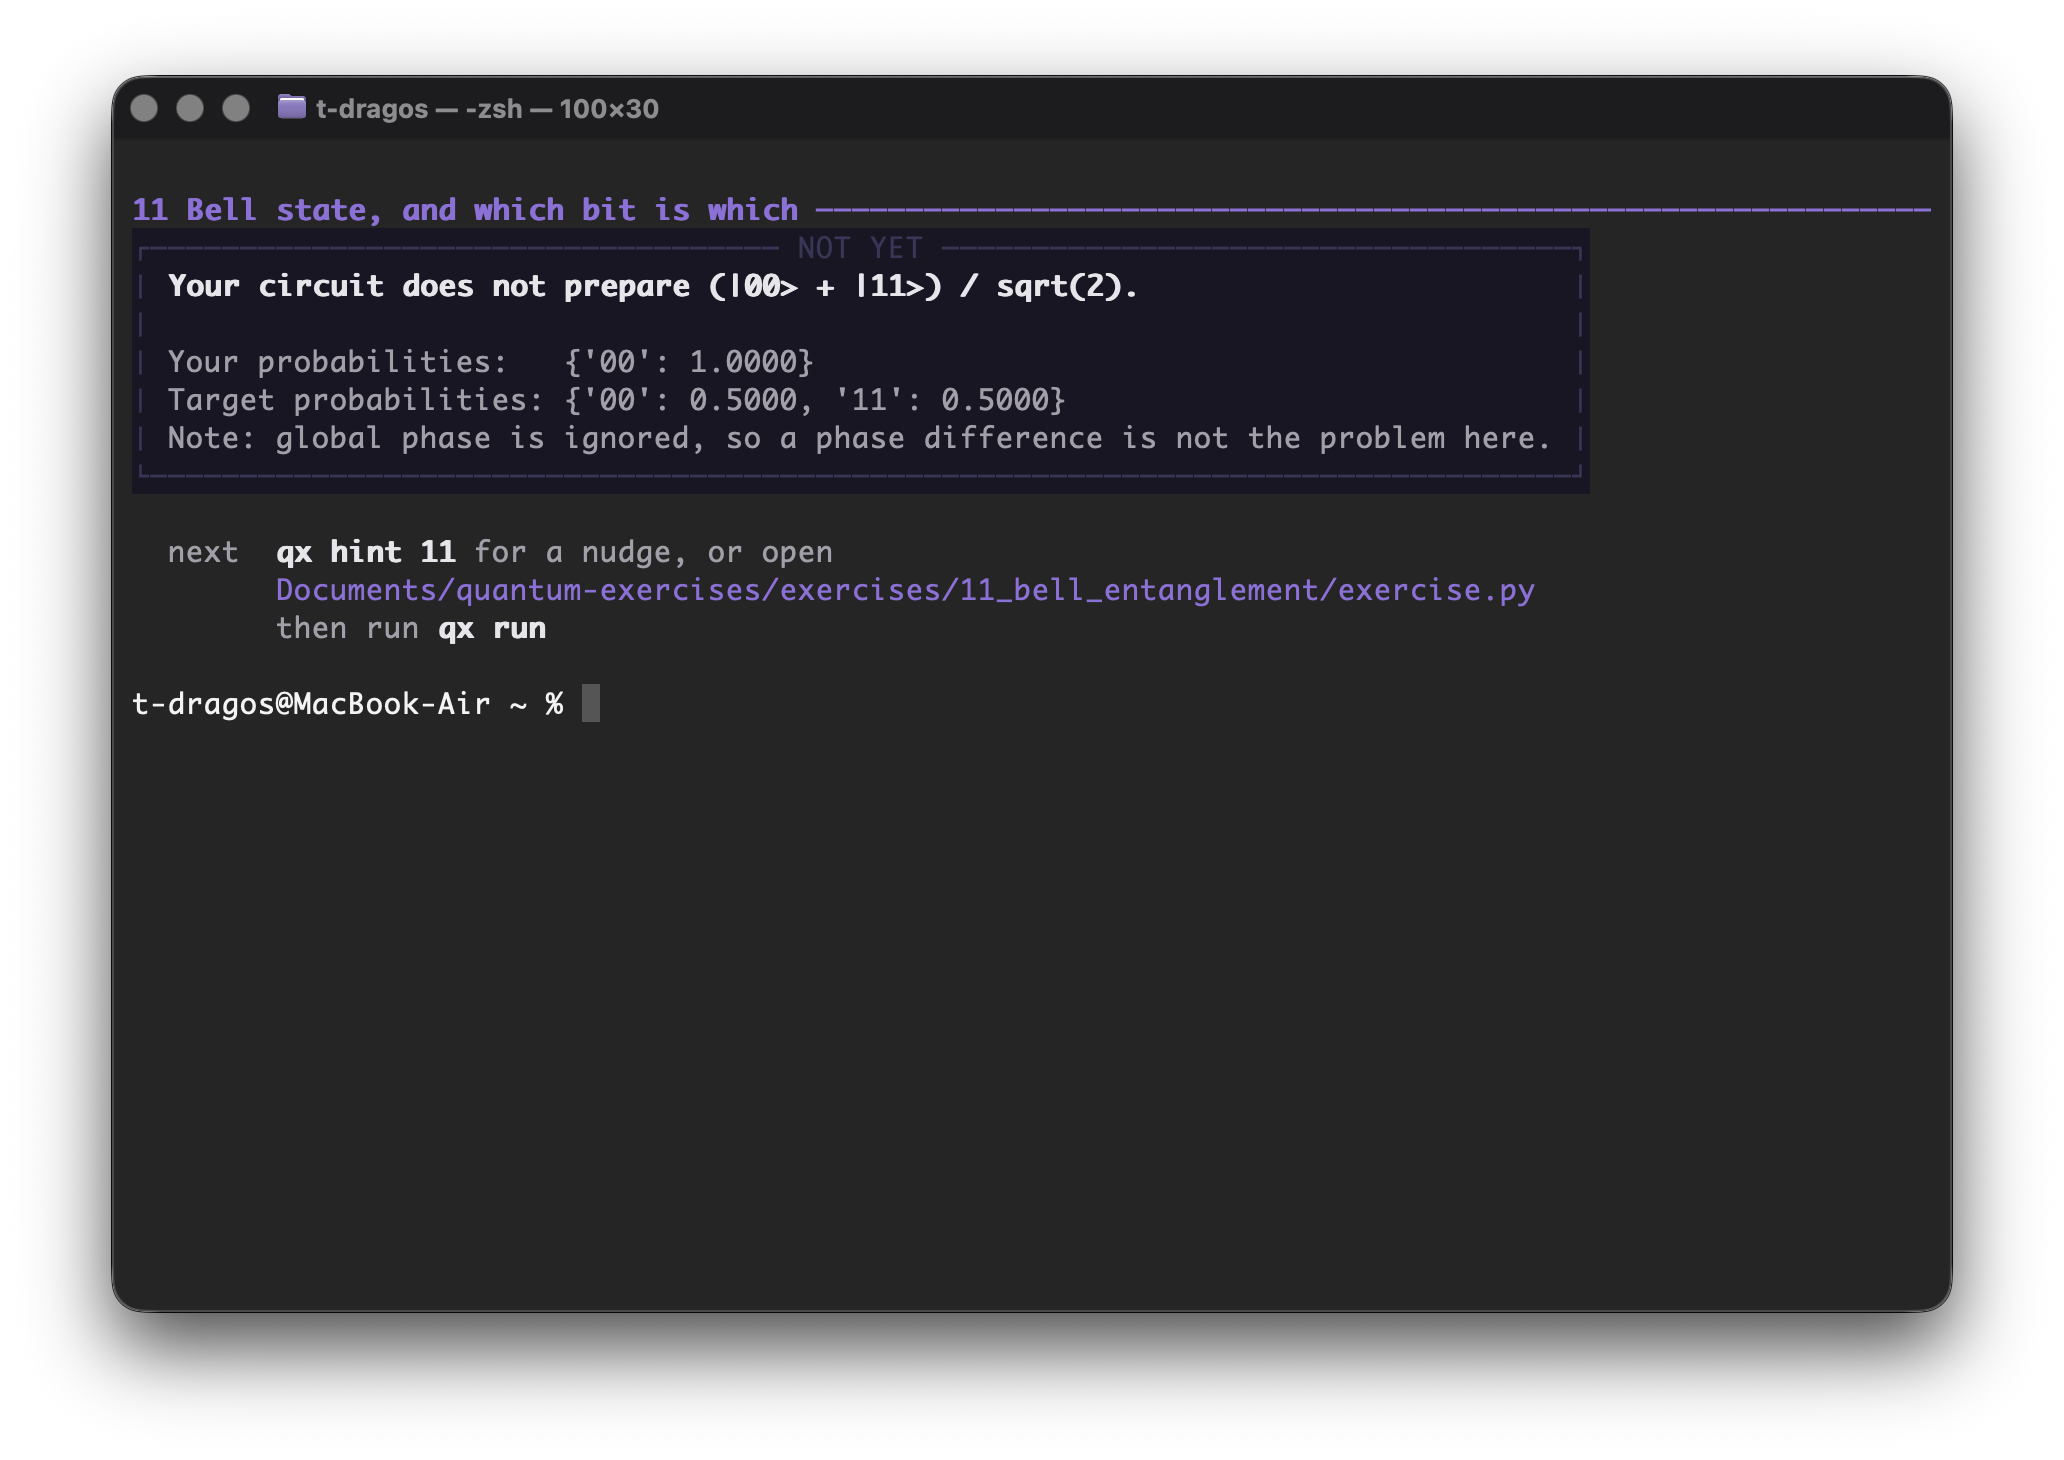
That is the whole idea. No traceback, no line number pointing at library code, no guessing. The runner knows which concept you tripped over, so it explains the concept.
You fix it, and something actually runs
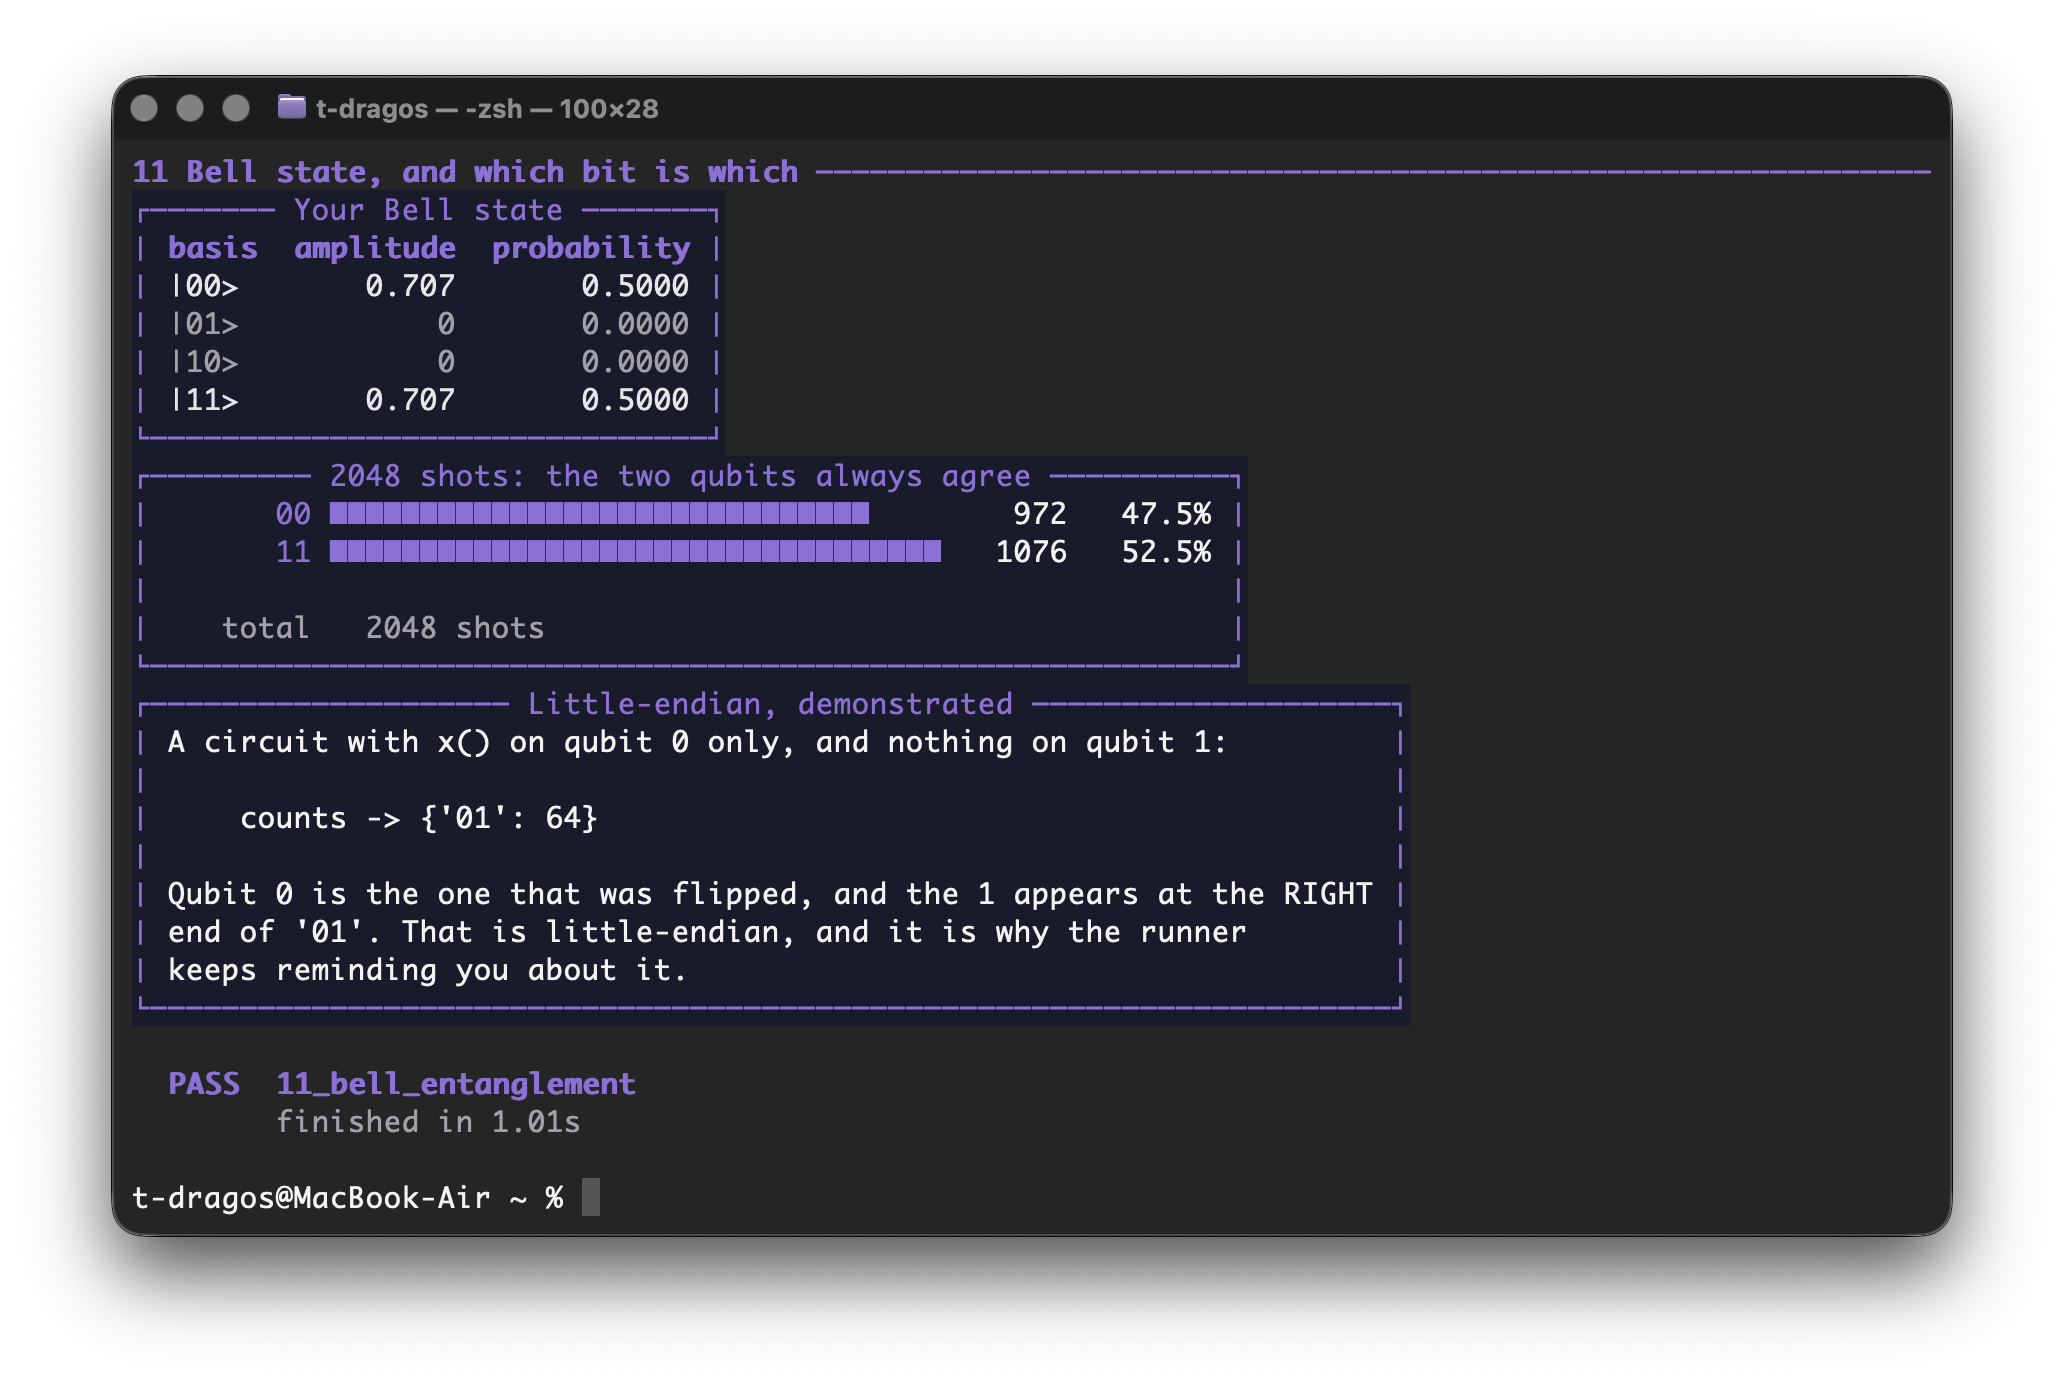
No exercise ends on a green tick alone. Each one finishes with something your own code produced and the runner rendered: a state, a matrix, a histogram, or the numbers themselves. Seeing the object is the point.
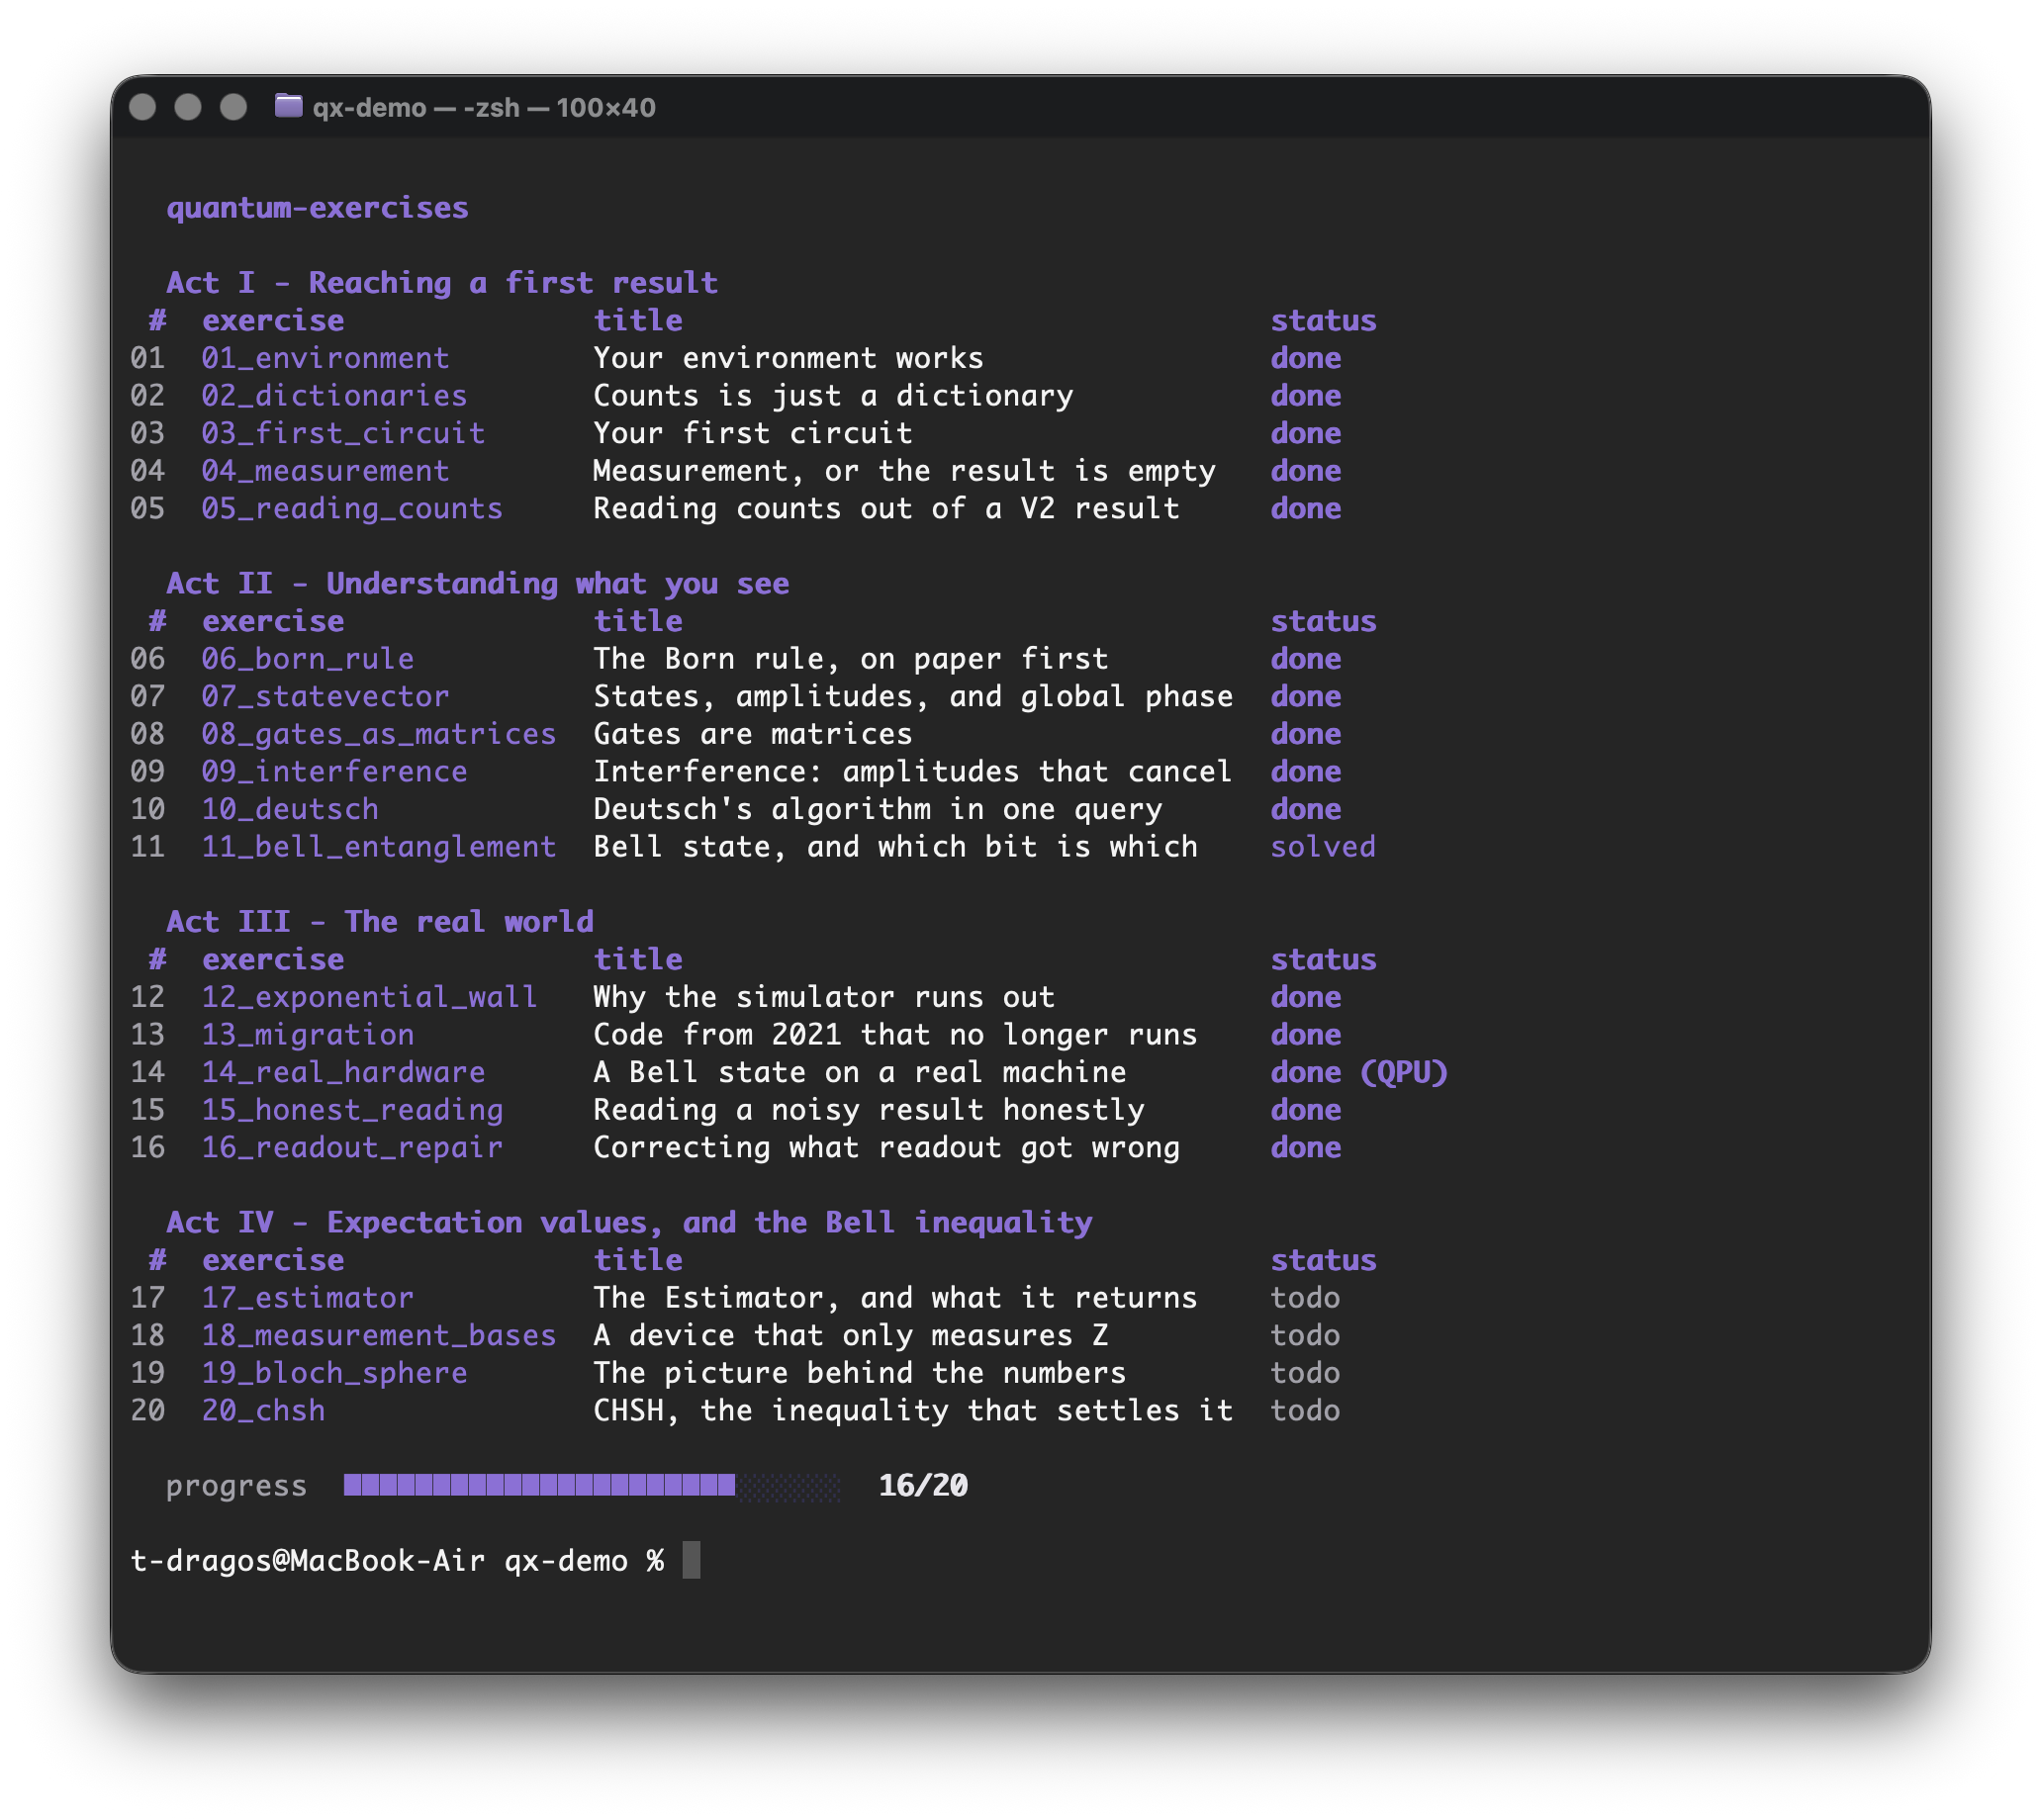
You always know where you are
Why this exists
Nearly every quantum computing tutorial on the internet was written for Qiskit
0.x, and none of it runs any more. execute() was removed, Aer moved to its
own package, IBMQ became a different thing entirely, and the way you read your
results changed shape completely.
So beginners hit an ImportError on line 3 and conclude they are not smart
enough for quantum computing. They were just reading instructions for software
that no longer exists.
The nearest thing to this project is Microsoft's Quantum Katas, and they are in good health: the original repository was archived in August 2024, but the exercises moved into the Quantum Development Kit and a hosted version at quantum.microsoft.com that has Copilot alongside them.
What separates them from this is the language. They teach Q#, which is Microsoft's own; this teaches Qiskit, which is what IBM's hardware speaks and what nearly every broken tutorial on the internet was written for.
Everything here is verified on the 1st and the 15th of every month against the Qiskit that actually ships today, not against the version this was written for. Every reference solution is re-run, and the run reports which version it tested. If a new Qiskit release breaks an exercise, the verify badge above turns red.
Who this is for
You need to be able to read and write basic Python: variables, functions, and
dictionaries. Exercise 02 covers the dictionary part, because measurement results
arrive as a plain dict and that trips people up more often than the physics.
You need no quantum background, and no linear algebra beyond multiplying a small matrix by a vector. Where a matrix shows up, the runner prints it.
Act I takes well under an hour. The whole course is an afternoon or two, depending on how much you stop to poke at things.
Installation
1. Install uv
uv is the only thing you have to install. It fetches the right Python itself, so you do not need Python first.
macOS and Linux:
curl -LsSf https://astral.sh/uv/install.sh | sh
Windows, in PowerShell:
powershell -ExecutionPolicy ByPass -c "irm https://astral.sh/uv/install.ps1 | iex"
If uv is not found afterwards, open a new terminal so the updated PATH takes
effect.
2. Install the tool
uv tool install quantum-exercises
That puts qx on your PATH, so every command below works from any directory. The
first run downloads about 350 MB, mostly Qiskit and its scientific stack, so give
it a minute or two on a normal connection. It is not stuck. Afterwards uv has
everything cached and the same command finishes in about a second.
pipx install quantum-exercises and pip install quantum-exercises work too.
3. Take a copy of the course
qx init
cd quantum-exercises
The exercises travel inside the package, and this copies them somewhere you can
edit, because editing them is the whole point. Pass a name to put them elsewhere:
qx init my-course.
Running it again never overwrites anything. That is the upgrade path: after
installing a release that adds an exercise, qx init in the same directory brings
the new one across and leaves every answer you have written exactly as it is.
A release that fixes an exercise is the other half of that, and skipping what is
already there means the fix never arrives. qx init --refresh brings those across
too. Upgrade the tool first, then run it from inside your course:
uv tool upgrade quantum-exercises
qx init --refresh
With no directory named, it updates the course you are standing in. Anywhere
else, name it: qx init my-course --refresh.
It updates the lesson files, the hints, the checkers and the labs, and it never
replaces an existing exercise.py, so your answers cannot be lost to it. An
exercise that is missing altogether arrives whole, its starting exercise.py
included, the same as it would from a plain qx init. Anything you had edited
yourself is copied aside with a .bak suffix first, and every file it touched is
listed on screen.
Or clone it instead
If you would rather have the repository, which is what you want to contribute or
to read the source alongside the exercises, git is the only extra requirement:
git clone https://github.com/TuguiDragos/quantum-exercises
cd quantum-exercises
uv tool install --editable .
--editable keeps qx pointed at this clone, so it follows your edits and finds
the exercises wherever you run it from, and there is no qx init step because the
exercises are already there.
If you want the exact versions this repository is tested against rather than a
fresh resolution, use uv sync --locked instead: uv tool install does not read
uv.lock at all, and has no flag that makes it.
4. Check that it worked
qx doctor
Every check names the problem and the fix when something is wrong. The circuit smoke test actually builds a Hadamard and samples it, so an install that imports but cannot execute is caught here rather than three exercises later.
qx doctor never touches the network. It reads your machine: interpreter,
packages, exercises, and whether an account file exists. That is enough to start
the course, and it is why the account row says saved rather than works. A key
IBM revoked yesterday still sits in that file today.
The one command that does ask IBM adds a tenth row to the same table:
qx doctor --online
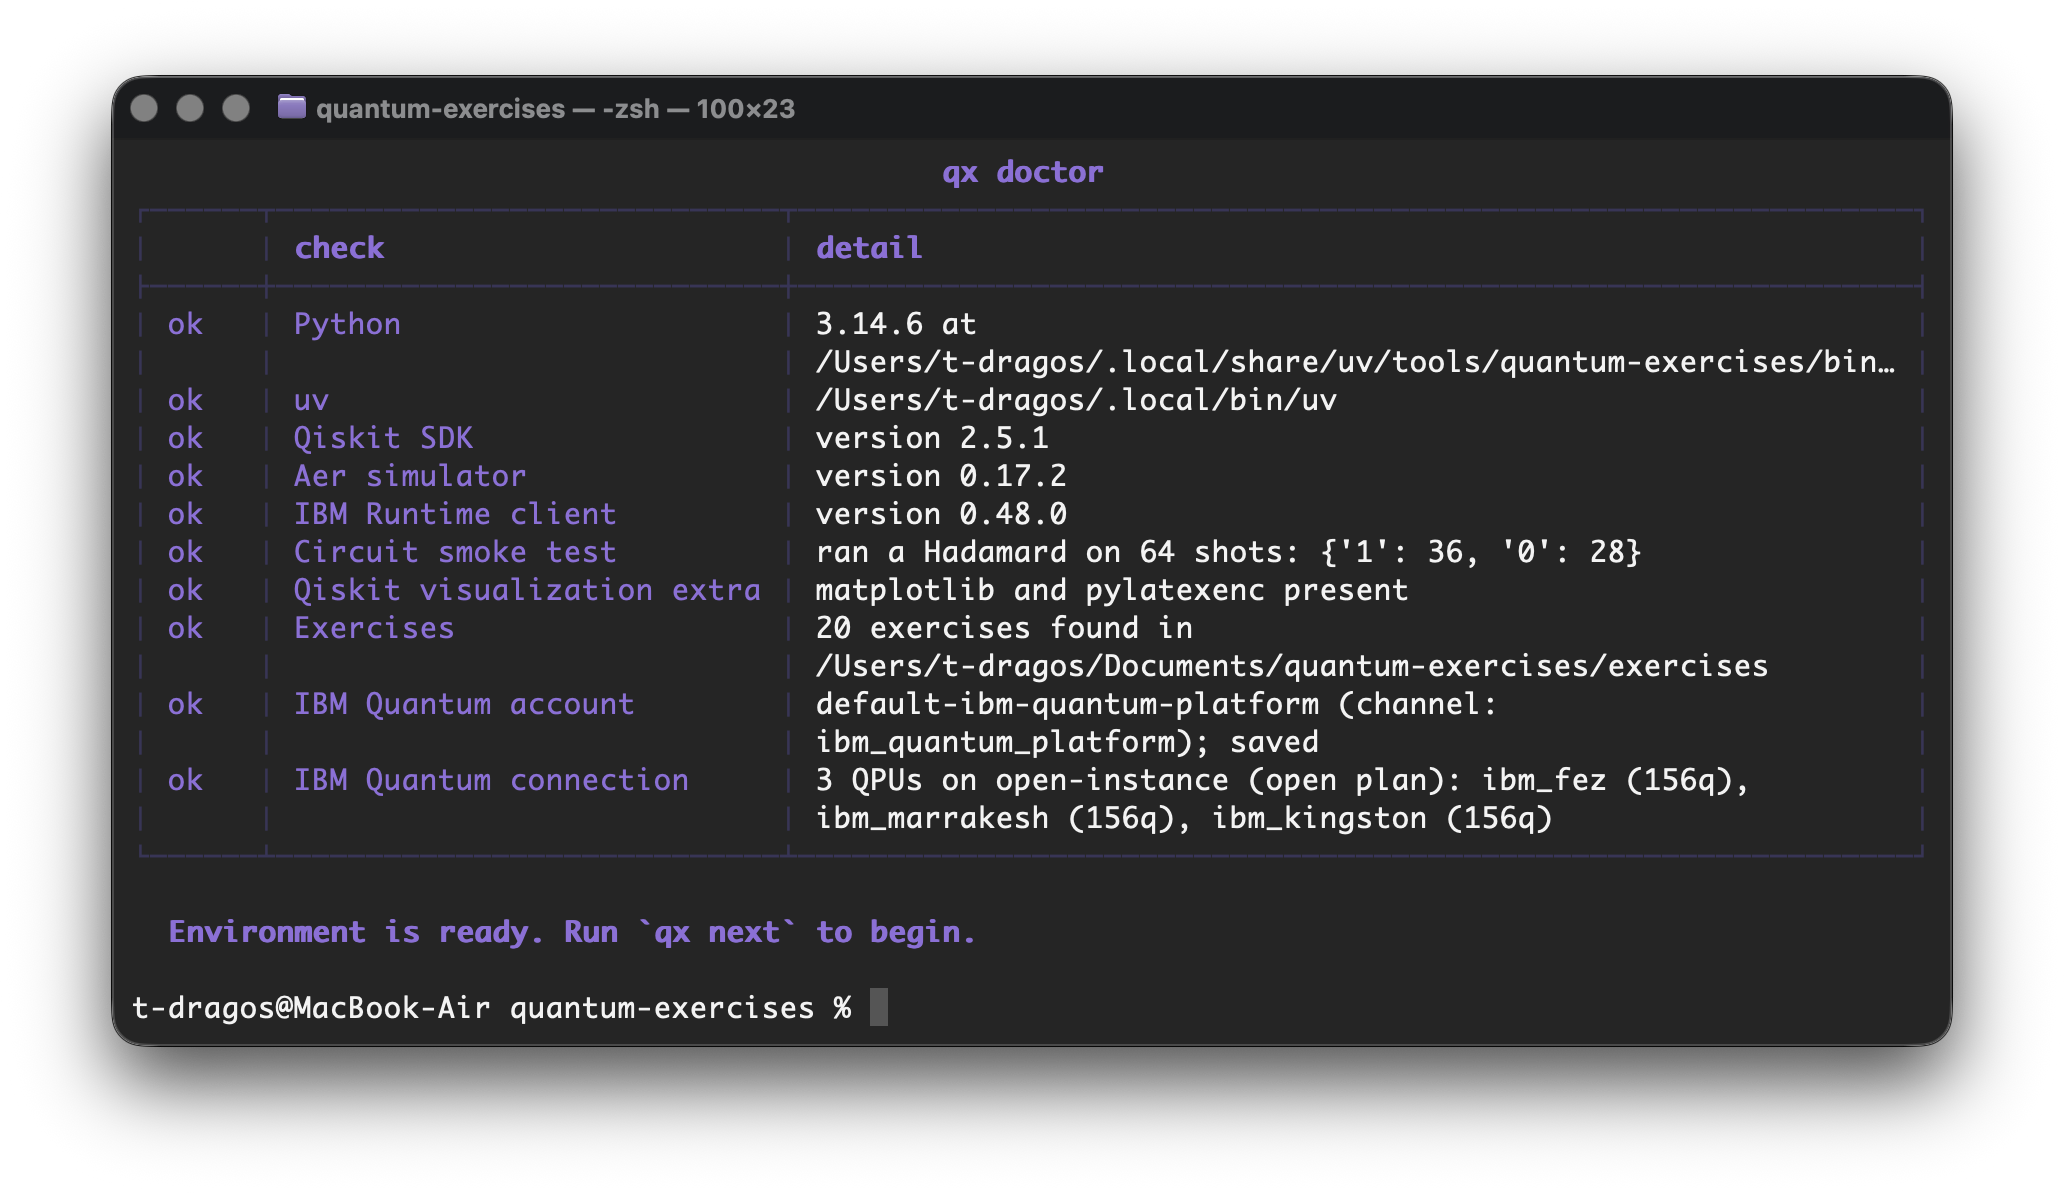
That last row signs in with the saved key and lists the QPUs your plan can reach.
Use it when you want to know the key is still good before spending a queue slot on
it. It costs no QPU time, it needs an account, and it is the only part of doctor
that can fail because of your network rather than your laptop.
An IBM Quantum account is optional. Every exercise runs on a local simulator
without one, and plain qx doctor reports that as a note rather than a problem.
5. Start
qx next
That prints the first unfinished exercise and two paths: the README.md holding
the lesson, and the exercise.py you edit. Read the first, fill in the TODOs in
the second, save, and run qx run.
Every exercise is written to be read before it is solved. The TODOs are short on purpose, because the explanation they belong to is next to them rather than inside them.
The commands
| Command | What it does |
|---|---|
qx init [dir] |
copy the exercises somewhere you can edit them |
qx init --refresh |
update the lesson files of a course you already have |
qx doctor |
check the environment, step by step |
qx list |
every exercise and your progress |
qx next |
the next thing to work on |
qx run [n] |
check an exercise |
qx watch [n] |
re-check automatically every time you save |
qx hint [n] |
reveal one more hint |
qx solution [n] |
show the answer, recorded as solved rather than done |
qx reset [n] |
restore an exercise to its starting state |
qx version |
versions of the tool and the quantum stack |
Leave the number off and the command picks the first exercise you have not
finished. Numbers, slugs and fragments all work, so qx run 11, qx run bell
and qx run 11_bell_entanglement are the same thing.
You never have to come back here for that list. Typing qx on its own prints it,
along with a short note on where to begin and how to set up an IBM account:
qx
qx --help prints exactly the same thing, so either will do. Note the qx in
front: --help alone is not a command, and your shell will answer
command not found.
qx --help
Every command explains its own options the same way, and that is where the flags not listed above live, including the two that set up an account:
qx doctor --help
If you skipped the install step, everything still works as uv run qx <command>
from inside the repository, and the tool prints whichever form applies to you.
The twenty exercises
Act I - reaching a first result
| # | Exercise | What you come away with |
|---|---|---|
| 01 | Your environment works | Prove the toolchain is real, and learn the one attribute worth printing when a tutorial misbehaves |
| 02 | Counts is just a dictionary | Measurement results are a plain dict. Write the three helpers you will reuse all course |
| 03 | Your first circuit | Build a one-qubit circuit and see the matrix it represents |
| 04 | Measurement, or the result is empty | Forget the measurement and Qiskit hands you nothing, without raising an error. Meet that trap on purpose |
| 05 | Reading counts out of a V2 result | A V2 result has no get_counts(). Learn the three-step path that replaces it |
Act II - understanding what you see
| # | Exercise | What you come away with |
|---|---|---|
| 06 | The Born rule, on paper first | Predict the probabilities before running anything, checked against 4096 real shots |
| 07 | States, amplitudes, and global phase | Prepare two target states, and find out why the runner compares with equiv rather than == |
| 08 | Gates are matrices | Build a controlled-Z out of nothing but Hadamards and a CNOT |
| 09 | Interference: amplitudes that cancel | Two Hadamards undo each other, which no coin can do. This is where the power comes from |
| 10 | Deutsch's algorithm in one query | Turn that cancellation into the first algorithm that provably beats every classical one |
| 11 | Bell state, and which bit is which | The state that started the argument, plus which character of the bitstring is qubit 0 |
Act III - the real world
| # | Exercise | What you come away with |
|---|---|---|
| 12 | Why the simulator runs out | Every qubit doubles the memory. Find the size where a laptop stops being able to check your answer |
| 13 | Code from 2021 that no longer runs | Migrate real 0.x code to 2.x. This is the skill that unblocks every old tutorial you will ever find |
| 14 | A Bell state on a real machine | Transpile to the backend's instruction set and run, on a QPU if you have one |
| 15 | Reading a noisy result honestly | Hardware gives outcomes the theory forbids. Quantify that instead of assuming your circuit is broken |
| 16 | Correcting what readout got wrong | Measure how the device misreads, invert it, and win back most of the gap. Error mitigation, by hand |
Act IV - expectation values, and the Bell inequality
Everything so far ends in counts. There is a second primitive that returns a number instead, and it is the one every serious algorithm is built on. Three exercises to reach it, and then to spend it on the quantity exercise 11 deliberately did not claim to have measured. The last one computes that quantity exactly rather than sampling it, and says so.
| # | Exercise | What you come away with |
|---|---|---|
| 17 | The Estimator, and what it returns | Expectation values instead of shots, computed two ways and shown to agree |
| 18 | A device that only measures Z | Hardware reads one axis. Measuring any other means rotating the state first |
| 19 | The picture behind the numbers | Three expectation values put the qubit on a sphere, where global phase visibly stops mattering |
| 20 | CHSH, the inequality that settles it | Correlate along different axes and reach S = 2.83, past the 2 that any pre-agreed answer is stuck below |
How answers are checked
Not by comparing your code to the solution. The runner inspects the objects your code produces:
- states with
Statevector.equiv, which ignores global phase, because no experiment can detect it - gates with
Operator.equiv, same reasoning - measurement counts never for exact equality. Sampling is random.
Proportions are checked against the binomial standard error
SE = sqrt(p(1-p)/N)at a 4-sigma tolerance, and whole distributions with a chi-square test
So an answer that is right for reasons the author did not anticipate still passes, and an answer that only looks right does not.
Your file runs in a separate process with a time limit, so an infinite loop or a crash costs you one run rather than your terminal session.
Working in an editor
Open your course folder and you get the exercise on one side and the verdict on the other.
code .
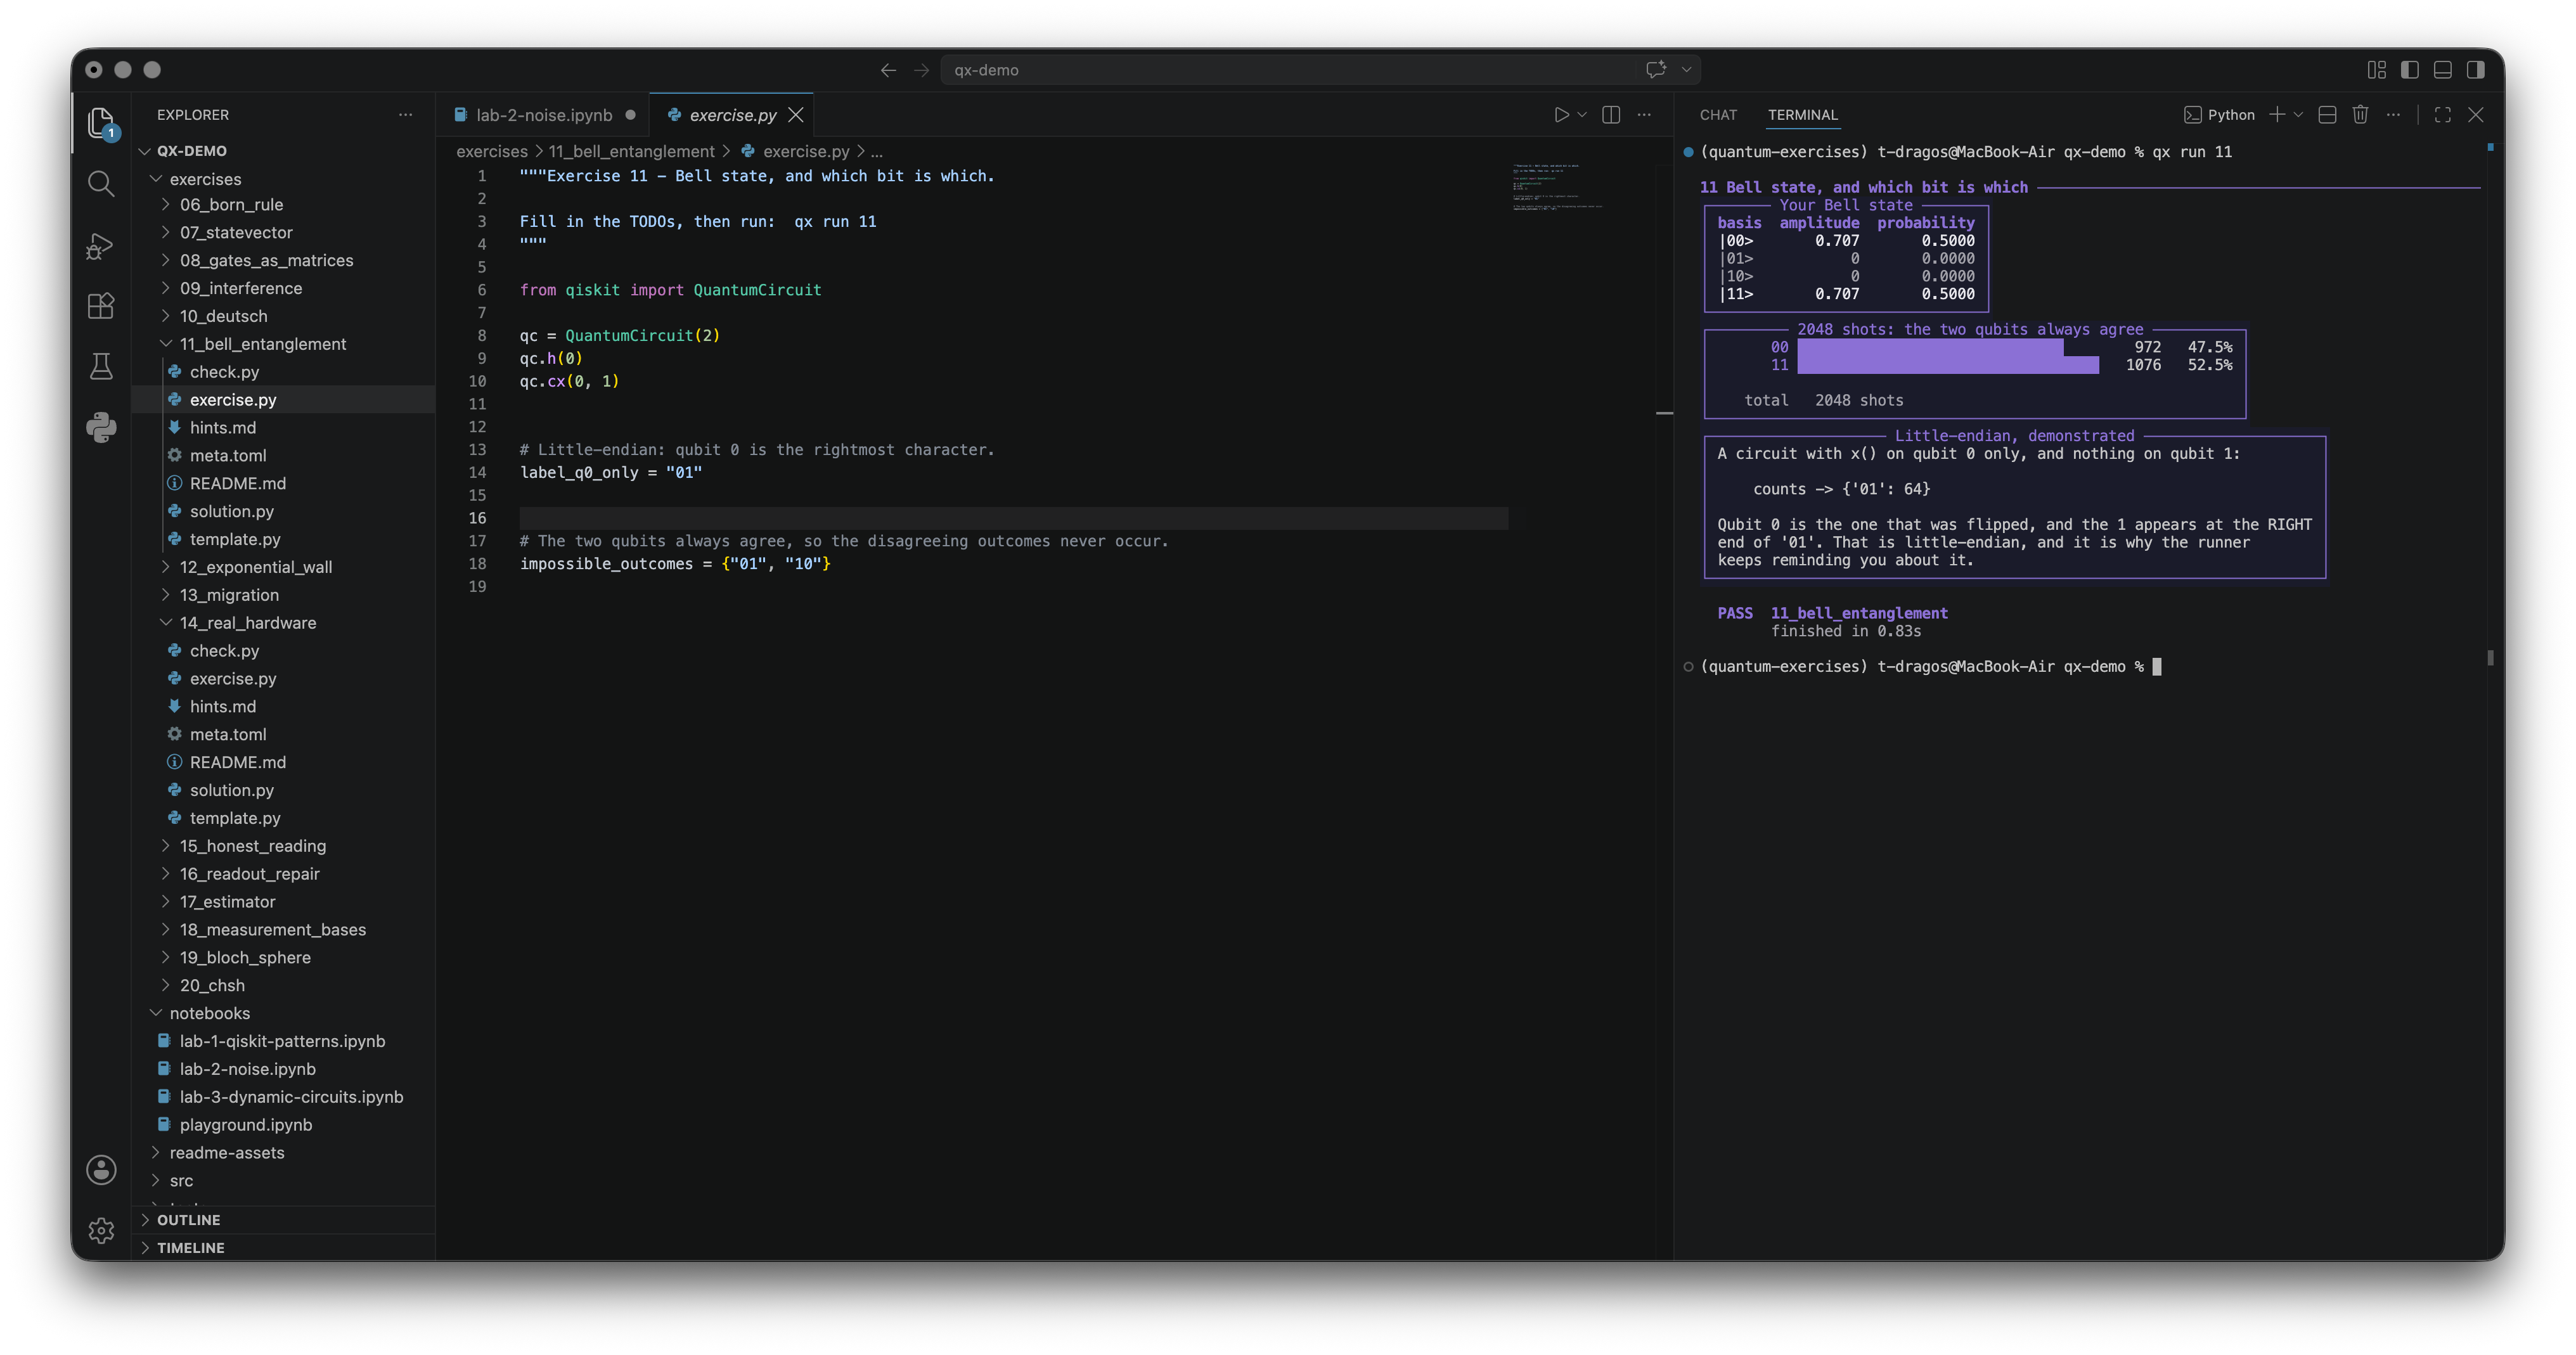
A course made by qx init needs no editor setup at all: qx is on your PATH, so
any terminal in that folder can run it.
The .vscode settings in this repository, which a clone gets and qx init does
not copy, turn on pytest, activate the environment in new terminals, and set ruff
as the formatter. They deliberately do not hardcode an interpreter path,
because uv puts it in .venv/bin on macOS and Linux and .venv/Scripts on
Windows; the Python extension discovers .venv on its own. If it picks the wrong
one, choose it from the status bar.
Editing and rerunning by hand gets old quickly, so there is a watch mode:
qx watch
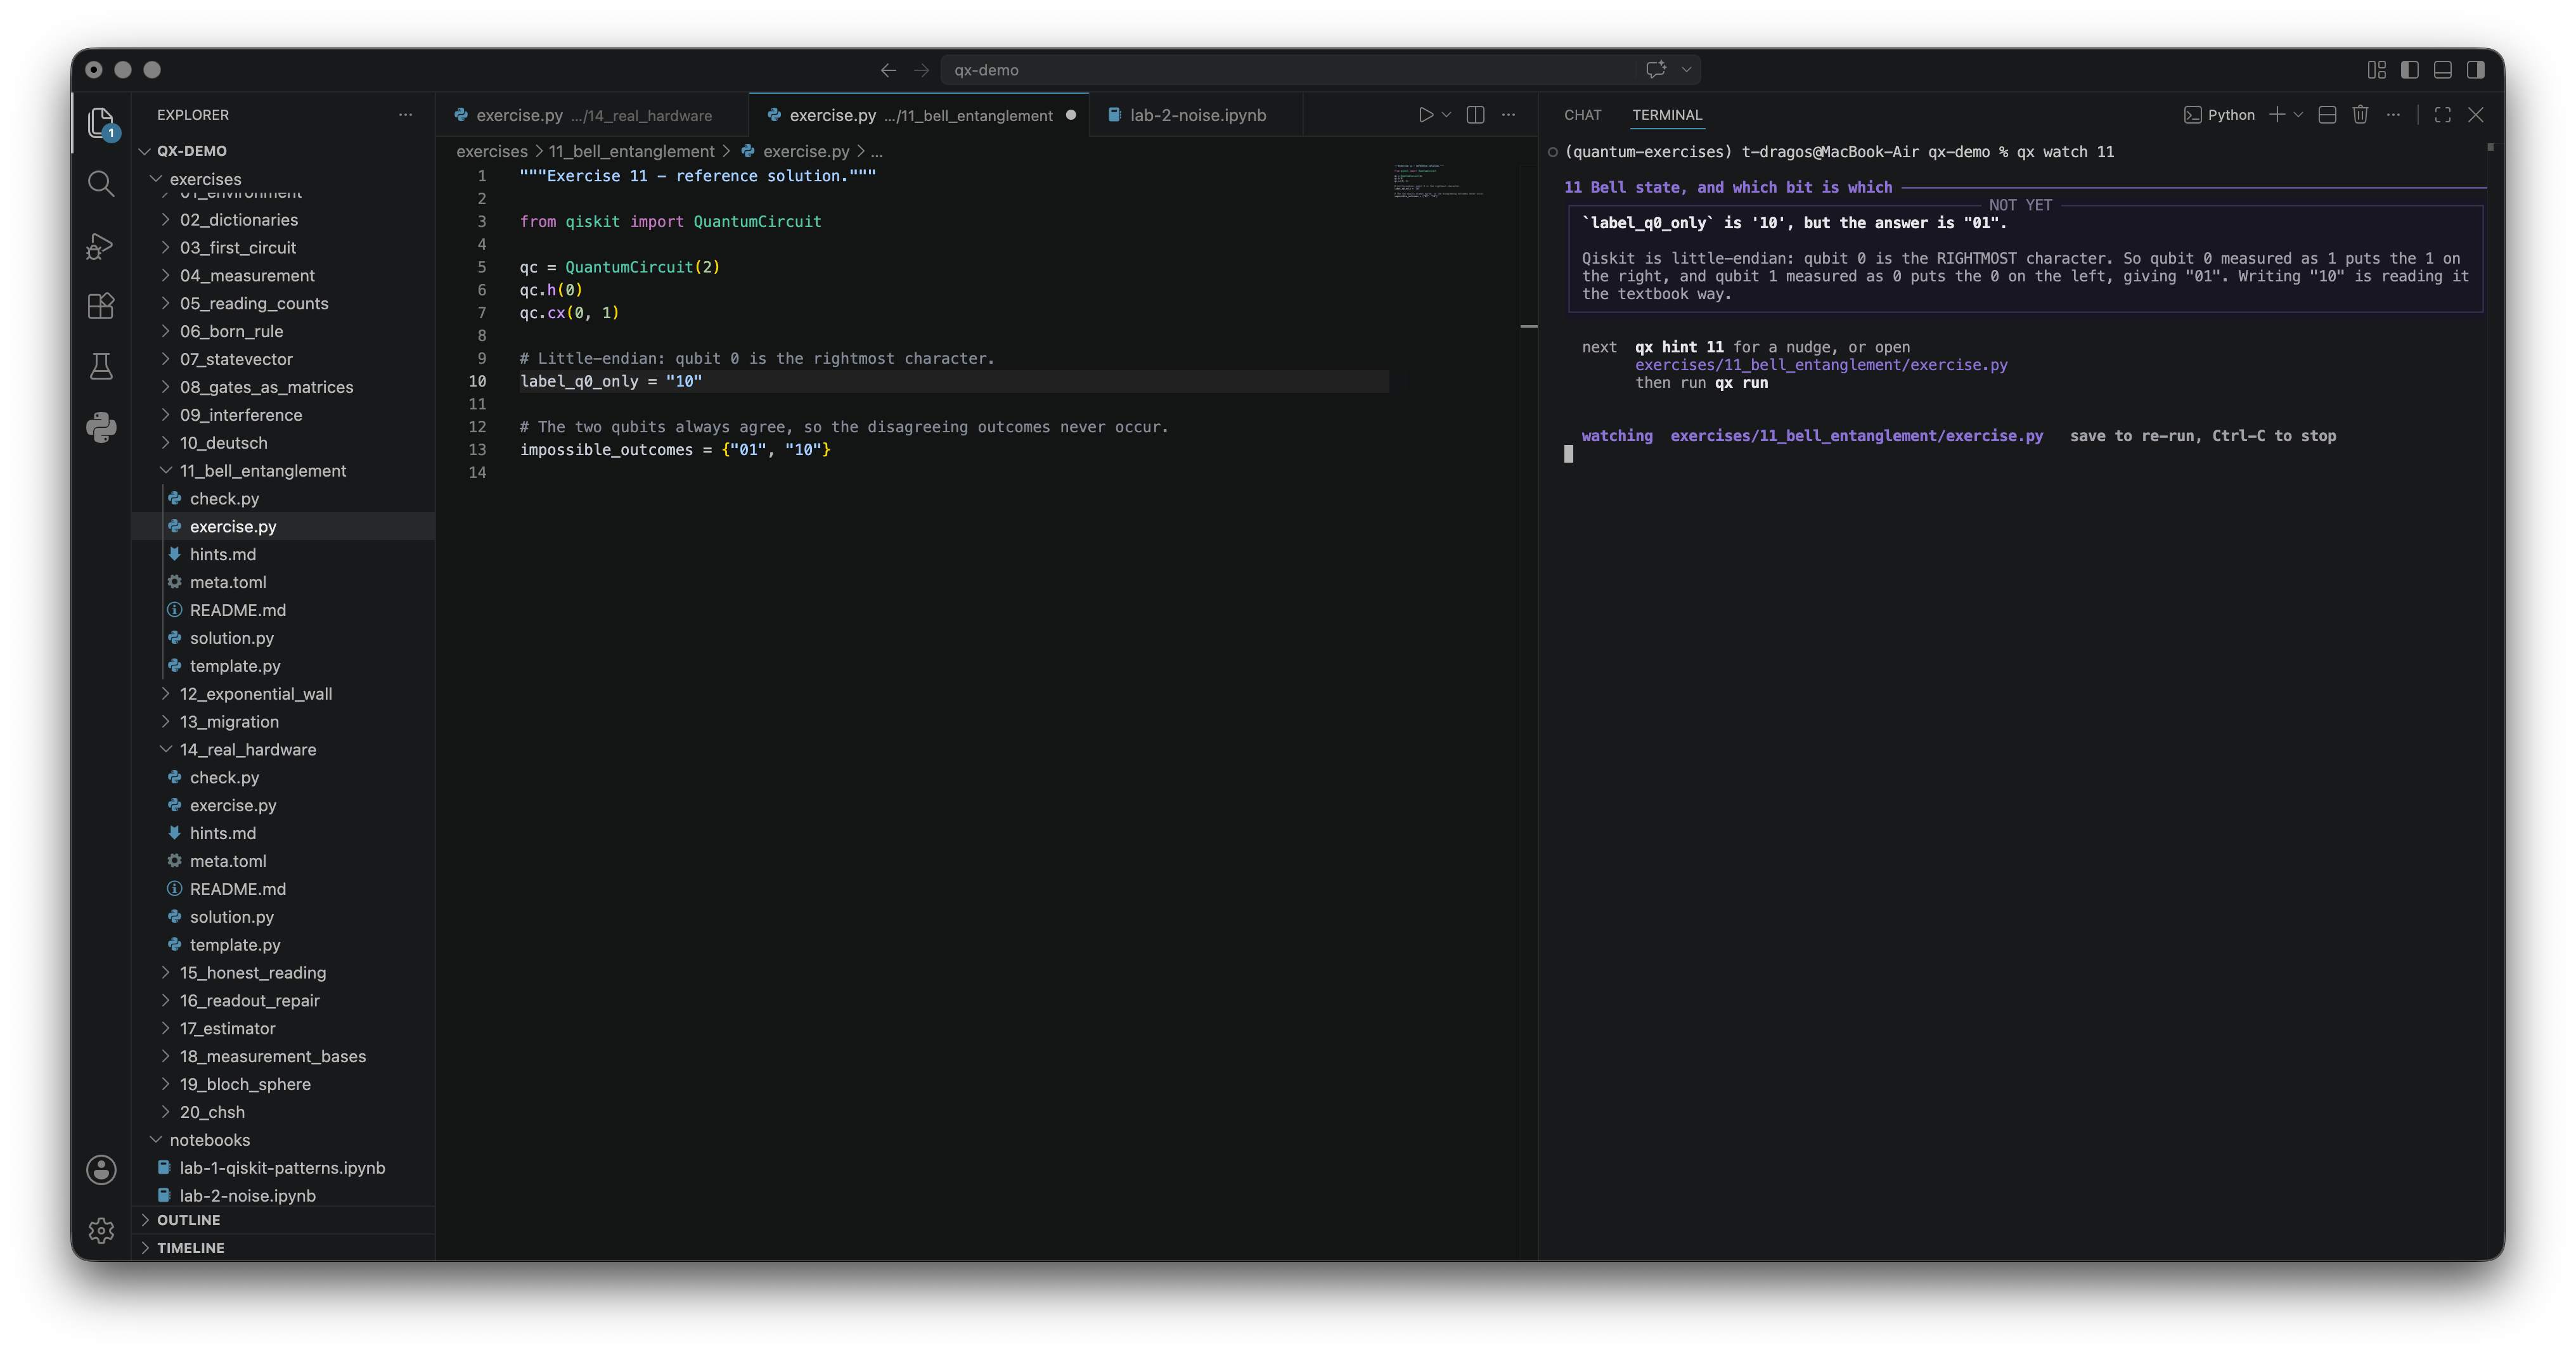
It re-runs on every save and moves to the next exercise on its own when one passes.
The notebooks
Four of them, none graded, all meant to be poked at. CI executes every cell of every one, so none of them can quietly rot.
| Notebook | What it is for |
|---|---|
playground.ipynb |
scratch space. Change numbers, see what moves |
lab-1-qiskit-patterns.ipynb |
the four steps every Qiskit program has: map, optimize, execute, post-process |
lab-2-noise.ipynb |
readout error against gate error, measured on a real device's published rates. Readout wins by more than most people expect |
lab-3-dynamic-circuits.ipynb |
measuring partway through and branching on the result, ending in teleportation |
The exercises are where you are checked. The labs are where you are shown, at a length an exercise cannot afford. Everything runs on a local simulator.
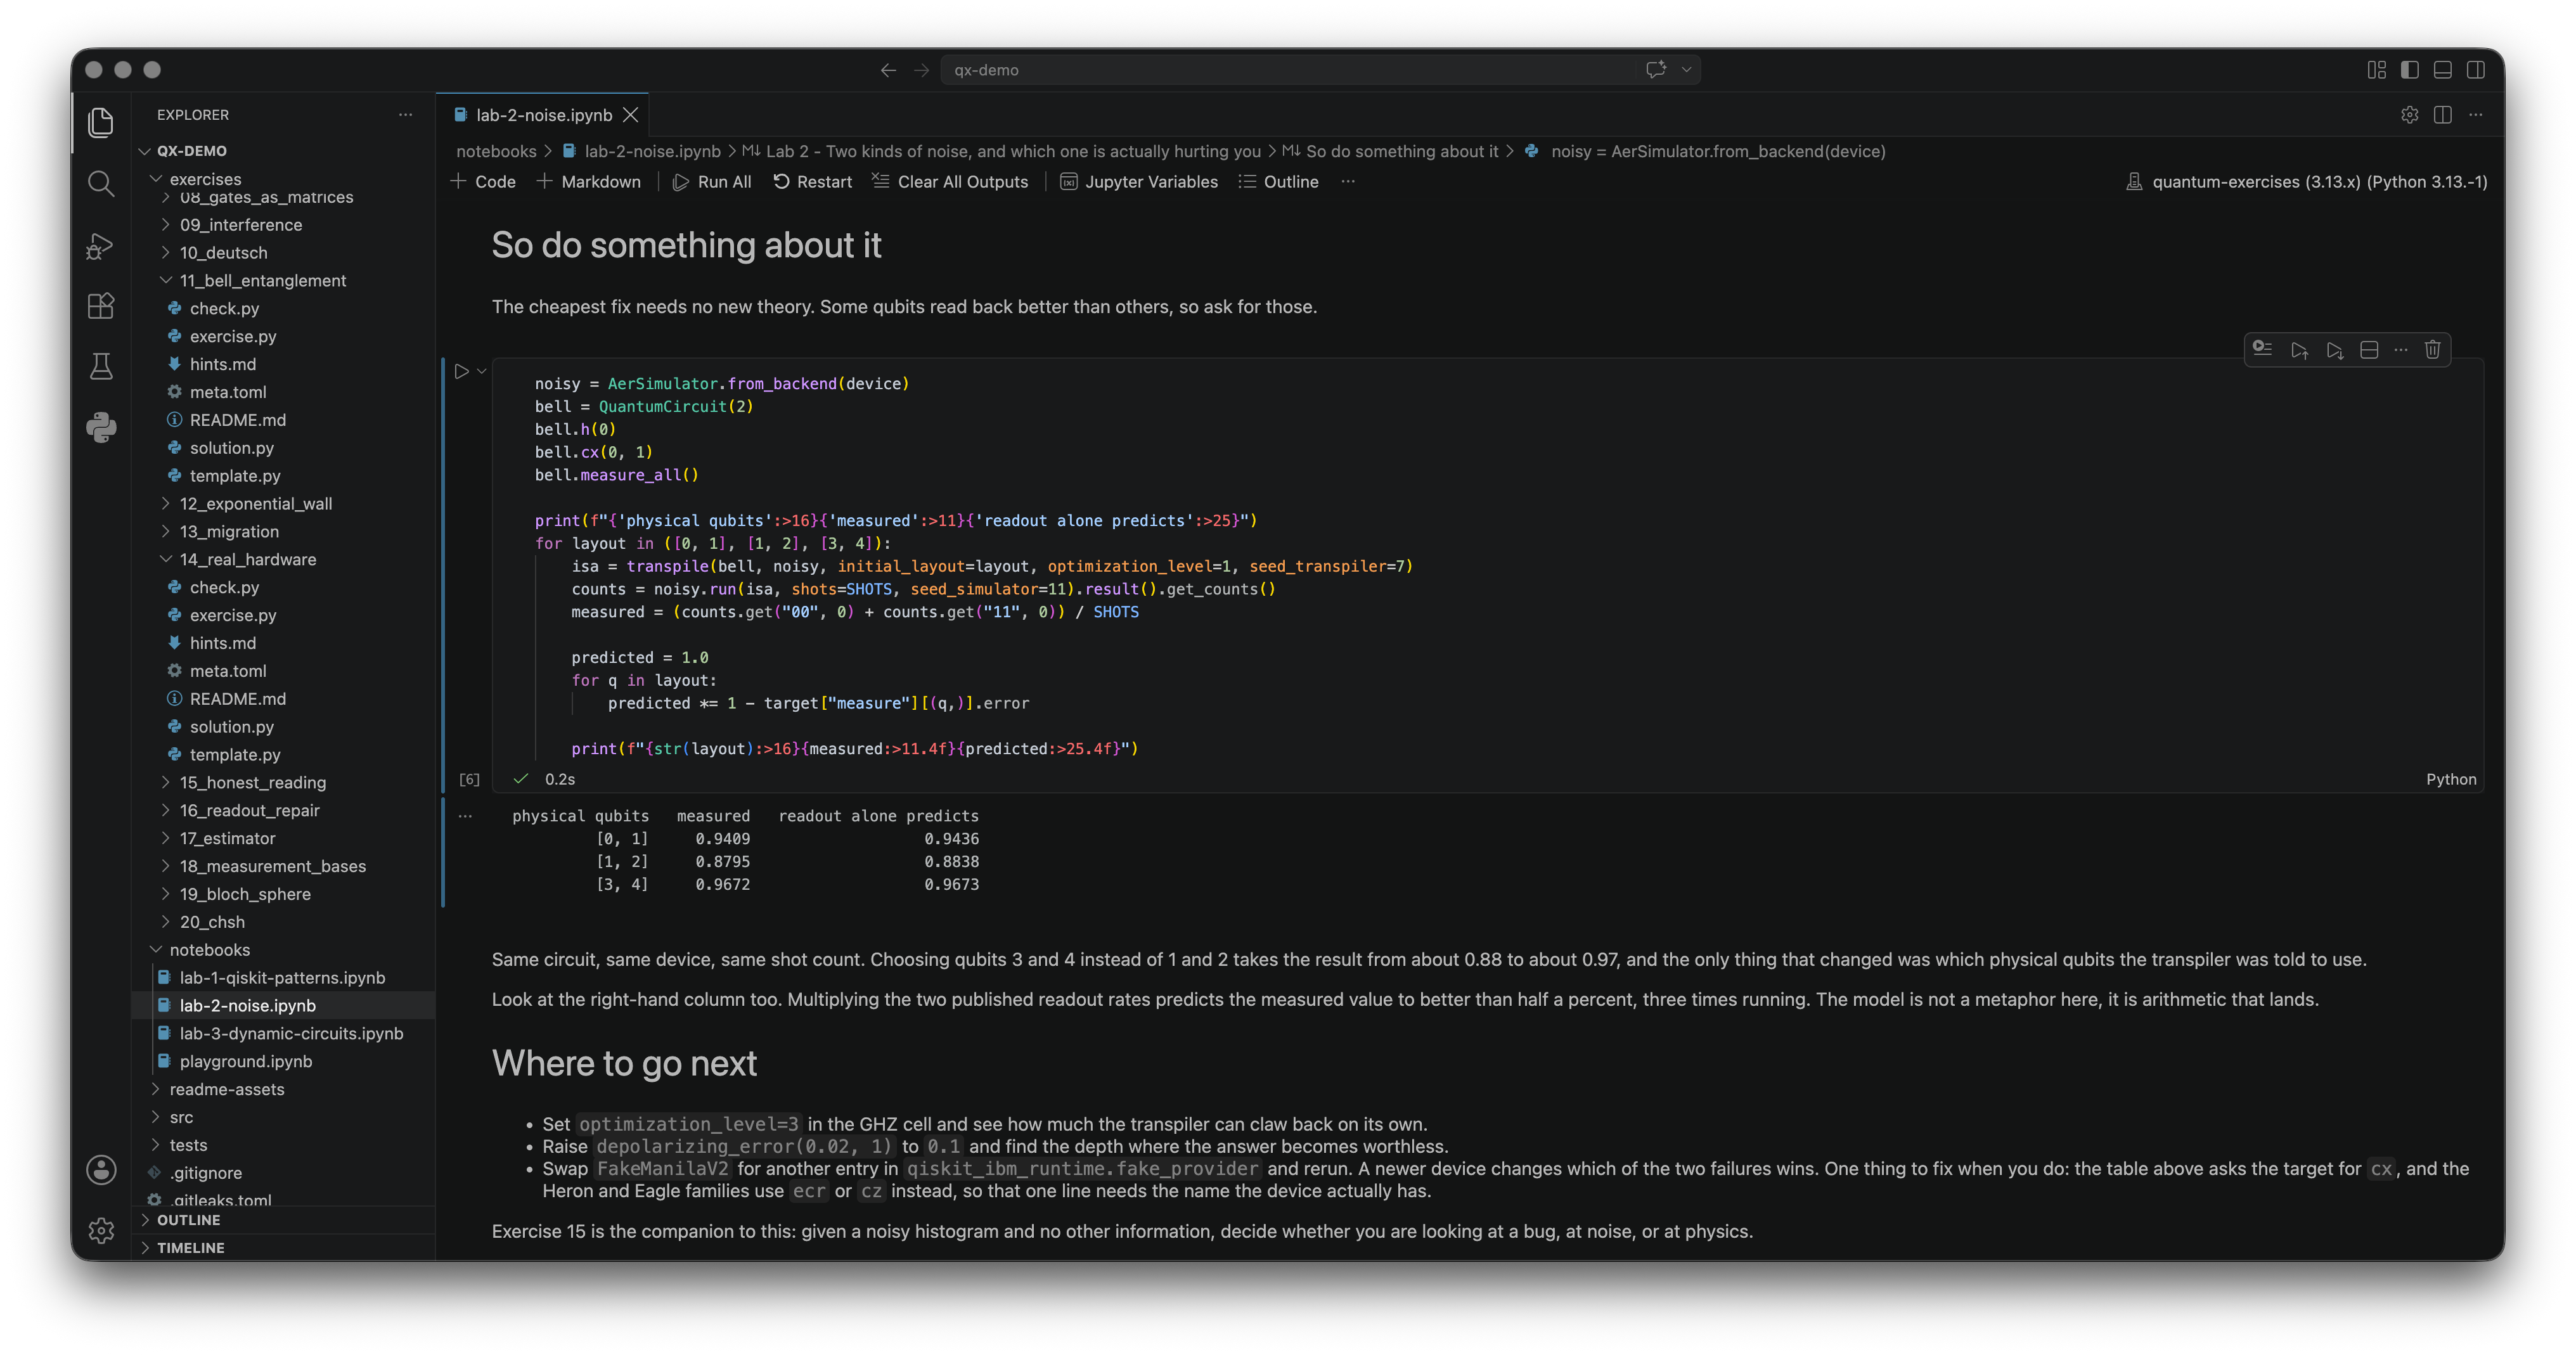
qx init copies them alongside the exercises, and qx itself cannot run them:
installing the tool keeps its dependencies to itself, and a notebook needs a
kernel of its own. One command builds one with everything the labs import:
uv run --with quantum-exercises --with jupyterlab jupyter lab
Nothing is installed permanently by that. uv assembles the environment, runs Jupyter in it, and throws it away when you close it.
In a clone, where there is a pyproject.toml, the shorter form works and uses the
same lockfile the exercises are tested against:
uv sync
That creates .venv in the repository, with the kernel the notebooks run on.
In VS Code the notebook kernel is a separate setting from the Python
interpreter. If qx doctor passes but the notebook cannot import qiskit, that is
the cause: pick the kernel that has it from the picker in the top right, which in
a clone is the one inside .venv.
Running on real hardware
Exercise 14 is the only one that can reach out to IBM, and it degrades gracefully:
- a real QPU, if you have an account and one is reachable
- a local simulator with a noise model copied from real hardware, so the lesson about noise still lands
- a plain noiseless simulator
Whichever it used is printed with the result and recorded in qx list.
Before anything is sent, qx run 14 asks IBM which QPU is free and shows you the
answer:
  least busy  ibm_marrakesh   1 job(s) ahead of you
  all of them https://quantum.cloud.ibm.com/computers

  Send it now? Answering no changes nothing and costs nothing [y/N]:
That question costs no QPU time, and answering no costs nothing either. Say yes
and qx waits for the result for up to three hours, which is what a real queue
can take. Ctrl-C stops the waiting, not the job: the job keeps running at IBM and
its result stays in your account on
IBM Quantum Platform.
The question is skipped whenever there is nothing to decide: no account, no
network, or QX_OFFLINE set.
A run with no terminal to answer in, so a script, a CI job or an editor task,
stays on the local simulator and says so rather than sending a job nobody agreed
to. qx watch does the same, because it re-runs on every save and asks nothing.
Nothing automated reaches a QPU.
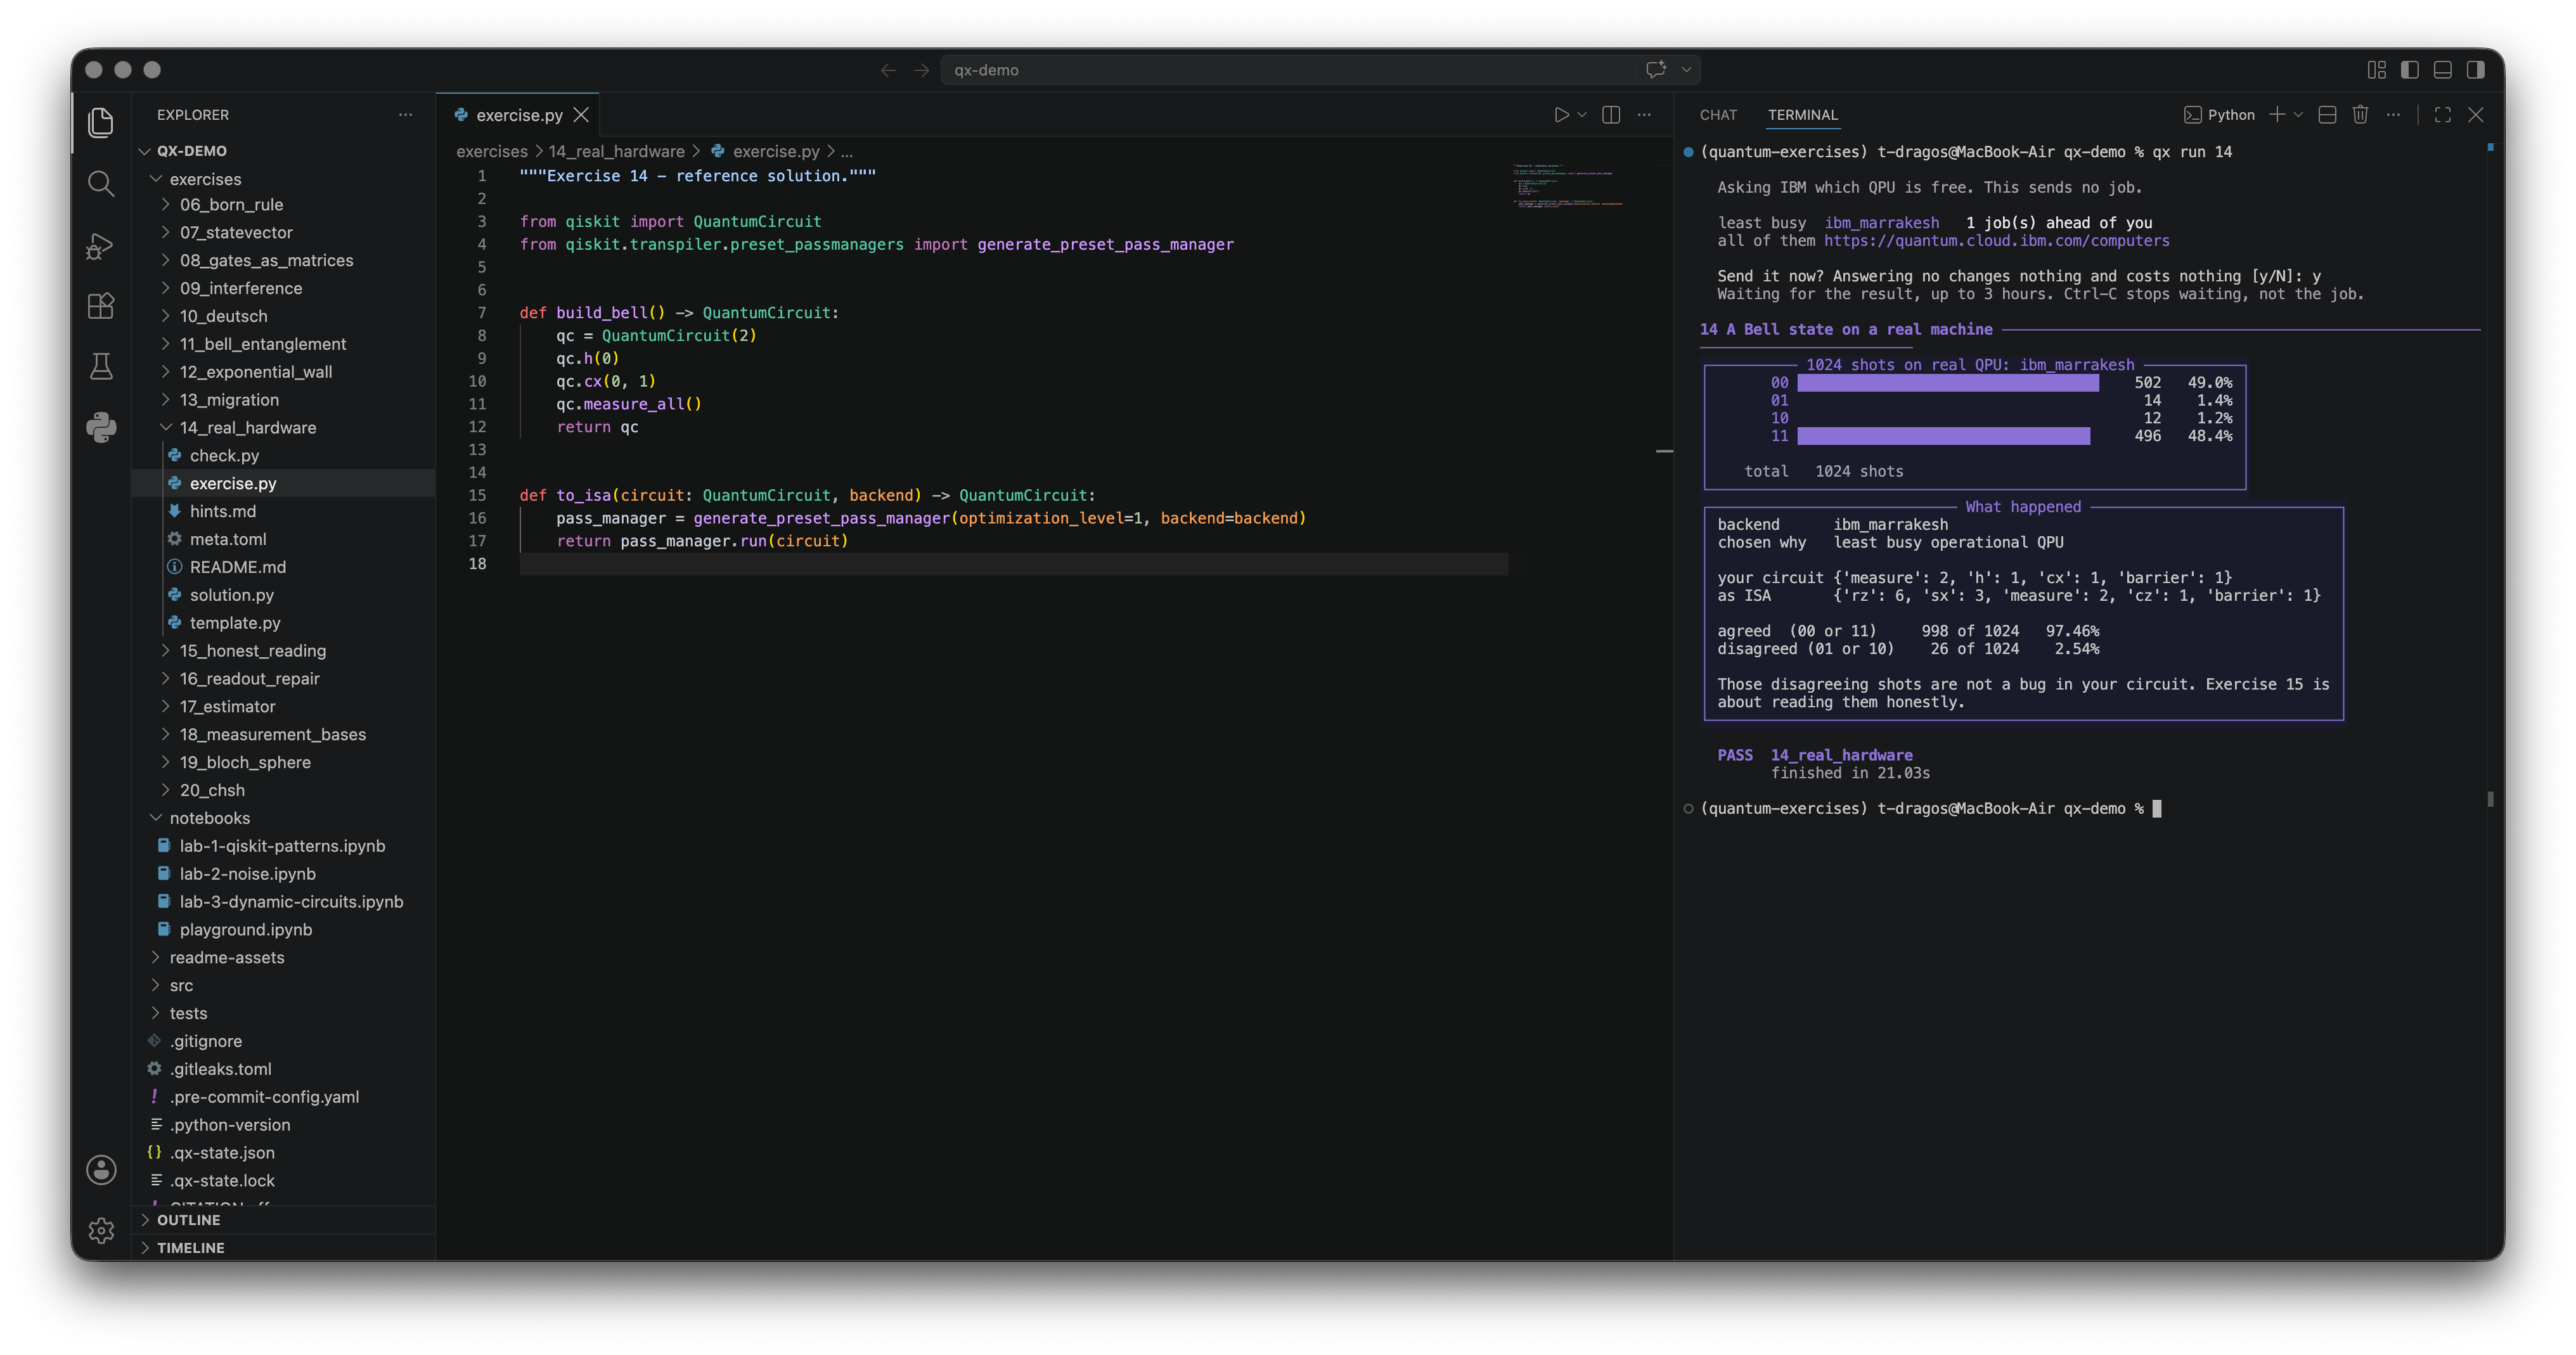
Those 01 and 10 shots are the point of the exercise that follows. An ideal
Bell state forbids them; a real machine produces them anyway, and exercise 15 is
about quantifying that instead of assuming your circuit is broken.
To set up an account:
qx doctor --save-account
It asks for two things, and only the first is required.
| Field | Where it comes from |
|---|---|
| API key | IBM Cloud, Manage › Access (IAM) › API keys. Create one, and copy it straight away: it is shown once and never again. |
| Instance CRN | Optional. Press Enter and the account uses whichever instance it finds. Fill it in only if you have several and want one of them by default. Your instances are listed on IBM Quantum Platform. |
The key is read without echo, so it never appears on screen or in your shell
history. If the terminal cannot suppress echo, qx refuses to read it at all
rather than printing it.
Qiskit stores the key unencrypted at ~/.qiskit/qiskit-ibm.json, outside this
repository, so it cannot be committed by accident, and qx tightens the file to
be readable only by you.
If a key later stops working, qx doctor will still say the account is saved,
because that check only reads the file. The one that asks IBM is:
qx doctor --online
To force the offline path even when you do have an account:
QX_OFFLINE=1 qx run 14
PowerShell has no prefix form, so set it first. It stays set for that window:
$env:QX_OFFLINE = '1'; qx run 14
CI always sets QX_OFFLINE, so no automated run can ever spend your free QPU
minutes.
Contributing
See CONTRIBUTING.md. Adding an exercise means creating one directory; the test suite enforces the rest. The full dependency inventory, with the reason each one is present, lives there too.
Security
Reporting, and what the tool does with your IBM API key, are in
SECURITY.md. The short version: an account is optional, the key
never reaches this repository, and qx run executes check.py from whichever
copy you cloned, so clone from a source you trust.
Author
Tugui Dragos, tuguidragos.com.
If you use this project in written work, CITATION.cff has the metadata; GitHub turns it into a formatted citation from the sidebar.
The notebook
Everything I learn about quantum computing, written down in order, at tuguidragos.com. Five notes, picked fresh on the 1st and the 15th:
- A qubit is not a coin under a cup
- Three quantum ways to diagonalize a giant matrix
- I Just Earned My Second IBM Quantum Badge, and It Says Advanced
- Active recall for hard technical subjects
- Quantum gates are just matrices you can run by hand
License
MIT. See LICENSE.
Qiskit is a trademark of IBM. This project is not affiliated with or endorsed by IBM. It is an independent set of exercises that happens to be written for Qiskit, which is why neither the project name nor the command contains "Qiskit" or "IBM".
1 maintainer

Metadata
1 maintainer
Release files for quantum-exercises 0.8.5
For a detailed explanation of source distributions (sdists) and built distributions (wheels), please see the package formats documentation.
Source distribution (sdist)
| File | Size | Uploaded | |
|---|---|---|---|
| quantum_exercises-0.8.5.tar.gz | 526.4 kB | Details |
Built distribution (wheel)
| File | Interpreter | ABI | Platform | Reset |
|---|---|---|---|---|
| quantum_exercises-0.8.5-py3-none-any.whl | Python 3 | none | any | Details |
Total release size: 767.3 kB
Release files / quantum_exercises-0.8.5.tar.gz
| Download URL | quantum_exercises-0.8.5.tar.gz |
|---|---|
| Size | 526.4 kB |
| Tags | Source |
|
SHA-256 checksum How to use checksums |
da531259e33ee0628ca8382f479af0aa4939462c46742601de7871d3df8b128c
|
|
BLAKE2b-256 checksum How to use checksums |
0ed3e9a98dfd24042a7cee638e1040017bb332158ad19dfc752b61e38a103e2e
|
| Upload date | |
|
Uploaded using Trusted Publishing? What is trusted publishing? |
Yes |
| Uploaded via |
twine/7.0.0 CPython/3.13.14
|
Provenance
Provenance describes where a file came from. On PyPI, provenance is shared via attestations, which provide a verifiable record of the build or publishing details. View details, limitations and caveats.


PyPI Publish Attestation
PyPI verified that this artifact, at this checksum, originated from the publisher listed below.
Signed by GitHub Actions, verified by PyPI on Aug 14, 2026.
Transparency logRelease files / quantum_exercises-0.8.5-py3-none-any.whl
| Download URL | quantum_exercises-0.8.5-py3-none-any.whl |
|---|---|
| Size | 240.9 kB |
| Tags | Python 3 |
|
SHA-256 checksum How to use checksums |
b5c9981edd461407d3cad1356fc27c57b4043a98c14f9fc4ad30ced276fc1d47
|
|
BLAKE2b-256 checksum How to use checksums |
a08ca439b402102a918f680df9884c1cafb82418aa710733540bddc6d32cdbb6
|
| Upload date | |
|
Uploaded using Trusted Publishing? What is trusted publishing? |
Yes |
| Uploaded via |
twine/7.0.0 CPython/3.13.14
|
Provenance
Provenance describes where a file came from. On PyPI, provenance is shared via attestations, which provide a verifiable record of the build or publishing details. View details, limitations and caveats.
PyPI Publish Attestation
PyPI verified that this artifact, at this checksum, originated from the publisher listed below.
Signed by GitHub Actions, verified by PyPI on Aug 14, 2026.
Transparency log













