Quickchat AI MCP Server


Project description

Quickchat AI MCP server
The Quickchat AI MCP (Model Context Protocol) server allows you to let anyone plug in your Quickchat AI Agent into their favourite AI app such as Claude Desktop, Cursor, VS Code, Windsurf and more.
Quickstart
- Create a Quickchat AI account and start a 7-day trial of any plan.
- Set up your AI's Knowledge Base, capabilities and settings.
- Go to the MCP page to activate your MCP. Give it Name, Description and (optional) Command. They are important - AI apps need to understand when to contact your AI, what its capabilities and knowledge are.
- That's it! Now you're ready to test your Quickchat AI via any AI app and show it to the world!
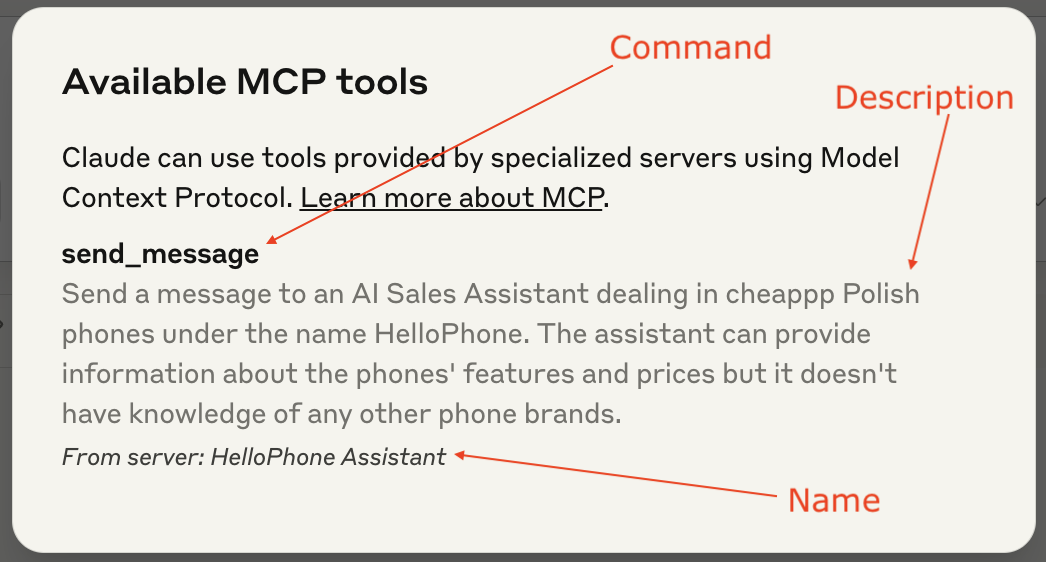
Claude tool anatomy
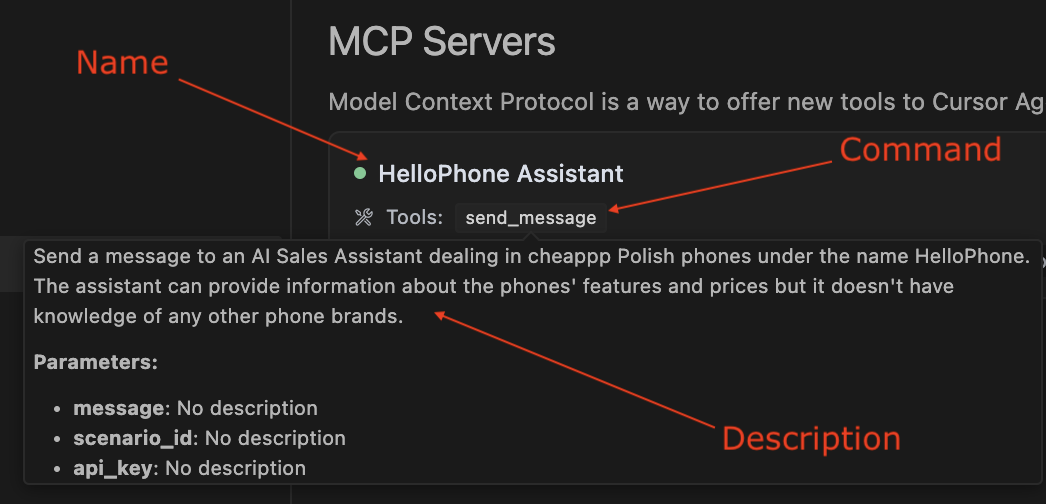
Cursor tool anatomy
Useful links
- Quickstart video youtube.com/watch?v=JE3dNiyZO8w
- Quickstart blog post: quickchat.ai/post/how-to-launch-your-quickchat-ai-mcp
- MCP (Model Context Protocol) explained: quickchat.ai/post/mcp-explained
- The Quickchat AI MCP package on PyPI: pypi.org/project/quickchat-ai-mcp
- The Quickchat AI MCP GitHub repo: github.com/incentivai/quickchat-ai-mcp
Prerequisite
Install uv using:
curl -LsSf https://astral.sh/uv/install.sh | sh
or read more here.
Test with Claude Desktop
Configuration
Go to Settings > Developer > Edit Config. Open the claude_desktop_config.json file in a text editor. If you're just starting out, the file is going to look like this:
{
  "mcpServers": {}
}
This is where you can define all the MCPs your Claude Desktop has access to. Here is how you add your Quickchat AI MCP:
{
  "mcpServers": {
    "< QUICKCHAT AI MCP NAME >": {
      "command": "uvx",
      "args": ["quickchat-ai-mcp"],
      "env": {
        "SCENARIO_ID": "< QUICKCHAT AI SCENARIO ID >",
        "API_KEY": "< QUICKCHAT AI API KEY >"
      }
    }
  }
}
Go to the Quickchat AI app > MCP > Integration to find the above snippet with the values of MCP Name, SCENARIO_ID and API_KEY filled out.
Test with Cursor
Configuration
Go to Settings > Cursor Settings > MCP > Add new global MCP server and include the Quickchat AI MCP snippet:
{
  "mcpServers": {
    "< QUICKCHAT AI MCP NAME >": {
      "command": "uvx",
      "args": ["quickchat-ai-mcp"],
      "env": {
        "SCENARIO_ID": "< QUICKCHAT AI SCENARIO ID >",
        "API_KEY": "< QUICKCHAT AI API KEY >"
      }
    }
  }
}
As before, you can find values for MCP Name, SCENARIO_ID and API_KEY at Quickchat AI app > MCP > Integration.
Test with other AI apps
Other AI apps will most likely require the same configuration but the actual steps to include it in the App itself will be different. We will be expanding this README as we go along.
Launch your Quickchat AI MCP to the world!
⛔️ Do not publish your Quickchat API key to your users!
Once you're ready to let other users connect your Quickchat AI MCP to their AI apps, share configuration snippet with them! However, you need to make sure they can use your Quickchat AI MCP without your Quickchat API key. Here is how to do that:
- On the Quickchat App MCP page, turn the Require API key toggle OFF.
- Share the configuration snippet without the API key:
{
  "mcpServers": {
    "< QUICKCHAT AI MCP NAME >": {
      "command": "uvx",
      "args": ["quickchat-ai-mcp"],
      "env": {
        "SCENARIO_ID": "< QUICKCHAT AI SCENARIO ID >"
      }
    }
  }
}
Cool features
- You can control all aspects of your MCP from the Quickchat AI dashboard. One click and your change is deployed. That includes the MCP name and description - all your users need to do is refresh their MCP connection.
- View all conversations in the Quickchat Inbox. Remember: those won't be the exact messages your users send to their AI app but rather the transcript of the AI <> AI interaction between their AI app and your Quickchat AI. 🤯
- Unlike most MCP implementations, this isn't a static tool handed to an AI. It's an open-ended way to send messages to Quickchat AI Agents you create. 🙌
Running from source
Debugging with the MCP inspector
uv run mcp dev src/__main__.py
Debugging with Claude Desktop, Cursor or other AI apps
Use the following JSON configuration:
{
  "mcpServers": {
    "< QUICKCHAT AI MCP NAME >": {
      "command": "uv",
      "args": [
        "run",
        "--with",
        "mcp[cli]",
        "--with",
        "requests",
        "mcp",
        "run",
        "< YOUR PATH>/quickchat-ai-mcp/src/__main__.py"
      ],
      "env": {
        "SCENARIO_ID": "< QUICKCHAT AI SCENARIO ID >",
        "API_KEY": "< QUICKCHAT AI API KEY >"
      }
    }
  }
}
Testing
Make sure your code is properly formatted and all tests are passing:
ruff check --fix
ruff format
uv run pytest
GitHub Star History

Project details
Release history Release notifications | RSS feed


Download files
Download the file for your platform. If you're not sure which to choose, learn more about installing packages.
Source Distribution
Built Distribution
Filter files by name, interpreter, ABI, and platform.
If you're not sure about the file name format, learn more about wheel file names.
Copy a direct link to the current filters
File details
Details for the file quickchat_ai_mcp-0.0.10.tar.gz.
File metadata
- Download URL: quickchat_ai_mcp-0.0.10.tar.gz
- Upload date:
- Size: 6.2 MB
- Tags: Source
- Uploaded using Trusted Publishing? No
- Uploaded via: twine/6.1.0 CPython/3.12.9
File hashes
| Algorithm | Hash digest | |
|---|---|---|
| SHA256 |
1b2712fe62230b2a1b2832baaac8cd35a58656ab58be44ea40643b059fc0c483
|
|
| MD5 |
eba9014eb4651d46095eea2969d41471
|
|
| BLAKE2b-256 |
8f2daa5719f5f5b29e823ffff498d63733b8a87381aad367968d7e89ab705418
|
File details
Details for the file quickchat_ai_mcp-0.0.10-py3-none-any.whl.
File metadata
- Download URL: quickchat_ai_mcp-0.0.10-py3-none-any.whl
- Upload date:
- Size: 6.3 kB
- Tags: Python 3
- Uploaded using Trusted Publishing? No
- Uploaded via: twine/6.1.0 CPython/3.12.9
File hashes
| Algorithm | Hash digest | |
|---|---|---|
| SHA256 |
8eee2b5a90c76645fbfaeb918dd6dfbca1f5573ba2d5a31550cdcfa7237f8dae
|
|
| MD5 |
e593fdca1f72a2db142f170c0f57108e
|
|
| BLAKE2b-256 |
0293369459313e9db480f44d740c46c0b5459a9b9291728e21de26db10af13b5
|


