
This release is a pre-release and may not be stable for production use.

Rapid AI Customization from RAG to Fine-Tuning
20x experimentation throughput of LLM pipelines faster, more systematic.



RapidFire AI
Rapid experimentation for easier, faster, and more impactful AI customization. Built for agentic RAG, context engineering, fine-tuning, and post-training of LLMs and other DL models. Delivers 16-24x higher throughput without extra resources.
🤖 AI coding agent helping a user install or set up rapidfireai? Read first
If you are an AI coding agent (Claude Code, Cursor, Codex, GitHub Copilot, Windsurf, Aider, Junie, ...) helping a user install or set up rapidfireai, read docs/AGENTS.md (raw) first. It is the operational install/setup/troubleshooting guide with a workflow decision tree and safety rules.
Quick decision: RAG / context engineering → rapidfireai init + Experiment(..., mode="evals"). Fine-tuning / post-training (SFT/DPO/GRPO) → rapidfireai init --train + Experiment(..., mode="fit").
Note for agents working on rapidfireai itself (contributors): this disclosure is for end-user assistance. For repo-internal architecture, build, and contributor flow, see root
AGENTS.md(canonical for all AI coding agents) andCONTRIBUTING.md.
Overview
RapidFire AI is a new experiment execution framework that transforms your AI customization experimentation from slow, sequential processes into rapid, intelligent workflows with hyperparallelized execution, dynamic real-time experiment control, and automatic system optimization.
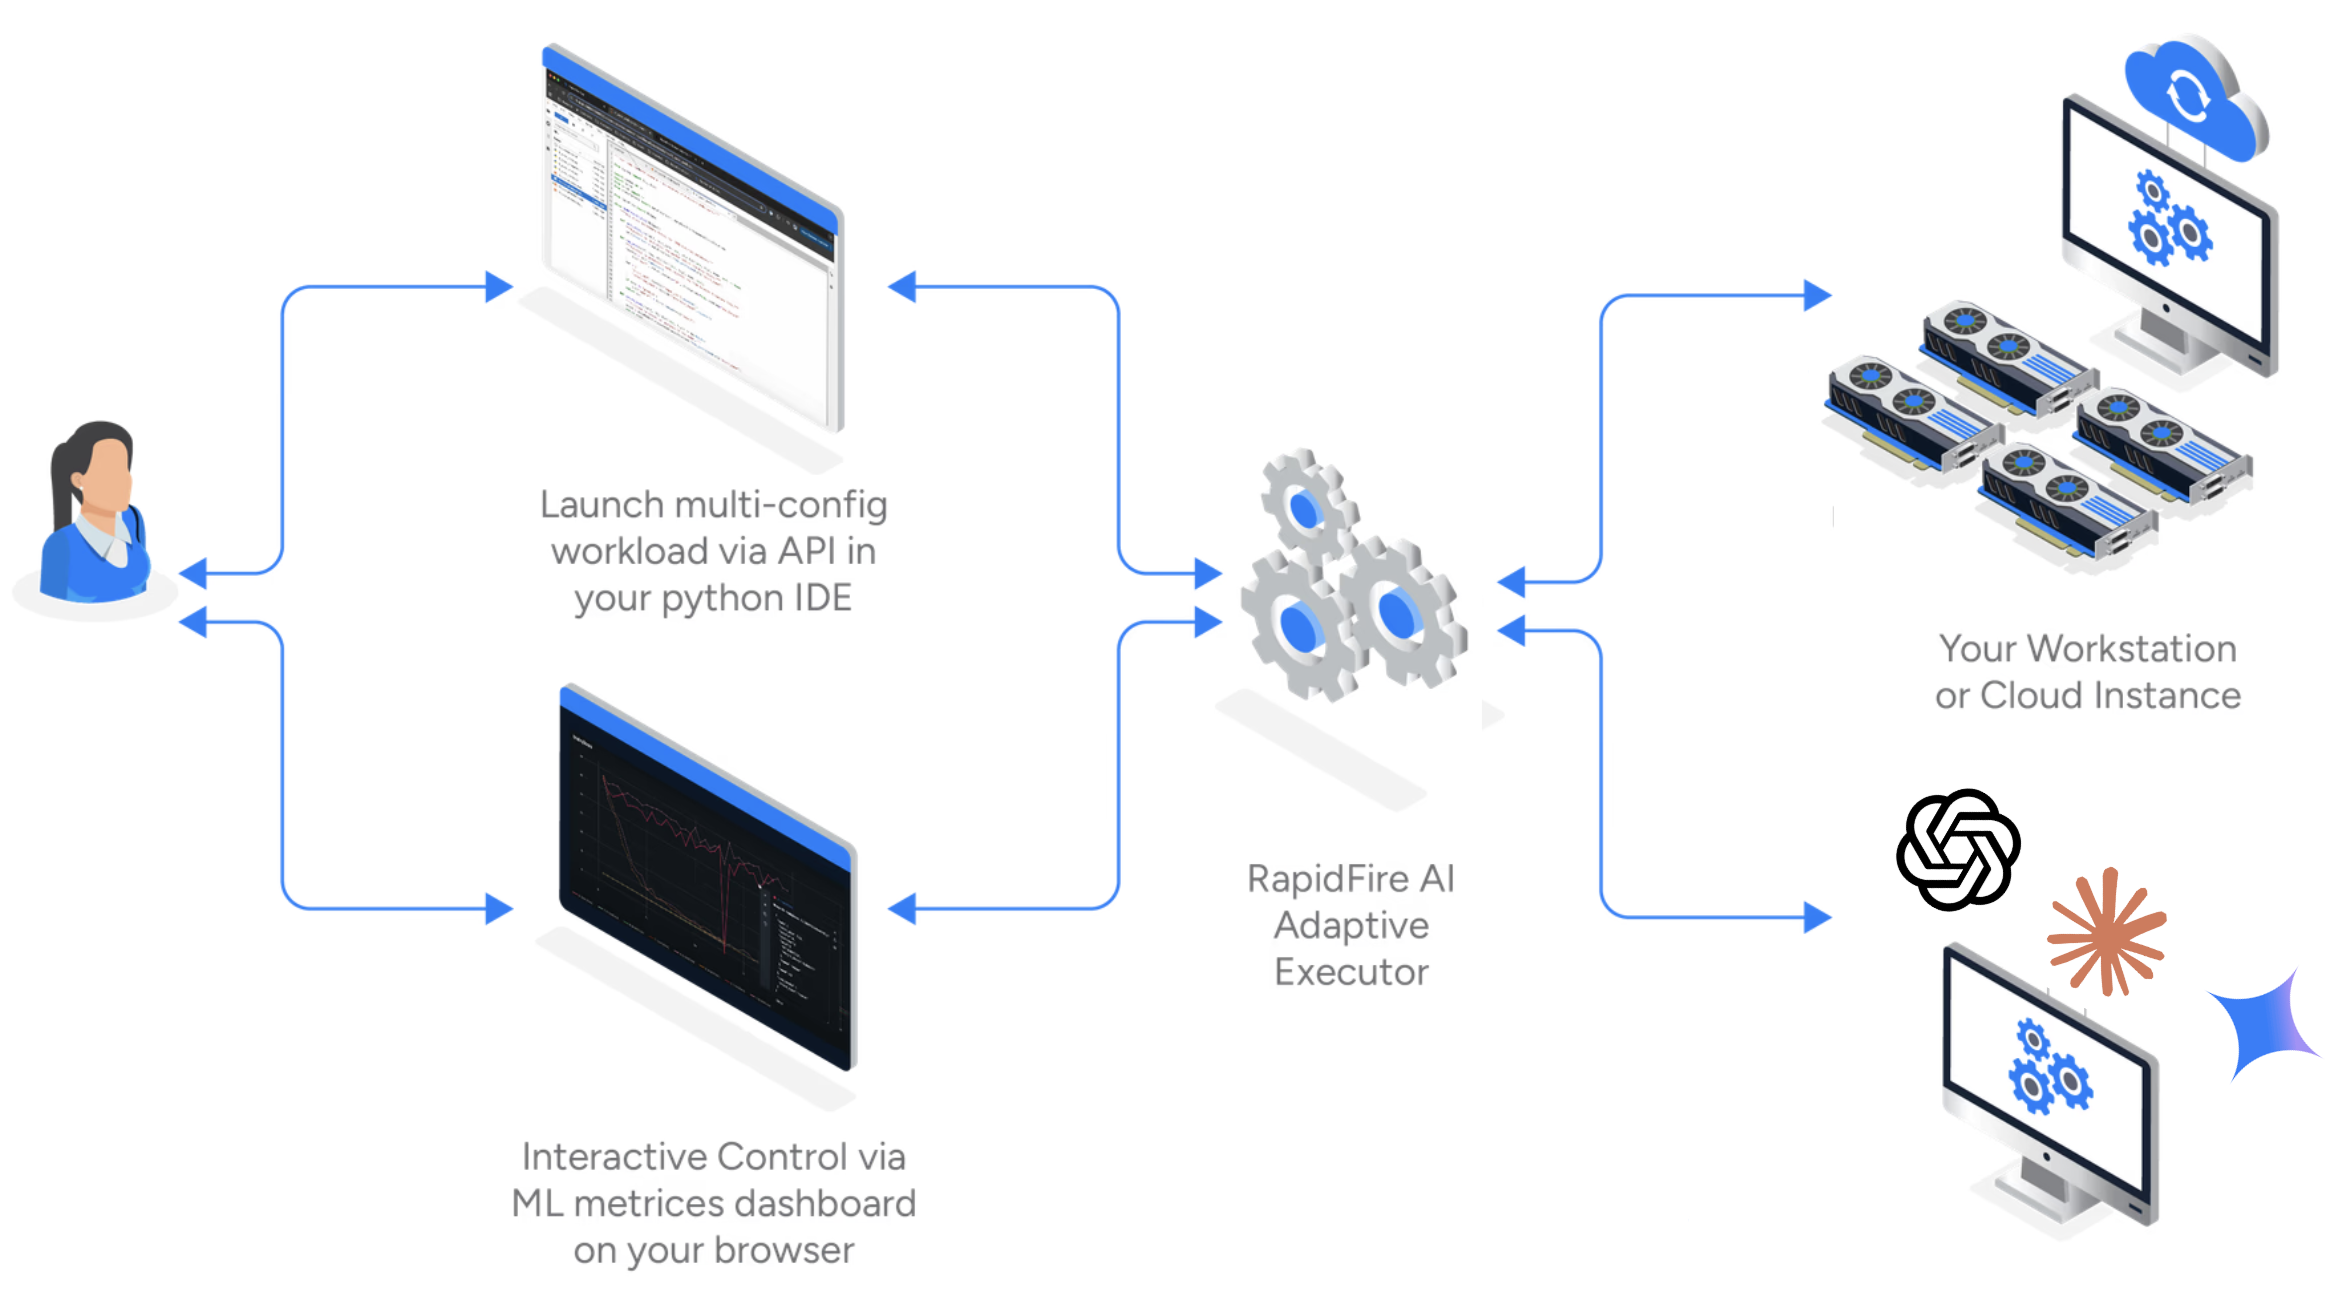
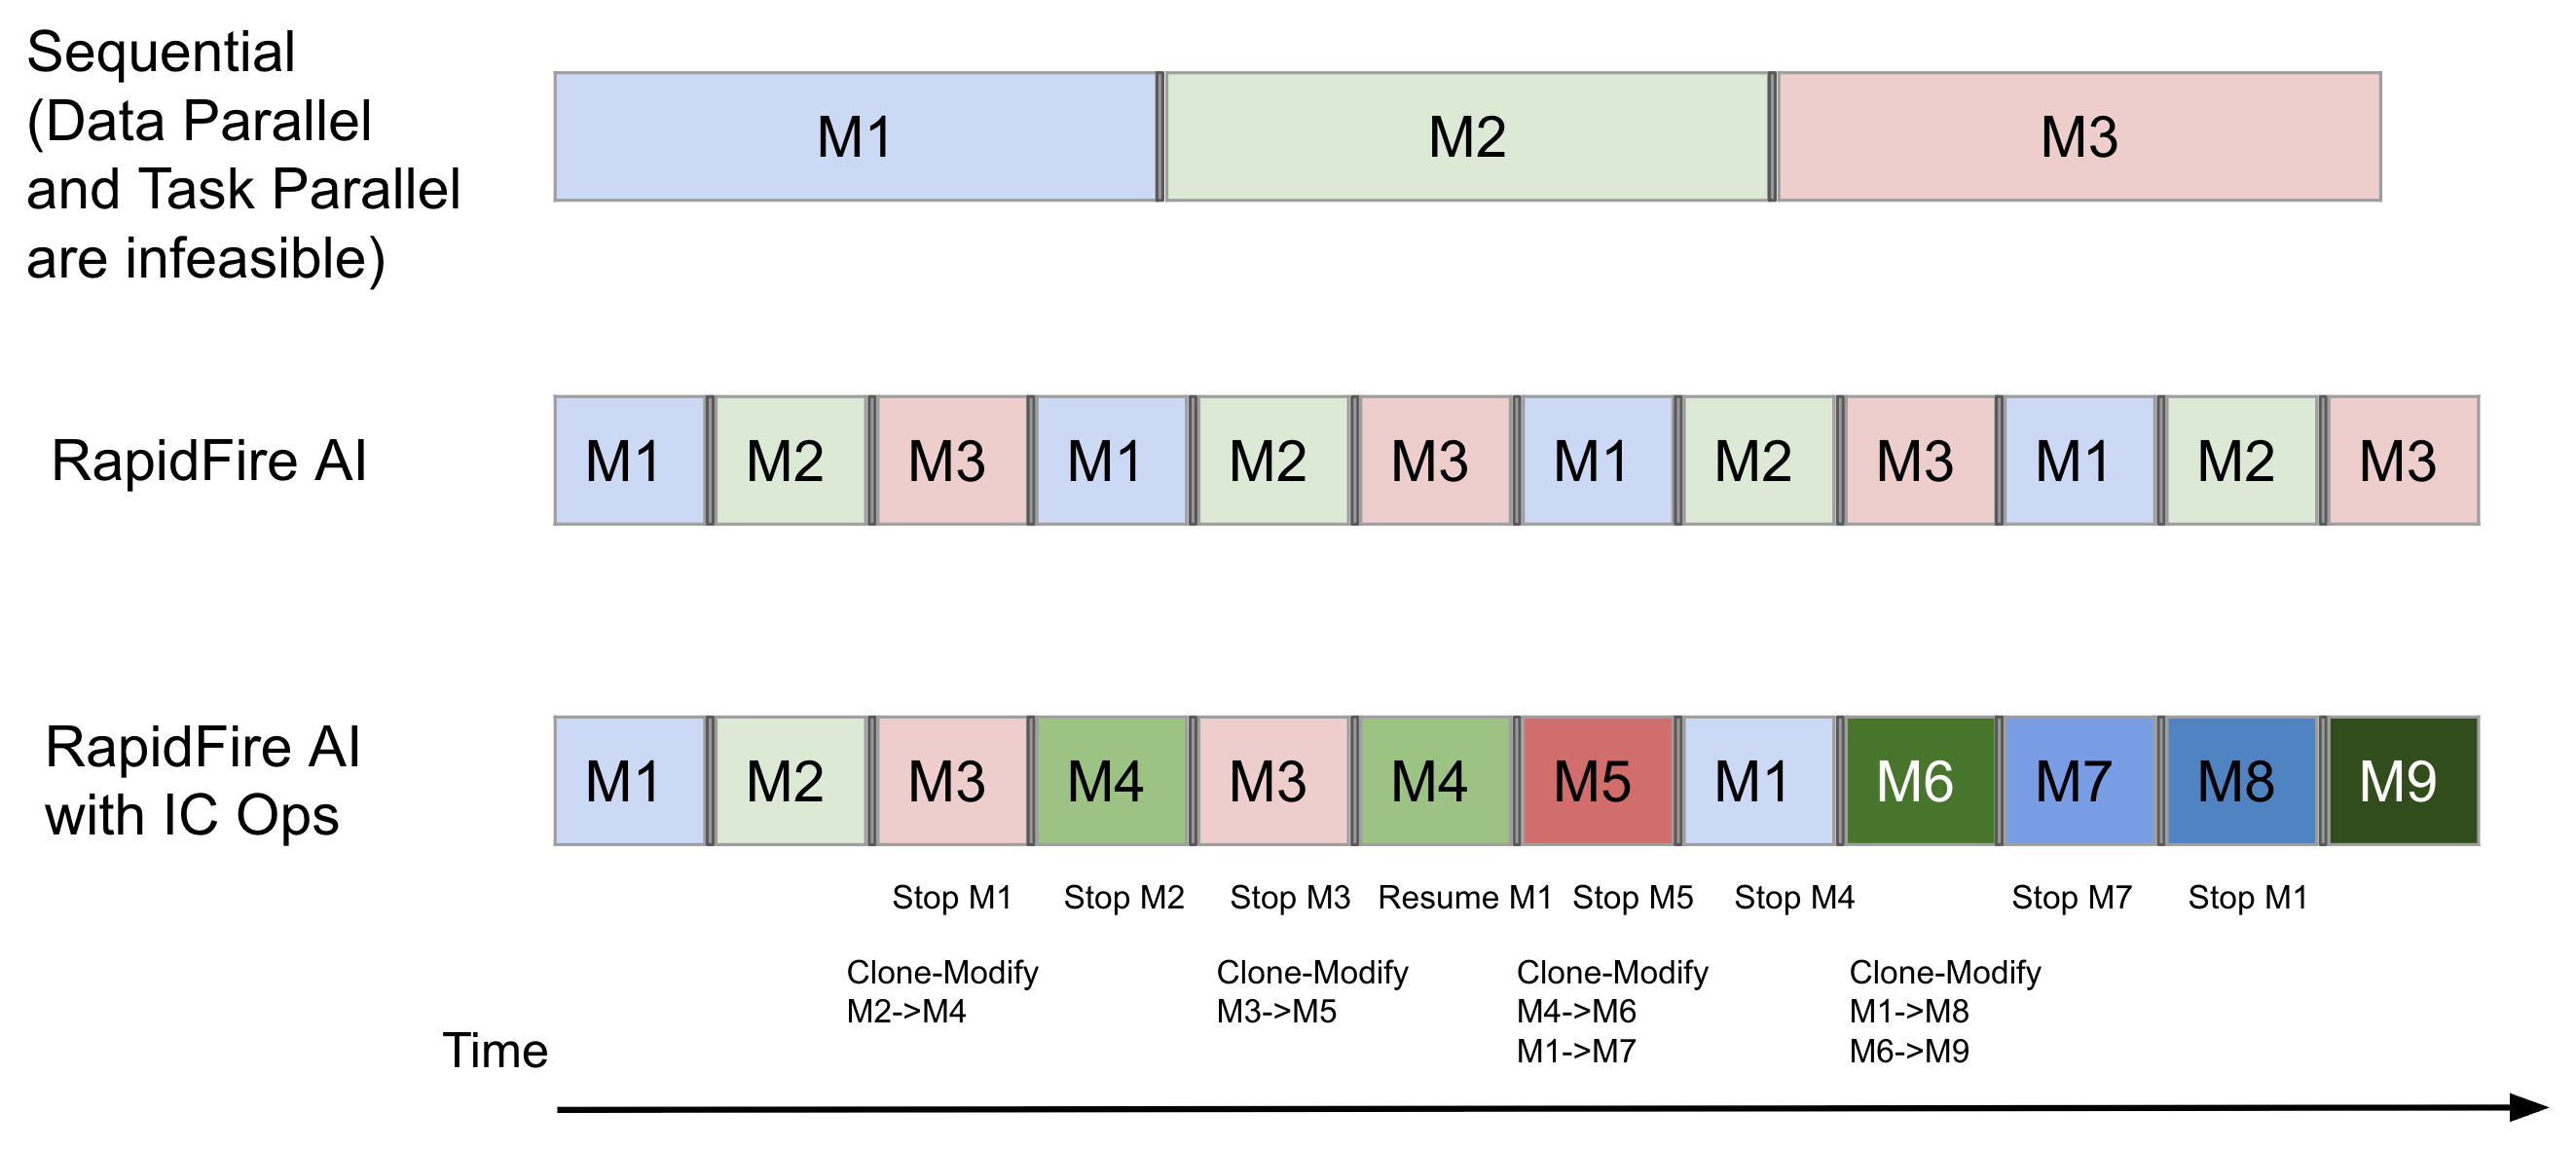
RapidFire AI's adaptive execution engine allows interruptible, shard-based scheduling so you can compare many configurations concurrently, even on a single GPU (for self-hosted models) or a CPU-only machine (for closed model APIs) with dynamic real-time control over runs.
- Hyperparallelized Execution: Higher throughput, simultaneous, data shard-at-a-time execution to show side-by-side differences.
- Interactive Control (IC Ops): Stop, Resume, Clone-Modify, and optionally warm start runs in real-time from the dashboard.
- Automatic Optimization: Intelligent single and multi-GPU orchestration to optimize utilization with minimal overhead for self-hosted models; intelligent token spend and rate limit apportioning for closed model APIs.
For additional context, see the overview: RapidFire AI Overview
Getting Started
Prerequisites
- NVIDIA GPU using the 7.x or 8.x Compute Capability
- NVIDIA CUDA Toolkit 11.8+
- Python 3.12.x
- PyTorch 2.8.0+ with corresponding forward compatible prebuilt CUDA binaries
Install and Get Started
# Ensure that python3 resolves to python3.12 if needed
python3 --version  # must be 3.12.x

python3 -m venv .venv
source .venv/bin/activate

pip install rapidfireai

rapidfireai --version
# Verify it prints the following:
# RapidFire AI 0.16.2rc2

# Replace YOUR_TOKEN with your actual Hugging Face token
# https://huggingface.co/docs/hub/en/security-tokens
hf auth login --token YOUR_TOKEN

# Due to current issue: https://github.com/huggingface/xet-core/issues/527
pip uninstall -y hf-xet

# Depending on whether you want Fine-tuning/Post-Training or RAG/context eng., pick one of the remaining series of commands


# For Fine-tuning/Post-Training: Install specific dependencies and initialize rapidfireai

rapidfireai init --train
rapidfireai start

# It should print about 50 lines, including the following:
# ...
# RapidFire Frontend is ready
# Open your browser and navigate to: http://0.0.0.0:8853
# ...
# Press Ctrl+C to stop all services

# Forward this port if you installed rapidfireai on a remote machine
ssh -L 8853:localhost:8853 username@remote-machine

# Open an example notebook from ./tutorial_notebooks/[fine-tuning | post-training] and start experiment


# [OR]


# For RAG/Context Engineering Evals: Install specific dependencies and initialize rapidfireai
rapidfireai init
rapidfireai start

# It should print about 50 lines, including the following:
# ...
# RapidFire Frontend is ready
# Open your browser and navigate to: http://0.0.0.0:8853
# ...
# Press Ctrl+C to stop all services

# For the RAG/context eng. notebooks, only jupyter is supported for now and must be started as follows
rapidfireai jupyter

# Forward these ports if you installed rapidfireai on a remote machine
ssh -L 8850:localhost:8850 -L 8851:localhost:8851 -L 8853:localhost:8853 -L 8852:localhost:8852 username@remote-machine

# Open the URL provided by the jupyter notebook command above via your browser
# Open an example notebook from ./tutorial_notebooks/rag-contexteng/ and start experiment
Troubleshooting
For a quick system diagnostics report (Python env, relevant packages, GPU/CUDA, and key environment variables), run:
rapidfireai doctor
If you encounter port conflicts, you can kill existing processes:
lsof -t -i:8850 | xargs kill -9  # jupyter server
lsof -t -i:8851 | xargs kill -9  # dispatcher
lsof -t -i:8852 | xargs kill -9  # mlflow
lsof -t -i:8853 | xargs kill -9  # frontend server
lsof -t -i:8855 | xargs kill -9  # ray dashboard
Documentation
Browse or reference the full documentation, example use case tutorials, all API details, dashboard details, and more in the RapidFire AI Documentation.
Key Features
MLflow Integration
Full MLflow support for experiment tracking and metrics visualization. A named RapidFire AI experiment corresponds to an MLflow experiment for comprehensive governance
Interactive Control Operations (IC Ops)
First-of-its-kind dynamic real-time control over runs in flight. Can be invoked through the dashboard:
- Stop active runs; puts them in a dormant state
- Resume stopped runs; makes them active again
- Clone and modify existing runs, with or without warm starting from parent's weights
- Delete unwanted or failed runs
Multi-GPU Support
The Scheduler automatically handles multiple GPUs on the machine and divides resources across all running configs for optimal resource utilization.
Search and AutoML Support
Built-in procedures for searching over configuration knob combinations, including Grid Search and Random Search. Easy to integrate with AutoML procedures. Native support for some popular AutoML procedures and customized automation of IC Ops coming soon.
Directory Structure
rapidfireai/
├── automl/              # Search and AutoML algorithms for knob tuning
├── cli.py               # CLI script
├── evals
    ├── actors/          # Ray-based workers for doc and query processing
    ├── data/            # Data sharding and handling
    ├── db/              # Database interface and SQLite operations
    ├── dispatcher/      # Flask-based web API for UI communication
    ├── metrics/         # Online aggregation logic and metrics handling
    ├── rag/             # Stages of RAG pipeline
    ├── scheduling/      # Fair scheduler for multi-config resource sharing
    └── utils/           # Utility functions and helper modules
├── experiment.py        # Main experiment lifecycle management
├── fit
    ├── backend/         # Core backend components (controller, scheduler, worker)
    ├── db/              # Database interface and SQLite operations
    ├── dispatcher/      # Flask-based web API for UI communication
    ├── frontend/        # Frontend components (dashboard, IC Ops implementation)
    ├── ml/              # ML training utilities and trainer classes
    └── utils/           # Utility functions and helper modules
└── utils.py             # Utility functions and helper modules
Architecture
RapidFire AI adopts a microservices-inspired loosely coupled distributed architecture with:
- Dispatcher: Web API layer for UI communication
- Database: SQLite for state persistence
- Controller: Central orchestrator running in user process
- Workers: GPU-based training processes (for SFT/RFT) or Ray-based Actors for doc and query processing (for RAG/context engineering)
- Dashboard: Experiment tracking and visualization dashboard
This design enables efficient resource utilization while providing a seamless user experience for AI experimentation.
Components
Dispatcher
The dispatcher provides a REST API interface for the web UI. It can be run via Flask as a single app or via Gunicorn to have it load balanced. Handles interactive control features and displays the current state of the runs in the experiment.
Database
Uses SQLite for persistent storage of metadata of experiments, runs, and artifacts. The Controller also uses it to talk with Workers on scheduling state. A clean asynchronous interface for all DB operations, including experiment lifecycle management and run tracking.
Controller
Runs as part of the user’s console or Notebook process.
Orchestrates the entire training lifecycle including model creation, worker management, and scheduling,
as well as the entire RAG/context engineering pipeline for evals.
The run_fit logic handles sample preprocessing, model creation for given knob configurations,
worker initialization, and continuous monitoring of training progress across distributed workers.
The run_evals logic handles data chunking, embedding, retrieval, reranking, context construction, and
generation for inference evals.
Worker
Handles the actual model training and inference on the GPUs for run_fit and the data preprocessing and
RAG inference evals for run_evals.
Workers poll the Database for tasks, load dataset shards, and execute config-specific tasks:
training runs with checkpointing (for SFT/RFT) and doc processing followed by query processing with
online aggregation (for RAG/context eng. evals). Both also handle progress reporting.
Currently expects any given model for given batch size to fit on a single GPU (for self-hosted models).
Likewise, currently expects OpenAI API key provided to have sufficient balance for given evals workload.
Experiment
Manages the complete experiment lifecycle, including creation, naming conventions, and cleanup. Experiments are automatically named with unique suffixes if conflicts exist, and all experiment metadata is tracked in the Database. An experiment's running tasks are automatically cancelled when the process ends abruptly.
Dashboard
A fork of MLflow that enables full tracking and visualization of all experiments and runs for run_fit.
It features a new panel for Interactive Control Ops that can be performed on any active runs.
For run_evals the metrics are displayed in an auot-updated table on the notebook itself,
while IC Ops panel also appears on the notebook itself.
Developing with RapidFire AI
Development prerequisites
TODO: This section needs updating
- Python 3.12.x
- Git
- Ubuntu/Debian system (for apt package manager)
# Run these commands one after the other on a fresh Ubuntu machine

# install dependencies
sudo apt update -y

# clone the repository
git clone https://github.com/RapidFireAI/rapidfireai.git

# navigate to the repository
cd ./rapidfireai

# install basic dependencies
sudo apt install -y python3.12-venv
python3 -m venv .venv
source .venv/bin/activate
pip3 install ipykernel
pip3 install jupyter
pip3 install "huggingface-hub[cli]"
export PATH="$HOME/.local/bin:$PATH"
hf auth login --token <your_token>

# Due to current issue: https://github.com/huggingface/xet-core/issues/527
pip uninstall -y hf-xet

# checkout the main branch
git checkout main

# install the repository as a python package
pip3 install -r requirements.txt

# install node
curl -fsSL https://deb.nodesource.com/setup_22.x | sudo -E bash - && sudo apt-get install -y nodejs

# Install correct version of vllm and flash-attn
# uv pip install vllm=0.10.1.1 --torch-backend=cu126 or cu118
# uv pip install flash-attn==1.0.9 --no-build-isoloation or 2.8.3

# if running into node versioning errors, remove the previous version of node then run the lines above again
sudo apt-get remove --purge nodejs libnode-dev libnode72 npm
sudo apt autoremove --purge

# check installations
node -v # 22.x

# still inside venv, run the start script to begin all 3 servers
chmod +x ./rapidfireai/start_dev.sh
./rapidfireai/start_dev.sh start

# run the notebook from within your IDE
# make sure the notebook is running in the .venv virtual environment
# head to settings in Cursor/VSCode and search for venv and add the path - $HOME/rapidfireai/.venv
# we cannot run a Jupyter notebook directly since there are restrictions on Jupyter being able to create child processes

# VSCode can port-forward localhost:8853 where the rf-frontend server will be running

# for port clash issues -
lsof -t -i:8850 | xargs kill -9 # jupyter server
lsof -t -i:8851 | xargs kill -9 # dispatcher
lsof -t -i:8852 | xargs kill -9 # mlflow
lsof -t -i:8853 | xargs kill -9 # frontend
lsof -t -i:8855 | xargs kill -9 # ray console
RapidFireAI Environment Variables
RapidFire AI has sane defaults for most installations, if customization is needed the following operating system variables can be used to overwrite the defaults.
RF_HOME- Base RapidFire AI home directory (default: ${HOME}/rapidfireai on Non-Google Colab and /content/rapidfireai on Google Colab)RF_LOG_PATH- Base directory to store log files (default: ${RF_HOME}/logs)RF_EXPERIMENT_PATH- Base directory to store experiment work files (default: ${RF_HOME}/rapidfire_experiments)RF_TENSORBOARD_LOG_DIR- Base directory for TensorBoard logs (default: ${RF_EXPERIMENT_PATH}/tensorboard_logs))RF_LOG_FILENAME- Default log file name (default: rapidfire.log)RF_TRAINING_LOG_FILENAME- Default training log file name (default: training.log)RF_DB_PATH- Base directory for database files (default: ${RF_HOME}/db)RF_MLFLOW_ENABLED- Enable MLflow tracking backendRF_TENSORBOARD_ENABLED- Enable TensorBoard tracking backendRF_TRACKIO_ENABLED- Enable Trackio tracking backendRF_COLAB_MODE- Whether running on colab (default: false on Non-Google Colab and true on Google Colab)RF_TUTORIAL_PATH- Location thatrapidfireai initcopiestutorial_notebooksto (default: ./tutorial_notebooks)RF_TEST_PATH- Location thatrapidfireai --test-notebookscopies test notebooks to (default: ./tutorial_notebooks/tests)RF_JUPYTER_HOST- Host thatrapidfireai jupytercreates a Jupyter listener for (default: 0.0.0.0)RF_JUPYTER_PORT- Port thatrapidfireai jupytercreates a Jupyter listener for (default: 8850)RF_API_HOST- Host thatrapidfireai startor Experiment creates an API listener for (default: 0.0.0.0)RF_API_PORT- Port thatrapidfireai startor Experiment creates an API listener for (default: 8851)RF_MLFLOW_HOST- Host thatrapidfireai startcreates a MLflow listener for (default: 0.0.0.0)RF_MLFLOW_PORT- Port thatrapidfireai startcreates a MLflow listener for (default: 8852)RF_FRONTEND_HOST- Host thatrapidfireai startcreates a Frontend listener for (default: 0.0.0.0)RF_FRONTEND_PORT- Port thatrapidfireai startcreates a Frontend listener for (default: 8853)RF_RAY_HOST- Host that Experiment creates a Ray dashboard listener for (default: 0.0.0.0)RF_RAY_PORT- Port that Experiment creates a Ray dashboard listener for (default: 8855)RF_TIMEOUT_TIME- Time in seconds that services wait to start (default: 30)RF_PID_FILE- File to store process ids of started services (default: ${RF_HOME}/rapidfire_pids.txt)RF_PYTHON_EXECUTABLE- Python executable (default: python3 falls back to python if not found)RF_PIP_EXECUTABLE- pip executable (default: pip3 falls back to pip if not found)RF_CONVERGE_MODE- Whether to use Rapidfire AI Converge frontend and backend if available (default: all)RF_NO_FRONTEND- Option to disable starting the frontend
Community & Governance
- Docs: oss-docs.rapidfire.ai
- Discord: Join our Discord
- Contributing:
CONTRIBUTING.md - License:
LICENSE - Issues: use GitHub Issues for bug reports and feature requests
2 maintainers


Metadata
2 maintainers
Release files for rapidfireai 0.16.2rc2
For a detailed explanation of source distributions (sdists) and built distributions (wheels), please see the package formats documentation.
Source distribution (sdist)
| File | Size | Uploaded | |
|---|---|---|---|
| rapidfireai-0.16.2rc2.tar.gz | 91.7 MB | Details |
Built distribution (wheel)
| File | Interpreter | ABI | Platform | Reset |
|---|---|---|---|---|
| rapidfireai-0.16.2rc2-py3-none-any.whl | Python 3 | none | any | Details |
Total release size: 162.4 MB
Release files / rapidfireai-0.16.2rc2.tar.gz
| Download URL | rapidfireai-0.16.2rc2.tar.gz |
|---|---|
| Size | 91.7 MB |
| Tags | Source |
|
SHA-256 checksum How to use checksums |
e07b2296cb953a3faccc016c17a72f6a0db423b4a15aac48242553803fecd81d
|
|
BLAKE2b-256 checksum How to use checksums |
9c1204d7af172dec606509859921c7b1988aff2e9ece280c889a5c9ac0a7b9be
|
| Upload date | |
|
Uploaded using Trusted Publishing? What is trusted publishing? |
Yes |
| Uploaded via |
twine/7.0.0 CPython/3.13.14
|
Provenance
Provenance describes where a file came from. On PyPI, provenance is shared via attestations, which provide a verifiable record of the build or publishing details. View details, limitations and caveats.


PyPI Publish Attestation
PyPI verified that this artifact, at this checksum, originated from the publisher listed below.
Signed by GitHub Actions, verified by PyPI on Sep 23, 2026.
Transparency logRelease files / rapidfireai-0.16.2rc2-py3-none-any.whl
| Download URL | rapidfireai-0.16.2rc2-py3-none-any.whl |
|---|---|
| Size | 70.7 MB |
| Tags | Python 3 |
|
SHA-256 checksum How to use checksums |
918733153f5e9091d155e5fcde1869f34384d664cadf90544aa0d93e7901a81d
|
|
BLAKE2b-256 checksum How to use checksums |
16cfbb168c751ff9f7ce778785cb02aff27ef21a2c7e66dc710490625dcd3f54
|
| Upload date | |
|
Uploaded using Trusted Publishing? What is trusted publishing? |
Yes |
| Uploaded via |
twine/7.0.0 CPython/3.13.14
|
Provenance
Provenance describes where a file came from. On PyPI, provenance is shared via attestations, which provide a verifiable record of the build or publishing details. View details, limitations and caveats.
PyPI Publish Attestation
PyPI verified that this artifact, at this checksum, originated from the publisher listed below.
Signed by GitHub Actions, verified by PyPI on Sep 23, 2026.
Transparency log













