A Python package that implements REACT: Receptor-Enriched Analysis of Functional Connectivity by Targets


Project description
REACT: Receptor-Enriched Analysis of functional Connectivity by Targets

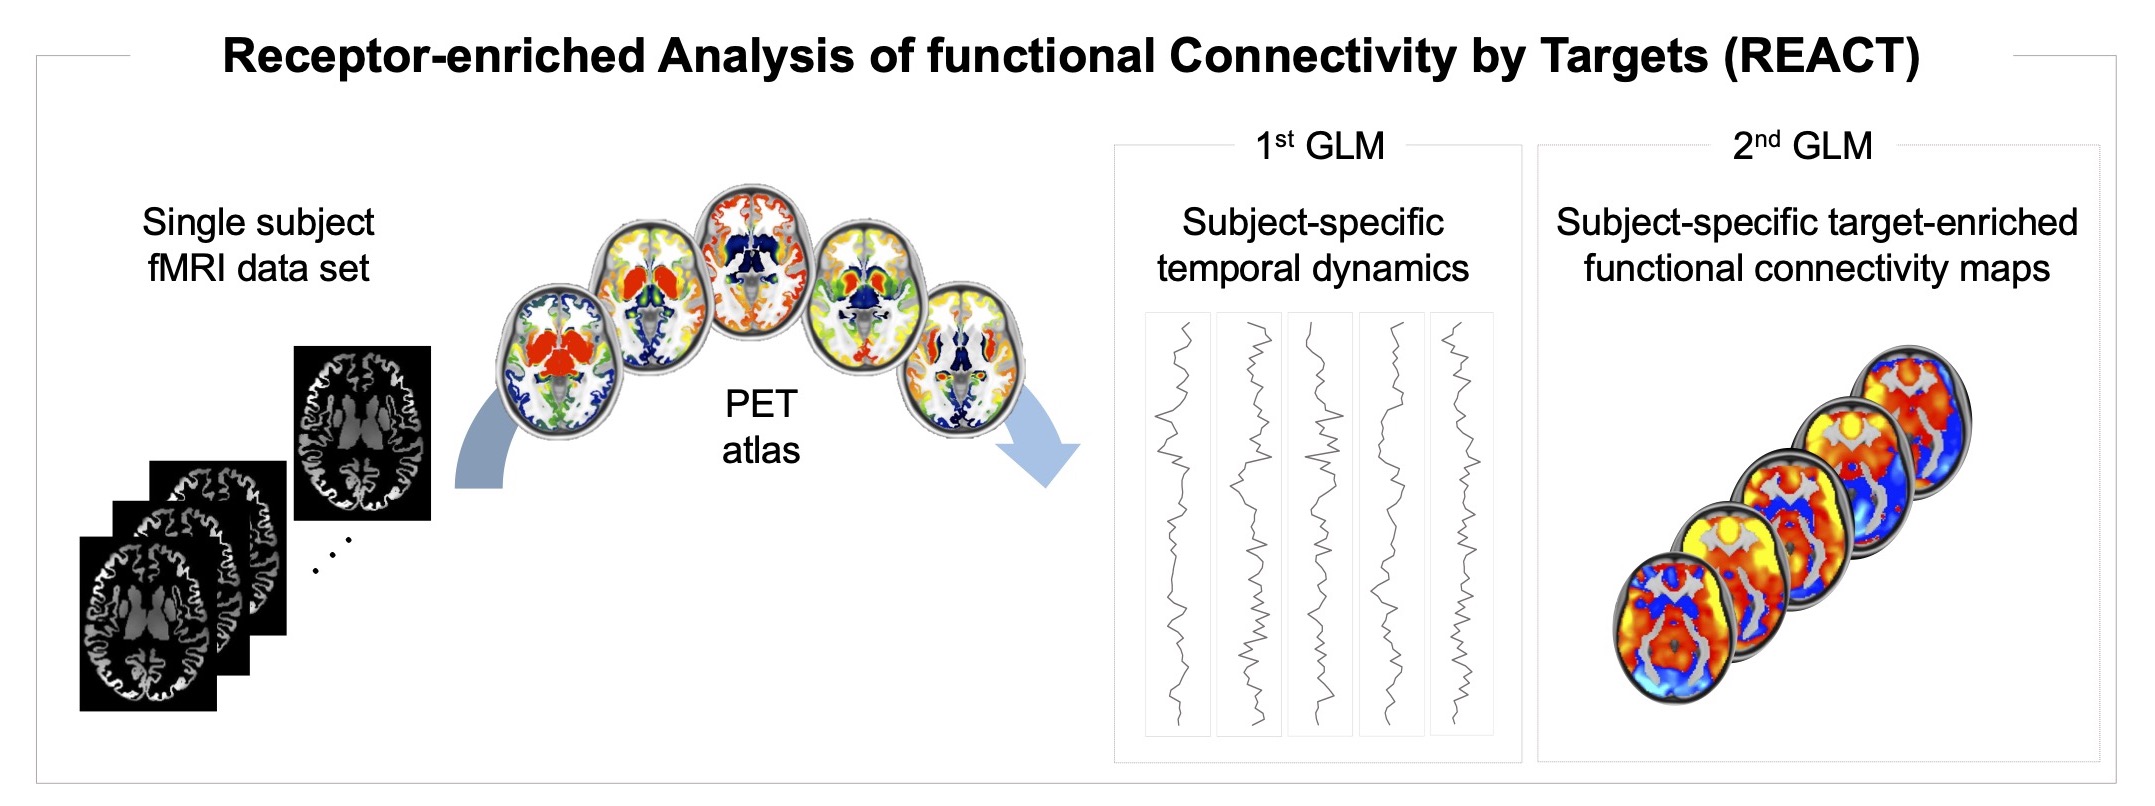
The react-fmri software package allows to estimate target-enriched functional
connectivity maps from functional MRI data using Positron Emission Tomography
(PET) templates as spatial priors of the density distribution of
neurotransmitters in the brain.
This software is coded in pure Python, its code is available on Github, it can be installed via Pypi and it is released under MIT License.
It is implemented as a two-step multivariate regression analysis:
- Step 1: the PET maps are used as a set of spatial regressors to estimate the
functional connectivity in terms of fitting the BOLD fluctuations across voxels
with respect to the dominant fluctuation within each of these maps. The same
resolution is required for the PET maps (i.e., spatial regressors) and the fMRI
images (i.e., input data). Both fMRI data and the PET maps will be demeaned at
this stage, before estimating the BOLD fluctuations, in order to obtain a good
fit. This step requires a mask that restricts the analysis to the voxels for
which the neurotransmitter density information is available. This mask can
either be estimated independently or by using the
react_maskscommand provided in this package. - Step 2: The BOLD fluctuations estimated in Step 1 are used as a set of
temporal regressors to estimate the subject-specific target-enriched functional
connectivity maps. At this stage, the fMRI data (i.e., input data) and the BOLD
fluctuations (i.e., design matrix) will be demeaned before estimating the
functional maps; the design matrix columns will also be normalised to unit
standard deviation. This stage requires a binary grey matter mask, which can
be estimated independently or by using the
react_maskscommand provided in this package.
Usage
To normalize the PET atlases: react_normalize
react_normalize original_pet_atlas.nii.gz pet_atlas.nii.gz
- Input data (required to be in standard space):
original_pet_atlas.nii.gzis a 3D or 4D volume including one or more PET atlases to be used for the estimation of the target-enriched functional maps. Of note, the regions used as reference regions in the kinetic model for the quantification of the PET data should be masked out from the respective PET volume. An example is the pet_atlas.nii.gz file provided in thedatadirectory, where the cerebellum was masked out as it was used as reference region. All values < 0 will be set at 0.
- Output:
The command will normalize each PET atlas included in the original_pet_atlas.nii.gz
file by shifting the minimum value to zero and rescaling the resulting values by
the span between the minimum and the maximum values of the image. Then, it will
generate:
pet_atlas.nii.gz: normalised version oforiginal_pet_atlas.nii.gz. The order of the PET atlases is the same as the one in the original file. The optional argument -v will output the min and max values for each PET map.
To create the masks: react_masks
react_masks subject_list.txt pet_atlas.nii.gz gm_mask.nii.gz out_masks
- Input data (required to be all in the same standard space and with the same
resolution):
subject_list.txtis a text file that specifies which functional MRI data are to be used for the creation of the masks. Typically, it includes all the subjects of the dataset. An example is the subject_list.txt file provided in thedatadirectory.pet_atlas.nii.gzis a 3D or 4D volume including one or more PET atlases to be used for the estimation of the target-enriched functional maps. Of note, the regions used as reference regions in the kinetic model for the quantification of the PET data should be masked out from the respective PET volume. An example is the pet_atlas.nii.gz file provided in thedatadirectory, where the cerebellum was masked out as it was used as reference region.gm_mask.nii.gzis a grey matter mask. A grey matter image, gm_mask.nii.gz, is provided in thedatadirectory and can be used as input in this command. It was estimated by thesholding the probabilistic grey matter image provided by FSL at the intensity value of 77 in order to retain all voxels with a probability of at least 30% of being grey matter. The resulting thresholded image was then binarised.
- Output:
The command will create two masks to be used as input in the
reactcommand. First, the script estimates a dataset-specific mask by intersecting all the subject-specific masks specified by the user in the subject_list.txt file and a PET-specific mask by intersecting all the PET atlases provided by the user in the pet_atlas.nii.gz file. Then, it will generate two masks:mask_stage1.nii.gz: intersection of the dataset-specific mask, PET-specific mask and grey matter maskgm_mask.nii.gz;mask_stage2.nii.gz: intersection of the dataset-specific mask and the grey matter maskgm_mask.nii.gz.
Once the two masks are generated, they can be used in react for the estimation
of the subject-specific target-enriched functional maps.
To run the target-enriched fMRI analysis: react
react subject001_fmri.nii.gz mask_stage1.nii.gz mask_stage2.nii.gz pet_atlas.nii.gz REACT/subject001
-
Input data (required to be all in the same standard space and with the same resolution):
fmri_subject001.nii.gzis the subject-specific 4D fMRI data set.mask_stage1.nii.gzis the mask used in the step 1 of the multivariate regression analysis.mask_stage2.nii.gzis the mask used in the step 2 of the multivariate regression analysis.pet_atlas.nii.gzis a 3D or 4D volume including one or more PET atlases to be used for the estimation of the target-enriched functional maps. Of note, the regions used as reference regions in the kinetic model for the quantification of the PET data should be masked out from the respective PET volume. An example is the pet_atlas.nii.gz file provided in thedatadirectory, where the cerebellum was masked out as it was used as reference region. We recommend to rescale each PET image in the [0,1] range after removing the reference region. This step can be done using thereact_normalizecommand.
-
Output: The command will run the two-step multivariate regression analysis and generate:
REACT/subject001_react_stage1.txt: subject-specific time series associated to the PET atlases used as spatial regressors;REACT/subject001_react_stage2.nii.gz: subject-specific functional connectivity maps associated to the PET atlases provided as regressors. If the number of PET atlases is higher than 1, the 4D filesubject001_react_stage2.nii.gzwill be split into 3D files, e.g.:subject001_react_stage2_IC0.nii.gzsubject001_react_stage2_IC1.nii.gzsubject001_react_stage2_IC2.nii.gz
REACT/subject001_react_stage2_Z.nii.gz: if the optional argument--out_zis specified, the Fisher z-transformation will be applied to theREACT/subject001_react_stage2.nii.gzfunctional connectivity maps, producing a 4D file namedREACT/subject001_react_stage2_Z.nii.gz
Requirements
- python3
- numpy >= 1.15
- scipy >= 0.19.1
- nibabel >= 3.0.0
- scikit-learn >= 0.22
Installation
You can install the react-fmri software package using Pypi by typing in your
terminal:
pip install react-fmri
However, we recommend to use REACT in a dedicated environment. If you are familiar with the Anaconda Python distribution, here's how you can safely install REACT without interfering with other local software.
conda create -n react-fmri python=3
conda activate react-fmri
pip install react-fmri
Then you will need to activate the react-fmri environment for using REACT.
conda activate react-fmri
react_masks ...
react ...
Getting help
For help requests and bug reporting we prefer to use the Github issues system.
Comparison with FSL
The react-fmri package is entirely based on Python and does not need FSL to
run. If you want to check that the results matches with the FSL output
(i.e., using the scripts from the original REACT paper) you just need to run
the following commands:
fsl_glm -i subject001_fmri.nii.gz -d pet_atlas.nii.gz -o REACT/subject001_stage1.txt -m mask_stage1.nii.gz --demean
fsl_glm -i subject001_fmri.nii.gz -d REACT/subject001_stage1.txt -o REACT/subject001_stage2 -m mask_stage2.nii.gz --demean --des_norm
How to cite REACT
-
Primary Reference: Ottavia Dipasquale, Pierluigi Selvaggi, Mattia Veronese, Anthony S.Gabay, Federico Turkheimer, Mitul A. Mehta, "Receptor-Enriched Analysis of functional connectivity by targets (REACT): A novel, multimodal analytical approach informed by PET to study the pharmacodynamic response of the brain under MDMA", Neuroimage, Volume 195, 2019, Pages 252-260, ISSN 1053-8119, https://doi.org/10.1016/j.neuroimage.2019.04.007.
-
Github Repository: Ottavia Dipasquale and Matteo Frigo, "REACT-fMRI Python package", 2021, https://github.com/ottaviadipasquale/react-fmri/, DOI:10.5281/zenodo.4730559.
Developers
- Ottavia Dipasquale - original REACT implementation in FSL
- Matteo Frigo - porting to Python
Release history Release notifications | RSS feed


Download files
Download the file for your platform. If you're not sure which to choose, learn more about installing packages.
Source Distribution
Built Distribution
Filter files by name, interpreter, ABI, and platform.
If you're not sure about the file name format, learn more about wheel file names.
Copy a direct link to the current filters
File details
Details for the file react-fmri-0.1.2.tar.gz.
File metadata
- Download URL: react-fmri-0.1.2.tar.gz
- Upload date:
- Size: 477.6 kB
- Tags: Source
- Uploaded using Trusted Publishing? No
- Uploaded via: twine/3.4.1 importlib_metadata/4.0.1 pkginfo/1.7.0 requests/2.25.1 requests-toolbelt/0.9.1 tqdm/4.60.0 CPython/3.8.8
File hashes
| Algorithm | Hash digest | |
|---|---|---|
| SHA256 |
591adee224694d586fb51c4c6cc08ef84aef820e348cec10f87bb9f58f2ef040
|
|
| MD5 |
bef5ca5b74a3c86670073d119180aaf5
|
|
| BLAKE2b-256 |
a95b58cd033cb713e62f7e87f97130fb212cb9ab97b3dc1df8822400cd7d9c9f
|
File details
Details for the file react_fmri-0.1.2-py3-none-any.whl.
File metadata
- Download URL: react_fmri-0.1.2-py3-none-any.whl
- Upload date:
- Size: 12.6 kB
- Tags: Python 3
- Uploaded using Trusted Publishing? No
- Uploaded via: twine/3.4.1 importlib_metadata/4.0.1 pkginfo/1.7.0 requests/2.25.1 requests-toolbelt/0.9.1 tqdm/4.60.0 CPython/3.8.8
File hashes
| Algorithm | Hash digest | |
|---|---|---|
| SHA256 |
b86547e5ef5485062f8f21228ede1cdbeca6483345310f81d2f367482b64afac
|
|
| MD5 |
28ad8dc277f364c770e27df6d112f51f
|
|
| BLAKE2b-256 |
a2e9aed784f9f5451a97de9ecab400ea50799f4feded61cd031a41ac7d8df5b5
|


