
Download and publish EverQuest scripts and software using the RedGuides API
Verified details
These details have been verified by PyPIProject links
GitHub Statistics
Maintainers

Project description

redfetch is for updating software and scripts for EverQuest that RedGuides recommends, as well as those you "watch". It's also open source, how nice.
Installation
On Windows the easiest way to install redfetch is to download and run redfetch.exe. (optional: If you're still on Windows 10 and want a more modern appearance, follow this guide to set Windows Terminal as your default terminal.)
Terminal / Python / Linux
Make sure you have a recent version of Python
- Install pipx
python -m pip install --user pipx
- Make it so you can run packages without having to type "python -m"
python -m pipx ensurepath
- Install redfetch
pipx install redfetch
When you open a new terminal window you'll be able to run redfetch by typing redfetch from the command line.
Usage
1) Double-click redfetch.exe to run the script.
Take a moment to consider your configuration and the settings tab.
2) Click the big blue "Easy Update" button, and then "Yes" or "Always" on the popup.
(It's updating Very Vanilla MQ and any of its scripts or plugins you have watched on RedGuides, your licensed resources, and scripts recommended by staff. You can customize this if you like.)
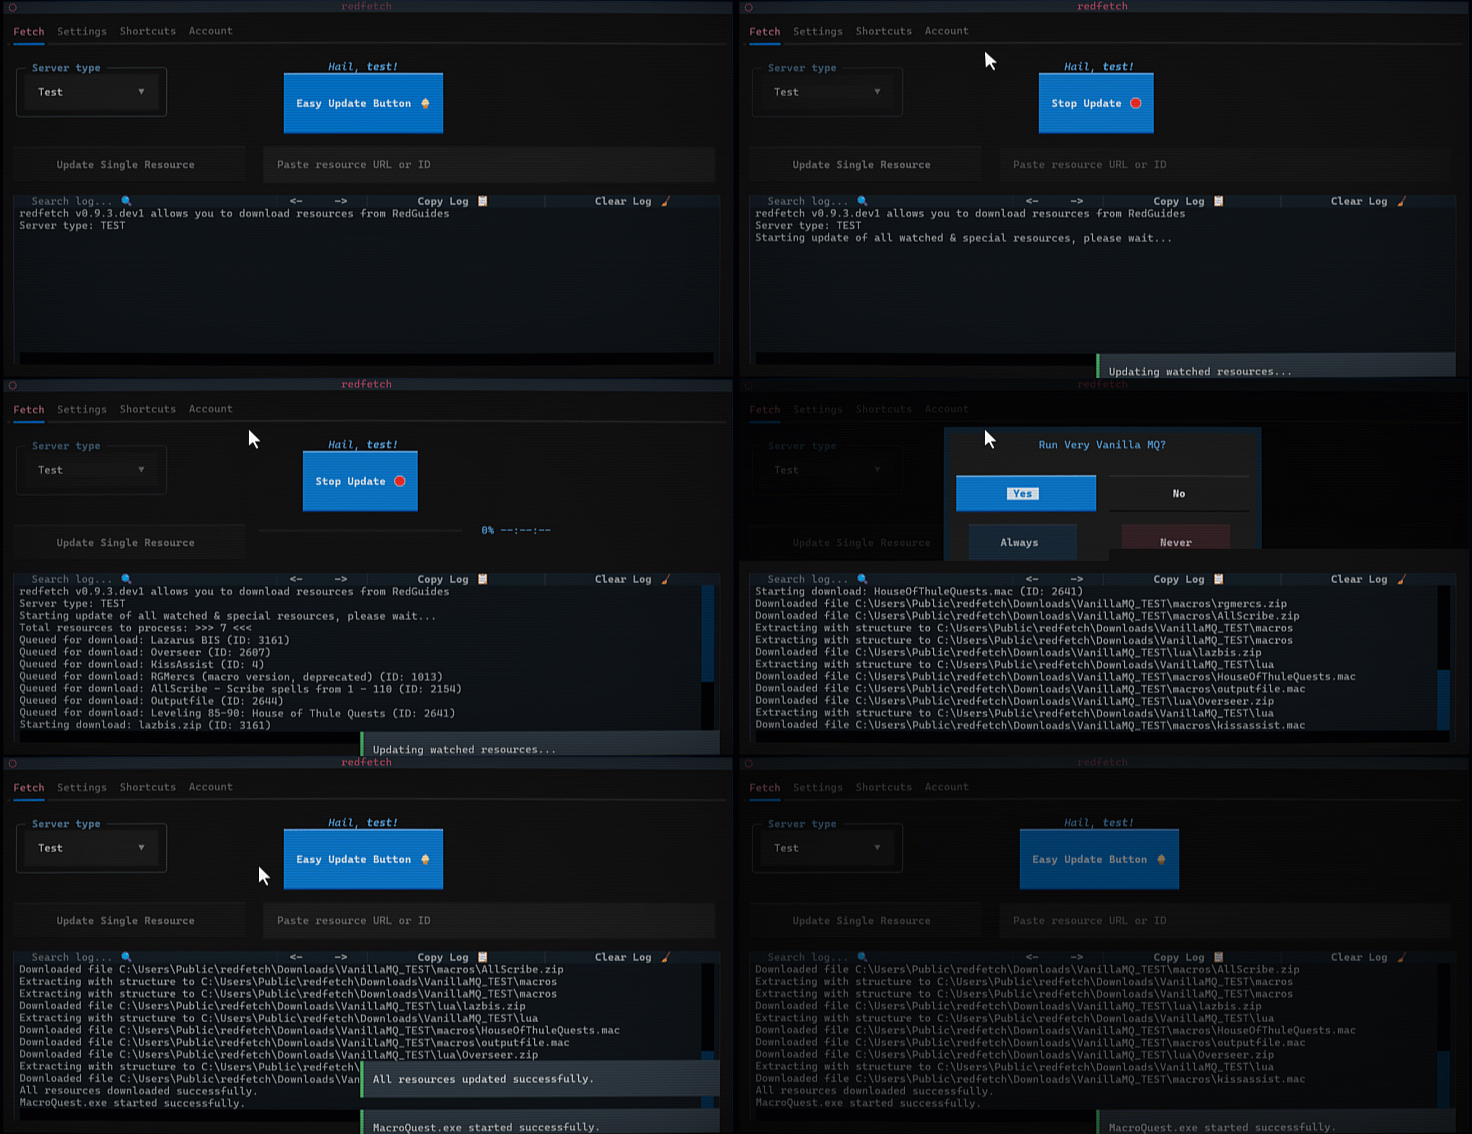
Now you're ready to play EQ with the big boys.
Add more MQ Scripts
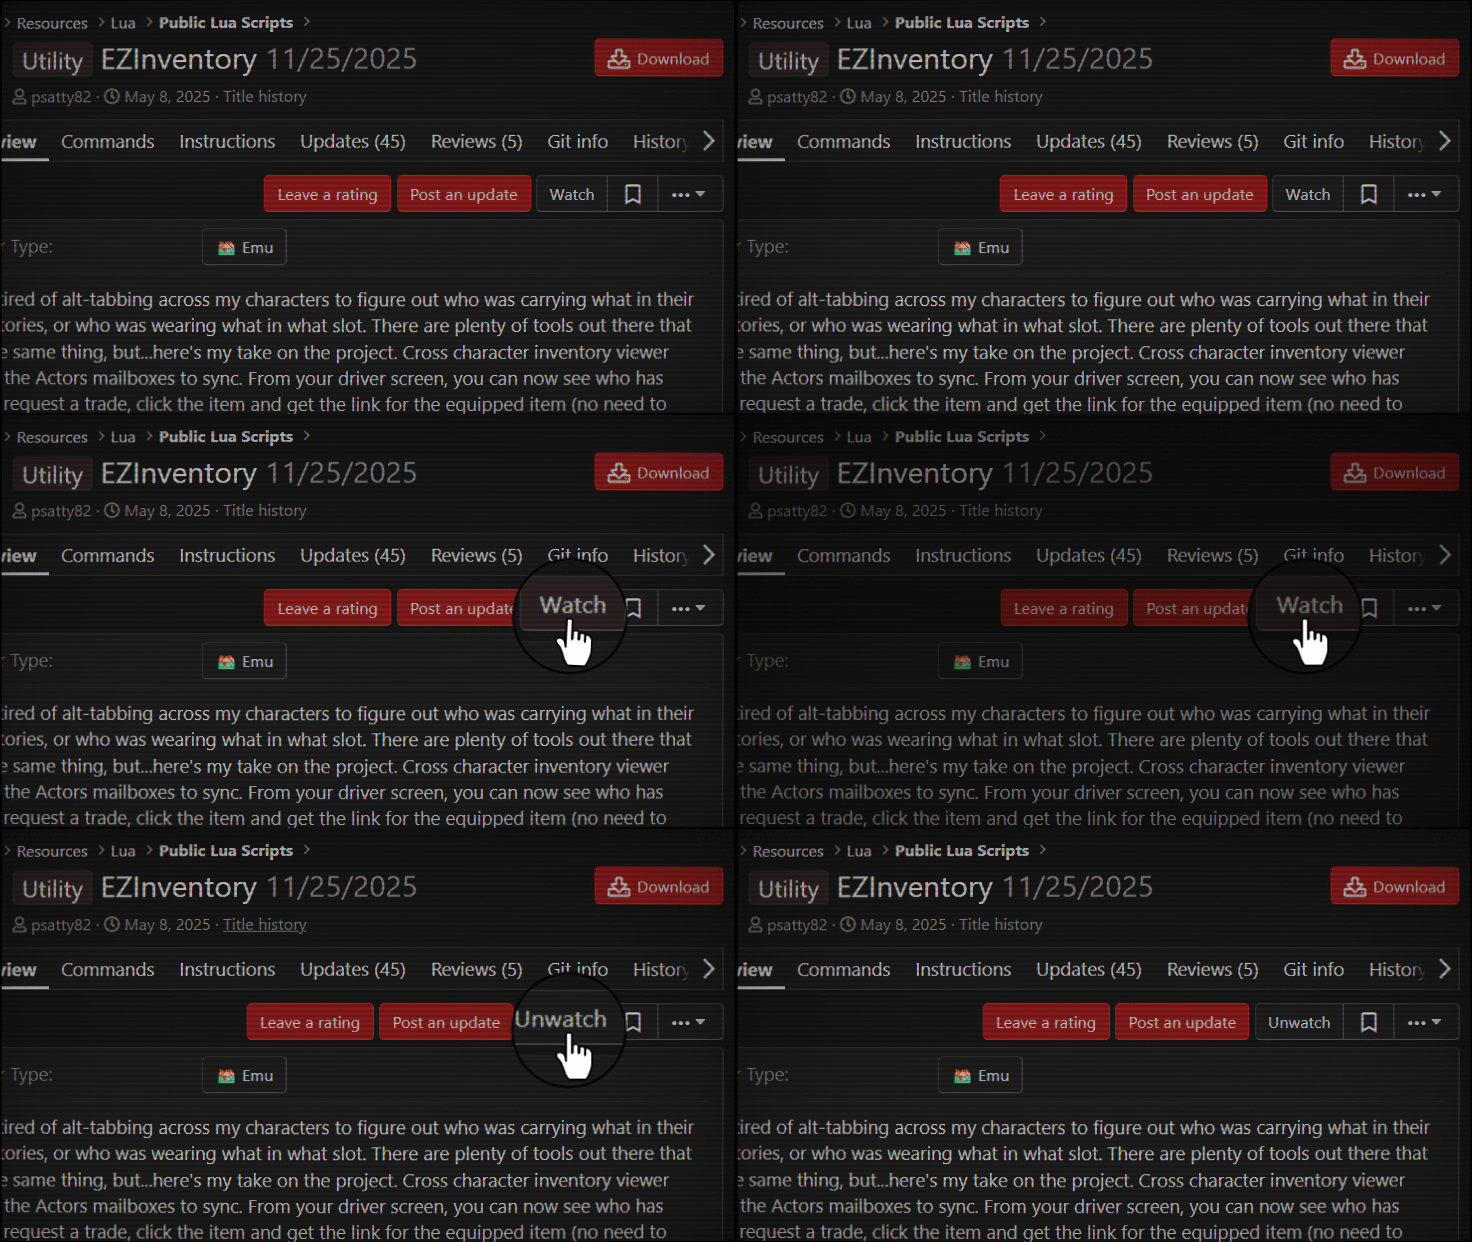
To add more MacroQuest scripts, "watch" them on www.redguides.com/community/resources, and then click the Easy Update button again.
If there are non-MQ resources you'd like to keep in sync with redfetch, you can add them as a "special resource" in the local settings file, as shown in settings section.
Command Line
To run redfetch from the command line:
| .exe file | python |
|---|---|
.\redfetch.exe update |
redfetch update |

Command Line Reference
Run
redfetch --helpor.\redfetch.exe --helpto see something like this in your terminal:📦 Resource Management
update- Update all watched and special resources
--force/-f- Force re-download of all watched resources--server/-s- Switch to this server before updating (LIVE,TEST,EMU)download <ID_OR_URL>- Download a specific resource by ID or URL
--force/-f- Force re-download by resetting this resource's download date--server/-s- Switch to this server before downloading (LIVE,TEST,EMU)list- List resources and dependencies in the cache databasereset- Reset download dates for watched resources🍔 Configuration
server <SERVER>- Switch the current server/environment toLIVE,TEST, orEMUconfig <SETTING_PATH> <VALUE>- Update a setting by path and value
SETTING_PATH- Dot-separated setting path (e.g.,SPECIAL_RESOURCES.1974.opt_in)VALUE- New value for the setting--server/-s- Server to apply the change in (LIVE,TEST,EMU)status- Show the configuration for the current or specified server
--server/-s- Server to show (defaults to current)🔧 System & Utilities
ui- Launch the Terminal User Interfaceweb- Launch the RedGuides.com web interfaceversion- Show version and exitlogout- Disconnect your account from redfetchuninstall- Uninstall redfetch and clean up data📤 Publishing
publish <resource_id>- Publish an update to you or your team's resource. There's also a github action for this.
resource_id- Existing RedGuides resource ID--description <README.md>/-d- Path to a file (e.g.README.md) that will become the resource's overview description--version <version_number>/-v- New version string (e.g.,v1.0.1)--message <CHANGELOG.md | MESSAGE>/-m- Version update message, a message file (e.g.message.md/message.txt), or aCHANGELOG.md(keep a changelog) file.--file <FILE.zip>/-f- Path to your zipped release file--domain <URL>- Domain to prepend to relative URLs in README.md or CHANGELOG.md files. (mostly for images. e.g.,https://raw.githubusercontent.com/yourusername/yourrepo/main/)
Settings
settings.local.toml is found in your configuration directory, which by default is c:\Users\Public\redfetch\settings.local.toml. Any keys you add will override their default values in settings.toml.
All settings are prefixed with the environment,
[DEFAULT]- encompasses all environments that are not explicitly defined.[LIVE]- EverQuest Live[TEST]- EverQuest Test[EMU]- EverQuest Emulator
Adding a special resource
To add a "special resource" (a non-MQ resource that you want to keep updated), open settings.local.toml and add an entry. You'll need the resource ID (numbers at the end of the url) and a target directory. Example:
[LIVE.SPECIAL_RESOURCES.153]
custom_path = 'C:\Users\Public\Daybreak Game Company\Installed Games\EverQuest\maps\Brewall_Maps'
opt_in = true
- Note the use of single quotes around the path, which are required for windows paths.
The above will install Brewall's maps to the EQ maps directory the next time --download-watched is run for LIVE servers.
Overwrite protection
If there are local files you don't want overwritten by a resource, you can add them to the PROTECTED_FILES_BY_RESOURCE setting. Include the resource ID and files you want to protect. e.g.,
[LIVE.PROTECTED_FILES_BY_RESOURCE]
1974 = ["CharSelect.cfg", "Zoned.cfg", "MQ2Map.ini", "MQ2MoveUtils.ini"]
153 = ["citymist.txt", "innothule.txt", "oasis.txt"]
navmesh = ["befallen.navmesh", "innothuleb.navmesh"]
Custom category directories
If you share lua, macros, or plugins directories across multiple MQ environments, you can override where an entire category is installed. Add a CATEGORY_PATHS section to your settings.local.toml:
[DEFAULT.CATEGORY_PATHS]
lua = 'D:\\shared\\lua'
macros = 'D:\\shared\\macros'
Absolute paths are used as-is. Relative paths are joined to DOWNLOAD_FOLDER. You can set this globally in [DEFAULT] or per-environment ([LIVE.CATEGORY_PATHS], [TEST.CATEGORY_PATHS], etc.).
Tinkerers
If you self-compile MacroQuest or use a discord friend's copy, you can still keep your scripts and plugins in sync with redfetch by opting out of Very Vanilla:
redfetch.exe config SPECIAL_RESOURCES.1974.opt_in false --server LIVE
redfetch.exe config SPECIAL_RESOURCES.60.opt_in false --server EMU
redfetch.exe config SPECIAL_RESOURCES.2218.opt_in false --server TEST
Then assign the Very Vanilla MQ path to your self-compiled MacroQuest.
Custom post-update launch
redfetch can launch extra programs after an update completes. Aside from the normal UI toggles, you can add custom to POST_UPDATE_LAUNCH.targets in settings.local.toml, then set command to whatever redfetch should run:
[LIVE.POST_UPDATE_LAUNCH]
targets = ["custom"]
command = ['C:\Tools\AfterRedfetch\after-update.exe', '--server', 'LIVE']
You can also combine it with the built-in post-update launches. For example, to start EQBCS and MySEQ and run your own Python script:
[LIVE.POST_UPDATE_LAUNCH]
targets = ["myseq", "custom", "eqbcs"]
command = ["C:\\Users\\Public\\Python\\python.exe", "C:\\Users\\Public\\redfetch\\after_update.py"]
You can set these per-server, e.g. [TEST.POST_UPDATE_LAUNCH], or global [DEFAULT.POST_UPDATE_LAUNCH].
Trailmap
- Add custom buttons for "fetch" tab.
- Option: Close after update
- Indicate when updated VV is available
- Run from MQ
- Deeper integration with the forums

Contributing
I'd love help, conceptually and technically. I'm not a developer and this is my first big python script.
[!NOTE] This project is built with LLM assistance.
To set up a development environment,
git clone https://github.com/RedGuides/redfetch
cd redfetch
pip install hatch
hatch env create dev
hatch shell dev
You can then run your dev version with,
redfetch
Or if the issue is ui-specific, run the terminal UI in debug mode,
textual run --dev .\src\redfetch\main.py
When you're done, type exit to leave the shell.
Project details
Verified details
These details have been verified by PyPIProject links
GitHub Statistics
Maintainers
Release history Release notifications | RSS feed


Download files
Download the file for your platform. If you're not sure which to choose, learn more about installing packages.
Source Distribution
Built Distribution
Filter files by name, interpreter, ABI, and platform.
If you're not sure about the file name format, learn more about wheel file names.
Copy a direct link to the current filters
File details
Details for the file redfetch-1.4.0.tar.gz.
File metadata
- Download URL: redfetch-1.4.0.tar.gz
- Upload date:
- Size: 147.9 kB
- Tags: Source
- Uploaded using Trusted Publishing? Yes
- Uploaded via: twine/6.1.0 CPython/3.13.12
File hashes
| Algorithm | Hash digest | |
|---|---|---|
| SHA256 |
a33d2129a051a2fe9c1a099e7e12b44fae60b2946dd17cc47f025219ec720875
|
|
| MD5 |
6e872dbee86049b434e6c4748ff9fce4
|
|
| BLAKE2b-256 |
fd3bcf7f5eaea9e8ef6137c0f043c93f6c7d54a0c7d7e5bf58c2c6cfbf731113
|
Provenance
The following attestation bundles were made for redfetch-1.4.0.tar.gz:
Publisher:
pipeline.yml on RedGuides/redfetch
-
Statement:
-
Statement type:
https://in-toto.io/Statement/v1 -
Predicate type:
https://docs.pypi.org/attestations/publish/v1 -
Subject name:
redfetch-1.4.0.tar.gz -
Subject digest:
a33d2129a051a2fe9c1a099e7e12b44fae60b2946dd17cc47f025219ec720875 - Sigstore transparency entry: 2082144433
- Sigstore integration time:
-
Permalink:
RedGuides/redfetch@ccf5cf558b6e6f261fab4079e837d5cb47e7975d -
Branch / Tag:
refs/tags/v1.4.0 - Owner: https://github.com/RedGuides
-
Access:
public
-
Token Issuer:
https://token.actions.githubusercontent.com -
Runner Environment:
github-hosted -
Publication workflow:
pipeline.yml@ccf5cf558b6e6f261fab4079e837d5cb47e7975d -
Trigger Event:
push
-
Statement type:
File details
Details for the file redfetch-1.4.0-py3-none-any.whl.
File metadata
- Download URL: redfetch-1.4.0-py3-none-any.whl
- Upload date:
- Size: 132.2 kB
- Tags: Python 3
- Uploaded using Trusted Publishing? Yes
- Uploaded via: twine/6.1.0 CPython/3.13.12
File hashes
| Algorithm | Hash digest | |
|---|---|---|
| SHA256 |
09490f6940b074e430790c49f6ceef9b939c6e8fb457430756603e34f141d0d5
|
|
| MD5 |
40767729ac929f4da6e7acb68d5d5676
|
|
| BLAKE2b-256 |
85554dce905c4d6be7d61718ee6ce9e8674b3bf8e76016572a871b1478a3cbf4
|
Provenance
The following attestation bundles were made for redfetch-1.4.0-py3-none-any.whl:
Publisher:
pipeline.yml on RedGuides/redfetch
-
Statement:
-
Statement type:
https://in-toto.io/Statement/v1 -
Predicate type:
https://docs.pypi.org/attestations/publish/v1 -
Subject name:
redfetch-1.4.0-py3-none-any.whl -
Subject digest:
09490f6940b074e430790c49f6ceef9b939c6e8fb457430756603e34f141d0d5 - Sigstore transparency entry: 2082144435
- Sigstore integration time:
-
Permalink:
RedGuides/redfetch@ccf5cf558b6e6f261fab4079e837d5cb47e7975d -
Branch / Tag:
refs/tags/v1.4.0 - Owner: https://github.com/RedGuides
-
Access:
public
-
Token Issuer:
https://token.actions.githubusercontent.com -
Runner Environment:
github-hosted -
Publication workflow:
pipeline.yml@ccf5cf558b6e6f261fab4079e837d5cb47e7975d -
Trigger Event:
push
-
Statement type:






