
remote-fileshare · 远程文件共享


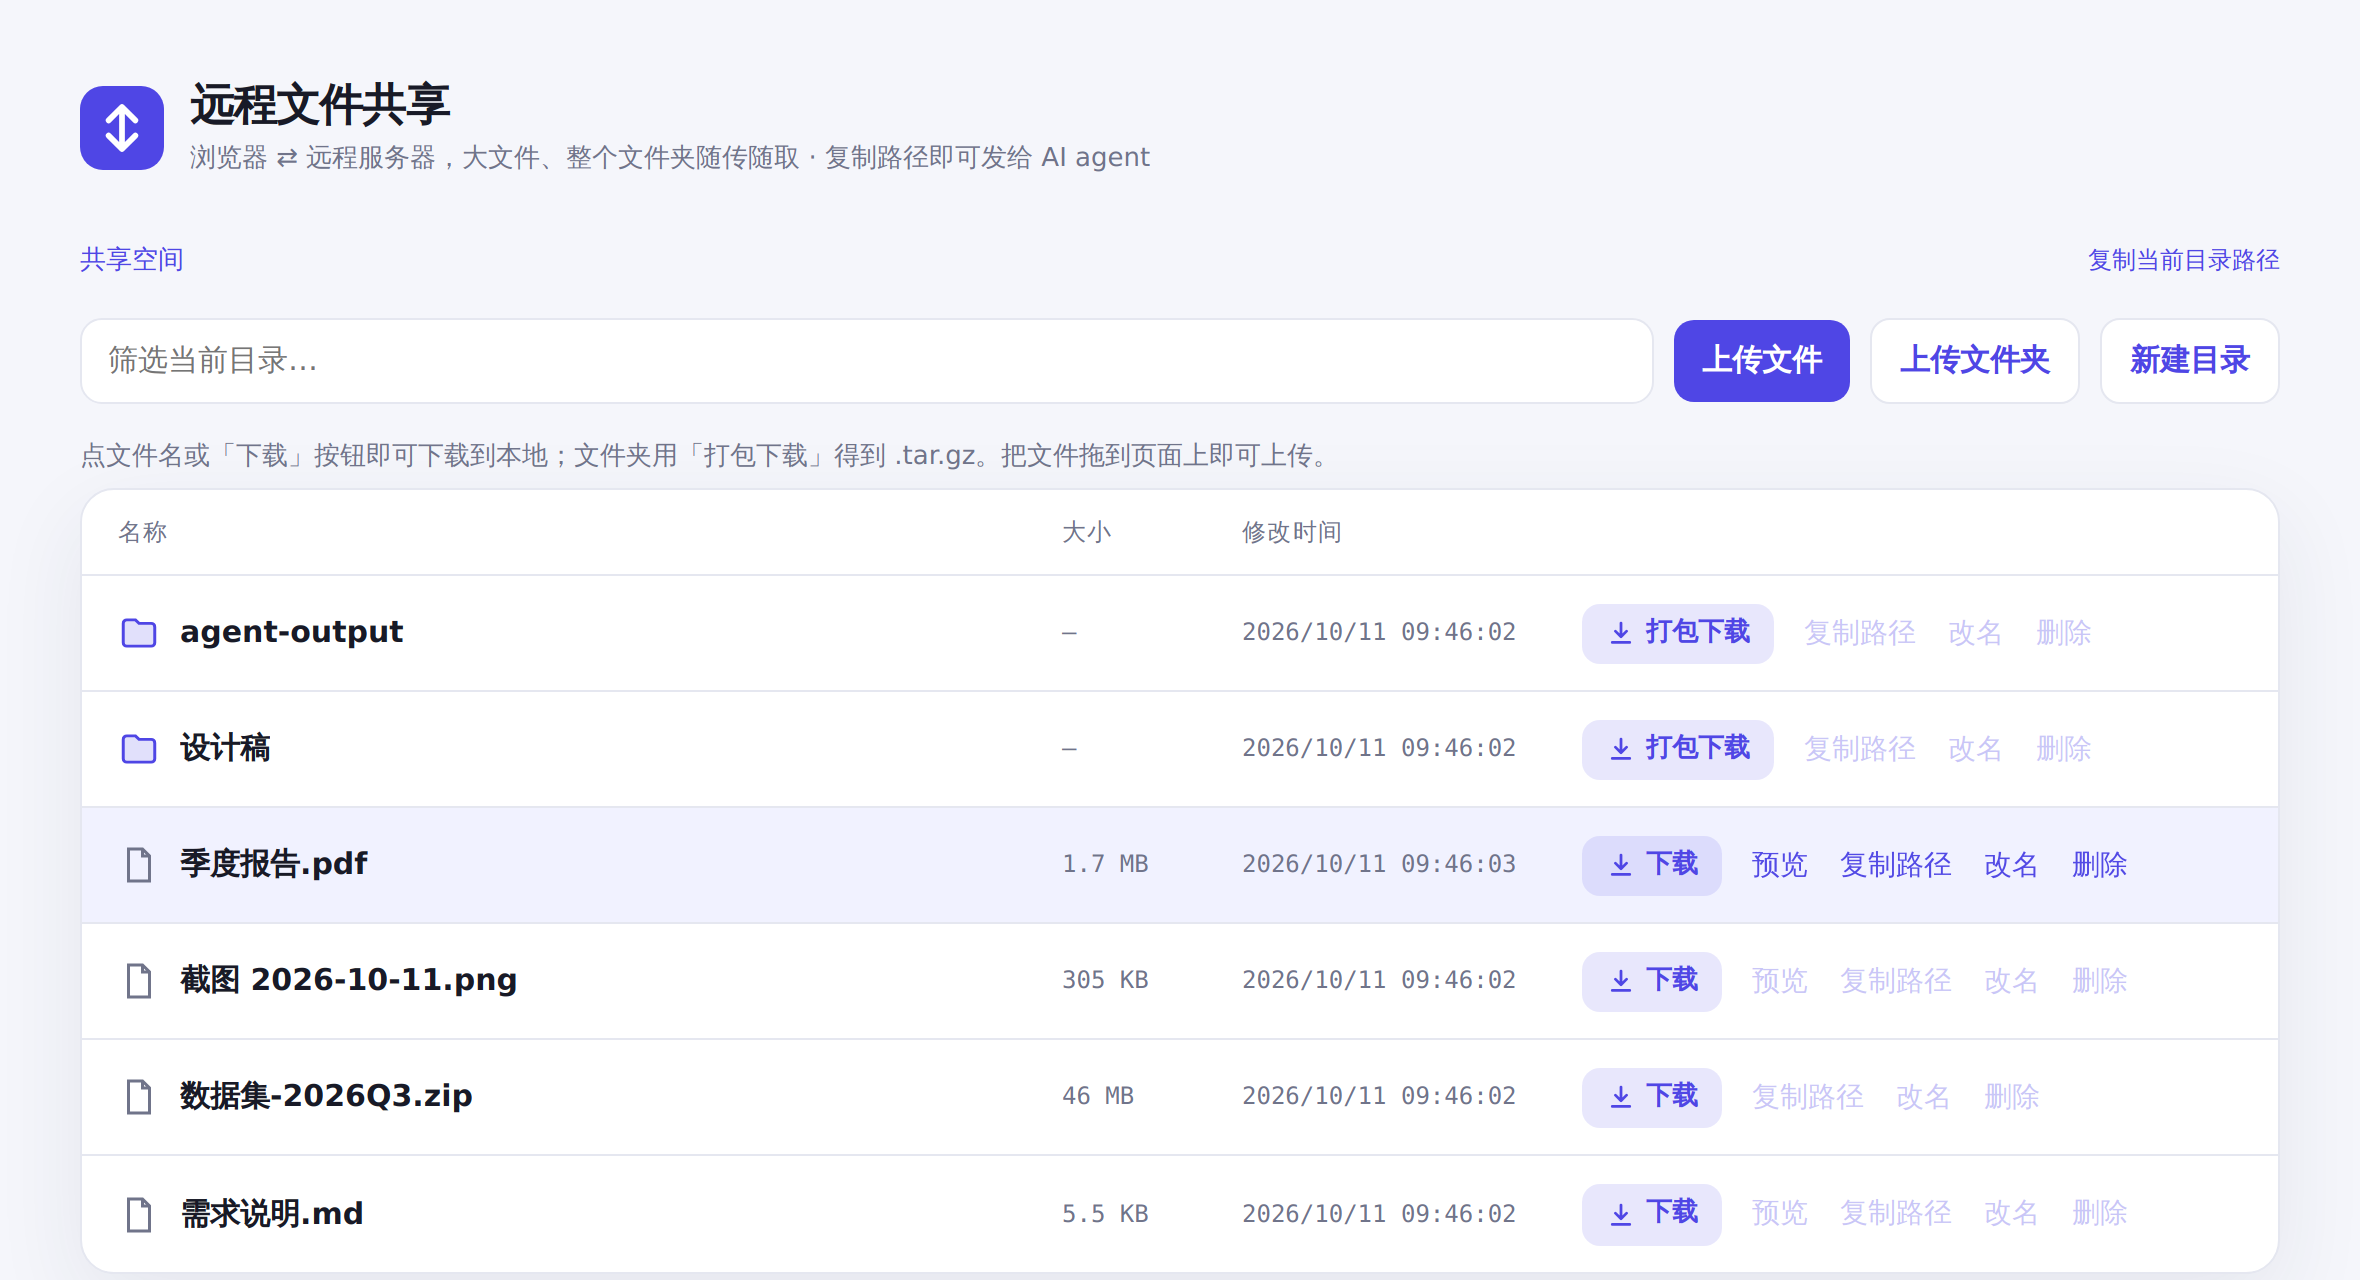
在浏览器和远程服务器之间传文件。 一行命令在服务器上启动,打开网页就能上传、下载、管理文件。不用装 FTP,不用配 scp,也不用折腾 VS Code 插件。
适合这样的场景:你在本地电脑上通过 Claude Code、Codex、opencode 等 AI agent 远程操作一台服务器,需要把图片、文档、整个文件夹传给 agent 处理,或者把 agent 生成的结果拿回本地。
⚠️ 特别提醒:服务器在境外时,直接在 VS Code / 终端里拖拽上传大文件会很慢,还容易中断。传大文件、整个文件夹,建议用 remote-fileshare 的网页上传:浏览器直连服务器,带进度、速度和剩余时间,体验好很多。
安装与启动
在远程服务器上运行下面任意一种,有 Node.js 或 Python 其中一个就够了:
npx remote-fileshare /path/to/share        # Node.js 18+
uvx remote-fileshare /path/to/share        # Python 3.8+,用 uv
pipx run remote-fileshare /path/to/share   # Python 3.8+,用 pipx
不传目录时共享当前目录,默认端口 8001。启动后终端会打印访问地址、用户名和密码:
remote-fileshare 1.1.1 已启动:http://0.0.0.0:8001
访问地址:http://127.0.0.1:8001
访问地址:http://10.0.0.5:8001
共享目录:/path/to/share
用户名:admin
密码:fRu_aghQlXQ6cJ1bOpWiw-Te(已随机生成并保存到 ~/.config/remote-fileshare/password)
然后在本地电脑的浏览器打开 http://服务器公网IP:8001 即可。查看服务器公网 IP:curl -s ifconfig.me。
其他安装方式
npm install -g remote-fileshare      # 全局安装,之后直接运行 remote-fileshare
uv tool install remote-fileshare     # 同上,Python 版
pip install remote-fileshare

# 不经过 npm / PyPI,直接从 GitHub 运行最新代码
npx github:chao5go/remote-fileshare /path/to/share
uvx --from git+https://github.com/chao5go/remote-fileshare remote-fileshare /path/to/share

# Node 版是一个零依赖的单文件,也可以直接下载运行
curl -fsSLO https://raw.githubusercontent.com/chao5go/remote-fileshare/main/remote-fileshare.js
node remote-fileshare.js /path/to/share
Node 版和 Python 版功能、接口、网页完全一致,共用同一套测试,选你服务器上现成的那个即可。两个版本都不依赖任何第三方包。
功能
- 全站密码保护:首次运行随机生成强密码;密码比对防时序攻击;连续登录失败自动锁定 IP
- 上传:多选文件、整个文件夹(保留目录结构)、拖拽到页面;流式写入不占内存;显示进度、速度、剩余时间;没有超时限制,慢速线路传几个小时也不会被掐断
- 下载:每个文件都有醒目的「下载」按钮,中文文件名正常;支持断点续传;文件夹一键「打包下载」成
.tar.gz,流式生成不落盘;在 Chrome / Edge 里还能把文件直接从网页拖到桌面 - 预览:图片、PDF、音视频、文本/代码在新标签页打开(放在沙箱里,上传的网页文件无法在本站执行脚本)
- 管理:新建目录、改名/移动(不会覆盖已有文件)、删除;即时筛选
- 给 AI agent 用:每个文件都能「复制路径」,复制的是它在服务器上的绝对路径,直接粘贴给 agent
- 好看、好用:明暗主题自动切换,手机可用
长期运行
nohup npx remote-fileshare /path/to/share > fileshare.log 2>&1 &
pkill -f remote-fileshare   # 停止
更推荐用 systemd 托管,开机自启、崩溃自动重启,示例见 contrib/remote-fileshare.service。
配置
全部通过环境变量设置:
| 变量 | 默认值 | 说明 |
|---|---|---|
PORT |
8001 |
监听端口 |
HOST |
0.0.0.0 |
监听地址,只想本机访问可设为 127.0.0.1 |
FS_USER |
admin |
登录用户名 |
PASS |
随机生成 | 登录密码,设置后不再读写密码文件 |
PASS_FILE |
~/.config/remote-fileshare/password |
自动生成的密码保存位置;改密码可以直接编辑它后重启 |
TRUST_PROXY |
不开启 | 放在本机反向代理后面时设为 1,从 X-Forwarded-For 读取真实客户端 IP(用于登录限流和日志) |
PORT=9000 PASS='一个足够长的密码' npx remote-fileshare ~/share
HTTPS
remote-fileshare 本身只提供 HTTP,以保持零依赖。需要 HTTPS 时,在前面放一个 Caddy,证书会自动申请和续期:
HOST=127.0.0.1 TRUST_PROXY=1 npx remote-fileshare /path/to/share # 只监听本机,不直接暴露
Caddy 配置见 contrib/Caddyfile。有域名时只需要两行配置。没有域名也可以:Let's Encrypt 支持直接给公网 IP 签证书(需要 Caddy 2.10 以上版本),访问地址就是 https://你的IP,也可以带端口,例如 https://你的IP:8001。两种方式都需要放行 80 端口,证书申请和续期要用它。
配合 AI agent 使用
- 把文件交给 agent:网页上传后,点该文件的「复制路径」(或页面上方的「复制当前目录路径」),把路径粘贴进对话,例如「帮我看看 /root/share/截图.png」。
- 把 agent 的产出拿回来:让 agent 把结果写到共享目录里,刷新网页点「下载」;整个文件夹点「打包下载」。
- 让 agent 用命令行操作(agent 在另一台机器上时):
U='admin:你的密码'; S='http://服务器IP:8001'
curl -u "$U" -T report.pdf "$S/报告/report.pdf"                           # 上传(自动创建目录)
curl -u "$U" -o report.pdf "$S/报告/report.pdf"                           # 下载
curl -u "$U" -C - -o big.iso "$S/big.iso"                                  # 断点续传下载
curl -u "$U" "$S/报告/?tar" | tar xz                                       # 打包下载整个目录
curl -u "$U" -X POST -G --data-urlencode "mkdir=新目录" "$S/"             # 新建目录
curl -u "$U" -X POST -G --data-urlencode "rename=归档/a.txt" "$S/a.txt"   # 改名 / 移动
curl -u "$U" -X DELETE "$S/a.txt"                                          # 删除
路径里的中文可以原样写;? 后面的参数含中文时要像上面那样用 -G --data-urlencode 编码。
HTTP 接口
| 请求 | 作用 | 成功状态码 |
|---|---|---|
GET /目录/ |
目录网页 | 200 |
GET /文件 |
下载(支持 Range) |
200 / 206 |
GET /文件?preview |
内联预览 | 200 |
GET /目录/?tar |
流式打包下载 .tar.gz |
200 |
PUT /路径/文件 |
上传原始文件体,自动创建父目录,同名文件会被覆盖 | 201 |
POST /目录/?mkdir=名称 |
新建目录,名称可以包含 / |
201 |
POST /路径?rename=新名称 |
改名;新名称相对当前所在目录,可含 / 实现移动;目标已存在返回 409 |
204 |
DELETE /路径 |
删除文件,或递归删除文件夹 | 204 |
安全说明
- 这个服务能读写共享目录里的所有文件,请使用足够长的随机密码(默认生成的就是)。
- 不要把共享目录设成
/,尤其是在公网服务器上。 - 直接用 HTTP 时,密码和文件在网络上都是明文传输。公网使用强烈建议按上文加 HTTPS,或者通过 SSH 隧道访问:
ssh -L 8001:127.0.0.1:8001 服务器,然后打开http://127.0.0.1:8001。 - 已经做了的防护:路径穿越与符号链接越界校验、禁止删除共享根目录、文件名 HTML 转义、拒绝跨站写请求(CSRF)、预览内容放进 CSP 沙箱、登录失败限流。
常见问题
打不开网页? 没配 HTTPS 时,先检查地址栏:浏览器经常自动把 http 改成 https,必须完整输入 http://IP:8001。再检查云服务器的安全组 / 防火墙有没有放行 8001 端口。还打不开就用手机流量试一下,能打开说明是你所在的网络拦截了。
传到一半断了? 网页上传是逐个文件进行的,已经传完的文件不受影响,重新选择剩下的文件继续即可。下载中断可以用浏览器的「继续」或 curl -C - 续传。
怎么换密码? 设置 PASS 环境变量,或者编辑 ~/.config/remote-fileshare/password 后重启服务。
开发
remote-fileshare.js          Node 版(单文件,网页界面的唯一来源)
src/remote_fileshare/        Python 版
  server.py                  服务器实现
  ui.py                      网页界面,由 scripts/sync-ui.js 从 Node 版生成,不要手动改
test/fileshare.test.js       端到端测试,两个版本共用
npm test                 # 测 Node 版
npm run test:python      # 用同一套测试测 Python 版(需要 python3)
npm run sync-ui          # 改了 remote-fileshare.js 里的网页界面后,同步到 Python 版
测试会在临时目录里启动真实的服务器逐项验证,并对比两个版本生成的页面必须完全一致。不需要安装任何依赖。
发布新版本
node scripts/bump-version.js 1.2.0       # 同时修改三处版本号
git commit -am "Release 1.2.0" && git push
推送到 main 后,GitHub Actions 会检查这个版本是否已经发布过;没发布过就跑完整测试,然后自动发布到 npm 和 PyPI,并创建 GitHub Release(tag v1.2.0)。仓库需要配置 NPM_TOKEN 和 PYPI_TOKEN 两个 Actions secrets,详见 .github/workflows/release.yml。
docs/PROMPT.md 是这个项目最初的 Claude Code 提示词。
English
remote-fileshare moves files between your browser and a remote server. Run one command on the server, open the page, and upload, download and manage files. It is built for the AI-agent workflow, where you drive a remote (often overseas) server through Claude Code, Codex or opencode and need to hand files to the agent or bring its output back.
npx remote-fileshare /path/to/share     # Node.js 18+
uvx remote-fileshare /path/to/share     # Python 3.8+
- Zero dependencies in both the Node.js and Python versions. They share one test suite and render identical pages.
- Password-protected. A random password is generated on first run, and failed logins are rate-limited.
- Upload files, whole folders or drag-and-drop, with progress, speed and ETA. There is no request timeout.
- Download with resume support. Folders stream as
.tar.gz. Images, PDFs, media and code can be previewed in a sandbox. - Copy any file's absolute server path in one click to paste to your agent.
- HTTPS works by putting Caddy in front, even without a domain (Let's Encrypt IP certificates). See
contrib/Caddyfile.
The UI is in Chinese. Configuration uses the environment variables listed above.
许可证
1 maintainer

Metadata
1 maintainer
Release files for remote-fileshare 1.1.1
For a detailed explanation of source distributions (sdists) and built distributions (wheels), please see the package formats documentation.
Source distribution (sdist)
| File | Size | Uploaded | |
|---|---|---|---|
| remote_fileshare-1.1.1.tar.gz | 23.0 kB | Details |
Built distribution (wheel)
| File | Interpreter | ABI | Platform | Reset |
|---|---|---|---|---|
| remote_fileshare-1.1.1-py3-none-any.whl | Python 3 | none | any | Details |
Total release size: 47.7 kB














