
Putting the Object Back into Video Object Segmentation
Fork notice: This fork packages and maintains Cutie for reliable installation and PyPI releases, while preserving the upstream project's research attribution and documentation.
Ho Kei Cheng, Seoung Wug Oh, Brian Price, Joon-Young Lee, Alexander Schwing
University of Illinois Urbana-Champaign and Adobe
CVPR 2024, Highlight

Highlight
Cutie is a video object segmentation framework -- a follow-up work of XMem with better consistency, robustness, and speed. This repository contains code for standard video object segmentation and a GUI tool for interactive video segmentation. The GUI tool additionally contains the "permanent memory" (from XMem++) option for better controllability.
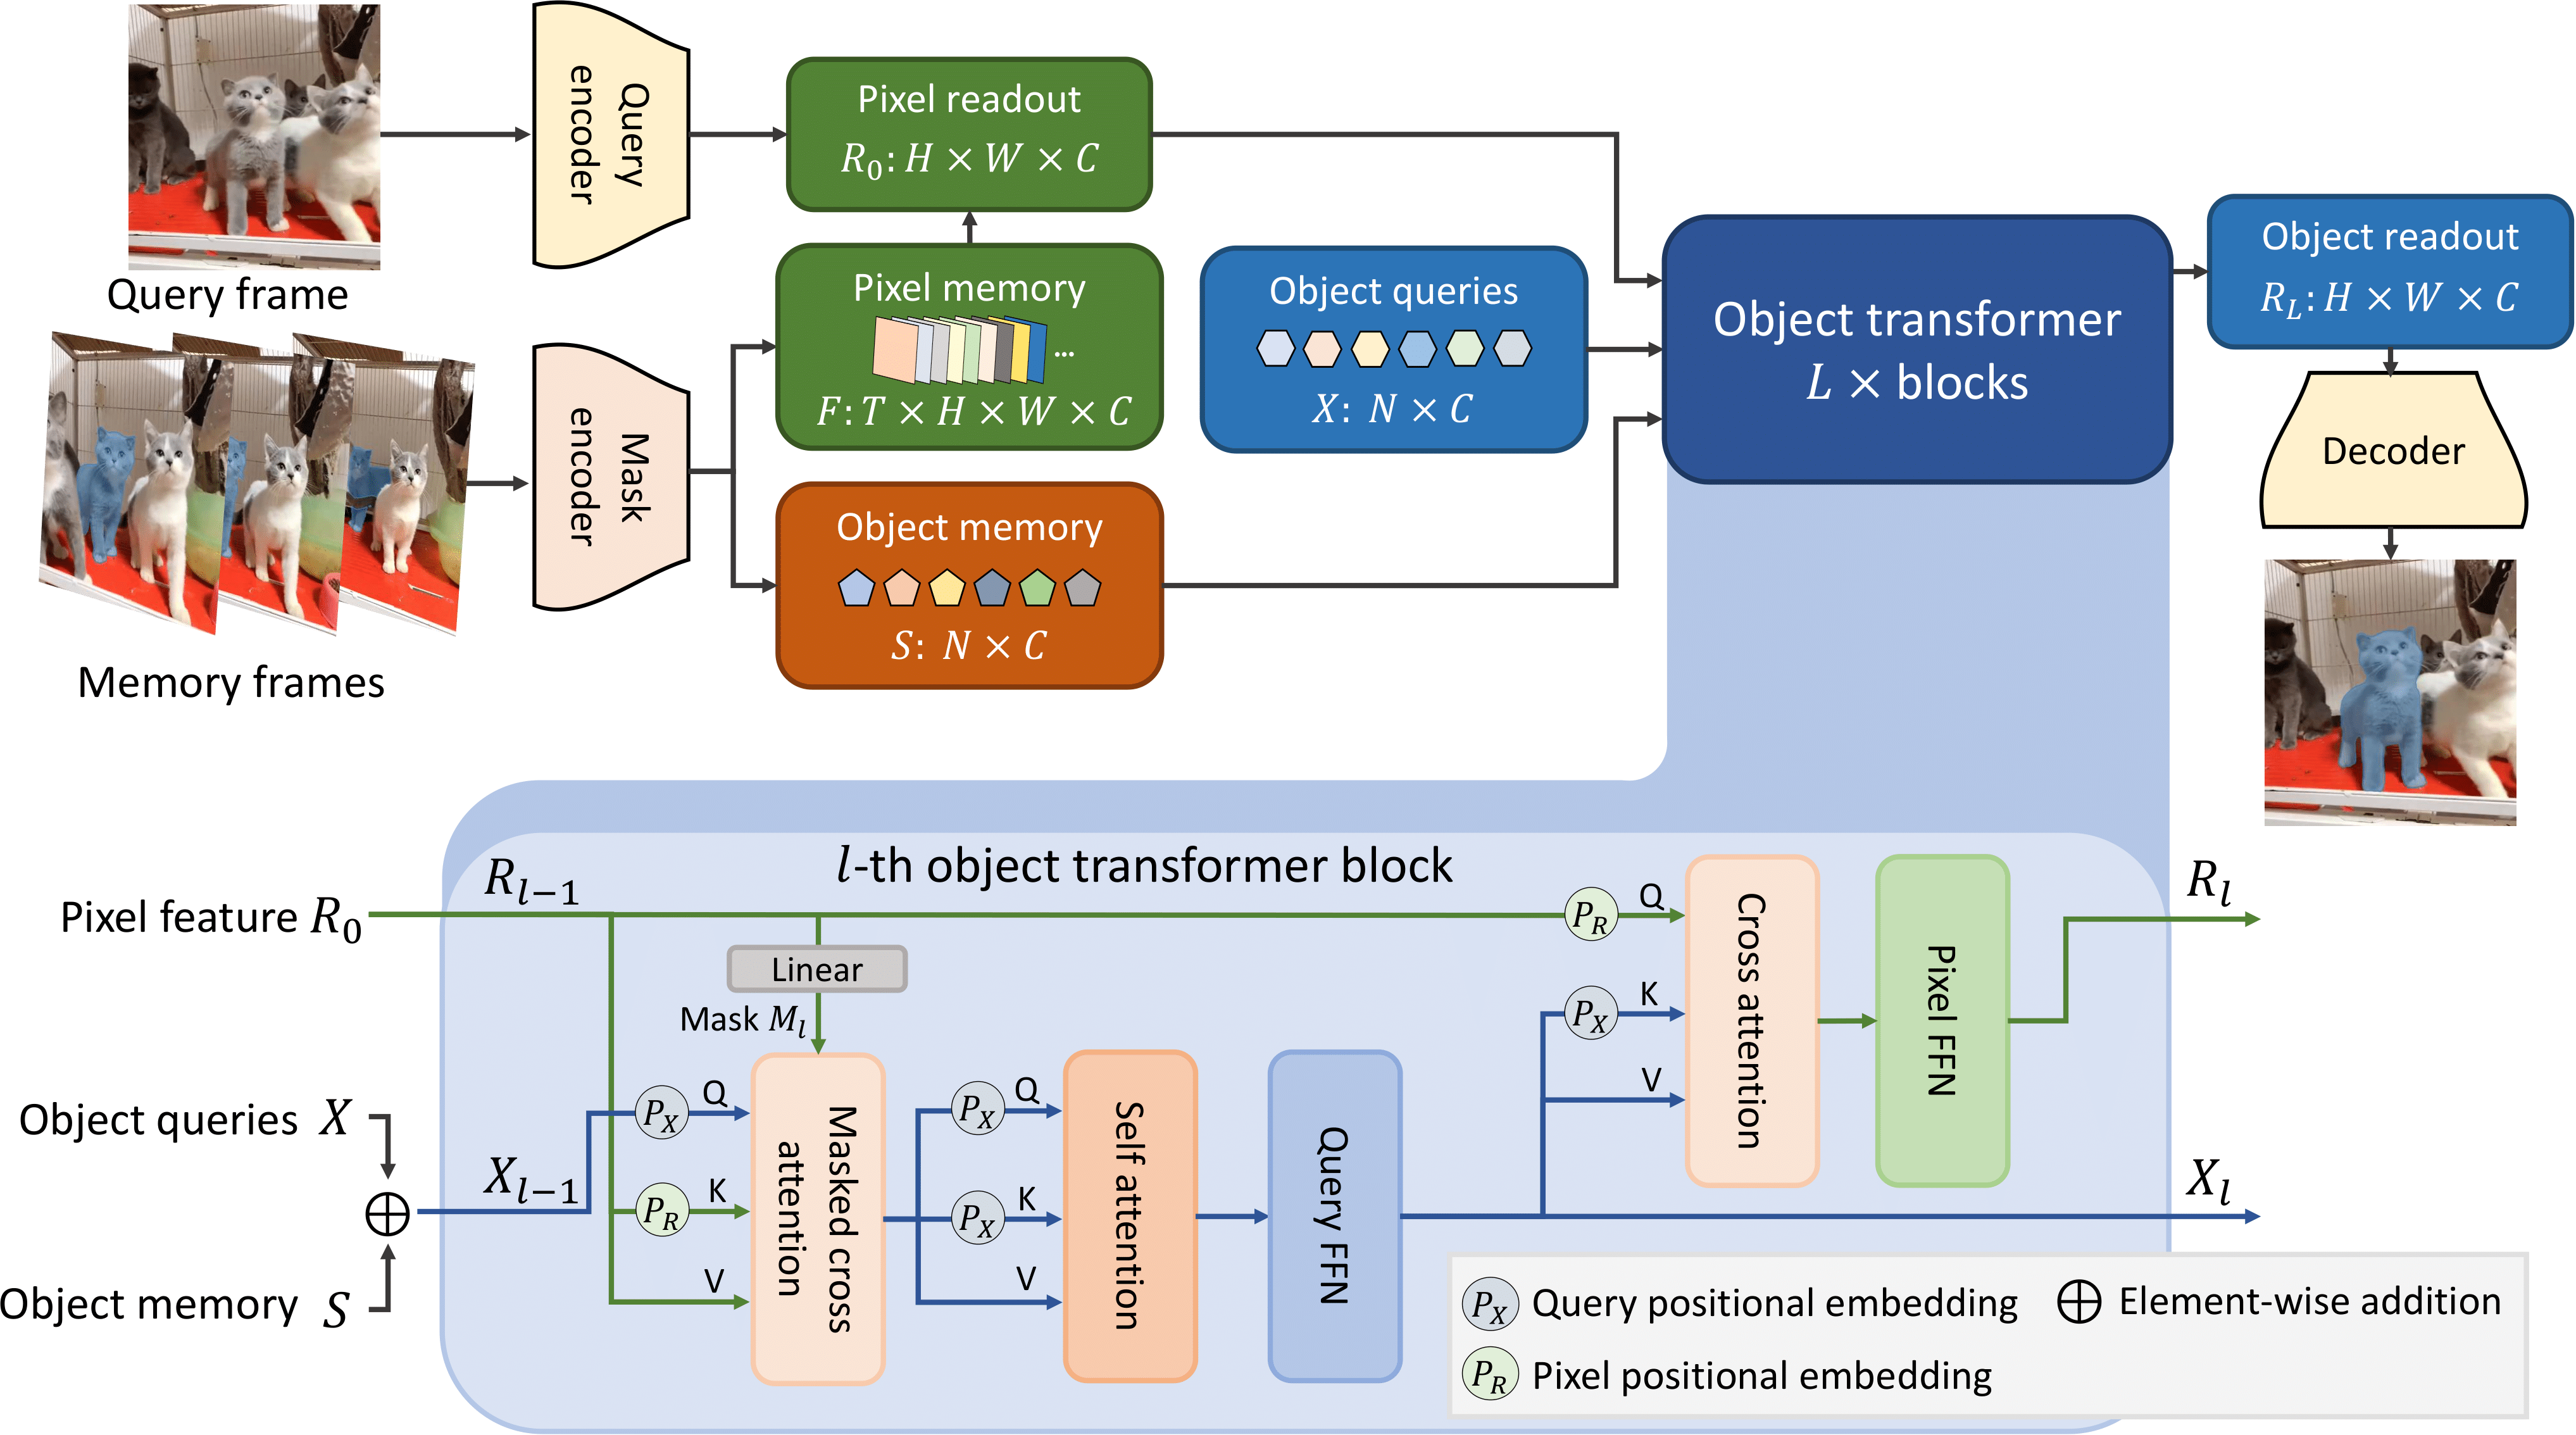
Demo Video
https://github.com/hkchengrex/Cutie/assets/7107196/83a8abd5-369e-41a9-bb91-d9cc1289af70
Source: https://raw.githubusercontent.com/hkchengrex/Cutie/main/docs/sources.txt
Installation
Tested on Ubuntu only.
Prerequisite:
- Python 3.10+
- A PyTorch build for your hardware; image profiles also require matching torchvision
Clone our repository:
git clone https://github.com/hkchengrex/Cutie.git
Install the model core with pip:
cd Cutie
pip install -e .
Install feature-specific dependencies only when needed:
| Profile | Command | Use case |
|---|---|---|
| Inference | pip install -e '.[inference]' |
Scripting examples and default model download. |
| Evaluation | pip install -e '.[evaluation]' |
cutie/eval_vos.py, BURST, and multi-scale score outputs. |
| Training | pip install -e '.[train]' |
Distributed training. |
| GUI | pip install -e '.[gui]' |
Interactive desktop tool from a source checkout. |
| Video | pip install -e '.[video]' |
scripts/process_video.py. |
| Data | pip install -e '.[data]' |
Dataset conversion and multi-scale utility scripts. |
The core package contains only the model dependencies. Choose a PyTorch and torchvision build compatible with your CPU, CUDA, or MPS environment before installing a profile that requires image transforms.
Download the pretrained models:
python cutie/utils/download_models.py
Quick Start
Scripting Demo
This is probably the best starting point if you want to use Cutie in your project. Hopefully, the script is self-explanatory (additional comments in scripting_demo.py). If not, feel free to open an issue. For more advanced usage, like adding or removing objects, see scripting_demo_add_del_objects.py.
@torch.inference_mode()
@torch.cuda.amp.autocast()
def main():

    cutie = get_default_model()
    processor = InferenceCore(cutie, cfg=cutie.cfg)
    # the processor matches the shorter edge of the input to this size
    # you might want to experiment with different sizes, -1 keeps the original size
    processor.max_internal_size = 480

    image_path = './examples/images/bike'
    images = sorted(os.listdir(image_path))  # ordering is important
    mask = Image.open('./examples/masks/bike/00000.png')
    palette = mask.getpalette()
    objects = np.unique(np.array(mask))
    objects = objects[objects != 0].tolist()  # background "0" does not count as an object
    mask = torch.from_numpy(np.array(mask)).cuda()

    for ti, image_name in enumerate(images):
        image = Image.open(os.path.join(image_path, image_name))
        image = to_tensor(image).cuda().float()

        if ti == 0:
            output_prob = processor.step(image, mask, objects=objects)
        else:
            output_prob = processor.step(image)

        # convert output probabilities to an object mask
        mask = processor.output_prob_to_mask(output_prob)

        # visualize prediction
        mask = Image.fromarray(mask.cpu().numpy().astype(np.uint8))
        mask.putpalette(palette)
        mask.show()  # or use mask.save(...) to save it somewhere


main()
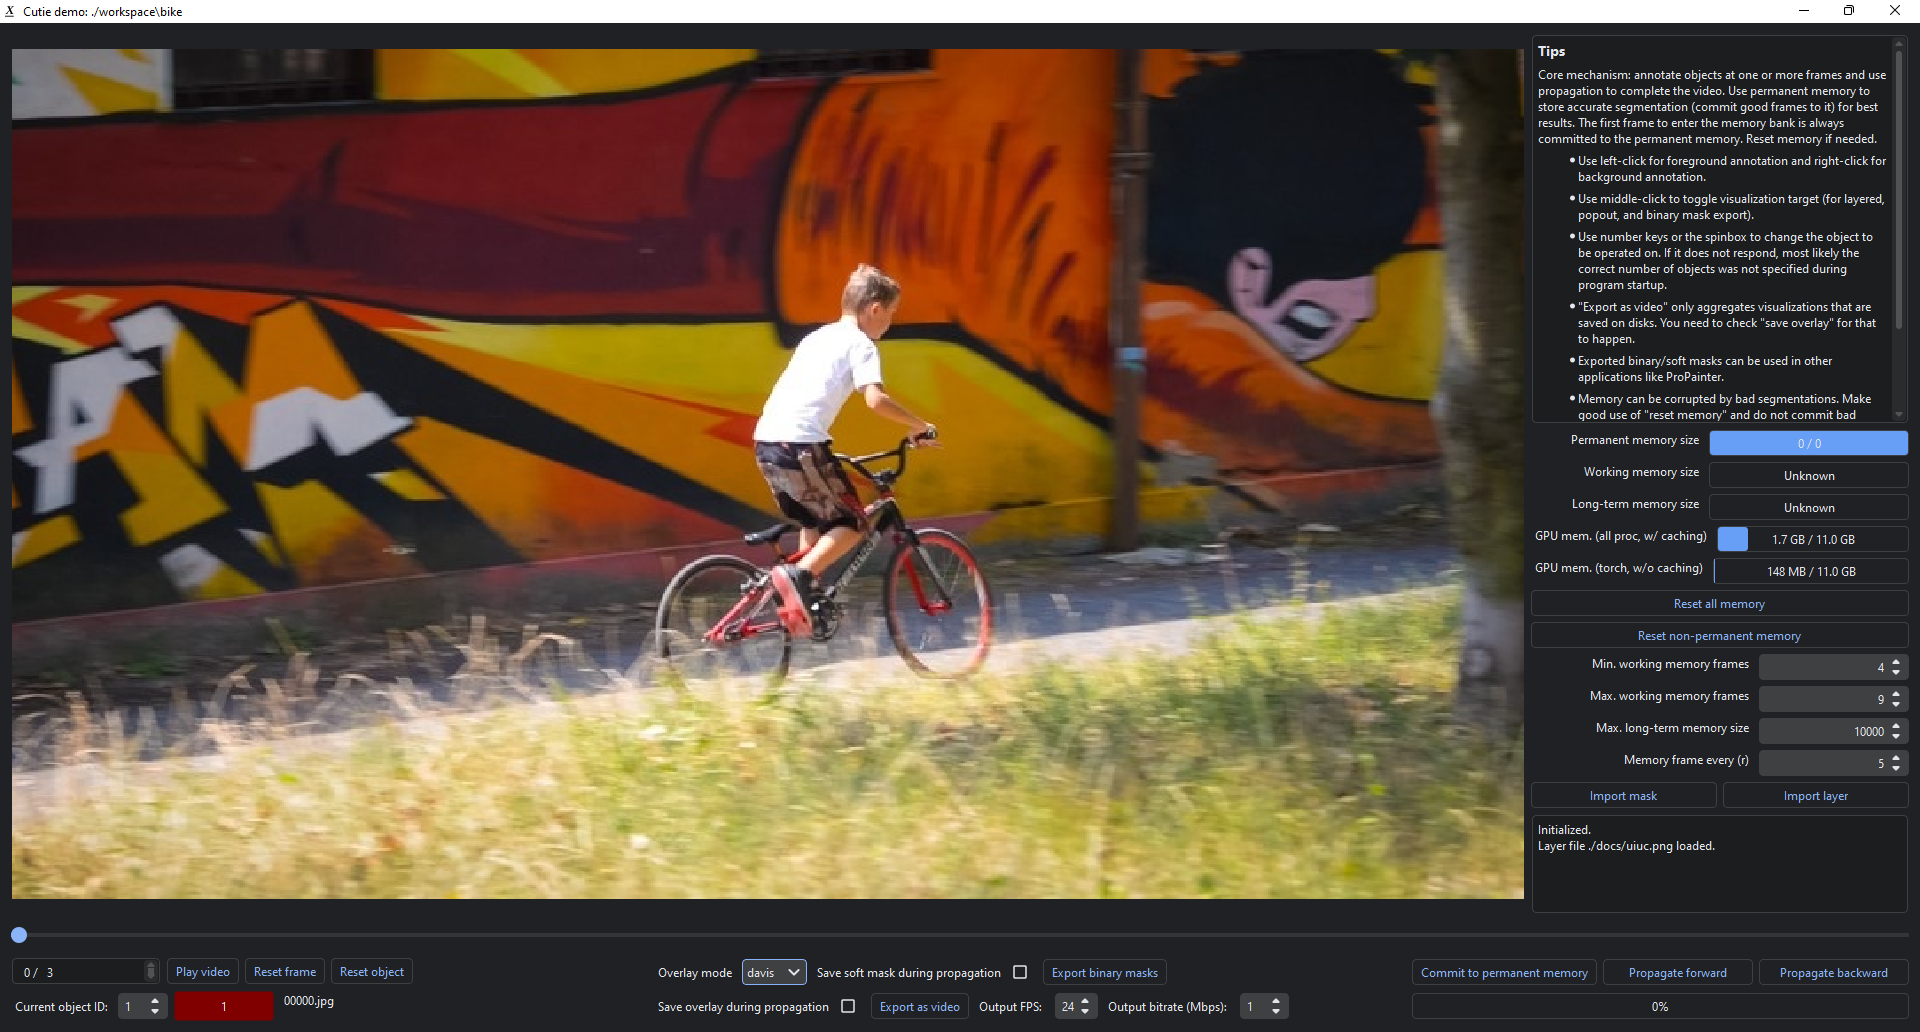
Interactive Demo
Start the interactive demo with:
python interactive_demo.py --video ./examples/example.mp4 --num_objects 1
See more instructions here.
If you are running this on a remote server, X11 forwarding is possible. Start by using ssh -X. Additional configurations might be needed but Google would be more helpful than me.
(For single video evaluation, see the unofficial script scripts/process_video.py from https://github.com/hkchengrex/Cutie/pull/16)
Training and Evaluation
Citation
@inproceedings{cheng2023putting,
  title={Putting the Object Back into Video Object Segmentation},
  author={Cheng, Ho Kei and Oh, Seoung Wug and Price, Brian and Lee, Joon-Young and Schwing, Alexander},
  booktitle={arXiv},
  year={2023}
}
References
-
The GUI tools uses RITM for interactive image segmentation. This repository also contains a redistribution of their code in
gui/ritm. That part of code follows RITM's license. -
For automatic video segmentation/integration with external detectors, see DEVA.
-
The interactive demo is developed upon IVS, MiVOS, and XMem.
-
We used ProPainter in our video inpainting demo.
1 maintainer

Release files for rf-cutie 1.0.1
For a detailed explanation of source distributions (sdists) and built distributions (wheels), please see the package formats documentation.
Source distribution (sdist)
| File | Size | Uploaded | |
|---|---|---|---|
| rf_cutie-1.0.1.tar.gz | 171.1 kB | Details |
Built distribution (wheel)
| File | Interpreter | ABI | Platform | Reset |
|---|---|---|---|---|
| rf_cutie-1.0.1-py3-none-any.whl | Python 3 | none | any | Details |
Total release size: 343.1 kB
Release files / rf_cutie-1.0.1.tar.gz
| Download URL | rf_cutie-1.0.1.tar.gz |
|---|---|
| Size | 171.1 kB |
| Tags | Source |
|
SHA-256 checksum How to use checksums |
4950205c62e6a055b6648ed35e8bf03650d9c83e86d568ac96725a2519451d43
|
|
BLAKE2b-256 checksum How to use checksums |
6b66406dde4b570dbbfd44646915254653fabedde8caebf37303053a354f109a
|
| Upload date | |
|
Uploaded using Trusted Publishing? What is trusted publishing? |
No |
| Uploaded via |
twine/7.0.0 CPython/3.14.2
|
Release files / rf_cutie-1.0.1-py3-none-any.whl
| Download URL | rf_cutie-1.0.1-py3-none-any.whl |
|---|---|
| Size | 172.0 kB |
| Tags | Python 3 |
|
SHA-256 checksum How to use checksums |
716234075b8d3166b0e028e5e467051a54b722e2dec53157d4ab8f631742ddd3
|
|
BLAKE2b-256 checksum How to use checksums |
0117a03b5b0aa40cc556447a5b7acfba2e5b07c073ab5ddddbc1943dd857e6c3
|
| Upload date | |
|
Uploaded using Trusted Publishing? What is trusted publishing? |
No |
| Uploaded via |
twine/7.0.0 CPython/3.14.2
|














