A Python client for interacting with Rivalz API


Project description
from mimetypes import knownfiles
Rivalz Python Client
rivalz-client is a Python client for interacting with the Rivalz API. It allows you to upload files, download files,
and manage files on the Rivalz platform using IPFS.
Features
- Upload Files: Upload any file to the Rivalz platform and get an IPFS hash.
- Upload Passport Images: Upload passport images to the Rivalz platform.
- Download Files: Download files from the Rivalz platform using an IPFS hash.v
- Delete Files: Delete files from the Rivalz platform using an IPFS hash.
- Vectorize Documents: Vectorize documents to create a RAG (Retrieval-Augmented Generation) based on the document uploaded.
- Create conversations: Create conversations based on the document uploaded.
Installation
You can install the rivalz-client package via pip:
pip install rivalz-client
Usage
Here is a detailed guide on how to use the rivalz-client to interact with the Rivalz API.
Initialization
First, import the RivalzClient class and initialize it with your secret token. If you don't provide a token, it will
use a default example token.
from rivalz_client.client import RivalzClient

# Initialize the client with your secret token
client = RivalzClient('your_secret_token')
Uploading a File
To upload a file, use the upload_file method. Provide the path to the file you want to upload.
response = client.upload_file('path/to/your/file.txt')
print(response)  # upload hash
Uploading a Passport Image
To upload a passport image, use the upload_passport method. Provide the path to the passport image file.
response = client.upload_passport('path/to/your/passport_image.jpg')
print(response)  # upload hash
Downloading a File
To download a file, use the download_file method with the IPFS hash of the file and the directory where you want to
save the file.
file_path = client.download_file('QmSampleHash', 'save/directory/filename')
print(f"File downloaded to: {file_path}")
Deleting a File
To delete a file, use the delete_file method with the IPFS hash of the file you want to delete.
response = client.delete_file('QmSampleHash')
print(response)
Getting all uploaded files
To get your uploaded files, use the get_upload_history method. This method accept page and size for pagination. Page
start from 0. And default is page 0 (first page) and size is 10.
total_files_uploaded, upload_histories = client.get_upload_history(0, 10)
print(f"Total files uploaded: {total_files_uploaded} ")
print(f"Upload histories: {upload_histories}")
Example
Here is a complete example demonstrating how to use the rivalz-client:
# main.py

import os
from dotenv import load_dotenv
from rivalz_client.client import RivalzClient


def main():
    # Load environment variables from .env file
    load_dotenv()

    # Get the secret token from environment variables
    secret_token = os.getenv('SECRET_TOKEN')

    if not secret_token:
        raise ValueError("SECRET_TOKEN is not set in the environment variables.")

    # Initialize the RivalzClient with the secret token
    client = RivalzClient(secret_token)

    # Define the file path to upload
    file_path_to_upload = 'sample.txt'

    # Upload the file
    try:
        upload_response = client.upload_file(file_path_to_upload)
        print(f"Upload response: {upload_response}")
    except Exception as e:
        print(f"An error occurred during file upload: {e}")

    # Define the upload hash and save path for downloading the file
    ipfs_hash = 'f1b1ab313bdf8ece712831b1835f7ef0e86630530866b2a021e72f6447070604'  # Replace with the actual IPFS hash
    save_path = './downloaded_file.txt'

    # Download the file
    try:
        file_path = client.download(ipfs_hash, save_path)
        print(f"File downloaded to: {file_path}")
    except Exception as e:
        print(f"An error occurred during file download: {e}")


if __name__ == '__main__':
    main()
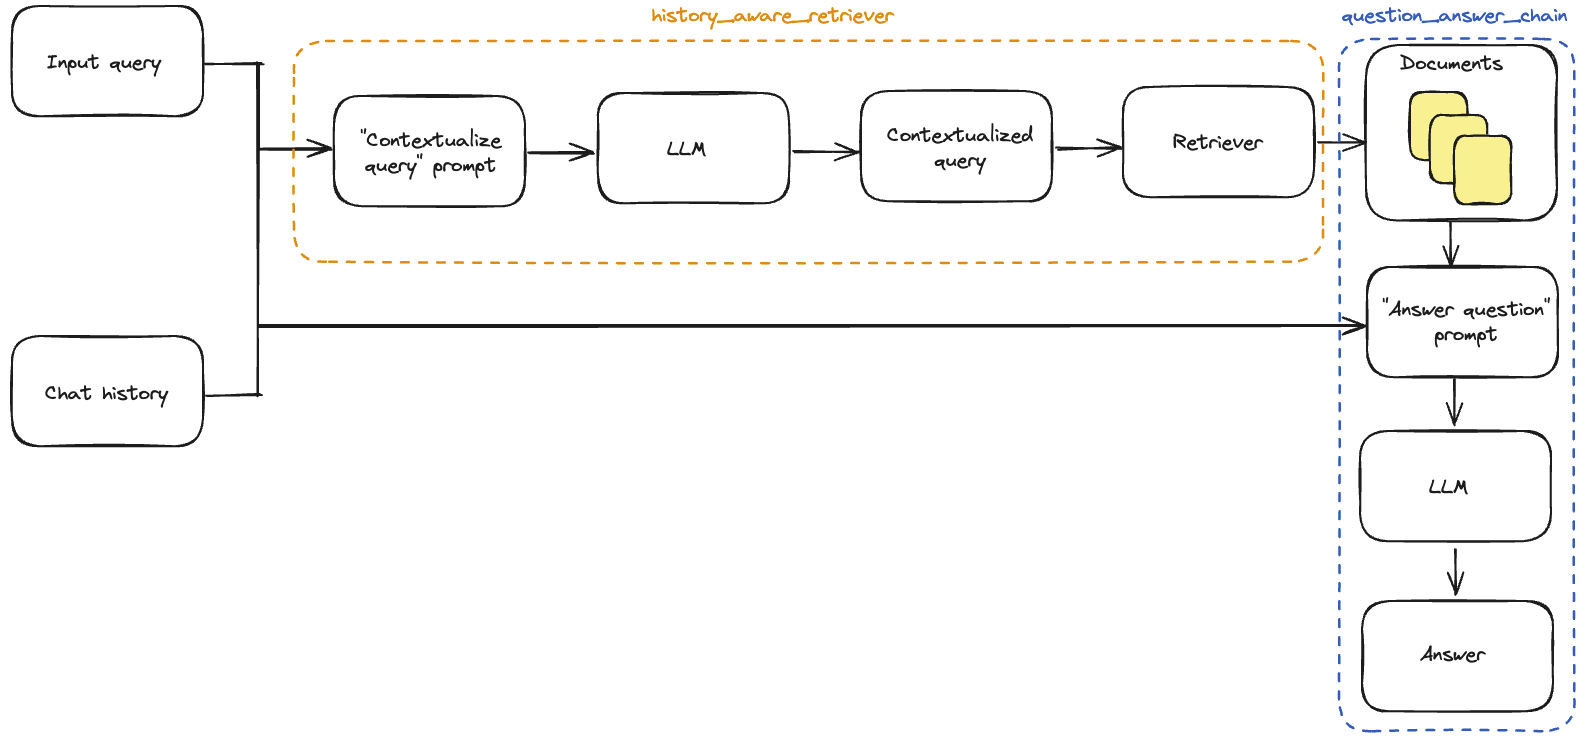
RAG (Retrieval-Augmented Generation) API
Prerequisites
Before using the RAG API, you need some rivalz credits. Claim for free now here
Creating knowledge base from a document
To vectorize a document (which will be used as embedding for the RAG) and create a knowledge base, use the
create_rag_knowledge_base method with the path to the document. This
method returns the knowledge base id which can be used to create a conversation.
We now only support PDF files for creating knowledge bases.
response = client.create_rag_knowledge_base('path/to/your/document.pdf', 'knowledge_base_name')
print(response)
# {'id': '66fa5bf022e73c17073768f0', 'name': 'test', 'files': '1727683567711_sample.pdf', 'userId': '66c4151c98bd0d3d47de682a'}
Adding document to an existed knowledge base
To add document to existed knowledge base, use the add_document_to_knowledge_base method with the knowledge base id
and the path to the document.
response = client.add_document_to_knowledge_base('knowledge_base_id', 'path/to/your/document.pdf')
print(response)
Deleting document from an existed knowledge base
To delete document from existed knowledge base, use the delete_document_from_knowledge_base method with the knowledge
base id and the document name.
response = client.delete_document_from_knowledge_base('knowledge_base_id', 'document_id')
print(response)
Getting all knowledge bases
To get all knowledge bases, use the get_knowledge_bases method.
response = client.get_knowledge_bases()
print(response)
Getting details of a knowledge base
To get details of a knowledge base, use the get_knowledge_base method with the knowledge base id.
response = client.get_knowledge_base('knowledge_base_id')
print(response)
Creating a conversation
To create a conversation, use the create_chat_session method with the knowledge base id and the question. This will
return the AI response along with the chat session id.
response = client.create_chat_session('knowledge_base_id', 'question')
print(response)
# {'answer': 'Hello! How can I help you today? \n', 'session_id': '66fa625fb58f5a4b9a30b983', 'userId': '66c4151c98bd0d3d47de682a'}
Adding a message to a conversation
To add a message to a conversation, use the same method create_chat_session with the chat session id and the message.
response = client.create_chat_session('knowledge_base_id', 'message', 'chat_session_id')
print(response)
Getting all conversations
To get all conversations, use the get_chat_sessions method.
response = client.get_chat_sessions()
print(response)
Getting details of a conversation
To get details of a conversation (which contains chat history for this conversation), use the get_chat_session method
with the chat session id.
response = client.get_chat_session('chat_session_id')
print(response)
Get uploaded documents
To get all uploaded documents, use the get_uploaded_documents method.
response = client.get_uploaded_documents()
print(response)
Examples
Here is a complete example demonstrating how to use the rivalz-client to create a simple RAG conversation based on a
PDF document:
# main.py

import os
from dotenv import load_dotenv
from rivalz_client.client import RivalzClient


def main():
    # Load environment variables from .env file
    load_dotenv()

    # Get the secret token from environment variables
    secret_token = os.getenv('SECRET_TOKEN')

    if not secret_token:
        raise ValueError("SECRET_TOKEN is not set in the environment variables.")

    # Initialize the RivalzClient with the secret token
    client = RivalzClient(secret_token)

    # create knowledge base
    knowledge_base = client.create_rag_knowledge_base('sample.pdf', 'knowledge_base_name')
    knowledge_base_id = knowledge_base['id']
    # create conversation
    conversation = client.create_chat_session(knowledge_base_id, 'what is the document about?')
    conversation_id = conversation['session_id']
    # add message to conversation
    conversation = client.create_chat_session(knowledge_base_id, 'what is the document about?', conversation_id)
    print(conversation['answer'])


if __name__ == '__main__':
    main()
Contributing
Contributions are welcome! Please fork the repository and submit a pull request with your changes.
- Fork the repository.
- Create a new branch (
git checkout -b feature/your-feature). - Commit your changes (
git commit -am 'Add new feature'). - Push to the branch (
git push origin feature/your-feature). - Create a new pull request.
Publish package
To publish your package, you will need to use setuptools and wheel to build your package. Here are the steps to
follow:
-
Make sure you have
setuptoolsandwheelinstalled. If not, you can install them usingpip:pip install setuptools wheel
-
Create a
setup.pyfile in the root directory of your project. This file will contain the metadata about your package, such as its name, version, and dependencies. Here is an examplesetup.pyfile:from setuptools import setup, find_packages setup( name='rivalz-client', version='1.0.0', description='Python client for interacting with the Rivalz API', author='Your Name', author_email='your_email@example.com', packages=find_packages(), install_requires=[ 'requests', ], )
Make sure to replace
'Your Name'and'your_email@example.com'with your actual name and email address. -
Build the package by running the following command:
python setup.py sdist bdist_wheel
This will create a
distdirectory containing the built package files. -
Upload the package to the Python Package Index (PyPI) using
twine. If you haven't already, you will need to create an account on PyPI. Once you have an account, you can upload the package by running the following command:twine upload dist/*
This will upload the package to PyPI, making it available for others to install using
pip.
That's it! Your package is now published and can be installed by others using pip install rivalz-py-client.
Remember to update the version number in your setup.py file each time you make changes to your package and want to
publish a new version.
Explanation
- Project Title: Clearly states the name of the project.
- Features: Lists the main functionalities of the package.
- Installation: Provides the command to install the package using
pip. - Usage: Detailed steps on how to initialize the client, upload files, upload passport images, download files, and delete files.
- Example: A complete example script that demonstrates the usage of all the major functionalities.
- Contributing: Instructions for contributing to the project.
- License: Specifies the license under which the project is released.
License
This project is licensed under the MIT License. See the LICENSE file for details.
Release history Release notifications | RSS feed


Download files
Download the file for your platform. If you're not sure which to choose, learn more about installing packages.
Source Distribution
Built Distribution
Filter files by name, interpreter, ABI, and platform.
If you're not sure about the file name format, learn more about wheel file names.
Copy a direct link to the current filters
File details
Details for the file rivalz-client-1.0.1.tar.gz.
File metadata
- Download URL: rivalz-client-1.0.1.tar.gz
- Upload date:
- Size: 6.5 kB
- Tags: Source
- Uploaded using Trusted Publishing? No
- Uploaded via: twine/5.1.1 CPython/3.9.20
File hashes
| Algorithm | Hash digest | |
|---|---|---|
| SHA256 |
16cef7efed3abbff83d7aed02546b23f2f5b91b44980fc56e734594ea7cdb09d
|
|
| MD5 |
1b8989e90d34d6becc09d8dc7dff9392
|
|
| BLAKE2b-256 |
cef9355aba7f10785e08302019e3dedd2c0ce1f82a6eb40b3910599f5888cafc
|
File details
Details for the file rivalz_client-1.0.1-py3-none-any.whl.
File metadata
- Download URL: rivalz_client-1.0.1-py3-none-any.whl
- Upload date:
- Size: 7.7 kB
- Tags: Python 3
- Uploaded using Trusted Publishing? No
- Uploaded via: twine/5.1.1 CPython/3.9.20
File hashes
| Algorithm | Hash digest | |
|---|---|---|
| SHA256 |
1d45639ce4ad857f025567922c3673843450fbf5b14ba15520450f3f4ee17bdb
|
|
| MD5 |
1f079380eaccaf6713557e2e7c63c408
|
|
| BLAKE2b-256 |
cdb42206fecd88fcfd5a697177d3f4007cfa12cbc7f3ad0621677b4f595d3886
|


