Prometheus exporter for Python RQ (Redis Queue)

Project description
Python RQ Prometheus Exporter


Prometheus metrics exporter for Python RQ (Redis Queue) job queue library.
Installation
Install the Python package:
$ # Install the latest version
$ pip install rq-exporter
$ # Or you can install a specific version
$ pip install rq-exporter==1.0.0
Or download the Docker image:
$ # Pull the latest image
$ docker pull mdawar/rq-exporter
$ # Or you can pull a specific version
$ docker pull mdawar/rq-exporter:v1.0.0
The releases are available as Docker image tags.
Usage
Python package:
$ # Start the exporter on port 9726
$ rq-exporter
$ # Start the exporter on a specific port and host (Default: 0.0.0.0:9726)
$ rq-exporter --host localhost --port 8080
$ # By default the exporter will connect to Redis on `localhost` port `6379`
$ # You can specify a Redis URL
$ rq-exporter --redis-url redis://:123456@redis_host:6379/0
$ # Or specific Redis options (host, port, db, password)
$ rq-exporter --redis-host 192.168.1.10 --redis-port 6380 --redis-pass 123456 --redis-db 1
$ # You can also specify a password file path (eg: mounted Docker secret)
$ rq-exporter --redis-pass-file /run/secrets/redis_pass
Docker image:
$ # Run the exporter and publish the port 9726 on the host
$ docker run -it -p 9726:9726 rq-exporter
$ # Use the -d option to run the container in the background (detached)
$ docker run -d -p 9726:9726 rq-exporter
$ # All the command line arguments will be passed to rq-exporter
$ docker run -it -p 9726:9726 rq-exporter --redis-host redis --redis-pass 123456
$ # You can also configure the exporter using environment variables
$ docker run -it -p 9726:9726 -e RQ_REDIS_HOST=redis -e RQ_REDIS_PASS=123456 rq-exporter
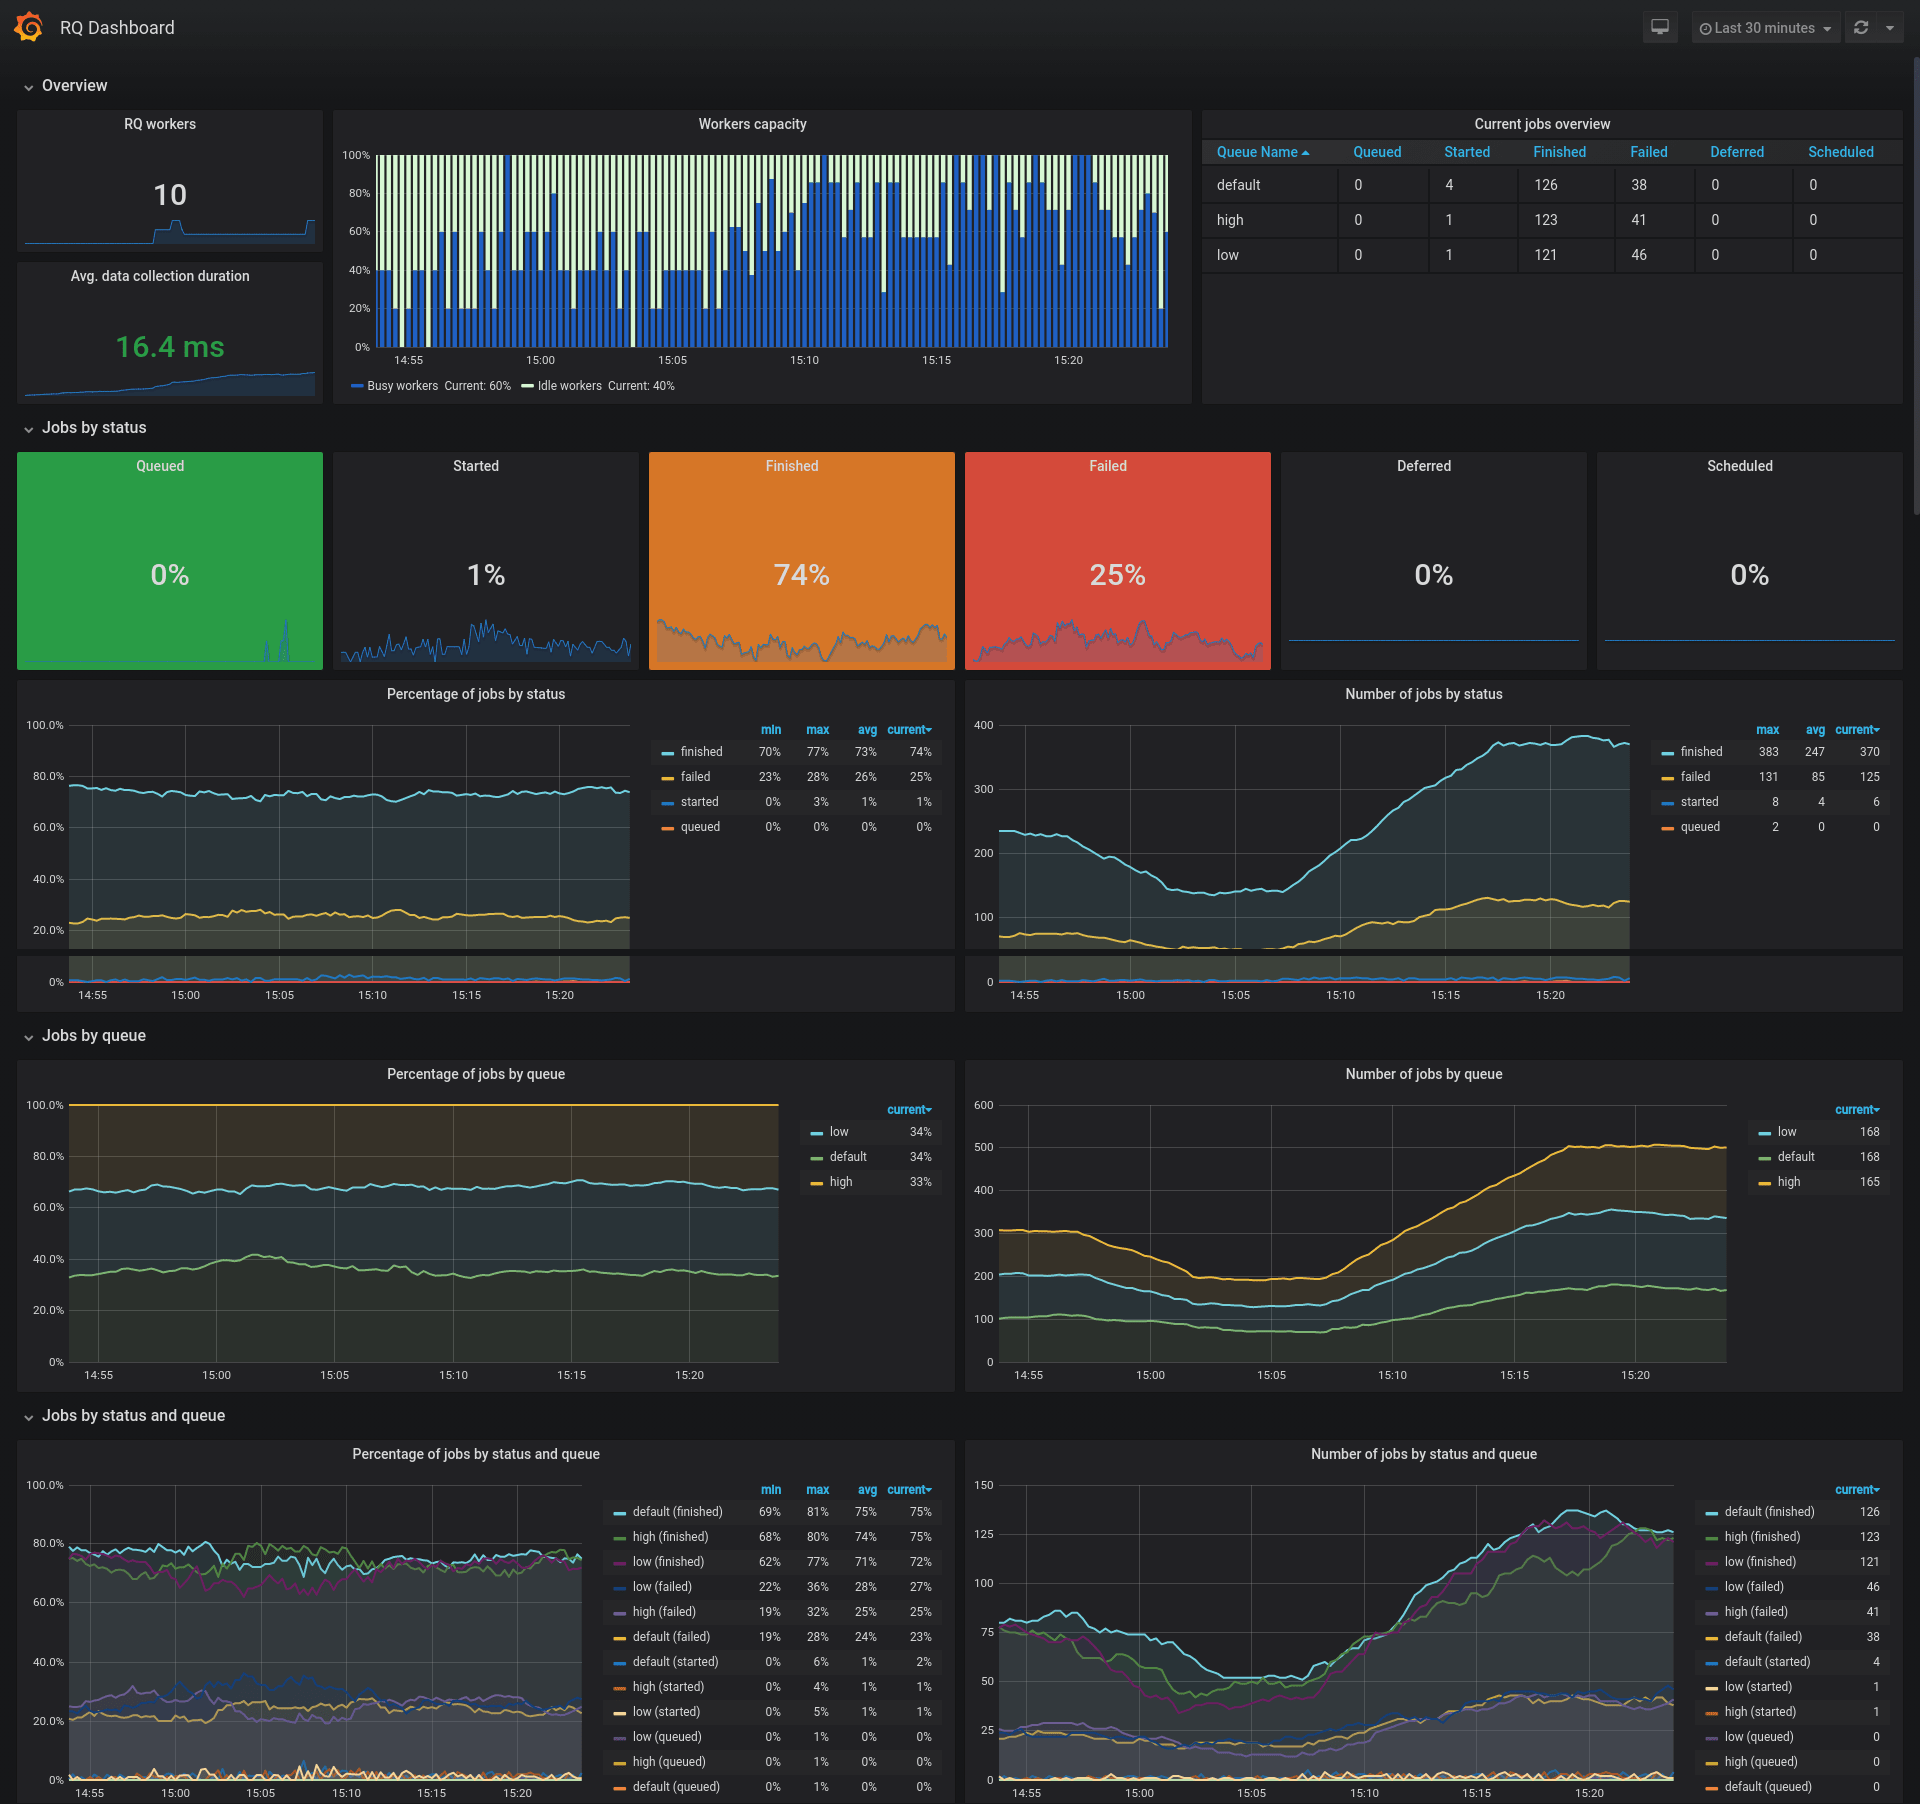
Grafana Dashboard
An example Grafana dashboard is available with the ID 12196 for showcasing this exporter's metrics.
You can also find the JSON file of the dashboard in this repository.
Note:
- This is just an example dashboard, feel free to use it as a base for your custom dashboard
- You need to adjust the color thresholds to suit your needs for the job status percentage singlestat panels
- Some panels might seem duplicated providing percentages and current values, these are just for showcasing the PromQL queries
Exported Metrics
RQ metrics:
| Metric Name | Type | Labels | Description |
|---|---|---|---|
rq_workers |
Gauge | name, queues, state |
RQ workers |
rq_jobs |
Gauge | queue, status |
RQ jobs by queue and status |
Request processing metrics:
| Metric Name | Type | Description |
|---|---|---|
rq_request_processing_seconds_count |
Summary | Number of times the RQ data were collected |
rq_request_processing_seconds_sum |
Summary | Total sum of time spent collecting RQ data |
rq_request_processing_seconds_created |
Gauge | Time created at (time.time() return value) |
Example:
# HELP rq_request_processing_seconds Time spent collecting RQ data
# TYPE rq_request_processing_seconds summary
rq_request_processing_seconds_count 1.0
rq_request_processing_seconds_sum 0.029244607000009637
# TYPE rq_request_processing_seconds_created gauge
rq_request_processing_seconds_created 1.5878023726039658e+09
# HELP rq_workers RQ workers
# TYPE rq_workers gauge
rq_workers{name="40d33ed9541644d79373765e661b7f38", queues="default", state="idle"} 1.0
rq_workers{name="fe9a433575e04685a53e4794b2eaeea9", queues="high,default,low", state="busy"} 1.0
# HELP rq_jobs RQ jobs by state
# TYPE rq_jobs gauge
rq_jobs{queue="default", status="queued"} 2.0
rq_jobs{queue="default", status="started"} 1.0
rq_jobs{queue="default", status="finished"} 5.0
rq_jobs{queue="default", status="failed"} 1.0
rq_jobs{queue="default", status="deferred"} 1.0
rq_jobs{queue="default", status="scheduled"} 2.0
Configuration
You can configure the exporter using command line arguments or environment variables:
| CLI Argument | Env Variable | Default Value | Description |
|---|---|---|---|
--host |
RQ_EXPORTER_HOST |
0.0.0.0 |
Serve the exporter on this host |
-p, --port |
RQ_EXPORTER_PORT |
9726 |
Serve the exporter on this port |
--redis-url |
RQ_REDIS_URL |
None |
Redis URL in the form redis://:[password]@[host]:[port]/[db] |
--redis-host |
RQ_REDIS_HOST |
localhost |
Redis host name |
--redis-port |
RQ_REDIS_PORT |
6379 |
Redis port number |
--redis-db |
RQ_REDIS_DB |
0 |
Redis database number |
--redis-pass |
RQ_REDIS_PASS |
None |
Redis password |
--redis-pass-file |
RQ_REDIS_PASS_FILE |
None |
Redis password file path (e.g. Path of a mounted Docker secret) |
--worker-class |
RQ_WORKER_CLASS |
rq.Worker |
RQ worker class |
--queue-class |
RQ_QUEUE_CLASS |
rq.Queue |
RQ queue class |
--log-level |
RQ_EXPORTER_LOG_LEVEL |
INFO |
Logging level |
--log-format |
RQ_EXPORTER_LOG_FORMAT |
[%(asctime)s] [%(name)s] [%(levelname)s]: %(message)s |
Logging handler format string |
--log-datefmt |
RQ_EXPORTER_LOG_DATEFMT |
%Y-%m-%d %H:%M:%S |
Logging date/time format string |
Note:
- When Redis URL is set using
--redis-urlorRQ_REDIS_URLthe other Redis options will be ignored - When the Redis password is set using
--redis-pass-fileorRQ_REDIS_PASS_FILE, then--redis-passandRQ_REDIS_PASSwill be ignored
Serving with Gunicorn
The WSGI application can be created using the rq_exporter.create_app() function:
$ gunicorn "rq_exporter:create_app()" -b 0.0.0.0:9726 --log-level info
Example Dockerfile to create a Docker image to serve the application with Gunicorn
FROM mdawar/rq-exporter:latest

USER root

RUN pip install --no-cache-dir gunicorn

USER exporter

ENTRYPOINT ["gunicorn", "rq_exporter:create_app()"]

CMD ["-b", "0.0.0.0:9726", "--threads", "2", "--log-level", "info", "--keep-alive", "3"]
Note about concurrency:
The exporter is going to work without any problems with multiple workers but you will get different values for these metrics:
rq_request_processing_seconds_countrq_request_processing_seconds_sumrq_request_processing_seconds_created
This is fine if you don't care about these metrics, these are only for measuring the count and time processing the RQ data, so the other RQ metrics are not going to be affected.
But you can still use multiple threads with 1 worker process to handle multiple concurrent requests:
$ gunicorn "rq_exporter:create_app()" -b 0.0.0.0:9726 --threads 2
Building the Docker Image
$ # Build the docker image and tag it rq-exporter:latest
$ docker build -t rq-exporter .
The image can also be built using docker-compose:
$ docker-compose build
Check out the docker-compose.yml file for usage example.
Development
To start a full development environment with RQ workers, Prometheus and Grafana:
$ docker-compose up
$ # If you want to start multiple workers use the --compatibility flag
$ # which will make docker-compose read the `deploy` section and start multiple replicas
$ docker-compose --compatibility up
You can access the services on these ports on your local machine:
- RQ exporter:
9726 - Redis:
6379 - RQ Dashboard:
9181 - Prometheus:
9090 - Grafana:
3000(Login usingadmin:admin)
You can specify the services that you want to start by their name in the docker-compose.yml file:
$ # Example starting only the `rq_exporter` and `redis` services
$ docker-compose up rq_exporter redis
To run more workers and enqueue more jobs you can scale the worker and enqueue services:
$ # Run 5 workers
$ docker-compose up -d --scale worker=5
$ # Enqueue more jobs
$ # Scale the enqueue service and the workers
$ docker-compose up -d --scale worker=5 --scale enqueue=2
To cleanup after development:
$ # Use -v to remove volumes
$ docker-compose down -v
You can also start another rq-exporter instance that collects stats from a project using custom RQ Worker and Queue classes:
$ # Using -f to pass multiple docker-compose files
$ # docker-compose.custom.yml defines services using custom RQ classes
$ docker-compose -f docker-compose.yml -f docker-compose.custom.yml up
$ # To cleanup you need to also pass the same files
$ docker-compose -f docker-compose.yml -f docker-compose.custom.yml down
A new RQ exporter instance will be exposed on port 9727 on your local machine.
Note: If you don't have docker-compose installed follow the installation instructions on the official website.
If you want to use the package manually:
$ # Clone the repository
$ git clone <REPO_URL>
$ # Change to the project directory
$ cd rq-exporter
$ # Create a new virtualenv
$ python -m venv /path/to/env
$ # Activate the environment
$ source /path/to/env/bin/activate
$ # Install the requirements
$ pip install -r requirements.txt
$ # Start the exporter on port 9726
$ python -m rq_exporter
$ # You can configure the exporter using command line arguments
$ python -m rq_exporter --port 8080
Running the Tests
$ python -m unittest
Contributing
- Fork the repository
- Clone the forked repository
git clone <URL> - Create a new feature branch
git checkout -b <BRANCH_NAME> - Make changes and add tests if needed and commit your changes
git commit -am "Your commit message" - Push the new branch to Github
git push origin <BRANCH_NAME> - Create a pull request
Release history Release notifications | RSS feed


Download files
Download the file for your platform. If you're not sure which to choose, learn more about installing packages.
Source Distribution
Built Distribution
Filter files by name, interpreter, ABI, and platform.
If you're not sure about the file name format, learn more about wheel file names.
Copy a direct link to the current filters
File details
Details for the file rq-exporter-1.6.0.tar.gz.
File metadata
- Download URL: rq-exporter-1.6.0.tar.gz
- Upload date:
- Size: 13.4 kB
- Tags: Source
- Uploaded using Trusted Publishing? No
- Uploaded via: twine/3.3.0 pkginfo/1.6.1 requests/2.25.1 setuptools/49.2.1 requests-toolbelt/0.9.1 tqdm/4.55.1 CPython/3.9.1
File hashes
| Algorithm | Hash digest | |
|---|---|---|
| SHA256 |
7e90bcbf5d9939ec33379788d3179136dd31ebb669e3aa265befcbffb76ce4e6
|
|
| MD5 |
bef113700d5ac58f2623b45c3bd87462
|
|
| BLAKE2b-256 |
0b7423930e7273410a85f0cad92e6e5916f3d70a82b847d9401e7fd7b4c6f5f3
|
File details
Details for the file rq_exporter-1.6.0-py3-none-any.whl.
File metadata
- Download URL: rq_exporter-1.6.0-py3-none-any.whl
- Upload date:
- Size: 11.9 kB
- Tags: Python 3
- Uploaded using Trusted Publishing? No
- Uploaded via: twine/3.3.0 pkginfo/1.6.1 requests/2.25.1 setuptools/49.2.1 requests-toolbelt/0.9.1 tqdm/4.55.1 CPython/3.9.1
File hashes
| Algorithm | Hash digest | |
|---|---|---|
| SHA256 |
c603844485e32189c223877d1d301602e2617e60d8f35d2c14a9e1691426b732
|
|
| MD5 |
b77f7e6f74b2d83ad89bdce53e8756f7
|
|
| BLAKE2b-256 |
e6b50d1c30e1063d61f525df9395b0ce71d46ad400723f88a8fcaafa46bd15bb
|


