Safely run AI agents in Docker to control scientific experiments via MCP

Project description
╭──────────────────────────────────╮
│  ▄▖▄▖▄▖▄▖  ▖ ▄▖▄▖  ▄▖▄▖▄▖▖▖▄▖▄▖  │
│  ▚ ▌▌▙▖▙▖  ▌ ▌▌▙▘  ▌▌▌▖▙▖▛▌▐ ▚   │
│  ▄▌▛▌▌ ▙▖  ▙▖▛▌▙▘  ▛▌▙▌▙▖▌▌▐ ▄▌  │
│                                  │
│ sandboxed AI agents for lab work │
╰──────────────────────────────────╯
Safe Lab Agents
Safely run AI agents in Docker to control scientific experiments via MCP (Model Context Protocol).
By Maximilian Nägele and Florian Marquardt. Made at the Max Planck Institute for the Science of Light in Germany. Open source and forever free. First release July 2026.
Overview
Safe Lab Agents lets experimental scientists hand control of their experiment to an AI agent — while keeping safety guarantees. The agent runs sandboxed inside a Docker container and can only interact with lab hardware through user-defined MCP tools running on the host.
┌─────────────────────────────────────────┐
│              Host Machine               │
│                                         │
│  ┌───────────────────────────────────┐  │
│  │  MCP Server (host-side)           │  │
│  │  ┌─────────────────────────────┐  │  │
│  │  │ Your tool functions         │  │  │
│  │  │  - set_angle(angle, comp)   │  │  │
│  │  │  - measure_power()          │  │  │
│  │  │  - get_lab_temperature(pos) │  │  │
│  │  └─────────────────────────────┘  │  │
│  └──────────────▲────────────────────┘  │
│                 │ HTTP                  │
│  ┌──────────────▼────────────────────┐  │
│  │  Docker Container                 │  │
│  │  ┌─────────────────────────────┐  │  │
│  │  │  AI Agent                   │  │  │
│  │  │  (Claude Code / OpenClaw)   │  │  │
│  │  └─────────────────────────────┘  │  │
│  │                                   │  │
│  │  Mounted directories:             │  │
│  │   /agent/context  (read-only)     │  │
│  │   /agent/shared   (read-write)    │  │
│  │   /agent/workspace(read-write)    │  │
│  └───────────────────────────────────┘  │
└─────────────────────────────────────────┘
Key features:
- Safety first — the agent is sandboxed in Docker; it can only affect your experiment through the MCP tools you define.
- Easy to use — install with
pip, define tools as plain Python functions, run one command. - Automatic logging — every tool call is recorded as a structured record (JSON + HDF5 for arrays) with no changes to your tools.
- ELN compatibility — sessions export to the standard
.elnformat, importable into eLabFTW, Kadi4Mat, PASTA, and other electronic lab notebooks. - Multiple agents — supports Claude Code and OpenClaw out of the box.
- Session persistence — Docker state is automatically committed when you stop, so you can resume conversations later.
- Conversation history — all agent actions are stored and can be viewed with rich terminal formatting or exported as a self-contained HTML viewer.
- Autonomous mode — give the agent a task and let it run without interaction.
Installation
Prerequisites
- Python 3.10+
- On Windows, make sure to run 'wsl --install' in an admin PowerShell and reboot before installing Podman/Docker.
- A container runtime — either:
- Docker — Install Docker Desktop (or Docker Engine on Linux). ⚠️ Docker Desktop requires a paid subscription for large organizations (see Docker's terms) on Windows and macOS — Podman is a free alternative.
- Podman — a free, open-source alternative to Docker. Install Podman.
- Agent credentials — a Claude Code subscription (for the Claude Code agent), or an LLM API key such as an Anthropic or OpenAI key (for OpenClaw).
Tested on macOS 15, Windows 11, and Ubuntu 24.04. If you hit runtime issues (especially with Podman), see Troubleshooting at the end.
Install the package
We recommend installing into a virtual environment (e.g. venv or conda) to keep the dependencies isolated.
To install from source:
git clone git@github.com:MaxNaeg/safe_lab_agents.git
cd safe_lab_agents
pip install -e .
or simply use pip:
pip install safe-lab-agents
Minimal Example
We will go step by step through a minimal example where we pretend to run microwave transmission measurements on some experimental setup. We will have the AI agent analyze that setup from scratch, without any prior knowledge, and document its results.
After installation, create the following python file (here called my_tools.py) inside a new folder somewhere on your hard drive. In this example, we define a single function that returns a mock measurement result of a microwave transmission spectrum.
import numpy as np

def measure_transmission(omega: float) -> dict:
   """
Measure the intensity transmission at a given frequency.

Args:
   omega - frequency in GHz
   """
   if omega>1.0 and omega<10.0:
      return { "transmission": np.abs(.5/((omega-3)+.5j))**2, "omega": omega }

PYTHON_TOOLS=[measure_transmission]
Now run mkdir shared inside the same folder to produce a subfolder in which the agent can place files that you can later access outside the sandbox -- for example documented measurement results.
To launch the AI agent safely inside a sandbox, simply run agent start inside your folder!
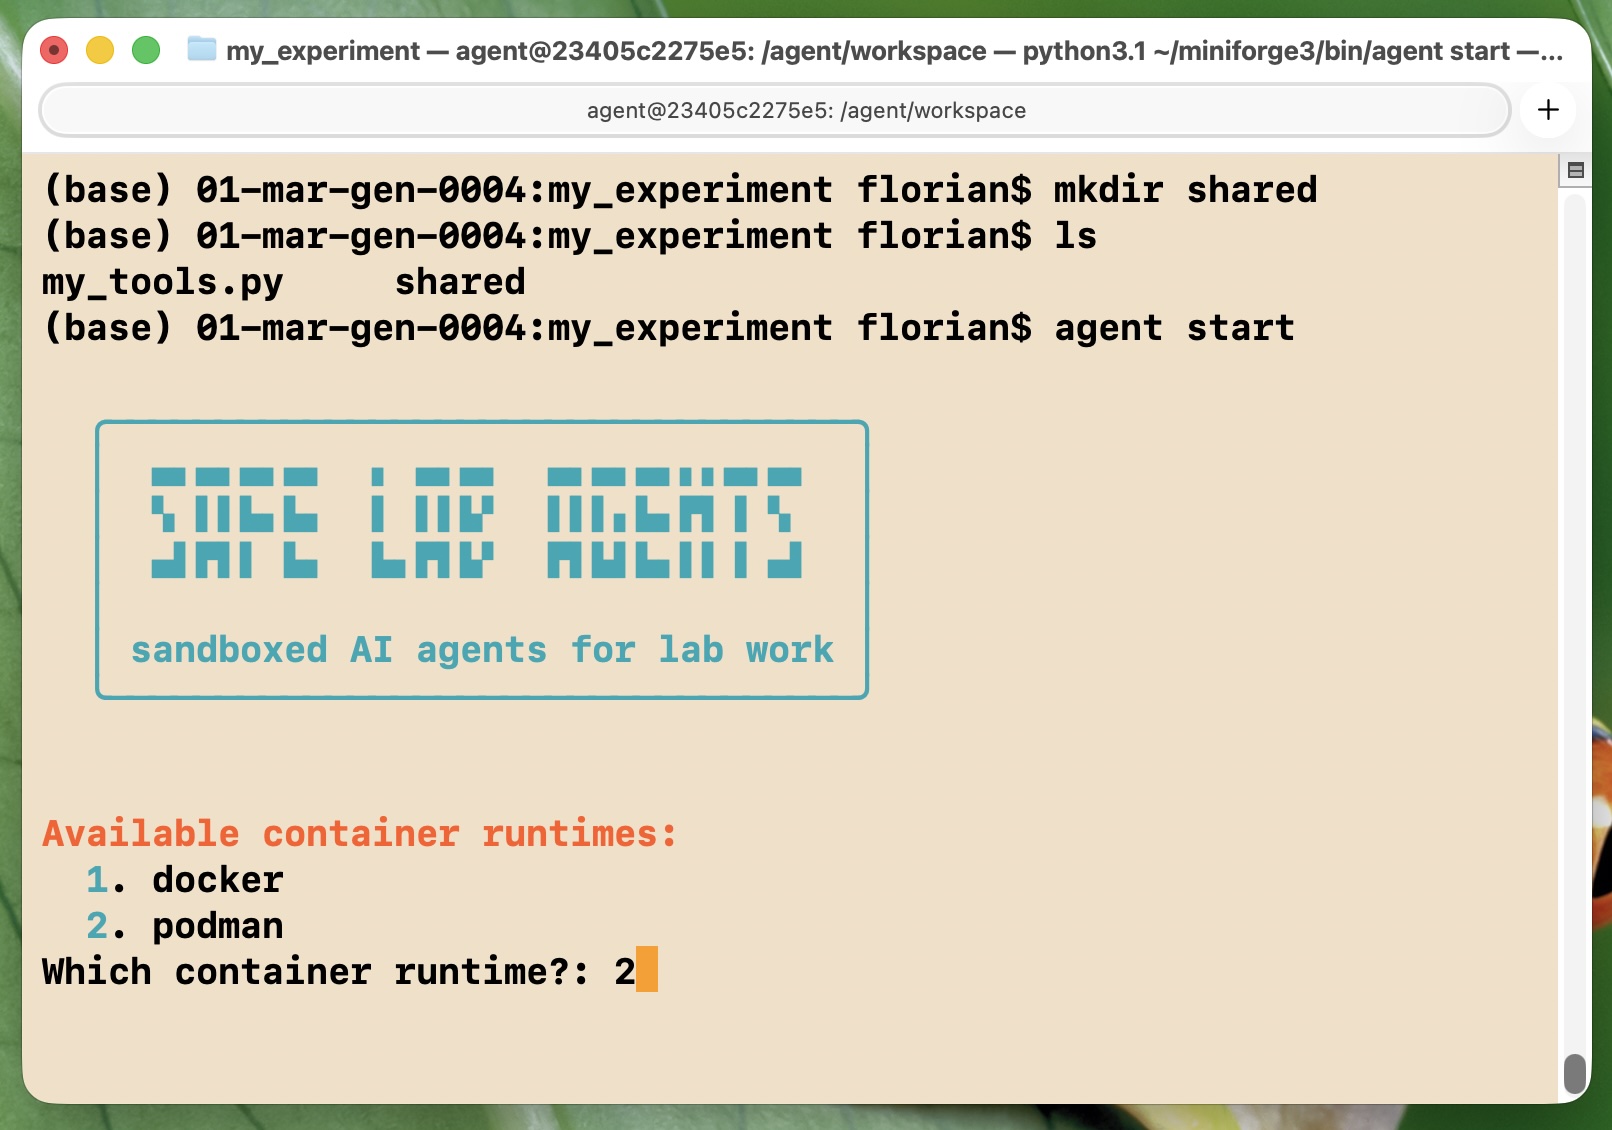
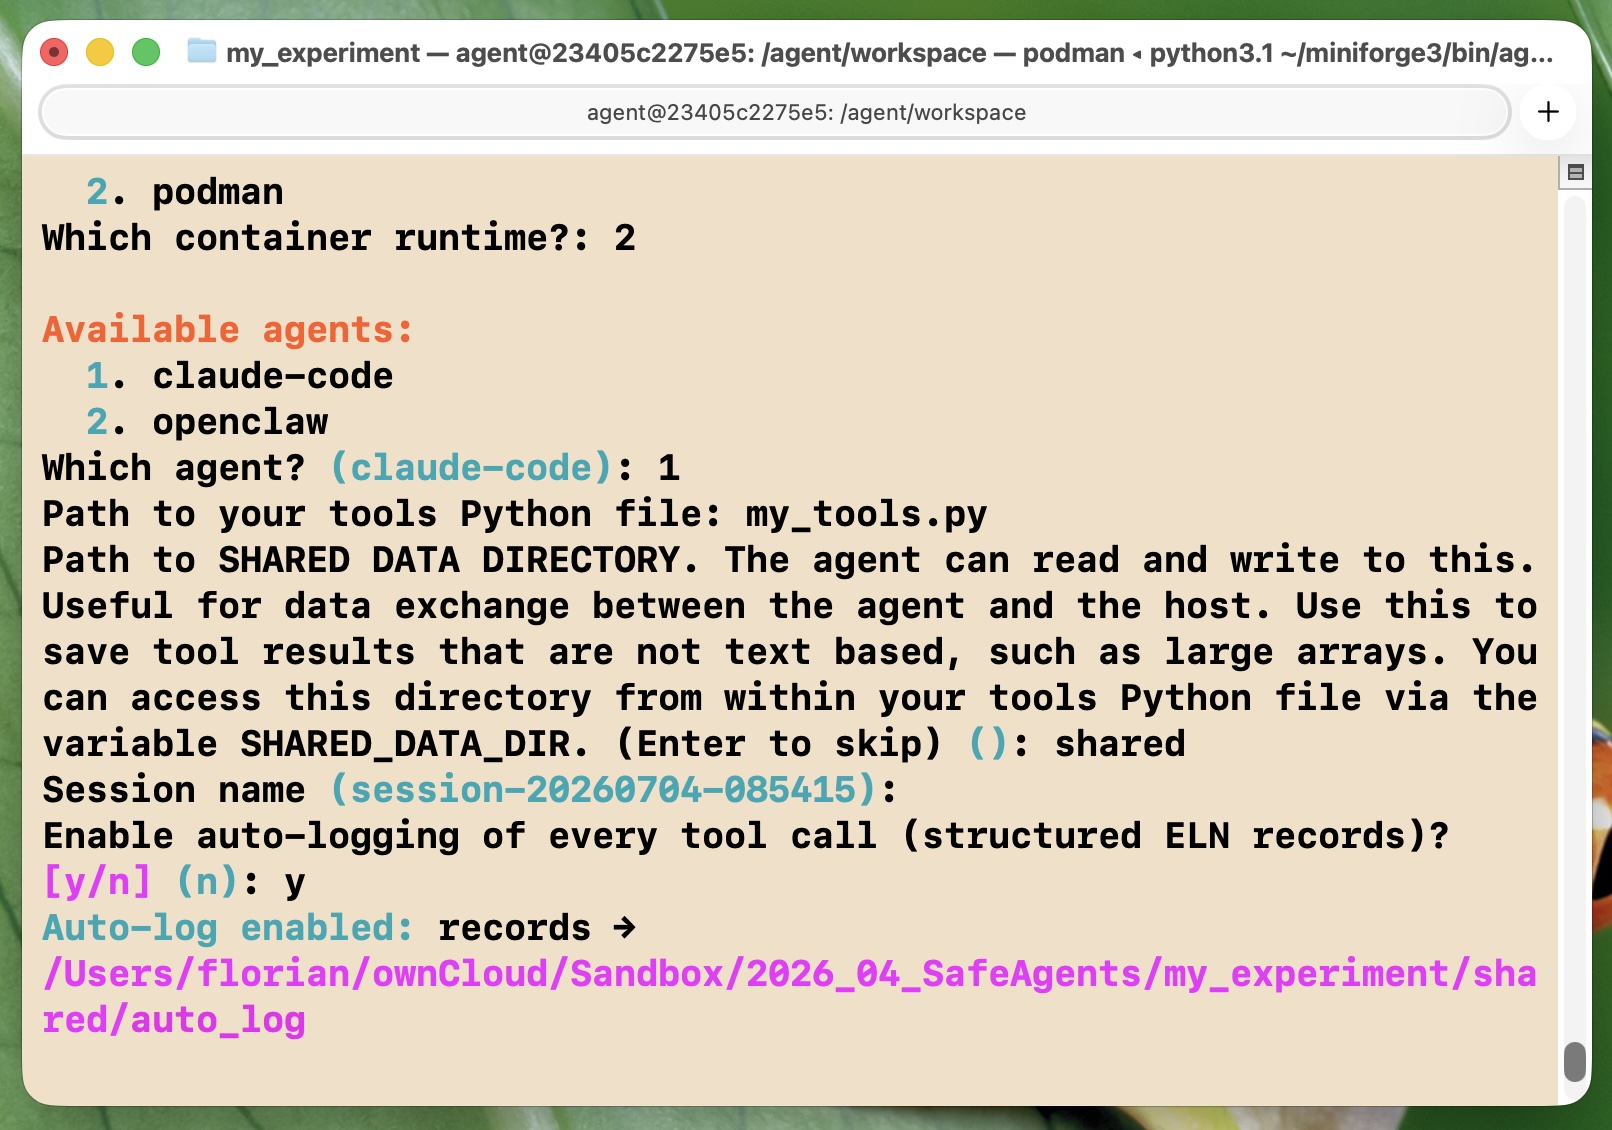
You will be asked a few questions by the setup wizard. In this example, we assume you had installed the open podman Docker alternative and you have a Claude Pro (or Max) subscription (though not necessarily a working installation of claude code) -- otherwise change as needed. Also enter my_tools.py when asked for the path to your tools python file, and enter shared when asked for the path to the shared folder. Say yes (y) when asked about auto-logging the experimental data.
Now you will observe some startup messages and the installation of various packages (such as numpy). Eventually Claude Code will launch. It will ask you to copy a link into a browser for getting the login credentials. This demonstrates that the sandbox works, as the agent cannot just launch a web page inside a browser on your machine (which would be what happens normally at this point). Copy that link to a browser, authorize access, and copy the resulting code back into the terminal. Afterwards, Claude Code is ready to take your instructions.
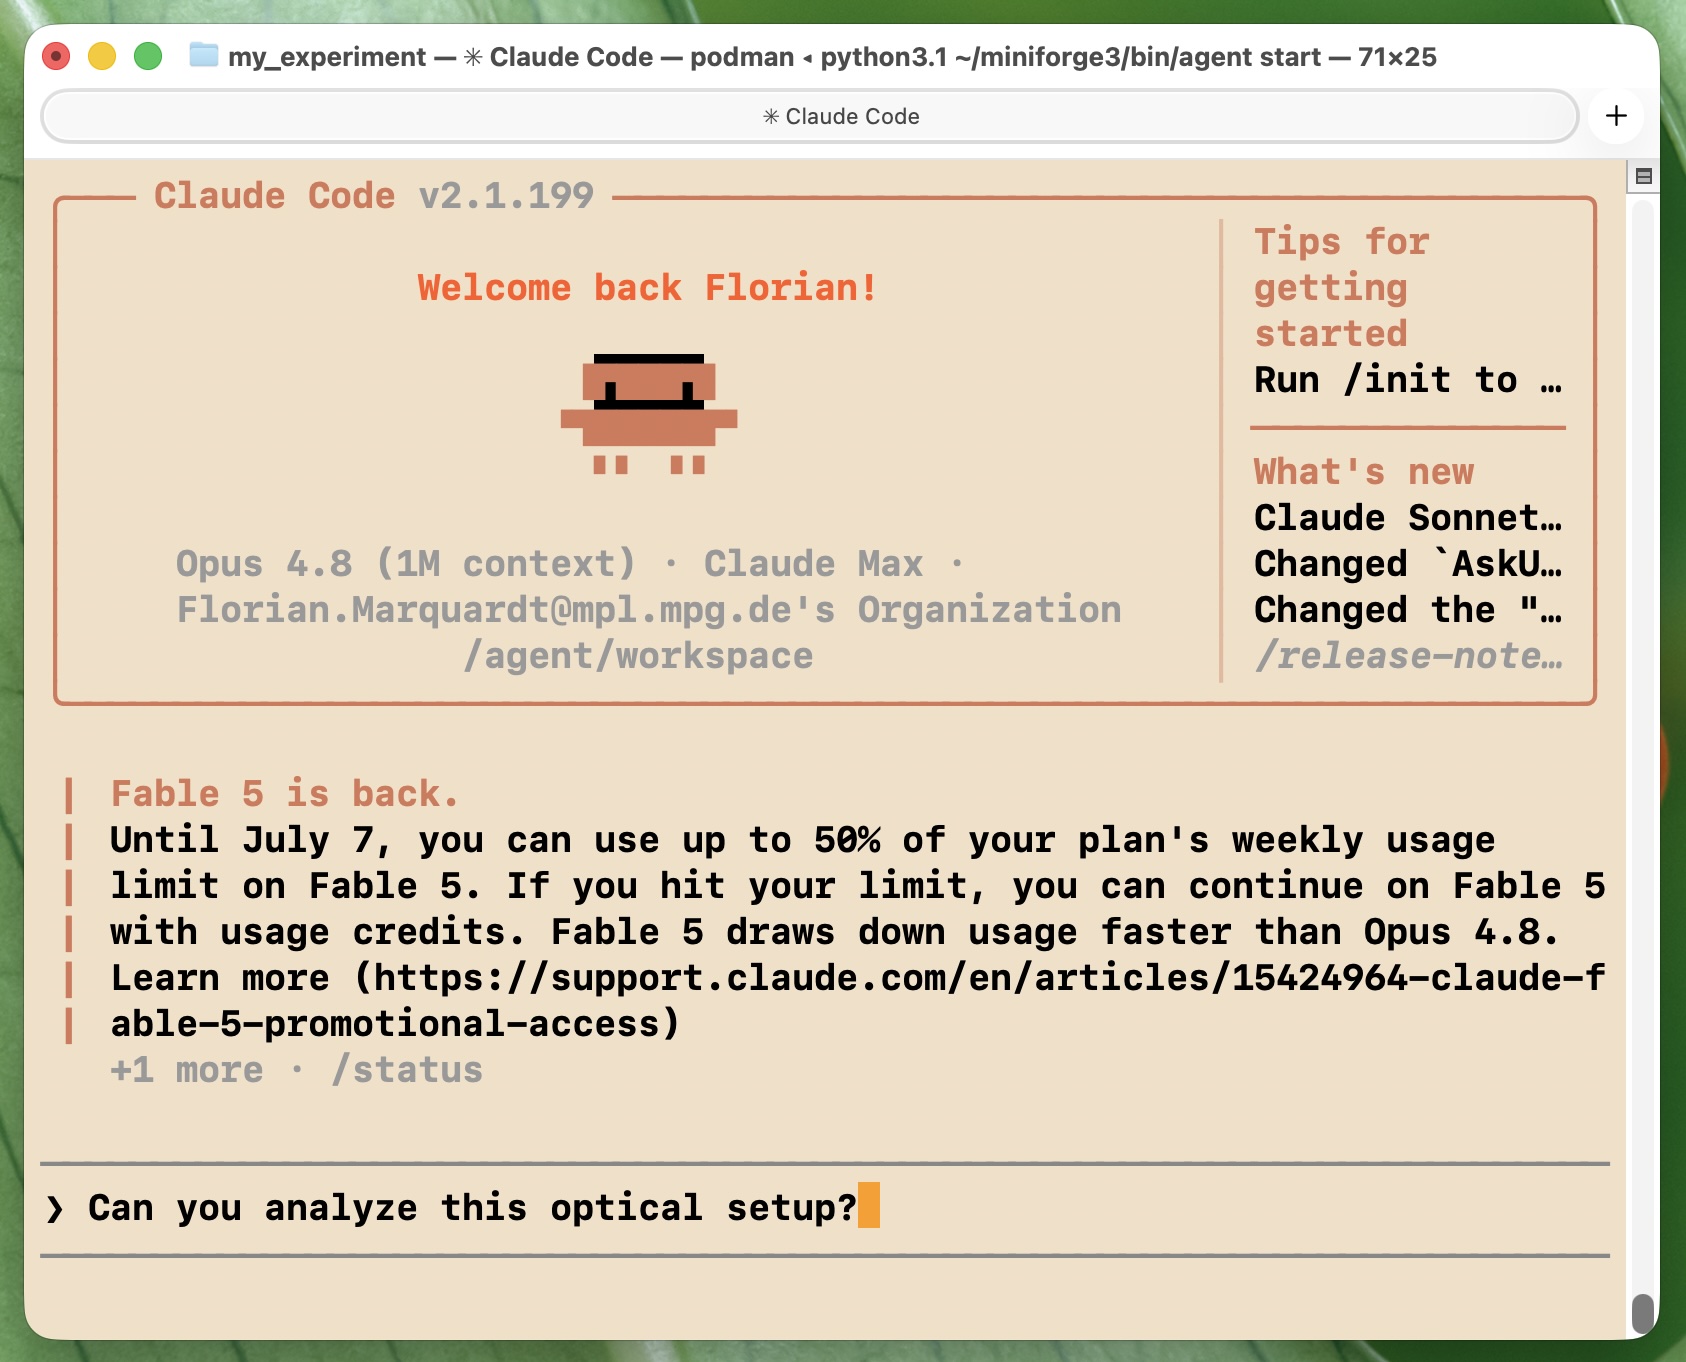
Give it instructions like Characterize this optical setup and let it run. In this example, it will still ask for permissions, but since you are inside the sandbox, feel free to let it run autonomously without any danger! You can do so by pressing shift-tab several times to reach 'auto' mode. Alternatively, you could have used agent start --task "Analyze the optical setup!" in the beginning to directly go to automatic mode.
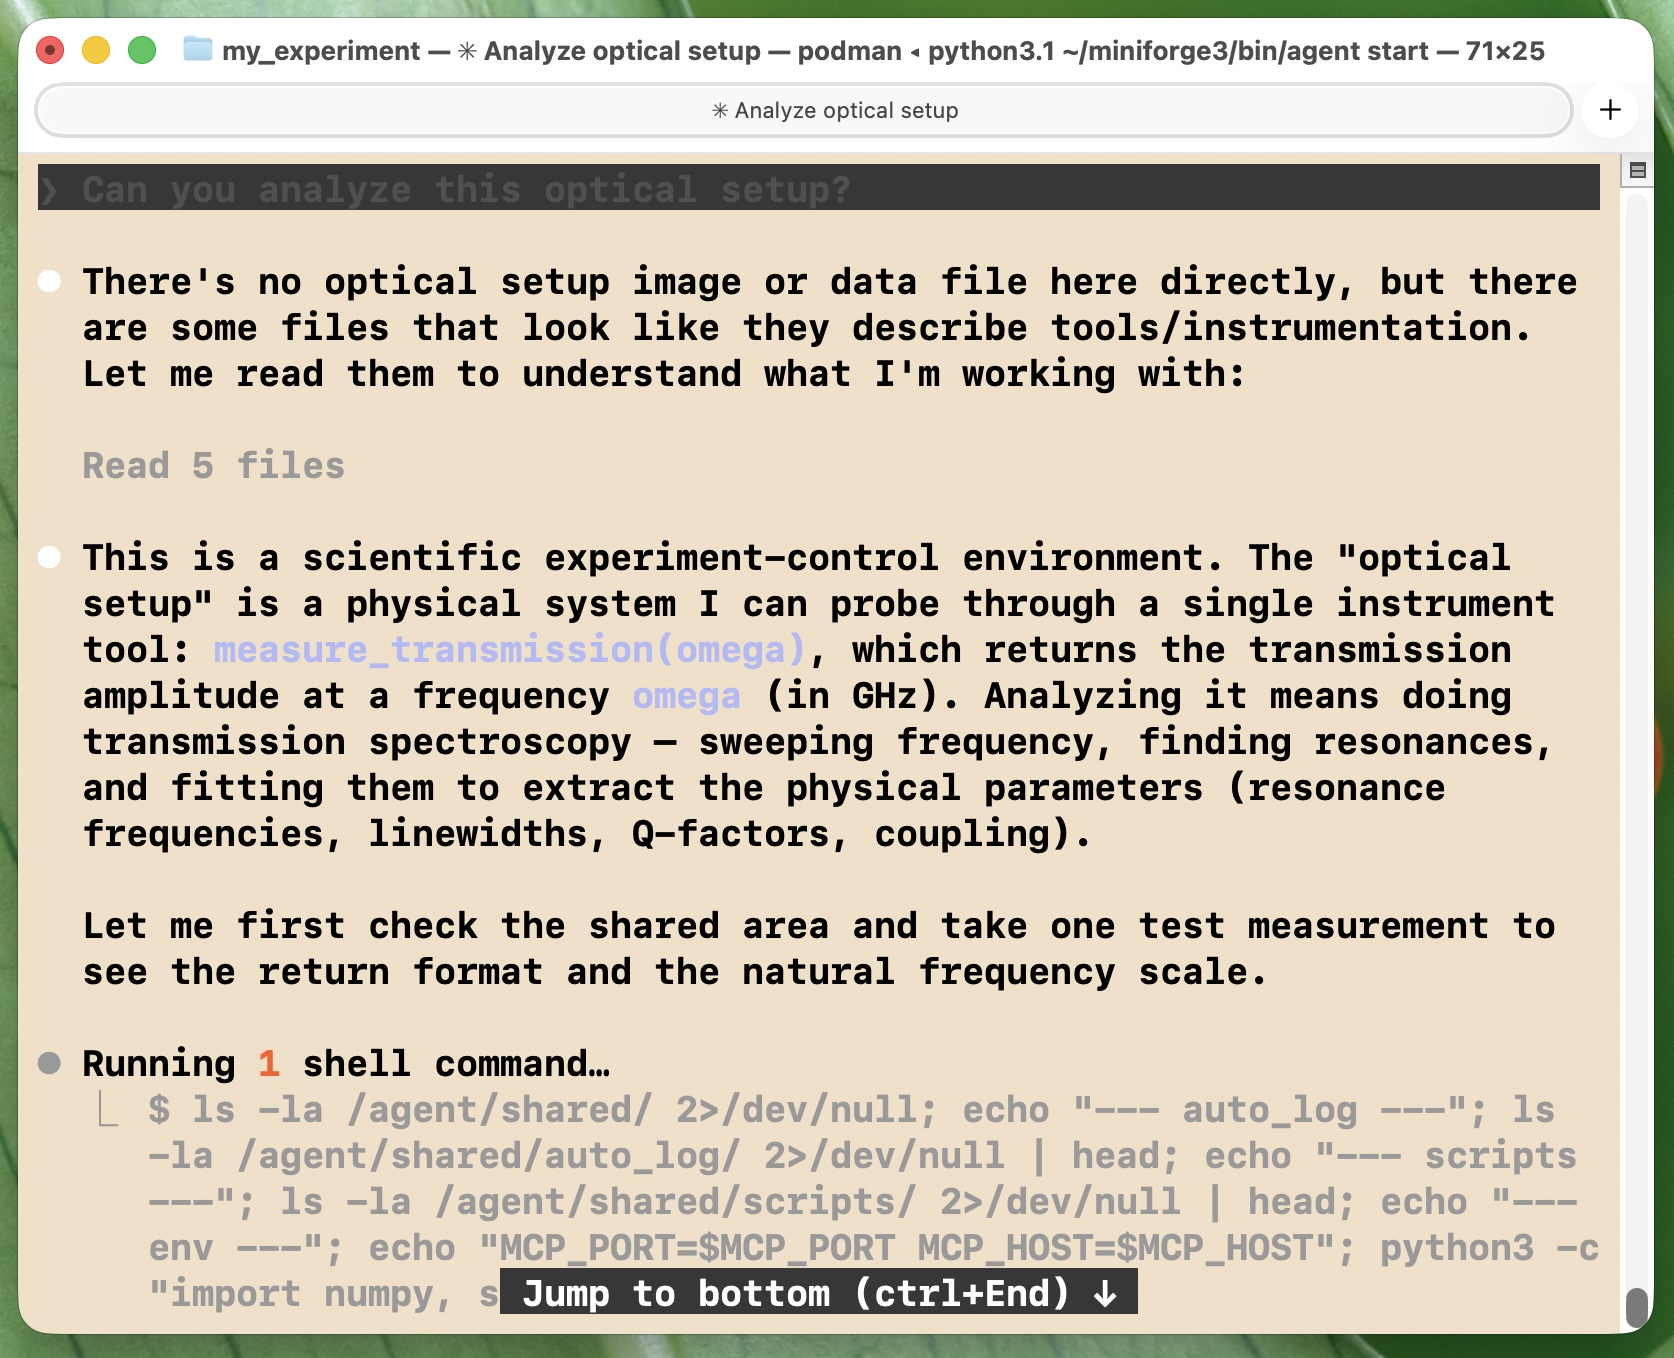
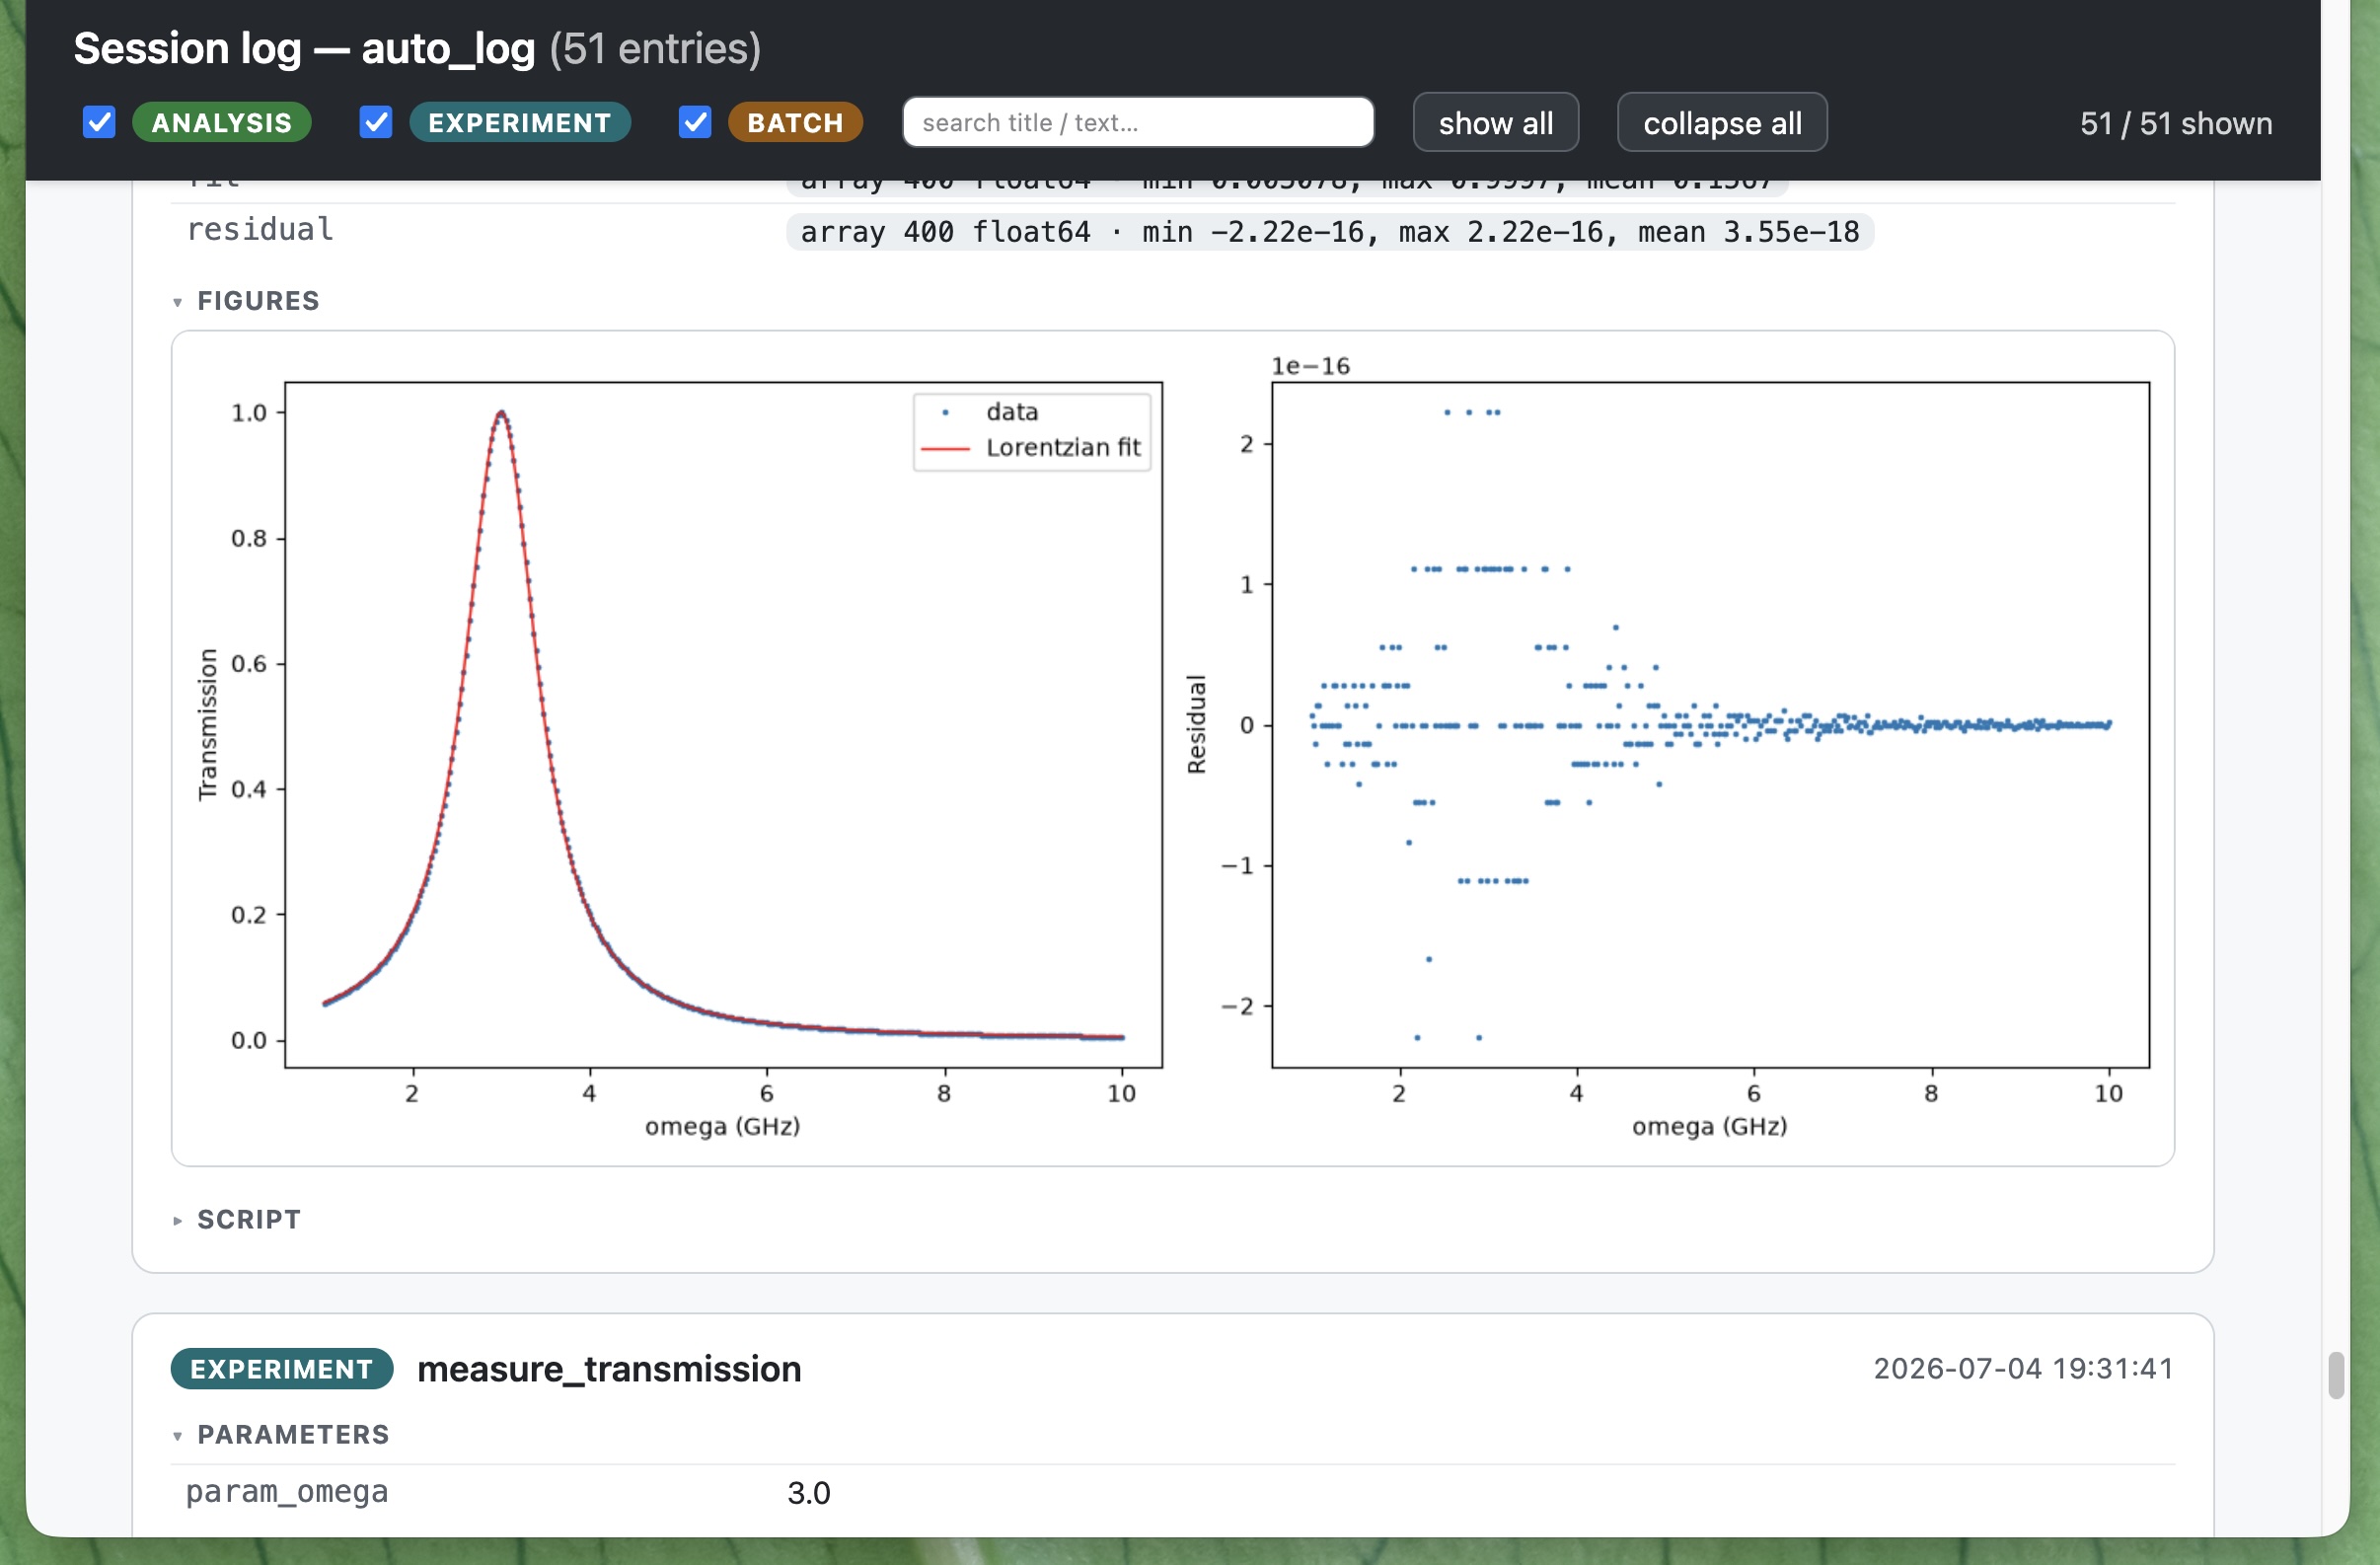
The agent will go through a series of measurements, will try to analyze, form hypotheses, run simulations, produce plots, and so on. Finally it converges on the assessment that this device has a Lorentzian transmission spectrum.
To finish, type /exit in Claude Code, and then exit again in the terminal. This last exit takes you out of the sandbox, back to the folder where you started. Now inside the shared subfolder you will find all kinds of files, representing the data that were taken. Since we switched on auto-logging, we can generate a nice report of the experiment, using agent report shared/auto_log/ --open.
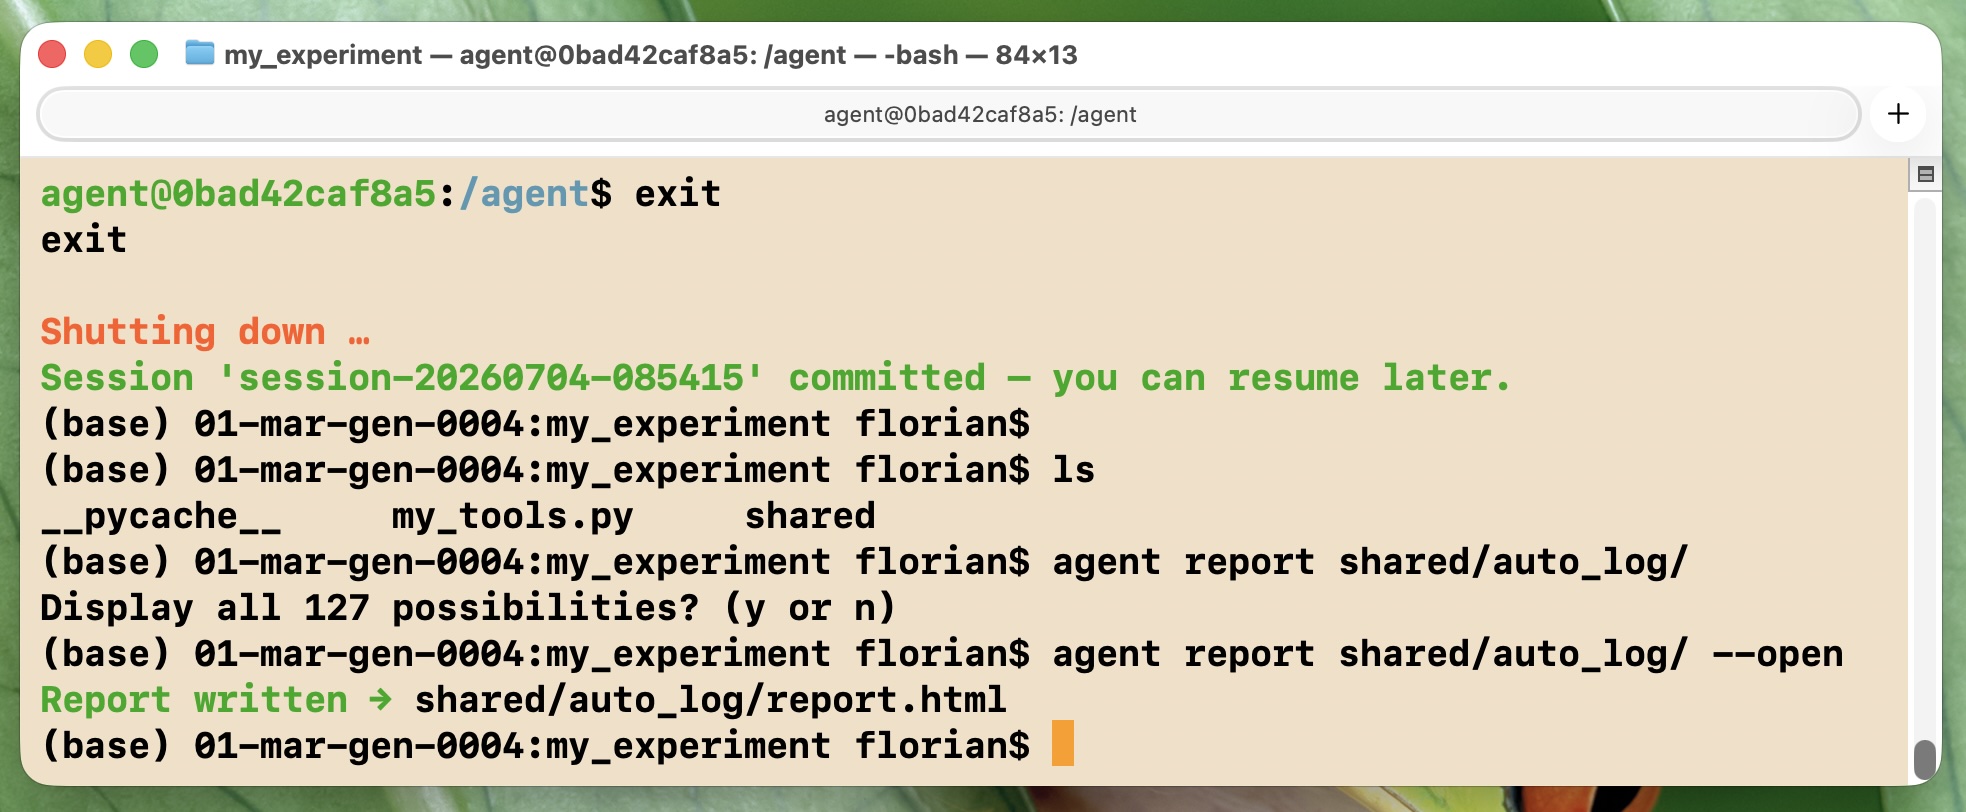
This will open the electronic lab notebook in a browser, as a searchable html document. That document shows you all the data that have been taken and the various analysis outcomes, including figures and analysis scripts.
Besides this log, there is also the full agent conversation history, including everything it was saying while exploring the experimental setup. In this example, you would use agent history --name session-20260704-085415 --open to show the html document for the history.
That's it for now! See below for a more complete example and explanation of the various options.
Quick Start
Note: A complete, runnable example lives in example_setup/ — a simulated optical bench with an experiment class (setup.py), the tools file (tools.py), a config file, and a captured agent run.
1. Define your tools
Create a folder for your experiment and, inside it, a Python file with functions that control your hardware:
from safe_lab_agents import experiment  # lazy wrapper — avoids opening hardware on import
from safe_lab_agents import quantity    # attach units to measurements for richer logging

from setup import ExampleOpticalSetup    # your class that talks to the hardware

# Constructed lazily on first use — see "Stateful experiments" below.
exp = experiment(ExampleOpticalSetup)

def get_current_lab_temperature(position: str) -> dict:
    """Return the current lab temperature at a given position.

    Args:
        position: One of 'near_laser', 'near_detector', or 'ambient'.
    """
    # Enforce safety checks in the tool — the agent can only call these functions,
    # so it cannot bypass them.
    if position not in ("near_laser", "near_detector", "ambient"):
        raise ValueError(f"Invalid position: {position}.")
    return {"temperature": quantity(22.5, "degrees_C"), "position": position}

# The agent should be able to run efficient sweeps, so expose set_angle/measure_power via
# the Python interface; the one-off temperature reading is a plain MCP tool.
MCP_TOOLS    = [get_current_lab_temperature]      # one-off; agent reasons about the result
PYTHON_TOOLS = [exp.set_angle, exp.measure_power]  # called repeatedly inside sweeps

# Called automatically when the session ends — put hardware into a safe state here.
GRACEFUL_EXPERIMENT_SHUTDOWN = exp.close
Type hints and docstrings are read by the agent to understand what each tool does, so write them clearly. Two lists at the bottom of the file control which functions are exposed through each interface:
PYTHON_TOOLS— the agent calls these as regular Python functions from scripts it writes inside the container, receiving native Python objects back (numpy arrays, dicts, …). Best for functions the agent calls many times in a sweep/loop or whose results are large arrays it processes in code (here,set_angle/measure_power).MCP_TOOLS— the agent calls these as tools and reads the result as text in the conversation. Best for one-off calls whose result the agent reasons about directly (scalars, status strings, small structured dicts — here,get_current_lab_temperature).
A function can appear in both lists, and each list is optional. experiment() wraps your hardware class so it is opened lazily (see Stateful experiments), and GRACEFUL_EXPERIMENT_SHUTDOWN runs on exit to leave instruments in a safe state.
Heads up: the tools file is imported several times (once per MCP subprocess, plus in the parent process for client generation), so avoid expensive or stateful work at module top level.
2. Start a session
Just run:
agent start
The interactive wizard guides you through each setting. You can also pass everything explicitly:
agent start \
    --agent claude-code \
    --tools tools.py \
    --context ./context/ \
    --shared ./shared/
Here --context is a directory of experiment background (protocols, descriptions, prior data) mounted read-only for the agent, and --shared is a read-write directory for exchanging data (measurements, figures, analysis) between your instruments and the agent. Both are optional. Independent sessions can point at the same --context/--shared directories (e.g. to build on a shared dataset) or use separate ones to stay fully isolated — it's up to you.
The agent starts in your terminal. Ask it to use your tools — for example: "Calibrate the setup: find the waveplate angles that maximize detected power, then report them." It can call your tools, write Python scripts, and create files — all visible in the shared and workspace directories on your host.
Exiting drops you into the container shell. When the agent exits (or you press
Ctrl+C), you are still inside the container's shell — handy for inspecting files the agent created. Typeexitthere to leave the container; the session is then committed so you can resume it later.
Stop and resume
Stopping (exiting the container) automatically saves the session: the container is committed to an image and persists at ~/.safe_lab_agents/sessions/<name>/. Resume it later:
agent resume --name session-20260413-153042
Security — committed images contain your secrets. The session image committed on stop includes the credentials supplied to the agent: the OpenClaw
LLM_API_KEY(and provider keys such asANTHROPIC_API_KEY) and, for Claude Code, the OAuth token / credentials file. Treat committed session images and the sessions directory as secrets.
See a real run
The example ships with a complete captured run where the agent calibrated the optical bench from scratch. See example_setup/example_agent_run.md for the walkthrough, plus the self-contained HTML data report and conversation transcript — open these .html files in a browser (they're self-contained and render offline).
Defining tools (reference)
The tools file you write is the agent's entire interface to your hardware. A complete example is example_setup/tools.py (with its experiment class in example_setup/setup.py); the sections below cover the building blocks.
Stateful experiments
When your tools share a stateful object — an instrument driver holding a serial/USB connection, a session, etc. — wrap it with experiment():
from safe_lab_agents import experiment

class Setup:
    def __init__(self, port: str = "/dev/ttyUSB0"):
        ...  # open the hardware connection

    def get_position(self, component: str) -> float:
        """Measure the position of an optical component, in millimeters."""
        ...

    def close(self) -> None:
        ...  # release the connection

exp = experiment(Setup, port="/dev/ttyUSB0")
experiment() constructs the object lazily — on first use, inside the process that runs the tools — so the hardware is opened once, not on every import of the file.
You can expose the experiment's methods as tools in two ways:
# Register a method directly (no wrapper needed):
MCP_TOOLS  = [exp.get_position]

# Or wrap it when you want to transform the result, or change the documentation shown to the agent:
def get_position(component: str) -> float:
    """Measure the position of an optical component, in millimeters."""
    return float(exp.get_position(component))
MCP_TOOLS.append(get_position)
Graceful shutdown hook
If your tools file defines a top-level callable named GRACEFUL_EXPERIMENT_SHUTDOWN, it is called automatically when the tool process stops. Use this to put hardware into a safe state (and to close a stateful experiment: GRACEFUL_EXPERIMENT_SHUTDOWN = exp.close):
def _shutdown_instrument():
    """Set the power supply to zero and disable the output."""
    set_angle(0.0, "polarizer")
    # ... close connections, disable outputs, etc.

GRACEFUL_EXPERIMENT_SHUTDOWN = _shutdown_instrument
It is called automatically when you exit the container, so use it to release hardware connections and leave instruments in a safe state.
Python tool client
When PYTHON_TOOLS is declared, a tools_client.py is auto-generated in the workspace (/agent/workspace/tools_client.py) at session start, so the agent — or any script inside Docker — can call tools as regular functions and receive native Python objects:
import sys; sys.path.insert(0, "/agent/workspace")
from tools_client import set_angle, measure_power

set_angle(30.0, "polarizer")
power = measure_power()   # returns a native dict, not JSON text
The agent is told about the available Python tools (names, signatures, docstrings) via its system prompt.
Safety — argument types are only shallow-checked. Incoming arguments are validated against your tool's type hints at the first level only: a hint of
list[int]is checked to be a list, but element types are not inspected —[1, "two"]would pass. The agent driving these calls is untrusted, so a tool that requires specific element types, shapes, or bounds must validate them itself and raise a clear error. (For safety, tool inputs must be JSON-serializable values or numpy arrays; return values can be any Python object, since the host controls them.)
Automatic logging & ELN export
The --auto-log flag records every tool call as a structured ELN entry — no changes to your tools needed. Records land in shared_dir/auto_log/ (or workspace/auto_log/ if no --shared is set); the CLI prints the exact path at startup.
agent start --tools tools.py --shared ./data/ --auto-log
Each call produces a JSON file with the function name, parameters, return values, and timestamps. Numpy arrays are extracted into a companion HDF5 file and replaced with a reference in the JSON:
{
  "title": "measure_power",
  "duration_ms": 234,
  "parameters": {"channel": 1},
  "result": {
    "power": {"value": 2.5, "unit": "W"},
    "trace": {"_type": "ndarray", "file": "exp_….h5", "dataset": "/trace", "shape": [1024]}
  }
}
Recommended format of tool results
For best results, tools should return a dict when --auto-log is on — keys become named fields. Non-dict returns are still logged, just less structured.
We also recommend attaching a unit to any measurement value by wrapping it with quantity(value, unit, term=None). Units are opt-in per value — anything you don't wrap stays a plain value.
from safe_lab_agents import quantity

def measure_power(channel: int) -> dict:
    return {
        "power": quantity(2.5, "W"),      # scalar with a unit
        "trace": quantity(samples, "V"),  # numpy array with a unit
        "status": "ok",                   # plain value, no unit
    }
Units flow through the logs, HTML report, and .eln export, so the recorded data stays self-describing.
Batches and analyses. Tool calls (your experiments) are auto-logged automatically. In addition, the agent is automatically instructed to record its own analyses and reasoning. Inside the container, auto_log_client.py exposes helpers for this:
start_batch(label, description="")/stop_batch()— group related calls (a sweep, an optimization loop, a multi-step protocol) into a single merged record (one JSON + one HDF5).log_analysis(title, text, data=…, references=…, script=…, figures=…, kind=…)— record the agent's own analysis, fits, figures, and reasoning. The agent is instructed to log not just successes but hypotheses, decisions, debugging detours, and failures, tagged bykind(analysis,hypothesis,decision,debug,failed,observation).
On exit, a session_summary.json and a standard <session>.eln archive are written automatically to the log folder.
View the log as a single self-contained HTML page (embedded figures, filter/search by kind, provenance links) — see the example report (open it in a browser):
agent report path/to/auto_log --open
Export to other ELNs — the log folder can be packaged as a standard .eln file (a ZIP wrapping an RO-Crate), importable into eLabFTW, Kadi4Mat, PASTA, SampleDB, RSpace, and datalab. This happens automatically on exit; re-export manually after adding analyses on resume:
agent export-eln path/to/auto_log -o session.eln
CLI Reference
agent start
Start a new agent session. All options are optional — missing ones are prompted interactively.
| Option | Description |
|---|---|
--agent, -a |
Agent type: claude-code or openclaw |
--tools, -t |
Path to Python file with MCP tool functions |
--context, -c |
Directory with experiment context (mounted read-only) |
--shared, -s |
Shared directory for data exchange (mounted read-write) |
--task |
Initial task for autonomous mode |
--task-file |
Path to a text/markdown file whose content is the initial task (mutually exclusive with --task) |
--name, -n |
Session name (auto-generated if omitted) |
--server |
Predefined MCP servers to enable (repeatable). See More features. |
--kadi4mat-project |
Kadi4Mat project name. Enables Kadi4Mat ELN push and auto-enables --auto-log. See More features. |
--kadi-max-per-minute |
Kadi4Mat: max records per minute (default 10) |
--kadi-max-per-session |
Kadi4Mat: max records per session (default 500, 0 = unlimited) |
--requirements, -r |
requirements.txt for extra Python packages in Docker |
--rebuild |
Force a full image rebuild (--no-cache --pull), ignoring the build cache. See Python Packages in Docker. |
--agent-args |
Agent-specific argument as KEY=VALUE (repeatable). See Agent-Specific Arguments. |
--port |
MCP server port (0 = auto) |
--container |
Container runtime: docker or podman (prompted if omitted; Podman auto-initializes the machine if needed) |
--no-web |
Disable web tools (soft restriction — does not block network access). Claude Code: built-in web tools disabled, but Bash can still reach the network. OpenClaw: system-prompt instruction only. |
--update-tools |
Expose a reload_tools MCP tool the agent can call to reload your tools file without restarting the container |
--auto-log |
Automatically log every tool call as a local ELN record (JSON + HDF5). See Automatic logging & ELN export. |
--config |
Path to a YAML config file supplying defaults for the options above. See Config file. |
--no-config |
Do not auto-discover safe-lab-agents.config.yaml in the current directory. |
Config file
Instead of retyping the same flags every run, store defaults in a YAML file. Keys are exactly the flag names with the leading -- stripped (kept hyphenated). A flag passed on the command line always overrides the config file (a warning is printed when it does); a value from the file means the interactive wizard won't prompt for it.
By default, start auto-discovers safe-lab-agents.config.yaml in the current directory. Use --config <path> to point at a specific file, or --no-config to ignore auto-discovery.
# safe-lab-agents.config.yaml
agent: claude-code
tools: ./tools.py            # paths resolve relative to THIS file's directory
context: ./context
shared: ./shared
auto-log: true
agent-args:
  model: opus
  effort: max
With that file in place, agent start runs with no flags, and e.g. agent start --agent openclaw overrides just the agent. Path-valued keys (tools, context, shared, requirements, task-file) resolve relative to the config file's location, so the file is portable.
agent resume
Resume a previously stopped session. Resume is always interactive — a session that originally ran autonomously (--task) is continued interactively so you can drive it by hand. The container runtime is autodetected from the saved session metadata.
| Option | Description |
|---|---|
--name, -n |
Session to resume (prompted if omitted) |
--agent-args |
Override agent-specific args for this resume (repeatable, same syntax as start) |
agent history
View the conversation history of a session. Without flags it prints to the terminal with rich formatting; --html/--open instead render a self-contained HTML viewer (role-colored cards, filter/search, collapsible tool calls, inlined agent-read images). Works for both claude-code and openclaw sessions.
| Option | Description |
|---|---|
--name, -n |
Session name (prompted if omitted) |
--last, -l |
Show only the last N entries |
--html, -o |
Write a self-contained HTML viewer instead of printing (default: <session>/conversation_safe_lab_agents.html) |
--open |
Open the HTML conversation viewer in the default browser |
agent list
List all saved sessions as a table, including a Container column showing the runtime each session used. Takes no options.
agent report
Build a self-contained HTML report from an auto-log folder.
| Option | Description |
|---|---|
LOG_DIR |
Path to an auto_log/ folder (positional, required) |
--output, -o |
Output HTML path (default: <log_dir>/report_safe_lab_agents.html) |
--open |
Open the report in the default browser when done |
agent export-eln
Export an auto-log folder as a standard .eln (RO-Crate) file for import into other ELNs.
| Option | Description |
|---|---|
LOG_DIR |
Path to an auto_log/ folder (positional, required) |
--output, -o |
Output .eln path (default: <log_dir>/<session>.eln) |
--name |
Human name for the session (root Dataset) |
--author |
Optional human author name to attribute records to |
--affiliation |
Optional organisation for the author |
Agent-Specific Arguments
Agent backends declare their own accepted arguments. Pass them with --agent-args KEY=VALUE (or just KEY for boolean flags). The flag can be repeated:
agent start --tools tools.py --agent-args effort=high --agent-args dangerously-skip-permissions
If a required argument is missing the CLI will prompt for it automatically.
Claude Code
| Argument | Type | Default | Description |
|---|---|---|---|
model |
string | — | Claude model alias or full ID (e.g. sonnet, opus, claude-sonnet-4-6) |
effort |
string | low |
Effort level: low, medium, high, xhigh, max |
copy-host-credentials |
bool | false |
Copy Claude login credentials from the host into the container. Off by default — without it, log in inside the container or pass oauth-token |
oauth-token |
string | — | Claude OAuth token (sk-ant-oat…) to authenticate with directly. Never stored in session metadata. See Authentication |
dangerously-skip-permissions |
bool | false |
Pass --dangerously-skip-permissions to Claude Code (interactive mode) |
None of these are required — Claude Code works without any --agent-args.
Claude Code authentication
Claude Code uses a Claude subscription (Pro/Max) — no API key is needed. The CLI resolves credentials in this order:
oauth-tokenagent arg — if you pass--agent-args oauth-token=sk-ant-oat…, that token is injected directly (asCLAUDE_CODE_OAUTH_TOKEN) and the steps below are skipped. The token is marked secret and is never written to session metadata, so it must be re-supplied when youresumea session that relies on it. Generate one on any logged-in machine withclaude setup-token.- Host credentials — pass
copy-host-credentialsand, if the host runningsafe-lab-agentsis logged into Claude Code, its credentials are copied into the container. This is off by default; without it the CLI falls through to the in-container login below. - In-container login — if the host is not logged in:
- Interactive mode: just log in inside the container session as usual.
- Autonomous mode: the CLI launches a one-time login first — it runs
claude setup-tokeninside a throwaway container, prints a sign-in URL, you open it and paste the code back, and the resulting token is captured and used for the run. After that, the autonomous task starts automatically.
Security: passing a token on the command line leaves it in your shell history and process list. Prefer
oauth-tokenfor short-lived/CI use, or rely on host credentials / the in-container login otherwise.
OpenClaw
| Argument | Type | Default | Description |
|---|---|---|---|
api-key |
string | — | API key for the LLM provider (required, secret) |
provider |
string | — | LLM provider: anthropic, openai, google, openrouter (required) |
model |
string | — | Model name, e.g. gpt-4o, claude-sonnet-4-6 (required) |
All three are required — if omitted, the CLI prompts for them.
agent start --tools tools.py \
    --agent-args provider=anthropic --agent-args model=claude-sonnet-4-6 --agent-args api-key=sk-…
Autonomous Mode
Give the agent a task and let it run to completion without interaction:
agent start \
    --agent claude-code \
    --tools tools.py \
    --shared ./data/ \
    --task "Run a polarizer sweep from 0 to 180° in 10° steps, measuring power at each angle. Save all results to a CSV file and create a summary plot."
The agent's output streams to your terminal. When the task finishes (or you press Ctrl+C), the session is saved.
Python Packages in Docker
The Docker container comes with Python 3 and common scientific packages pre-installed (numpy, pandas, matplotlib, scipy, h5py). To install more, create a requirements.txt and pass it with --requirements:
agent start --tools tools.py --requirements my_requirements.txt
The packages are installed at image build time and cached, keyed on the Dockerfile, entrypoint, and requirements file — so a rebuild triggers automatically when any of those change.
Note — the cache does not see upstream updates. The base image and the agent/Python toolchain are installed unpinned, so a "latest" tag that moves upstream will not trigger a rebuild — you can keep running a stale toolchain indefinitely. Pass
--rebuildto force a full rebuild that ignores the cache and re-pulls the base image (--no-cache --pull).
More features
Smaller or optional capabilities, one line each:
- Agent workspace — the agent's working directory (
/agent/workspaceinside the container — scripts, analysis, output files) is bind-mounted to~/.safe_lab_agents/sessions/<name>/workspace/on your host, so everything it creates is available there. --update-tools— exposes areload_toolsMCP tool the agent can call to pick up edits to your tools file without restarting the container (handy while developing tools).--no-web— soft-disable the agent's web tools (a lab agent driving hardware usually shouldn't browse); does not block network access.--port— pin the host-side MCP server port (default auto-selects a free one).@results_to_shared— decorator that copies selected return values of an MCP tool into the shared directory and hands the agent a confirmation string (a niche helper —PYTHON_TOOLSalready return native objects directly).from safe_lab_agents import results_to_shared.@no_autolog— decorator to exclude a specific tool from auto-logging.from safe_lab_agents import no_autolog.- Kadi4Mat push — install the extra (
pip install -e ".[kadi4mat]"), configure once withkadi-apy config, then pass--kadi4mat-project <name>to push every logged record to a Kadi4Mat ELN (auto-enables--auto-log; rate-limited via--kadi-max-per-minute/--kadi-max-per-session). - Predefined MCP servers (
--server) — enable a built-in bundle of tools by name; for example,--server lab-notebookadds a simple Markdown-based lab-notebook server. - Podman support — Docker and Podman are equal choices per session (
--container); the Podman machine (macOS/Windows) or socket (Linux) is started automatically, and the runtime is autodetected onresume. - Docker auto-start — Docker Desktop is launched automatically on macOS/Windows (and the daemon started via
systemctlon Linux) if it isn't already running.
Troubleshooting
Podman on Windows
Podman on Windows must be installed with the WSL backend (the default for podman machine init). The agent container reaches the host-side tool server through the WSL virtual network, and that path is what Safe Lab Agents resolves automatically. The Hyper-V backend (--provider hyperv) uses a different network layout and is not supported — the container will not be able to reach the tool server.
On the first --container podman run, if the required firewall rule is missing, the CLI prints a one-time command to add it. The agent container reaches the host's tool server over the WSL virtual adapter, which the Windows firewall blocks by default. Run the printed command once in an Administrator PowerShell — for example:
New-NetFirewallRule -DisplayName 'safe-lab-agents-mcp' -Direction Inbound -Action Allow -Protocol TCP -InterfaceAlias 'vEthernet (WSL)'
The rule is scoped to the WSL adapter only, so the (unauthenticated) tool server is not exposed to the rest of your network. Until the rule is added, tool calls from the agent will time out.
Podman on Linux
You may need to additionally install:
sudo apt install uidmap         # user-namespace ID mapping, required for rootless Podman
sudo apt install podman-docker  # provides a `docker` command that transparently calls Podman
and set:
# Allow unprivileged user namespaces (some distros restrict them via AppArmor), which
# rootless containers need:
sudo sysctl -w kernel.apparmor_restrict_unprivileged_userns=0
Build fails with "Release file is not valid yet"
If the build fails with an error like E: Release file ... is not valid yet (invalid for another Xh Ymin Zs)., the BuildKit container's clock is out of sync with the host. This can happen after the host clock is corrected (e.g. via NTP sync) while Podman's internal state still runs with the old time.
sudo timedatectl set-ntp true   # sync the host clock
podman system reset             # restart Podman's internal state
Warning:
podman system resetremoves all Podman containers, images, volumes, and networks on your machine — not just those created by Safe Lab Agents. Make sure you have no other Podman workloads you need to preserve before running this command.
After the reset, retry your agent start --container podman ... command. The Docker image will be rebuilt from scratch on the first run.
Release history Release notifications | RSS feed

Download files
Download the file for your platform. If you're not sure which to choose, learn more about installing packages.
Source Distribution
Built Distribution
Filter files by name, interpreter, ABI, and platform.
If you're not sure about the file name format, learn more about wheel file names.
Copy a direct link to the current filters
File details
Details for the file safe_lab_agents-0.1.0.tar.gz.
File metadata
- Download URL: safe_lab_agents-0.1.0.tar.gz
- Upload date:
- Size: 187.0 kB
- Tags: Source
- Uploaded using Trusted Publishing? No
- Uploaded via: twine/6.2.0 CPython/3.10.20
File hashes
| Algorithm | Hash digest | |
|---|---|---|
| SHA256 |
c8a4b75d61fa5864f1a5c986953c76a588b880918488dcdf02c40fb02cd68316
|
|
| MD5 |
30966351ef2e0b61608ca600e5413aa1
|
|
| BLAKE2b-256 |
2ce5bc13bf9e4ac5505e6d66c46e3875266575fccded53242ba4b658314e43f6
|
File details
Details for the file safe_lab_agents-0.1.0-py3-none-any.whl.
File metadata
- Download URL: safe_lab_agents-0.1.0-py3-none-any.whl
- Upload date:
- Size: 144.2 kB
- Tags: Python 3
- Uploaded using Trusted Publishing? No
- Uploaded via: twine/6.2.0 CPython/3.10.20
File hashes
| Algorithm | Hash digest | |
|---|---|---|
| SHA256 |
a7e855928579fc7875f1f30ba00e0327e95cd6facbc70aec6f6c6600dde70fe0
|
|
| MD5 |
5f72c138c8151ccd85d6c273636f327e
|
|
| BLAKE2b-256 |
b31d726b328f7aab546a1015a6f47201d03c0bc961bf8397c352dad1122193b5
|


