Saterys — Scalable Analysis Toolkit for Earth Remote sYStemS

Project description
🛰️ SATERYS
Scalable Analysis Toolkit for Earth Remote sYStemS


A modern geospatial pipeline builder with interactive node-based workflows
🌟 Overview
SATERYS is a powerful geospatial analysis platform that combines the best of modern web technologies with robust geospatial processing capabilities. Build complex Earth observation workflows using an intuitive drag-and-drop interface, execute Python-based analysis nodes, and visualize results on interactive maps.
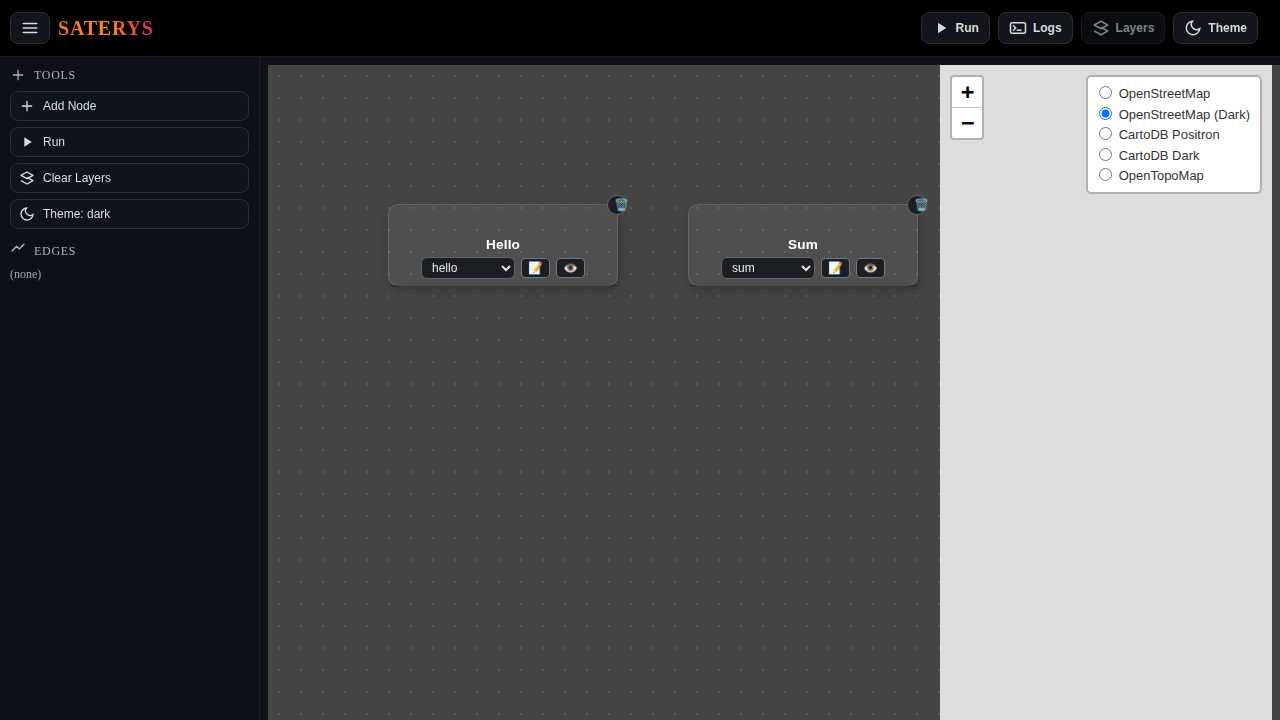
✨ Key Features
🎨 Visual Pipeline Builder
|
⚡ High-Performance Backend
|
🛰️ Geospatial Native
|
🔌 Extensible Architecture
|
🚀 Quick Start
Installation
# Install SATERYS
pip install saterys
# Verify installation
saterys --help
Launch the Application
# Start SATERYS server
saterys

# Access the web interface at http://localhost:8000
The application will automatically:
- 🔍 Discover all available plugins
- 🌐 Start the FastAPI backend
- 🎨 Serve the Svelte frontend
- 📊 Open your default browser
Development Mode
For development with hot-reload:
# Start with auto-reload
saterys --dev
🎯 Examples
Basic Workflow: Hello World
- Add a Node: Click "Add Node" and select "hello"
- Configure: Set the name parameter to "SATERYS"
- Execute: Click the "Run" button
- View Results: Check the output in the logs panel
# This runs automatically when you execute the hello node
def run(args, inputs, context):
    name = args.get("name", "world")
    return {"text": f"hello {name}"}
Geospatial Workflow: NDVI Calculation
Create a vegetation index from satellite imagery:
# 1. Add a raster input node
# 2. Set path to your multispectral image (e.g., Landsat, Sentinel)
# 3. Add NDVI calculation node
# 4. Configure band indices (e.g., red=4, nir=5 for Landsat 8)
# 5. Connect nodes and execute
Example NDVI Node Configuration:
{
  "red_band": 4,
  "nir_band": 5,
  "output_path": "./results/ndvi_output.tif",
  "dtype": "float32"
}
Custom Processing with Script Node
Write inline Python for custom analysis:
# Script node example - band math
import numpy as np
import rasterio

def process_raster(input_raster):
    with rasterio.open(input_raster["path"]) as src:
        # Read bands
        red = src.read(4).astype(float)
        nir = src.read(5).astype(float)

        # Custom vegetation index
        evi = 2.5 * ((nir - red) / (nir + 6 * red - 7.5 * blue + 1))

        return {"custom_index": evi}
📚 Documentation
Built-in Nodes
| Node Type | Description | Use Case |
|---|---|---|
| 🔢 raster.input | Load GeoTIFF/COG files | Data ingestion |
| 🌿 raster.ndvi | Calculate NDVI | Vegetation analysis |
| 🌊 raster.ndwi | Calculate NDWI | Water body detection |
| 📊 raster.pca | Principal Component Analysis | Dimensionality reduction |
| ➕ sum | Sum numeric values | Basic arithmetic |
| 👋 hello | Hello world example | Testing/demos |
| 📝 script | Custom Python code | Flexible processing |
API Endpoints
The FastAPI backend provides REST endpoints for integration:
# Get available node types
GET /node_types

# Execute a node
POST /run_node
{
  "nodeId": "unique-id",
  "type": "raster.ndvi",
  "args": {"red_band": 4, "nir_band": 5},
  "inputs": {...}
}

# Register raster for preview
POST /preview/register
{
  "id": "my-raster",
  "path": "/path/to/file.tif"
}

# Get map tiles
GET /preview/tile/{id}/{z}/{x}/{y}.png
🧩 Creating Plugins
SATERYS uses a simple plugin architecture. Create custom nodes by adding Python files to a nodes/ directory:
Basic Plugin Structure
# nodes/my_custom_node.py

NAME = "my.custom.node"  # Unique identifier
DEFAULT_ARGS = {         # Default configuration
    "param1": "default_value",
    "param2": 42
}

def run(args, inputs, context):
    """
    Execute the node logic

    Args:
        args: Node configuration parameters
        inputs: Data from connected upstream nodes
        context: Runtime context (nodeId, etc.)

    Returns:
        Dictionary with output data
    """
    # Your processing logic here
    result = process_data(args, inputs)

    return {
        "type": "custom",
        "data": result,
        "metadata": {...}
    }
Raster Processing Plugin Example
# nodes/custom_filter.py

NAME = "raster.custom_filter"
DEFAULT_ARGS = {
    "filter_size": 3,
    "operation": "gaussian"
}

def run(args, inputs, context):
    import rasterio
    import numpy as np
    from scipy import ndimage

    # Get input raster
    raster_input = next(
        (inp for inp in inputs.values()
         if inp.get("type") == "raster"),
        None
    )

    if not raster_input:
        raise ValueError("No raster input found")

    # Process the raster
    with rasterio.open(raster_input["path"]) as src:
        data = src.read(1)

        # Apply filter
        if args["operation"] == "gaussian":
            filtered = ndimage.gaussian_filter(
                data,
                sigma=args["filter_size"]
            )

        # Save result...
        output_path = "/tmp/filtered_result.tif"
        # ... saving logic here ...

    return {
        "type": "raster",
        "path": output_path,
        "operation": "custom_filter"
    }
Plugin Discovery
SATERYS automatically discovers plugins from:
- Built-in nodes:
saterys/nodes/(package installation) - User nodes:
./nodes/(current working directory)
Simply restart the application after adding new plugins!
🛠️ Advanced Usage
Environment Configuration
# Custom host and port
export SATERYS_HOST=0.0.0.0
export SATERYS_PORT=8080

# Raster cache directory
export RASTER_CACHE=./my_cache

# Development frontend origin (for CORS)
export SATERYS_DEV_ORIGIN=http://localhost:5173
Docker Usage
FROM python:3.10-slim

RUN pip install saterys

# Add your custom nodes
COPY nodes/ /app/nodes/

WORKDIR /app

EXPOSE 8000

CMD ["saterys", "--host", "0.0.0.0"]
Programmatic Usage
import uvicorn
from saterys.app import app

# Customize the FastAPI app
@app.get("/custom")
def custom_endpoint():
    return {"message": "Custom endpoint"}

# Run programmatically
if __name__ == "__main__":
    uvicorn.run(app, host="0.0.0.0", port=8000)
🤝 Contributing
We welcome contributions! Here's how to get started:
Development Setup
# Clone the repository
git clone https://github.com/bastian6666/SATERYS.git
cd SATERYS

# Install in development mode
pip install -e .

# Install frontend dependencies (if modifying UI)
cd saterys/web
npm install

# Start development server
npm run dev
Code Style
- Follow PEP 8 for Python code
- Use type hints where possible
- Add docstrings for public functions
- Test your changes before submitting
Submitting Changes
- Fork the repository
- Create a feature branch (
git checkout -b feature/amazing-feature) - Commit your changes (
git commit -m 'Add amazing feature') - Push to the branch (
git push origin feature/amazing-feature) - Open a Pull Request
📄 License
This project is licensed under the MIT License - see the LICENSE file for details.
🙏 Acknowledgments
- FastAPI - Modern Python web framework
- Svelte - Cybernetically enhanced web apps
- Svelvet - Interactive node-based UI
- rio-tiler - Raster tiling library
- Rasterio - Geospatial raster I/O
- Leaflet - Mobile-friendly interactive maps
📞 Support
- 📖 Documentation
- 🐛 Issue Tracker
- 💬 Discussions
Made with ❤️ for the geospatial community


Release history Release notifications | RSS feed


Download files
Download the file for your platform. If you're not sure which to choose, learn more about installing packages.
Source Distribution
Built Distribution
Filter files by name, interpreter, ABI, and platform.
If you're not sure about the file name format, learn more about wheel file names.
Copy a direct link to the current filters
File details
Details for the file saterys-0.3.8.tar.gz.
File metadata
- Download URL: saterys-0.3.8.tar.gz
- Upload date:
- Size: 177.9 kB
- Tags: Source
- Uploaded using Trusted Publishing? No
- Uploaded via: twine/6.2.0 CPython/3.12.11
File hashes
| Algorithm | Hash digest | |
|---|---|---|
| SHA256 |
50d6e0fd03a8ee2f3118c21d3585d456fffdd54b49f2507e90f4eff483bd7ebb
|
|
| MD5 |
c7b4c47cd181e1ba9e8132da41167f50
|
|
| BLAKE2b-256 |
9fe1e69c54ac9775cd11155e12094985208091387f5d4233c3373562ae5313e4
|
File details
Details for the file saterys-0.3.8-py3-none-any.whl.
File metadata
- Download URL: saterys-0.3.8-py3-none-any.whl
- Upload date:
- Size: 181.2 kB
- Tags: Python 3
- Uploaded using Trusted Publishing? No
- Uploaded via: twine/6.2.0 CPython/3.12.11
File hashes
| Algorithm | Hash digest | |
|---|---|---|
| SHA256 |
350882632e1f418fac97df28be5ddad0662ee8bccfc5c7f3023146eb544c06db
|
|
| MD5 |
ca74e8c3bb91a4836564982e715d6232
|
|
| BLAKE2b-256 |
bfbed60df35d42c0692b3b1b76718835d0289925800c01cc968b2cd1f340d672
|


