A Database Change Management tool for Snowflake


Project description
schemachange
Looking for snowchange? You've found the right spot. snowchange has been renamed to schemachange.


Overview
schemachange is a simple python based tool to manage all of your Snowflake objects. It follows an Imperative-style approach to Database Change Management (DCM) and was inspired by the Flyway database migration tool. When combined with a version control system and a CI/CD tool, database changes can be approved and deployed through a pipeline using modern software delivery practices. As such schemachange plays a critical role in enabling Database (or Data) DevOps.
DCM tools (also known as Database Migration, Schema Change Management, or Schema Migration tools) follow one of two approaches: Declarative or Imperative. For a background on Database DevOps, including a discussion on the differences between the Declarative and Imperative approaches, please read the Embracing Agile Software Delivery and DevOps with Snowflake blog post.
For the complete list of changes made to schemachange check out the CHANGELOG.
To learn more about making a contribution to schemachange, please see our Contributing guide.
For maintainers: See docs/maintainers for repository management guides.
Please note that schemachange is a community-developed tool, not an official Snowflake offering. It comes with no support or warranty.
Quick Start
Get schemachange running in 5 minutes:
1. Install schemachange
pip install schemachange
2. Create your first migration script
mkdir -p migrations
cat > migrations/V1.0.0__initial_setup.sql << 'EOF'
CREATE SCHEMA IF NOT EXISTS my_app;
CREATE TABLE IF NOT EXISTS my_app.customers (
    id INTEGER,
    name VARCHAR(100)
);
EOF
3. Run your first deployment
Option A: Using environment variables (recommended for CI/CD)
export SNOWFLAKE_ACCOUNT="myaccount.us-east-1.aws"
export SNOWFLAKE_USER="my_user"
export SNOWFLAKE_PASSWORD="my_password"  # Or use a PAT token
export SNOWFLAKE_ROLE="MY_ROLE"
export SNOWFLAKE_WAREHOUSE="MY_WH"
export SNOWFLAKE_DATABASE="MY_DB"

schemachange deploy -f migrations
Option B: Using CLI arguments (quick tests)
# Password must be set as environment variable
export SNOWFLAKE_PASSWORD="your_password_or_pat"

schemachange deploy \
  -f migrations \
  -a myaccount.us-east-1.aws \
  -u my_user \
  -r MY_ROLE \
  -w MY_WH \
  -d MY_DB
Option C: Using connections.toml (local development)
# Create ~/.snowflake/connections.toml with your credentials
schemachange deploy -f migrations -C my_connection
4. Verify your deployment
# Check what schemachange sees
schemachange verify -f migrations

# Check Snowflake (using Snowflake CLI)
snow sql -q "SELECT * FROM metadata.schemachange.change_history ORDER BY installed_on DESC LIMIT 5;"
🎯 Next Steps
- Learn the basics: Change Scripts - Understand versioned, repeatable, and always scripts
- Configure properly: Configuration - Choose the right config method for your environment
- Secure your setup: Authentication - Use JWT, PATs, or SSO instead of passwords
- CI/CD integration: Using in a CI/CD Pipeline - Automate your deployments
Table of Contents
- Overview
- Quick Start
- Project Structure
- Change Scripts
- Change History Table
- Authentication
- Configuration
- Deployment Scenarios
- Upgrading to 4.1.0
- Commands
- Troubleshooting
- Running schemachange
- Integrating With DevOps
- Maintainers
- Third Party Packages
- Legal
Project Structure
Folder Structure
schemachange expects a directory structure like the following to exist:
(project_root)
|
|-- folder_1
    |-- V1.1.1__first_change.sql
    |-- V1.1.2__second_change.sql
    |-- V1.1.3__deploy_dbt_project.cli.yml
    |-- R__sp_add_sales.sql
    |-- R__fn_get_timezone.sql
|-- folder_2
    |-- folder_3
        |-- V1.1.4__third_change.sql
        |-- R__fn_sort_ascii.sql
        |-- A__run_cleanup.cli.yml
The schemachange folder structure is very flexible. The project_root folder is specified with the -f,
--schemachange-root-folder, or --root-folder argument. schemachange only pays attention to the filenames, not the paths. Therefore, under
the project_root folder you are free to arrange the change scripts any way you see fit. You can have as many
subfolders (and nested subfolders) as you would like.
Change Scripts
Versioned Script Naming
Versioned change scripts follow a similar naming convention to that used by Flyway Versioned Migrations. The script name must follow this pattern (image taken from Flyway docs):
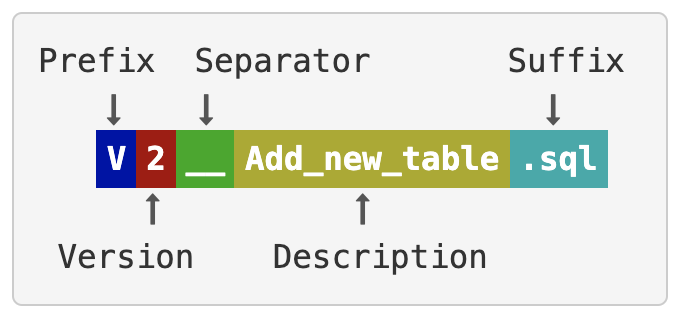
With the following rules for each part of the filename:
- Prefix: The letter 'V' for versioned change
- Version: A unique version number with dots or underscores separating as many number parts as you like
- Separator: __ (two underscores)
- Description: An arbitrary description with words separated by underscores or spaces (can not include two underscores)
- Suffix: .sql or .sql.jinja (case-insensitive: .SQL, .Sql, .JINJA also work)
For example, a script name that follows this convention is: V1.1.1__first_change.sql. As with Flyway, the unique
version string is very flexible. You just need to be consistent and always use the same convention, like 3 sets of
numbers separated by periods. Here are a few valid version strings:
- 1.1
- 1_1
- 1.2.3
- 1_2_3
Every script within a database folder must have a unique version number. schemachange will check for duplicate version numbers and throw an error if it finds any. This helps to ensure that developers who are working in parallel don't accidentally (re-)use the same version number.
Repeatable Script Naming
Repeatable change scripts follow a similar naming convention to that used by Flyway Versioned Migrations. The script name must follow this pattern (image taken from Flyway docs:

e.g:
- R__sp_add_sales.sql
- R__fn_get_timezone.sql
- R__fn_sort_ascii.sql
All repeatable change scripts are applied each time the utility is run, if there is a change in the file. Repeatable scripts could be used for maintaining code that always needs to be applied in its entirety. e.g. stored procedures, functions and view definitions etc.
Just like Flyway, within a single migration run, repeatable scripts are always applied after all pending versioned scripts have been executed. Repeatable scripts are applied in alphabetical order of their description.
Always Script Naming
Always change scripts are executed with every run of schemachange. This is an addition to the implementation of Flyway Versioned Migrations. The script name must follow this pattern:
A__Some_description.sql
e.g.
- A__add_user.sql
- A__assign_roles.sql
This type of change script is useful for an environment set up after cloning. Always scripts are applied always last.
CLI Migration Scripts
CLI migration scripts allow you to execute command-line tools as part of your deployment process. This is useful for deploying complex objects in Snowflake that go beyond SQL (such as a dbt Project or Snowpark object) and would require the use of the Snowflake CLI.
CLI migration scripts use a YAML format with the .cli.yml extension (or .cli.yml.jinja for Jinja templating). They follow the same naming conventions as SQL scripts:
V1.0.0__deploy_dbt_project.cli.yml- Versioned CLI scriptR__refresh_snowpark_function.cli.yml- Repeatable CLI scriptA__cleanup.cli.yml- Always CLI script
YAML Schema
CLI migration scripts define a list of steps to execute:
steps:
  - cli: snow
    command: dbt
    args:
      - "deploy"
      - "--connection"
      - "myconnection"
    working_dir: ./my_dbt_project
    description: "Deploy the Snowflake dbt Project"

  - cli: snow
    command: snowpark
    args:
      - "deploy"
      - "--connection"
      - "myconnection"
    working_dir: ./my_snowpark_function
    description: "Deploy the Snowpark function"
Step Fields
| Field | Required | Description |
|---|---|---|
cli |
Yes | CLI tool to execute. Currently only snow (Snowflake CLI) is supported. |
command |
Yes | The command to run (e.g., app, sql, connection). |
args |
No | List of arguments to pass to the command. Each argument must be a separate list item. |
working_dir |
No | Working directory for command execution. Resolved relative to root-folder. Defaults to root-folder. |
env |
No | Environment variables to set for the command (key-value pairs). |
description |
No | Human-readable description of what this step does. |
Important Notes
Arguments must be separate list items: When specifying args, each argument must be its own list item. For example:
# Correct
args:
  - "--connection"
  - "myconnection"

# Incorrect - will not work
args:
  - "--connection myconnection"
Supported CLI tools: Currently only the Snowflake CLI (snow) is supported. The tool must be installed and available in your PATH.
Jinja templating: CLI migration scripts support Jinja templating. Use the .cli.yml.jinja extension and reference variables the same way as in SQL scripts:
steps:
  - cli: snow
    command: sql
    args:
      - "--query"
      - "USE DATABASE {{ database_name }}"
    description: "Switch to {{ environment }} database"
Change history tracking: CLI migration scripts are tracked in the change history table just like SQL scripts. The SCRIPT column will contain the full filename including the .cli.yml extension.
Script Requirements
schemachange is designed to be very lightweight and not impose too many limitations. Each change script can have any
number of SQL statements within it and must supply the necessary context, like database and schema names. The context
can be supplied by using an explicit USE <DATABASE> command or by naming all objects with a three-part
name (<database name>.<schema name>.<object name>). schemachange will simply run the contents of each script against
the target Snowflake account, in the correct order. After each script, Schemachange will execute "reset" the context (
role, warehouse, database, schema) to the values used to configure the connector.
Using Variables in Scripts
schemachange supports the jinja engine for a variable replacement strategy. One important use of variables is to support
multiple environments (dev, test, prod) in a single Snowflake account by dynamically changing the database name during
deployment. To use a variable in a change script, use this syntax anywhere in the script: {{ variable1 }}.
To pass variables to schemachange, check out the Configuration section below. You can either use
the --vars command line parameter or the YAML config file schemachange-config.yml. For the command line version you
can pass variables like this: --vars '{"variable1": "value", "variable2": "value2"}'. This parameter accepts a flat
JSON object formatted as a string.
Nested objects and arrays don't make sense at this point and aren't supported.
schemachange will replace any variable placeholders before running your change script code and will throw an error if it finds any variable placeholders that haven't been replaced.
Secrets filtering
While many CI/CD tools already have the capability to filter secrets, it is best that any tool also does not output
secrets to the console or logs. Schemachange implements secrets filtering in a number of areas to ensure secrets are not
writen to the console or logs. The only exception is the render command which will display secrets.
A secret is just a standard variable that has been tagged as a secret. This is determined using a naming convention and either of the following will tag a variable as a secret:
- The variable name has the word
secretin it.config-version: 1 vars: bucket_name: S3://...... # not a secret secret_key: 567576D8E # a secret
- The variable is a child of a key named
secrets.config-version: 1 vars: secrets: my_key: 567576D8E # a secret aws: bucket_name: S3://...... # not a secret secrets: encryption_key: FGDSUUEHDHJK # a secret us_east_1: encryption_key: sdsdsd # a secret
Jinja templating engine
schemachange uses the Jinja templating engine internally and supports: expressions, macros, includes and template inheritance.
These files can be stored in the root-folder but schemachange also provides a separate modules
folder --modules-folder. This allows common logic to be stored outside of the main changes scripts.
The demo/citibike_demo_jinja has a simple example that demonstrates this.
schemachange uses Jinja's PrefixLoader, so
regardless of the --modules-folder that's used, the file paths (such as those passed to include)
should be prefixed with modules/.
The Jinja auto-escaping feature is disabled in schemachange, this feature in Jinja is currently designed for where the output language is HTML/XML. So if you are using schemachange with untrusted inputs you will need to handle this within your change scripts.
Common Pitfalls
Within change scripts, be aware of:
- Tasks with multi-statement bodies: Use
EXECUTE IMMEDIATE $$...$$;or call a stored procedure. Single-statement tasks don't needBEGIN...END. Note:$$delimiters are NOT valid directly in task definitions. - UTF-8 BOM characters: Automatically stripped by schemachange (fixed in 4.2.0)
- Trailing comments: When comments appear on new lines after the final
;, schemachange automatically appendsSELECT 1;to prevent "Empty SQL Statement" errors - Snowflake Scripting blocks: The
execute_string()method splits on semicolons client-side, breakingBEGIN...ENDblocks. See TROUBLESHOOTING.md for solutions.
For detailed troubleshooting and solutions, see TROUBLESHOOTING.md
Change History Table
schemachange records all applied changes scripts to the change history table. By default, schemachange will attempt to
log all activities to the METADATA.SCHEMACHANGE.CHANGE_HISTORY table. The name and location of the change history
table can be overriden via a command line argument (-c, --schemachange-change-history-table, or --change-history-table)
or the schemachange-config.yml file (change-history-table). The value passed to the parameter can have a one, two, or
three part name (e.g. "TABLE_NAME", or "SCHEMA_NAME.TABLE_NAME", or "DATABASE_NAME.SCHEMA_NAME.TABLE_NAME"). This can be
used to support multiple environments (dev, test, prod) or multiple subject areas within the same Snowflake account.
By default, schemachange will not try to create the change history table, and it will fail if the table does not exist.
This behavior can be altered by passing in the --schemachange-create-change-history-table or --create-change-history-table
argument or adding create-change-history-table: true to the schemachange-config.yml file.
For first-time deployments, simply add the --create-change-history-table flag:
schemachange deploy --create-change-history-table
If the change history table already exists, it will be used. If it doesn't exist, it will be created. This works correctly for:
- First-time production deployments
- Parallel CI/CD test jobs (each creating their own schema)
- Ephemeral preview environments
- Developer local testing
Note: Even with the --create-change-history-table parameter, schemachange will not attempt to create the database for the change history
table. That must be created before running schemachange.
The structure of the CHANGE_HISTORY table is as follows:
| Column Name | Type | Example |
|---|---|---|
| VERSION | VARCHAR | 1.1.1 |
| DESCRIPTION | VARCHAR | First change |
| SCRIPT | VARCHAR | V1.1.1__first_change.sql |
| SCRIPT_TYPE | VARCHAR | V |
| CHECKSUM | VARCHAR | 38e5ba03b1a6d2... |
| EXECUTION_TIME | NUMBER | 4 |
| STATUS | VARCHAR | Success |
| INSTALLED_BY | VARCHAR | SNOWFLAKE_USER |
| INSTALLED_ON | TIMESTAMP_LTZ | 2020-03-17 12:54:33.056 -0700 |
A new row will be added to this table every time a change script has been applied to the database. Both SQL scripts (.sql) and CLI migration scripts (.cli.yml) are tracked in this table. schemachange will use
this table to identify which changes have been applied to the database and will not apply the same version more than
once.
Here is the current schema DDL for the change history table (found in the schemachange/cli.py
script), in case you choose to create it manually and not use the --create-change-history-table parameter:
CREATE TABLE IF NOT EXISTS SCHEMACHANGE.CHANGE_HISTORY
(
    VERSION        VARCHAR,
    DESCRIPTION    VARCHAR,
    SCRIPT         VARCHAR,
    SCRIPT_TYPE    VARCHAR,
    CHECKSUM       VARCHAR,
    EXECUTION_TIME NUMBER,
    STATUS         VARCHAR,
    INSTALLED_BY   VARCHAR,
    INSTALLED_ON   TIMESTAMP_LTZ
)
Authentication
Schemachange supports the many of the authentication methods supported by
the Snowflake Python Connector.
The authenticator can be set by setting an authenticator in the connections.toml file
The following authenticators are supported:
snowflake: Password or PAToauth: External OAuthexternalbrowser: Browser-based SSOhttps://<okta_account_name>.okta.com: Okta SSOsnowflake_jwt: Private Key
If an authenticator is unsupported, an exception will be raised.
Security Note: For detailed security guidance on credential management, authentication best practices, and preventing credential leakage, please see SECURITY.md.
Password Authentication
⚠️ SNOWFLAKE AUTHENTICATION REQUIREMENTS:
- Service users: Password authentication is NOT SUPPORTED. Must use PAT, Key Pair (JWT), OAuth, or WIF.
- Human users (CLI/CI/CD): PREFERRED to use PAT, Key Pair (JWT), or OAuth over password+MFA (avoids interactive prompts).
- Human users (Interactive): Password+MFA is acceptable but PAT or Key Pair is preferred.
Recommended Authentication Methods (in order of preference):
- Private Key (JWT) - Best for service accounts and automation
- Programmatic Access Token (PAT) - Best for human users in CLI/CI/CD
- External Browser/SSO - Best for interactive use
- OAuth - For OAuth-enabled workflows
- Password+MFA - Allowed for human users but not recommended for automation (requires interactive MFA prompts)
Password Authentication with Programmatic Access Token (PAT)
Password authentication is the default authenticator (or set authenticator: snowflake explicitly).
For CLI/CI/CD automation, it is strongly recommended to use a Programmatic Access Token (PAT) instead of your regular password+MFA.
What is a PAT? A Programmatic Access Token is a long-lived token that allows automated tools to authenticate without MFA prompts. It's Snowflake's recommended approach for automation and is required for service accounts.
How to use a PAT:
export SNOWFLAKE_PASSWORD="<your_pat_token>"  # PAT, not your regular password
schemachange deploy
How to generate a PAT:
- Log into Snowflake Web UI
- Go to your user preferences
- Generate a new Programmatic Access Token
- Copy the token and use it in place of your password
For detailed PAT setup and best practices, see:
- Snowflake PAT Documentation
- SECURITY.md for comprehensive authentication guidance
Password+MFA Authentication (Not Recommended for Automation)
⚠️ For Human Users Only: Password+MFA authentication is allowed for human users in interactive sessions but is not recommended for CLI/CI/CD automation due to interactive MFA prompts.
export SNOWFLAKE_PASSWORD="your_password"  # Will prompt for MFA code
schemachange deploy  # ⚠️ Requires manual MFA input (blocks automation)
For Automation, Use Instead:
- Service accounts: PAT or Private Key (JWT) - password not supported
- Human accounts: PAT or Private Key (JWT) - avoids MFA prompts
Legacy Password-Only (No MFA) - Deprecated
❌ NOT SUPPORTED: Password-only authentication (without MFA) is deprecated by Snowflake and will not work on modern accounts.
External OAuth Authentication
External OAuth authentication can be selected by supplying oauth as your authenticator. A token_file_path must be
supplied in the connections.toml file
Schemachange no longer supports the --oauth-config option. Prior to the 4.0 release, this library supported
supplying an --oauth-config that would be used to fetch an OAuth token via the requests library. This required
Schemachange to keep track of connection arguments that could otherwise be passed directly to the Snowflake Python
connector. Maintaining this logic in Schemachange added unnecessary complication to the repo and prevented access to
recent connector parameterization features offered by the Snowflake connector.
External Browser Authentication
External browser authentication can be selected by supplying externalbrowser as your authenticator. The client will be
prompted to authenticate in a browser that pops up. Refer to
the documentation
to cache the token to minimize the number of times the browser pops up to authenticate the user.
Okta Authentication
External browser authentication can be selected by supplying your Okta endpoint as your authenticator (e.g.
https://<org_name>.okta.com). For clients that do not have a browser, can use the popular SaaS Idp option to connect
via Okta. A password must be supplied in the connections.toml file
** NOTE**: Please disable Okta MFA for the user who uses Native SSO authentication with client drivers. Please consult your Okta administrator for more information.
Private Key Authentication
Private key authentication can be selected by supplying snowflake_jwt as your authenticator. The filepath to a
Snowflake user-encrypted private key must be supplied as private_key_file in the connections.toml
file. If the private key file is password protected, supply the password as private_key_file_pwd in
the connections.toml file. If the variable is not set, the Snowflake Python connector will
assume the private key is not encrypted.
Parameter Name Migration:
For better alignment with the Snowflake Python Connector, schemachange now supports both old and new parameter names:
| Configuration Source | Old Name (Deprecated) | New Name (Recommended) |
|---|---|---|
| Private Key Path | ||
| CLI | --snowflake-private-key-path |
--snowflake-private-key-file |
| Environment Variable | SNOWFLAKE_PRIVATE_KEY_PATH |
SNOWFLAKE_PRIVATE_KEY_FILE |
| connections.toml | private_key_path |
private_key_file |
| YAML Config | snowflake-private-key-path |
snowflake-private-key-file |
| Private Key Passphrase | ||
| Environment Variable | SNOWFLAKE_PRIVATE_KEY_PASSPHRASE |
SNOWFLAKE_PRIVATE_KEY_FILE_PWD |
| connections.toml | private_key_passphrase |
private_key_file_pwd |
| YAML Config | snowflake-private-key-passphrase |
snowflake-private-key-file-pwd |
Note: Passphrases are not supported via CLI for security reasons (they would be visible in process lists and shell history).
The old parameter names continue to work but show deprecation warnings. Please migrate to the new names to match the Snowflake Python Connector's parameter naming convention.
Configuration
schemachange supports multiple configuration methods for both Snowflake connection parameters and schemachange-specific settings. Configuration can be supplied through (in order of priority):
- Command Line Arguments - Explicit flags passed to the CLI
- Environment Variables -
SNOWFLAKE_*prefixed variables (as of v4.1.0) - YAML Config File -
schemachange-config.ymlconfiguration file - connections.toml File - Snowflake Python Connector's connection file (as of v4.0)
Higher priority sources override lower priority sources, allowing flexible configuration management across different environments.
Note: As of 4.0, vars provided via command-line argument will be merged with vars provided via YAML config.
Previously, one overwrote the other completely.
Please see Usage Notes for the account Parameter (for the connect Method) for more details on how to structure the account name.
connections.toml File
What is connections.toml?
A standard Snowflake configuration file for storing connection parameters and credentials. Think of it as your personal Snowflake address book.
When should you use it?
✅ Great for:
- Local development - Juggle multiple Snowflake accounts (dev, staging, prod) without juggling credentials
- Team consistency - Share connection configurations (without secrets) across your team
- Secure storage - Keep credentials in one secure file with proper permissions (
chmod 600)
❌ Skip it for:
- CI/CD pipelines - Use environment variables instead (easier secret management)
- Production deployments - Service accounts should use ENV vars or vault systems
- Quick experiments - Just use CLI arguments
How does schemachange find connections.toml?
Important: schemachange only uses connections.toml when you explicitly opt-in by specifying at least one of:
- A
connection-name(which profile to use) - A
connections-file-path(where to find the file)
If you specify neither, connections.toml is skipped entirely and parameters come from CLI > ENV > YAML only.
When you do use it:
| What you specify | How schemachange finds it |
|---|---|
Only --connection-name dev |
Looks in ~/.snowflake/connections.toml for [dev] profile |
Only --connections-file-path ./team.toml |
Looks in ./team.toml for [default] profile |
| Both specified | Uses exactly what you specified |
File path precedence (highest to lowest):
- CLI:
--connections-file-path - ENV:
SCHEMACHANGE_CONNECTIONS_FILE_PATH(or legacySNOWFLAKE_CONNECTIONS_FILE_PATH) - YAML:
connections-file-path - Default:
$SNOWFLAKE_HOME/.snowflake/connections.toml(where$SNOWFLAKE_HOMEdefaults to your home directory)
Connection name precedence (highest to lowest):
- CLI:
--connection-nameor-C - ENV:
SCHEMACHANGE_CONNECTION_NAME(or legacySNOWFLAKE_DEFAULT_CONNECTION_NAME) - YAML:
connection-name - Default:
default
💡 Pro tip: Paths support tilde expansion (~), so ~/configs/snowflake.toml works everywhere.
Example: Create a connections.toml file
Create ~/.snowflake/connections.toml:
# Development environment
[dev]
account = "myorg-dev"
user = "developer"
role = "DEV_ROLE"
warehouse = "DEV_WH"
database = "DEV_DB"

# Production environment (using JWT authentication)
[prod]
account = "myorg-prod"
user = "deploy_service"
authenticator = "snowflake_jwt"
private_key_file = "~/.ssh/snowflake_prod.p8"  # Recommended parameter name (matches Snowflake connector)
private_key_file_pwd = "my_secure_passphrase"   # Recommended parameter name (matches Snowflake connector)
role = "DEPLOY_ROLE"
warehouse = "PROD_WH"
database = "PROD_DB"

# NOTE: private_key_path is deprecated but still supported for backwards compatibility
# Please migrate to private_key_file to match Snowflake Python Connector naming

# Optional: Set session parameters for this connection
[prod.parameters]
QUERY_TAG = "my_app_prod"
QUOTED_IDENTIFIERS_IGNORE_CASE = false
Secure your file:
chmod 600 ~/.snowflake/connections.toml
Use it:
# Deploy to dev
schemachange deploy -f migrations -C dev

# Deploy to prod
schemachange deploy -f migrations -C prod
Session Parameters in connections.toml
Session parameters let you control Snowflake session behavior (like QUERY_TAG, date formats, query timeouts, etc.).
Quick example:
[my_connection.parameters]
QUERY_TAG = "my_app"
TIMESTAMP_OUTPUT_FORMAT = "YYYY-MM-DD HH24:MI:SS"
📘 Advanced: How session parameters merge across all config sources
You can set session parameters in multiple places, and schemachange intelligently merges them:
Sources (in priority order):
- CLI:
--snowflake-session-parameters '{"PARAM": "value"}' - ENV:
SNOWFLAKE_SESSION_PARAMETERS='{"PARAM": "value"}' - YAML v2: Under
snowflake.session-parameters - connections.toml: Under
[connection_name.parameters]
How merging works:
- Higher priority sources override lower ones per parameter
- Only explicitly-set parameters from connections.toml are used (not Snowflake defaults)
- Parameters from all sources are combined and passed once to Snowflake (efficient!)
Special case: QUERY_TAG appends instead of overriding:
QUERY_TAG is special - values are appended with semicolons instead of replaced. This lets you track queries at multiple levels:
| Layer | Source | Value |
|---|---|---|
| 🏠 Application | connections.toml | "my_app" |
| 🌍 Environment | CLI session params | "deployment" |
| 🎯 Run-specific | --query-tag |
"production" |
| 🔧 Tool | schemachange (auto) | "schemachange 4.1.0" |
| 📊 Final | Snowflake sees | "my_app;deployment;production;schemachange 4.1.0" |
Example:
# connections.toml has QUERY_TAG = "my_app"
export SNOWFLAKE_SESSION_PARAMETERS='{"QUERY_TAG": "ci_pipeline"}'
schemachange deploy -C prod --query-tag "release-v2.0"

# Snowflake query history shows:
# QUERY_TAG = "my_app;ci_pipeline;release-v2.0;schemachange 4.1.0"
This makes it easy to filter queries by application, environment, or specific deployment in Snowflake's query history!
YAML Config File
By default, Schemachange expects the YAML config file to be named schemachange-config.yml, located in the current
working directory. The YAML file name can be overridden with the
--config-file-name command-line argument. The folder can be overridden by using the
--config-folder command-line argument
schemachange supports two YAML configuration formats:
Config Version 2 (Recommended)
Config version 2 separates schemachange-specific parameters from Snowflake connector parameters into distinct sections, providing better organization and clarity:
config-version: 2

schemachange:
  # The root folder for the database change scripts
  root-folder: './migrations'

  # The modules folder for jinja macros and templates to be used across multiple scripts
  modules-folder: './modules'

  # Override the default connections.toml file path
  connections-file-path: '~/.snowflake/connections.toml'

  # Override the default connections.toml connection name
  connection-name: 'my-connection'

  # Used to override the default name of the change history table (default: METADATA.SCHEMACHANGE.CHANGE_HISTORY)
  change-history-table: 'METADATA.SCHEMACHANGE.CHANGE_HISTORY'

  # Define values for variables to be replaced in change scripts
  vars:
    var1: 'value1'
    var2: 'value2'
    secrets:
      var3: 'value3' # This is considered a secret and will not be displayed in any output

  # Create the change history schema and table if they do not exist (default: false)
  create-change-history-table: true

  # Enable autocommit feature for DML commands (default: false)
  autocommit: false

  # Run schemachange in dry run mode (default: false)
  dry-run: false

  # A string to include in the QUERY_TAG that is attached to every SQL statement
  query-tag: 'my-project'

  # Log level: DEBUG, INFO, WARNING, ERROR, or CRITICAL (default: INFO)
  log-level: 'INFO'

  # Regex pattern for version number validation
  version-number-validation-regex: '^[0-9]+\.[0-9]+\.[0-9]+$'

  # Raise exception when versioned scripts are ignored (default: false)
  raise-exception-on-ignored-versioned-script: false

  # Allow out-of-order versioned script execution for parallel development (default: false)
  out-of-order: false

snowflake:
  # Snowflake connection parameters (these can also come from connections.toml or environment variables)
  account: 'myaccount.us-east-1.aws'
  user: 'my_user'
  role: 'MY_ROLE'
  warehouse: 'MY_WH'
  database: 'MY_DB'
  schema: 'MY_SCHEMA'

  # Authentication parameters (optional, based on auth method)
  authenticator: 'snowflake_jwt'  # snowflake, oauth, externalbrowser, snowflake_jwt, or okta URL
  private-key-path: '~/.ssh/snowflake_key.p8'

  # Additional Snowflake Python Connector parameters
  # Any valid connector parameter can be specified here
  client-session-keep-alive: true
  login-timeout: 60
  network-timeout: 120
Benefits of Config Version 2:
- Clear separation between schemachange config and Snowflake connector parameters
- All Snowflake Python Connector parameters are supported in the
snowflakesection - Better organization and maintainability
- Forward-compatible with future schemachange releases
Config Version 1 (Legacy, Backward Compatible)
Config version 1 uses a flat structure. This format is still supported for backward compatibility:
config-version: 1

# The root folder for the database change scripts
root-folder: '/path/to/folder'

# The modules folder for jinja macros and templates to be used across multiple scripts.
modules-folder: null

# Override the default connections.toml file path at snowflake.connector.constants.CONNECTIONS_FILE (OS specific)
connections-file-path: null

# Override the default connections.toml connection name. Other connection-related values will override these connection values.
connection-name: null

# Used to override the default name of the change history table (the default is METADATA.SCHEMACHANGE.CHANGE_HISTORY)
change-history-table: null

# Define values for the variables to replaced in change scripts. vars supplied via the command line will be merged into YAML-supplied vars
vars:
  var1: 'value1'
  var2: 'value2'
  secrets:
    var3: 'value3' # This is considered a secret and will not be displayed in any output

# Create the change history schema and table, if they do not exist (the default is False)
create-change-history-table: false

# Enable autocommit feature for DML commands (the default is False)
autocommit: false

# Display verbose debugging details during execution (the default is False)
verbose: false

# Run schemachange in dry run mode (the default is False)
dry-run: false

# A string to include in the QUERY_TAG that is attached to every SQL statement executed
query-tag: 'QUERY_TAG'

# Allow out-of-order versioned script execution for parallel development (the default is False)
out-of-order: false
Note: If config-version is not specified, schemachange assumes version 1 for backward compatibility.
Yaml Jinja support
The YAML config file supports the jinja templating language and has a custom function "env_var" to access environmental variables. Jinja variables are unavailable and not yet loaded since they are supplied by the YAML file. Customisation of the YAML file can only happen through values passed via environment variables.
Configuration Validation
Schemachange validates YAML configuration files and provides helpful feedback for configuration issues:
Unknown Keys: If your configuration contains keys that are not recognized by schemachange, you will see warning messages like:
Unknown configuration keys found and will be ignored: unknown_key, another_unknown_key
This behavior ensures:
- Backward compatibility: Existing configurations continue to work
- Sideways compatibility: Tools that overlay schemachange can add custom keys without conflicts
- Clear feedback: Users are informed about ignored configuration options
- No errors: Unknown keys are filtered out rather than causing deployment failures
env_var
Provides access to environmental variables. The function can be used two different ways.
Return the value of the environmental variable if it exists, otherwise return the default value.
{{ env_var('<environmental_variable>', 'default') }}
Return the value of the environmental variable if it exists, otherwise raise an error.
{{ env_var('<environmental_variable>') }}
Environment Variables
Why Use Environment Variables?
Environment variables are the go-to choice for CI/CD pipelines and production deployments because:
- 🔐 Secrets stay secret - Credentials never touch your code repository
- 🌍 Environment-specific - Same code, different configs for dev/staging/prod
- 🤖 CI/CD native - GitHub Actions, GitLab CI, Jenkins all inject secrets as ENV vars
- 🔄 Easy rotation - Update credentials without touching code
Quick Start: Common Scenarios
Scenario: GitHub Actions CI/CD
# .github/workflows/deploy.yml
env:
  SNOWFLAKE_ACCOUNT: ${{ secrets.SNOWFLAKE_ACCOUNT }}
  SNOWFLAKE_USER: ${{ secrets.SNOWFLAKE_USER }}
  SNOWFLAKE_PASSWORD: ${{ secrets.SNOWFLAKE_PAT }}  # Use a PAT!
  SNOWFLAKE_ROLE: DEPLOY_ROLE
  SNOWFLAKE_WAREHOUSE: DEPLOY_WH
  SNOWFLAKE_DATABASE: ${{ vars.TARGET_DATABASE }}  # Environment-specific

steps:
  - run: schemachange deploy -f migrations
Scenario: Local development with vault
# Fetch secrets from your vault (1Password, AWS Secrets Manager, etc.)
export SNOWFLAKE_ACCOUNT=$(op read "op://Engineering/Snowflake/account")
export SNOWFLAKE_PASSWORD=$(op read "op://Engineering/Snowflake/pat")
export SNOWFLAKE_USER="my_user"
export SNOWFLAKE_ROLE="DEV_ROLE"

schemachange deploy -f migrations
Scenario: Docker container
docker run --rm \
  -e SNOWFLAKE_ACCOUNT \
  -e SNOWFLAKE_USER \
  -e SNOWFLAKE_PASSWORD \
  -e SNOWFLAKE_ROLE \
  -v "$PWD":/workspace \
  -w /workspace \
  schemachange/schemachange:latest deploy -f migrations
Variable Types
schemachange supports two prefixes:
| Prefix | Purpose | Example |
|---|---|---|
SCHEMACHANGE_* |
schemachange behavior | SCHEMACHANGE_ROOT_FOLDER, SCHEMACHANGE_DRY_RUN |
SNOWFLAKE_* |
Snowflake connection | SNOWFLAKE_ACCOUNT, SNOWFLAKE_USER, SNOWFLAKE_PASSWORD |
Naming convention: PREFIX_PARAMETER_NAME in UPPERCASE (hyphens become underscores)
📘 Complete reference: All supported environment variables
SCHEMACHANGE_* Environment Variables
These environment variables configure schemachange-specific behavior:
| Environment Variable | Description | Example | Type |
|---|---|---|---|
SCHEMACHANGE_CONFIG_FOLDER |
The folder to look for schemachange config file. Important: Must be set via --config-folder CLI argument to control YAML file loading location. ENV variable is loaded after YAML, so it only affects the config object property. Useful for CI/CD with no YAML file. |
. (current directory) |
string |
SCHEMACHANGE_CONFIG_FILE_NAME |
The schemachange config YAML file name. Important: Must be set via --config-file-name CLI argument to control YAML file loading. ENV variable is loaded after YAML, so it only affects the config object property. Useful for CI/CD with no YAML file. |
schemachange-config.yml |
string |
SCHEMACHANGE_ROOT_FOLDER |
The root folder for database change scripts | ./migrations |
string |
SCHEMACHANGE_MODULES_FOLDER |
The modules folder for jinja macros and templates | ./modules |
string |
SCHEMACHANGE_CHANGE_HISTORY_TABLE |
Override the default change history table name | METADATA.SCHEMACHANGE.CHANGE_HISTORY |
string |
SCHEMACHANGE_VARS |
Define variables for scripts in JSON format | {"var1": "value1", "var2": "value2"} |
JSON |
SCHEMACHANGE_CREATE_CHANGE_HISTORY_TABLE |
Create change history table if it doesn't exist | true or false |
boolean |
SCHEMACHANGE_AUTOCOMMIT |
Enable autocommit for DML commands | true or false |
boolean |
SCHEMACHANGE_DRY_RUN |
Run in dry run mode | true or false |
boolean |
SCHEMACHANGE_OUT_OF_ORDER |
Allow out-of-order versioned script execution | true or false |
boolean |
SCHEMACHANGE_QUERY_TAG |
String to include in QUERY_TAG for SQL statements | my-project |
string |
SCHEMACHANGE_LOG_LEVEL |
Logging level | DEBUG, INFO, WARNING, ERROR, or CRITICAL |
string |
SCHEMACHANGE_CONNECTIONS_FILE_PATH |
Path to connections.toml file (controls where schemachange looks for connection config) | ~/.snowflake/connections.toml |
string |
SCHEMACHANGE_CONNECTION_NAME |
Connection profile name from connections.toml (controls which profile schemachange uses) | production |
string |
Note: Boolean values accept true/false, yes/no, 1/0 (case-insensitive).
🏗️ Architecture Note: SCHEMACHANGE_CONNECTION_NAME and SCHEMACHANGE_CONNECTIONS_FILE_PATH use the SCHEMACHANGE_ prefix because they control where schemachange looks for configuration (first-pass resolution), not what gets passed to Snowflake.
Configuration Loading Order:
- Parse CLI arguments (includes
--config-folder,--config-file-name) - Load YAML config (if present)
- Load ENV variables
- Determine if connections.toml should be used (if
connection-nameorconnections-file-pathset) - Load connections.toml (if applicable)
- Merge all sources with precedence: CLI > ENV > YAML > connections.toml
Note: YAML file location is determined by --config-folder CLI arg only, since ENV variables are loaded after YAML parsing
SNOWFLAKE_* Environment Variables
Explicit Connection Parameters
These Snowflake-specific environment variables are explicitly handled by schemachange:
| Environment Variable | Description | Example |
|---|---|---|
SNOWFLAKE_ACCOUNT |
Snowflake account identifier | myaccount.us-east-1.aws |
SNOWFLAKE_USER |
Username for authentication | my_user |
SNOWFLAKE_PASSWORD |
Password for authentication (also supports PATs) | my_password or <pat_token> |
SNOWFLAKE_ROLE |
Role to use after connecting | TRANSFORMER |
SNOWFLAKE_WAREHOUSE |
Default warehouse | COMPUTE_WH |
SNOWFLAKE_DATABASE |
Default database | MY_DATABASE |
SNOWFLAKE_SCHEMA |
Default schema | PUBLIC |
Authentication Parameters
| Environment Variable | Description | Example |
|---|---|---|
SNOWFLAKE_AUTHENTICATOR |
Authentication method | snowflake, oauth, externalbrowser, snowflake_jwt, or https://<okta_account>.okta.com |
SNOWFLAKE_PRIVATE_KEY_FILE |
Path to private key file for JWT authentication | ~/.ssh/snowflake_key.p8 |
SNOWFLAKE_PRIVATE_KEY_FILE_PWD |
Passphrase for encrypted private key | my_key_password |
SNOWFLAKE_TOKEN_FILE_PATH |
Path to OAuth token file (for external OAuth only) | ~/.snowflake/oauth_token.txt |
Generic SNOWFLAKE_* Parameters (Pass-through)
NEW: Any SNOWFLAKE_* environment variable not explicitly listed above will be automatically passed through to the Snowflake Python Connector. This allows you to use any connector parameter via environment variables.
Common pass-through parameters include:
| Environment Variable | Description | Example |
|---|---|---|
SNOWFLAKE_CLIENT_SESSION_KEEP_ALIVE |
Keep the session alive | true or false |
SNOWFLAKE_LOGIN_TIMEOUT |
Login timeout in seconds | 60 |
SNOWFLAKE_NETWORK_TIMEOUT |
Network timeout in seconds | 120 |
SNOWFLAKE_CLIENT_PREFETCH_THREADS |
Number of threads for result prefetching | 4 |
SNOWFLAKE_CLIENT_STORE_TEMPORARY_CREDENTIAL |
Store temporary credentials | true or false |
For a complete list of supported connector parameters, see the Snowflake Python Connector documentation.
Note on PATs (Programmatic Access Tokens): For CI/CD pipelines and service accounts, especially with Snowflake's MFA enforcement, use PATs via SNOWFLAKE_PASSWORD. PATs use the default snowflake authenticator—no need to set SNOWFLAKE_AUTHENTICATOR. The Snowflake connector automatically detects PAT tokens.
Configuration File Parameters
| Environment Variable | Description | Example |
|---|---|---|
SNOWFLAKE_HOME |
Snowflake home directory (default: your user home directory, e.g., /Users/tmathew). Schemachange uses $SNOWFLAKE_HOME/.snowflake/connections.toml as the default connections file path. |
/Users/tmathew |
Legacy Environment Variables
These variables are supported for backward compatibility but are superseded by SCHEMACHANGE_* prefixed versions:
| Environment Variable | Modern Equivalent | Description |
|---|---|---|
SNOWFLAKE_CONNECTIONS_FILE_PATH |
SCHEMACHANGE_CONNECTIONS_FILE_PATH |
Custom path to connections.toml file. Use SCHEMACHANGE_CONNECTIONS_FILE_PATH instead. |
SNOWFLAKE_DEFAULT_CONNECTION_NAME |
SCHEMACHANGE_CONNECTION_NAME |
Connection profile name from connections.toml. Use SCHEMACHANGE_CONNECTION_NAME instead. |
SNOWSQL_PWD |
SNOWFLAKE_PASSWORD |
Legacy password variable. Use SNOWFLAKE_PASSWORD instead. |
Complete Authentication Examples
For complete environment variable examples covering JWT, PAT, SSO, and OAuth authentication methods, see the Authentication section above. For security best practices and decision trees, see SECURITY.md
Configuration Priority
The Simple Rule
Higher wins. When the same parameter is set in multiple places, the highest priority source wins:
🥇 CLI Arguments (--flags)
  ↓ overrides
🥈 Environment Variables (SNOWFLAKE_*, SCHEMACHANGE_*)
  ↓ overrides
🥉 YAML Config File (schemachange-config.yml)
  ↓ overrides
🏅 connections.toml (when explicitly enabled)
When to Use Each Method
Think about who needs to change the value and when:
| Method | Best For | Example Scenario |
|---|---|---|
| connections.toml | Personal defaults | "I always connect to DEV_DB when developing locally" |
| YAML Config | Team/project standards | "Our staging environment always uses STAGE_WH warehouse" |
| Environment Variables | CI/CD & secrets | "GitHub Actions sets credentials per environment" |
| CLI Arguments | One-off overrides | "Just this once, use a different warehouse" |
Quick Example
# connections.toml has: user = "toml_user"
# YAML has: snowflake-user: yaml_user
export SNOWFLAKE_USER=env_user
schemachange deploy -C dev --snowflake-user cli_user

# Result: Connects as "cli_user" (CLI wins all)
Snowflake Python Connector Parameters:
schemachange now provides multiple ways to pass parameters to the Snowflake Python Connector:
-
Explicit Parameters - Common connection parameters (
account,user,role,warehouse,database,schema) can be specified via:- CLI arguments (e.g.,
--snowflake-account,-a) - Environment variables (e.g.,
SNOWFLAKE_ACCOUNT) - YAML configuration (v1 or v2)
- connections.toml file
- CLI arguments (e.g.,
-
Additional Connector Parameters - Any Snowflake connector parameter can be specified via:
- Config Version 2 YAML: Use the
snowflake:section to specify any connector parameter - Generic
SNOWFLAKE_*Environment Variables: AnySNOWFLAKE_*variable not explicitly handled will be passed through to the connector - connections.toml file: Full parameter set support
- Config Version 2 YAML: Use the
Example: Using Additional Connector Parameters
# Config Version 2 YAML (Recommended)
config-version: 2

snowflake:
  account: 'myaccount.us-east-1'
  user: 'my_user'
  # Additional connector parameters
  client-session-keep-alive: true
  login-timeout: 60
  network-timeout: 120
# Environment Variables
export SNOWFLAKE_ACCOUNT="myaccount.us-east-1.aws"
export SNOWFLAKE_CLIENT_SESSION_KEEP_ALIVE="true"
export SNOWFLAKE_LOGIN_TIMEOUT="60"
export SNOWFLAKE_NETWORK_TIMEOUT="120"

schemachange deploy
For comprehensive connector documentation and the full list of connection parameters, see:
- Snowflake Python Connector Documentation
- Snowflake Connector API Reference - Complete parameter reference for additional_snowflake_params
Account Identifier Format
Snowflake account identifiers can be specified in multiple formats. Choose the format that matches your account setup:
Legacy Format (Account Locator)
<account_locator>.<region>.<cloud>
Examples:
xy12345.us-east-1.awsab67890.us-central1.gcpcd34567.west-europe.azure
Preferred Format (Organization Name)
<orgname>-<account_name>
Examples:
myorg-myaccountacme-production
How to find your account identifier:
- Log into Snowflake Web UI
- Look at the URL or account locator in your profile
- Or run:
SELECT CURRENT_ACCOUNT_NAME();in Snowflake
Important: Do NOT include snowflakecomputing.com in the account identifier when configuring schemachange.
For detailed information about account identifiers, see:
Required Snowflake Privileges
The Snowflake user running schemachange needs appropriate privileges:
Minimum Required:
USAGEon the target database and schemaSELECTandINSERTon the change history table- Privileges to execute your change scripts (e.g.,
CREATE TABLE,CREATE VIEW, etc.)
For automatic change history table creation:
CREATE SCHEMAon the metadata database (if using--create-change-history-table)
Example privilege grants:
-- Grant database and schema access
GRANT USAGE ON DATABASE my_database TO ROLE deployment_role;
GRANT USAGE ON SCHEMA my_database.my_schema TO ROLE deployment_role;

-- Grant change history table access
GRANT SELECT, INSERT ON TABLE metadata.schemachange.change_history TO ROLE deployment_role;

-- Grant privileges for change scripts
GRANT CREATE TABLE, CREATE VIEW ON SCHEMA my_database.my_schema TO ROLE deployment_role;
For more information about Snowflake access control:
Deployment Scenarios
This section covers common deployment patterns and how to configure schemachange for different workflows.
Out Of Order
When multiple development teams work on feature branches simultaneously, they often create versioned migrations that don't merge in chronological order. This can cause issues with schemachange's default behavior.
The Problem
Consider this scenario:
- Team A creates
V1.0.1__feature_a.sqlon branch-a - Team B creates
V1.0.2__feature_b.sqlon branch-b - Branch B merges first →
V1.0.2is applied (max version = 1.0.2) - Branch A merges later →
V1.0.1is skipped because 1.0.1 ≤ 1.0.2
By default, schemachange skips any versioned script with a version number less than or equal to the maximum version already applied. This protects against accidentally re-running old migrations, but it can cause legitimate migrations to be missed in parallel development scenarios.
The Solution: Out-of-Order Execution
Enable the --out-of-order option to allow versioned scripts to be applied regardless of whether their version number is older than the maximum applied version:
schemachange deploy --out-of-order
| Scenario | Default Behavior | With --out-of-order |
|---|---|---|
| Script version > max applied | ✅ Apply | ✅ Apply |
| Script version ≤ max applied, already run | ⏭️ Skip | ⏭️ Skip |
| Script version ≤ max applied, never run | ⏭️ Skip | ✅ Apply |
Configuration
CLI:
schemachange deploy --out-of-order
Environment Variable:
export SCHEMACHANGE_OUT_OF_ORDER=true
YAML Config:
out-of-order: true
Best Practices for Parallel Development
-
Use timestamp-based versioning to minimize version collisions:
V20260122143052__add_customers_table.sql
V20260122154512__add_orders_table.sql
Timestamps are virtually unique across developers and branches.
-
Enable out-of-order in your CI/CD pipeline when deploying to shared environments where multiple branches may merge in any order.
-
Keep migrations independent when possible. Out-of-order execution means migrations may run in a different order than their version numbers suggest.
-
Review the change history table to understand which migrations have been applied and in what order.
Interaction with Other Options
| Option | Behavior with --out-of-order |
|---|---|
--raise-exception-on-ignored-versioned-script |
Irrelevant—scripts are applied instead of ignored |
--dry-run |
Shows which out-of-order scripts would be applied |
Upgrading to 4.1.0
New Authentication CLI Arguments (with Security Design Decision)
What's new: Version 4.1.0 adds CLI support for authentication parameters (--snowflake-authenticator, --snowflake-private-key-file, --snowflake-token-file-path). These were not available via CLI in previous versions (4.0.x and earlier).
Important Security Design: For security reasons, --snowflake-private-key-file-pwd (passphrase) is intentionally NOT supported via CLI. Command-line arguments are visible in process lists (ps aux) and shell history files (.bash_history, .zsh_history), which would expose sensitive credentials to other users on the system and in log files.
Using Private Key Authentication in 4.1.0
✅ Option 1: Environment variable (recommended for CI/CD):
export SNOWFLAKE_PRIVATE_KEY_FILE_PWD="my_passphrase"
schemachange deploy \
  --snowflake-authenticator snowflake_jwt \
  --snowflake-private-key-file ~/.ssh/snowflake_key.p8
✅ Option 2: connections.toml (recommended for local development):
Create or update ~/.snowflake/connections.toml:
[production]
account = "myaccount.us-east-1.aws"
user = "service_account"
authenticator = "snowflake_jwt"
private_key_file = "~/.ssh/snowflake_key.p8"  # Recommended parameter name (matches Snowflake connector)
private_key_file_pwd = "my_passphrase"         # Recommended parameter name (matches Snowflake connector)
Important: Set secure file permissions:
chmod 600 ~/.snowflake/connections.toml
Then deploy with the connection profile:
schemachange deploy -C production
✅ Option 3: YAML config v2 + environment variable:
In schemachange-config.yml:
config-version: 2

snowflake:
  account: myaccount.us-east-1
  user: service_account
  authenticator: snowflake_jwt
  private-key-file: ~/.ssh/snowflake_key.p8
  # Do NOT put private-key-file-pwd here!
Then use environment variable for the passphrase:
export SNOWFLAKE_PRIVATE_KEY_FILE_PWD="my_passphrase"
schemachange deploy
❌ NEVER use passphrase as a CLI argument (this was never supported and will not work):
# This will fail - CLI passphrases are not supported for security
schemachange deploy --snowflake-private-key-passphrase "my_passphrase"
See SECURITY.md for comprehensive security best practices and authentication guidance.
Commands
Schemachange supports a few subcommands. If the subcommand is not provided it defaults to deploy. This behaviour keeps compatibility with versions prior to 3.2.
deploy
This is the main command that runs the deployment process.
Usage: schemachange deploy [-h] [--config-folder CONFIG_FOLDER] [--config-file-name CONFIG_FILE_NAME] [-f ROOT_FOLDER] [-m MODULES_FOLDER] [-c CHANGE_HISTORY_TABLE] [-V VARS] [--create-change-history-table] [-ac] [--dry-run] [--out-of-order] [-Q QUERY_TAG] [-L LOG_LEVEL] [-C CONNECTION_NAME] [--connections-file-path CONNECTIONS_FILE_PATH] [-a ACCOUNT] [-u USER] [-r ROLE] [-w WAREHOUSE] [-d DATABASE] [-s SCHEMA] [--snowflake-authenticator AUTHENTICATOR] [--snowflake-private-key-path PATH] [--snowflake-token-file-path PATH]
Command-Line Arguments
schemachange supports prefixed CLI arguments for better clarity and organization:
--schemachange-*for schemachange-specific parameters--snowflake-*for Snowflake connection parameters
Most arguments also support short forms (single dash, single letter) for convenience.
General Configuration
| Parameter | Description |
|---|---|
-h, --help |
Show the help message and exit |
--config-folder |
The folder to look in for the schemachange config file (default: current working directory) |
--config-file-name |
The file name of the schemachange config file (default: schemachange-config.yml) |
Schemachange Parameters
| Parameter | Environment Variable | Description |
|---|---|---|
-f--schemachange-root-folder--root-folder (deprecated) |
SCHEMACHANGE_ROOT_FOLDER |
The root folder for database change scripts (default: current directory) |
-m--schemachange-modules-folder--modules-folder (deprecated) |
SCHEMACHANGE_MODULES_FOLDER |
The modules folder for jinja macros and templates |
-c--schemachange-change-history-table--change-history-table (deprecated) |
SCHEMACHANGE_CHANGE_HISTORY_TABLE |
Override the default change history table name (default: METADATA.SCHEMACHANGE.CHANGE_HISTORY) |
-V--schemachange-vars--vars (deprecated) |
SCHEMACHANGE_VARS |
Define variables for scripts in JSON format. Merged with YAML vars (e.g., '{"var1": "val1"}') |
--schemachange-create-change-history-table--create-change-history-table (deprecated) |
SCHEMACHANGE_CREATE_CHANGE_HISTORY_TABLE |
Create the change history table if it doesn't exist (default: false) |
-ac--schemachange-autocommit--autocommit (deprecated) |
SCHEMACHANGE_AUTOCOMMIT |
Enable autocommit for DML commands (default: false) |
--schemachange-dry-run--dry-run (deprecated) |
SCHEMACHANGE_DRY_RUN |
Run in dry run mode (default: false) |
--out-of-order |
SCHEMACHANGE_OUT_OF_ORDER |
Allow out-of-order versioned script execution for parallel development (default: false) |
-Q--schemachange-query-tag--query-tag (deprecated) |
SCHEMACHANGE_QUERY_TAG |
String to include in QUERY_TAG attached to every SQL statement |
-L--schemachange-log-level--log-level (deprecated) |
SCHEMACHANGE_LOG_LEVEL |
Logging level: DEBUG, INFO, WARNING, ERROR, or CRITICAL (default: INFO) |
-C--schemachange-connection-name--connection-name (deprecated) |
SCHEMACHANGE_CONNECTION_NAME |
Connection profile name from connections.toml |
--schemachange-connections-file-path--connections-file-path (deprecated) |
SCHEMACHANGE_CONNECTIONS_FILE_PATH |
Path to connections.toml file |
-v--verbose (deprecated) |
Use -L DEBUG or --schemachange-log-level DEBUG instead |
Snowflake Connection Parameters
| Parameter | Environment Variable | Description |
|---|---|---|
-a--snowflake-account |
SNOWFLAKE_ACCOUNT |
Snowflake account identifier (e.g., myaccount.us-east-1) |
-u--snowflake-user |
SNOWFLAKE_USER |
Username for authentication |
-r--snowflake-role |
SNOWFLAKE_ROLE |
Role to use after connecting |
-w--snowflake-warehouse |
SNOWFLAKE_WAREHOUSE |
Default warehouse |
-d--snowflake-database |
SNOWFLAKE_DATABASE |
Default database |
-s--snowflake-schema |
SNOWFLAKE_SCHEMA |
Default schema |
--snowflake-authenticator |
SNOWFLAKE_AUTHENTICATOR |
Authentication method (e.g., snowflake, oauth, externalbrowser, snowflake_jwt) |
--snowflake-private-key-file |
SNOWFLAKE_PRIVATE_KEY_FILE |
Path to private key file for JWT authentication |
--snowflake-token-file-path |
SNOWFLAKE_TOKEN_FILE_PATH |
Path to OAuth token file |
Snowflake Parameters (ENV/YAML/connections.toml only)
These parameters are not available via CLI for security reasons:
| Environment Variable | YAML v2 Path | connections.toml | Description |
|---|---|---|---|
SNOWFLAKE_PASSWORD |
snowflake.password |
password |
Password or Programmatic Access Token (PAT) for authentication |
SNOWFLAKE_PRIVATE_KEY_FILE_PWD |
snowflake.private-key-file-pwd |
private_key_file_pwd |
Passphrase for encrypted private key files |
Note on Argument Aliases:
- Multiple argument forms are supported for backward compatibility (e.g.,
-f,--schemachange-root-folder,--root-folder) - The recommended forms are the short forms (e.g.,
-f,-m,-c) or the explicit prefixed forms (e.g.,--schemachange-root-folder) - Deprecated aliases (e.g.,
--root-folder,--vars,--query-tag) are noted in the help text but continue to work - All variants of an argument set the same configuration value
- Use the prefixed forms (
--schemachange-*,--snowflake-*) or short forms for clarity and future compatibility
Dry-Run Mode
Dry-run mode (--schemachange-dry-run or --dry-run) simulates a deployment without executing any SQL statements. This is useful for:
- Previewing what changes would be applied
- Validating scripts and configuration before actual deployment
- Testing in CI/CD pipelines without affecting databases
What Dry-Run Does:
- ✅ Connects to Snowflake (validates credentials)
- ✅ Queries the change history table (if it exists)
- ✅ Renders Jinja templates with provided variables
- ✅ Determines which scripts would be executed
- ✅ Logs all SQL statements that would be executed
- ✅ Shows CREATE TABLE for change history (if
--create-change-history-tableis set) - ❌ Does NOT execute any SQL statements
- ❌ Does NOT create the change history table (even with
--create-change-history-table) - ❌ Does NOT modify any database objects
Important Requirements:
Dry-run mode requires the same prerequisites as a normal deployment:
- Valid Snowflake credentials
- Warehouse must be specified and accessible
- Database and schema must exist and be accessible
- Change history table must exist OR
--create-change-history-tablemust be specified
Common Scenarios:
# Preview first-time deployment (change history table doesn't exist yet)
schemachange deploy --dry-run --create-change-history-table

# Preview subsequent deployment (change history table exists)
schemachange deploy --dry-run

# ERROR: This will fail if change history table doesn't exist
schemachange deploy --dry-run  # Missing --create-change-history-table
Why does dry-run require the change history table?
Dry-run simulates exactly what would happen during actual execution. If the change history table is missing and you don't specify --create-change-history-table, the actual deployment would also fail with "Unable to find change history table". This ensures dry-run accurately reflects reality.
render
This subcommand is used to render a single script to the console. It is intended to support the development and troubleshooting of script that use features from the jinja template engine.
Usage: schemachange render [-h] [--config-folder CONFIG_FOLDER] [-f ROOT_FOLDER] [-m MODULES_FOLDER] [-V VARS] [-L LOG_LEVEL] script
| Parameter | Description |
|---|---|
--config-folder--schemachange-config-folder |
The folder to look in for the schemachange-config.yml file (default: current directory) |
-f--schemachange-root-folder--root-folder (deprecated) |
The root folder for the database change scripts |
-m--schemachange-modules-folder--modules-folder (deprecated) |
The modules folder for jinja macros and templates |
-V--schemachange-vars--vars (deprecated) |
Define variables in JSON format (e.g., '{"var1": "value1", "var2": "value2"}') |
-L--schemachange-log-level--log-level (deprecated) |
Logging level: DEBUG, INFO, WARNING, ERROR, or CRITICAL (default: INFO) |
script |
Path to the script to render |
verify
This subcommand tests Snowflake connectivity and displays all configuration parameters being used. It is useful for troubleshooting connection issues, validating credentials before deployment, and auditing configuration in CI/CD pipelines.
Usage: schemachange verify [-h] [--config-folder CONFIG_FOLDER] [-f ROOT_FOLDER] [-m MODULES_FOLDER] [-V VARS] [-L LOG_LEVEL] [-a ACCOUNT] [-u USER] [-r ROLE] [-w WAREHOUSE] [-d DATABASE] [-s SCHEMA] [--snowflake-authenticator AUTHENTICATOR] [--snowflake-private-key-path PATH] [--snowflake-token-file-path PATH] [-C CONNECTION_NAME] [--schemachange-connections-file-path PATH]
What it does:
- Tests connection to Snowflake with your configured credentials
- Displays all configuration parameters (with secrets masked)
- Shows connection details after successful connection (session ID, Snowflake version)
- Provides clear troubleshooting guidance if connection fails
Common Use Cases:
# Test connection with environment variables
schemachange verify

# Test connection with specific credentials
schemachange verify -a myaccount.us-east-1 -u myuser -r MYROLE

# Test connection with connections.toml profile
schemachange verify -C production

# Test configuration from YAML file
schemachange verify --config-folder ./config
Configuration Parameters:
The verify command accepts the same configuration parameters as deploy (except deployment-specific options like --change-history-table, --autocommit, etc.):
| Parameter Category | Parameters |
|---|---|
| Schemachange Config | --config-folder, -f/--schemachange-root-folder, -m/--schemachange-modules-folder, -V/--schemachange-vars, -L/--schemachange-log-level |
| Snowflake Connection | -a/--snowflake-account, -u/--snowflake-user, -r/--snowflake-role, -w/--snowflake-warehouse, -d/--snowflake-database, -s/--snowflake-schema |
| Authentication | --snowflake-authenticator, --snowflake-private-key-file, --snowflake-token-file-path |
| Connection Profile | -C/--schemachange-connection-name, --schemachange-connections-file-path |
Note: For security, passwords and private key passphrases are NOT accepted via CLI arguments. Use SNOWFLAKE_PASSWORD and SNOWFLAKE_PRIVATE_KEY_FILE_PWD environment variables, or store them in connections.toml (with proper file permissions). See SECURITY.md for security best practices.
Troubleshooting
For detailed troubleshooting guidance including common errors and solutions, see TROUBLESHOOTING.md.
Quick diagnostics: Use the verify command to test connectivity and validate your configuration:
schemachange verify
Common issues covered in the troubleshooting guide:
- Connection errors (authentication failures, network issues)
- Permission and access errors (missing tables, insufficient privileges)
- Security warnings (insecure file permissions, credentials in YAML)
- Configuration and script errors (Jinja templates, invalid JSON)
Running schemachange
Prerequisites
In order to run schemachange you must have the following:
- Python 3.10 or later - schemachange requires Python 3.10 or newer (see Supported Python Versions below)
- Snowflake Python Connector (version 2.8+, but < 5.0) - Install via
pip install schemachangewhich includes the appropriate connector version. See the Snowflake Python Connector documentation for more details - You will need to create the change history table used by schemachange in Snowflake (
see Change History Table above for more details)
- First, you will need to create a database to store your change history table (schemachange will not help you with this). For your convenience, initialize.sql file has been provided to get you started. Feel free to align the script to your organizations RBAC implementation. The setup_schemachange_schema.sql file is provided to set up the target schema that will host the change history table for each of the demo projects in this repo. Use it as a means to test the required permissions and connectivity in your local setup.
- Second, you will need to create the change history schema and table. You can do this manually (
see Change History Table above for the DDL) or have schemachange create them by running
it with the
--create-change-history-tableparameter (just make sure the Snowflake user you're running schemachange with has privileges to create a schema and table in that database)
- You will need to create (or choose) a user account that has privileges to apply the changes in your change script
- Don't forget that this user also needs the SELECT and INSERT privileges on the change history table
Supported Python Versions
schemachange follows Python's official end-of-life schedule. When a Python version reaches EOL, support may be dropped in the next major schemachange release.
| Python Version | Status | Notes |
|---|---|---|
| 3.13 | ✅ Supported | Fully tested and supported |
| 3.12 | ✅ Supported | Fully tested and supported |
| 3.11 | ✅ Supported | Fully tested and supported |
| 3.10 | ✅ Supported | Minimum required version |
| 3.9 | ❌ Not supported | Dropped in version 4.1.0 (reached EOL October 31, 2025) |
| 3.8 | ❌ Not supported | Dropped in version 4.0.0 |
Running the Script
schemachange is a single python script located at schemachange/cli.py. It can be executed as follows:
python schemachange/cli.py [-h] [--config-folder CONFIG_FOLDER] [-f ROOT_FOLDER] [-c CHANGE_HISTORY_TABLE] [-V VARS] [--create-change-history-table] [-ac] [-L LOG_LEVEL] [--dry-run] [-Q QUERY_TAG] [--connections-file-path CONNECTIONS_FILE_PATH] [-C CONNECTION_NAME]
Or if installed via pip, it can be executed as follows:
schemachange deploy [-h] [--config-folder CONFIG_FOLDER] [-f ROOT_FOLDER] [-c CHANGE_HISTORY_TABLE] [-V VARS] [--create-change-history-table] [-ac] [-L LOG_LEVEL] [--dry-run] [-Q QUERY_TAG] [--connections-file-path CONNECTIONS_FILE_PATH] [-C CONNECTION_NAME]
Note: All arguments support multiple forms for backward compatibility. See the deploy command section for the full list of argument variants.
The demo folder in this project repository contains three schemachange demo projects for you to try out. These demos showcase the basics and a couple of advanced examples based on the standard Snowflake Citibike demo which can be found in the Snowflake Hands-on Lab. Check out each demo listed below
- Basics Demo: Used to test the basic schemachange functionality.
- Citibike Demo: Used to show a simple example of building a database and loading data using schemachange.
- Citibike Jinja Demo: Extends the citibike demo to showcase the use of macros and jinja templating.
The Citibike data for this demo comes from the NYC Citi Bike bike share program.
To get started with schemachange and these demo scripts follow these steps:
- Make sure you've completed the Prerequisites steps above
- Get a copy of this schemachange repository (either via a clone or download)
- Open a shell and change directory to your copy of the schemachange repository
- Run schemachange (see Running the Script above) with your Snowflake account details and respective demo project as the root folder (make sure you use the full path)
Integrating With DevOps
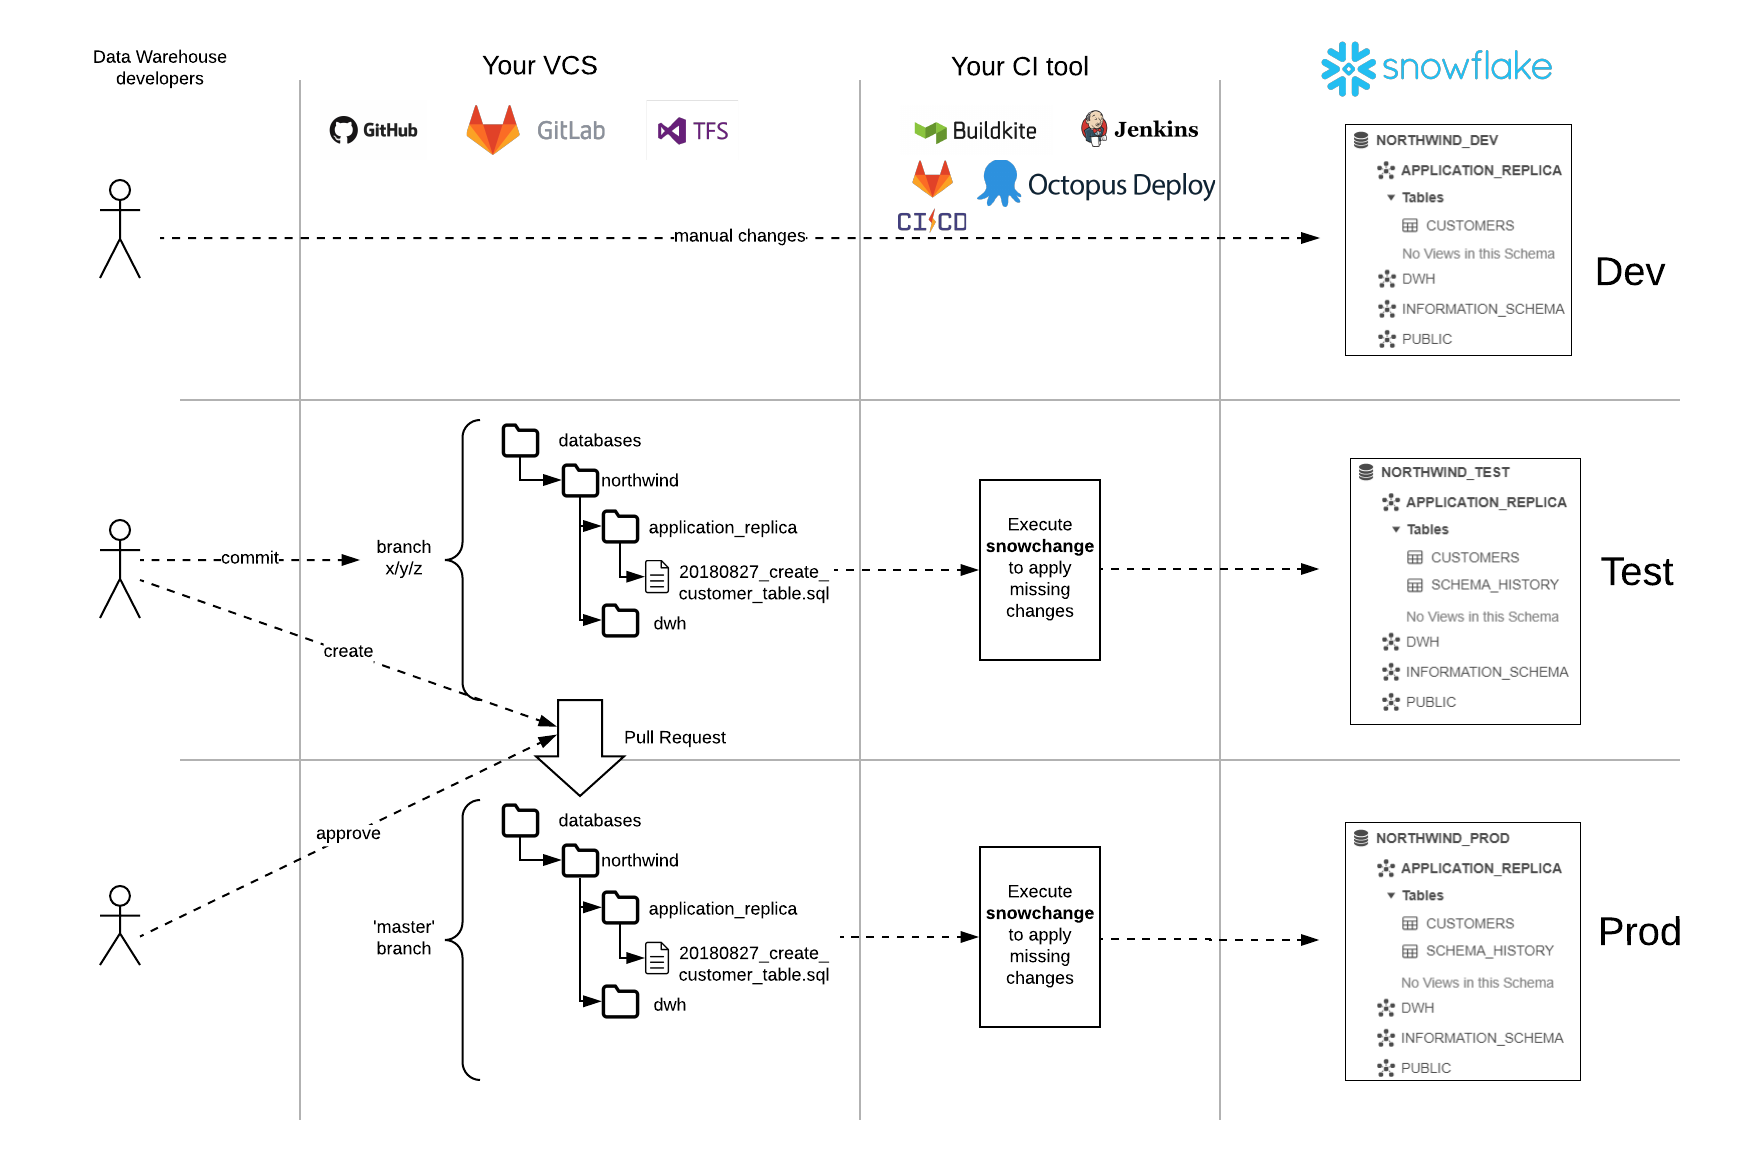
Sample DevOps Process Flow
Here is a sample DevOps development lifecycle with schemachange:
Using in a CI/CD Pipeline
If your build agent has a recent version of python 3 installed, the script can be run like so:
pip install schemachange --upgrade
schemachange deploy [-f ROOT_FOLDER] [-c CHANGE_HISTORY_TABLE] [-V VARS] [--create-change-history-table] [-ac] [-L LOG_LEVEL] [--dry-run] [-Q QUERY_TAG] [--connections-file-path CONNECTIONS_FILE_PATH] [-C CONNECTION_NAME]
Or if you prefer docker, run like so:
docker run -it --rm \
  --name schemachange-script \
  -v "$PWD":/usr/src/schemachange \
  -w /usr/src/schemachange \
  -e ROOT_FOLDER \
  -e $CONNECTION_NAME \
  python:3 /bin/bash -c "pip install schemachange --upgrade && schemachange -f $ROOT_FOLDER --connections-file-path connections.toml --connection-name $CONNECTION_NAME"
Either way, don't forget to configure a connections.toml file for connection parameters
Maintainers
- James Weakley (@jamesweakley)
- Jeremiah Hansen (@jeremiahhansen)
This is a community-developed tool, not an official Snowflake offering. It comes with no support or warranty. However, feel free to raise a GitHub issue if you find a bug or would like a new feature.
Third Party Packages
The current functionality in schemachange would not be possible without the following third party packages and all those that maintain and have contributed.
| Name | License | Author | URL |
|---|---|---|---|
| Jinja2 | BSD License | Armin Ronacher | https://palletsprojects.com/p/jinja/ |
| PyYAML | MIT License | Kirill Simonov | https://pyyaml.org/ |
| pandas | BSD License | The Pandas Development Team | https://pandas.pydata.org |
| pytest | MIT License | Holger Krekel, Bruno Oliveira, Ronny Pfannschmidt, Floris Bruynooghe, Brianna Laugher, Florian Bruhin and others | https://docs.pytest.org/en/latest/ |
| snowflake-connector-python | Apache Software License | Snowflake, Inc | https://www.snowflake.com/ |
Legal
Licensed under the Apache License, Version 2.0 (the "License"); you may not use this tool except in compliance with the License. You may obtain a copy of the License at: http://www.apache.org/licenses/LICENSE-2.0
Unless required by applicable law or agreed to in writing, software distributed under the License is distributed on an " AS IS" BASIS, WITHOUT WARRANTIES OR CONDITIONS OF ANY KIND, either express or implied. See the License for the specific language governing permissions and limitations under the License.
Release history Release notifications | RSS feed


Download files
Download the file for your platform. If you're not sure which to choose, learn more about installing packages.
Source Distribution
Built Distribution
Filter files by name, interpreter, ABI, and platform.
If you're not sure about the file name format, learn more about wheel file names.
Copy a direct link to the current filters
File details
Details for the file schemachange-4.3.3.tar.gz.
File metadata
- Download URL: schemachange-4.3.3.tar.gz
- Upload date:
- Size: 96.4 kB
- Tags: Source
- Uploaded using Trusted Publishing? No
- Uploaded via: twine/6.2.0 CPython/3.9.25
File hashes
| Algorithm | Hash digest | |
|---|---|---|
| SHA256 |
e61982bd01ecd686e3302ac82ebb5e4171fc940770cba374bd36826c198a3716
|
|
| MD5 |
40984bdac3bdc9578c4bd21efc93f40f
|
|
| BLAKE2b-256 |
131b2ef4f844c8e4c625acd298b3ca21f43e972a8e9d7b70a00fa704c116ec36
|
File details
Details for the file schemachange-4.3.3-py3-none-any.whl.
File metadata
- Download URL: schemachange-4.3.3-py3-none-any.whl
- Upload date:
- Size: 85.8 kB
- Tags: Python 3
- Uploaded using Trusted Publishing? No
- Uploaded via: twine/6.2.0 CPython/3.9.25
File hashes
| Algorithm | Hash digest | |
|---|---|---|
| SHA256 |
ba2392ea73b06858f45b91bbee337b207c812338886af0c6b1cf3ac9a1c4ad12
|
|
| MD5 |
097e4e3c13cf61c6b8439356bd5442b0
|
|
| BLAKE2b-256 |
d2a9d5992125b662bff1fecbaa88654f56bcfcabe0ed022492014af54bc3ea47
|


