An AI powered scientific literature search engine

Reason this release was yanked:
io folder missing
Project description
ScienceAI


An AI-Powered Research Assistant for Systematic Literature Analysis
ScienceAI is a Python application that transforms how researchers analyze scientific literature. Unlike a standard LLM chatbot, ScienceAI is specifically designed to handle complex, multi-paper research tasks through an intelligent agent-based architecture that supports both GPT-5.2, Claude, and Gemini models.
🎯 Why ScienceAI vs. a Regular LLM Chatbot?
| Standard LLM Chatbot | ScienceAI |
|---|---|
| Single conversation context | Multi-agent system with specialized analyst agents |
| Manual upload of each document excerpt | Automatic processing of hundreds of PDFs |
| Limited by context window (~200K tokens) | Processes entire paper collections regardless of size |
| Requires you to extract data manually | Automated data extraction with structured schemas |
| One-off responses | Persistent analysis with downloadable results |
| No systematic validation | Built-in validation and provenance tracking |
| Generic responses | Evidence-based answers with source citations |
The Key Difference: Agentic Architecture
ScienceAI employs a Principal Investigator (PI) that:
- Breaks down your research question into manageable sub-tasks
- Creates specialized Analyst Agents for each sub-task
- Coordinates parallel data extraction across your entire paper collection
- Synthesizes findings from multiple analysts
- Provides comprehensive, evidence-backed answers
This means you can ask: "Extract healing times, sample sizes, and intervention types from all these papers" and ScienceAI will automatically create the right analysts, define extraction schemas, process all papers, and return structured CSV data—something impossible with a standard chatbot.
🚀 Main Features
- 📚 Automated Paper Processing: Upload PDFs and let ScienceAI extract text, figures, tables, and metadata automatically
- 🤖 AI-Driven Multi-Agent Analysis: The PI delegates tasks to specialized Analyst Agents that work autonomously
- 📊 Structured Data Extraction: Define data schemas and extract information systematically across all papers
- 💬 Interactive Research Discussion: Ask complex research questions and receive evidence-backed answers
- 🔍 Provenance Tracking: Every extracted data point includes source quotes and derivation explanations
- 📈 Export & Visualization: Download extracted data as CSV, export papers with metadata, view analysis results in an interactive interface
- 🌙 Dark Mode: Fully supported dark mode for comfortably working in low-light environments, including specialized styling for data viewers.
- 💾 Project Management: Save and resume research projects with full checkpoint support
📦 Installation
Requirements: Python 3.11+ and an OpenAI API key
pip install scienceai-llm
🎬 Getting Started
1. Launch ScienceAI
scienceai
This starts a local web server. Open your browser to:
http://localhost:4242
You will be prompted to enter your OpenAI API key. This key is used to authenticate requests to the OpenAI API. You can find your API key in your OpenAI account settings.
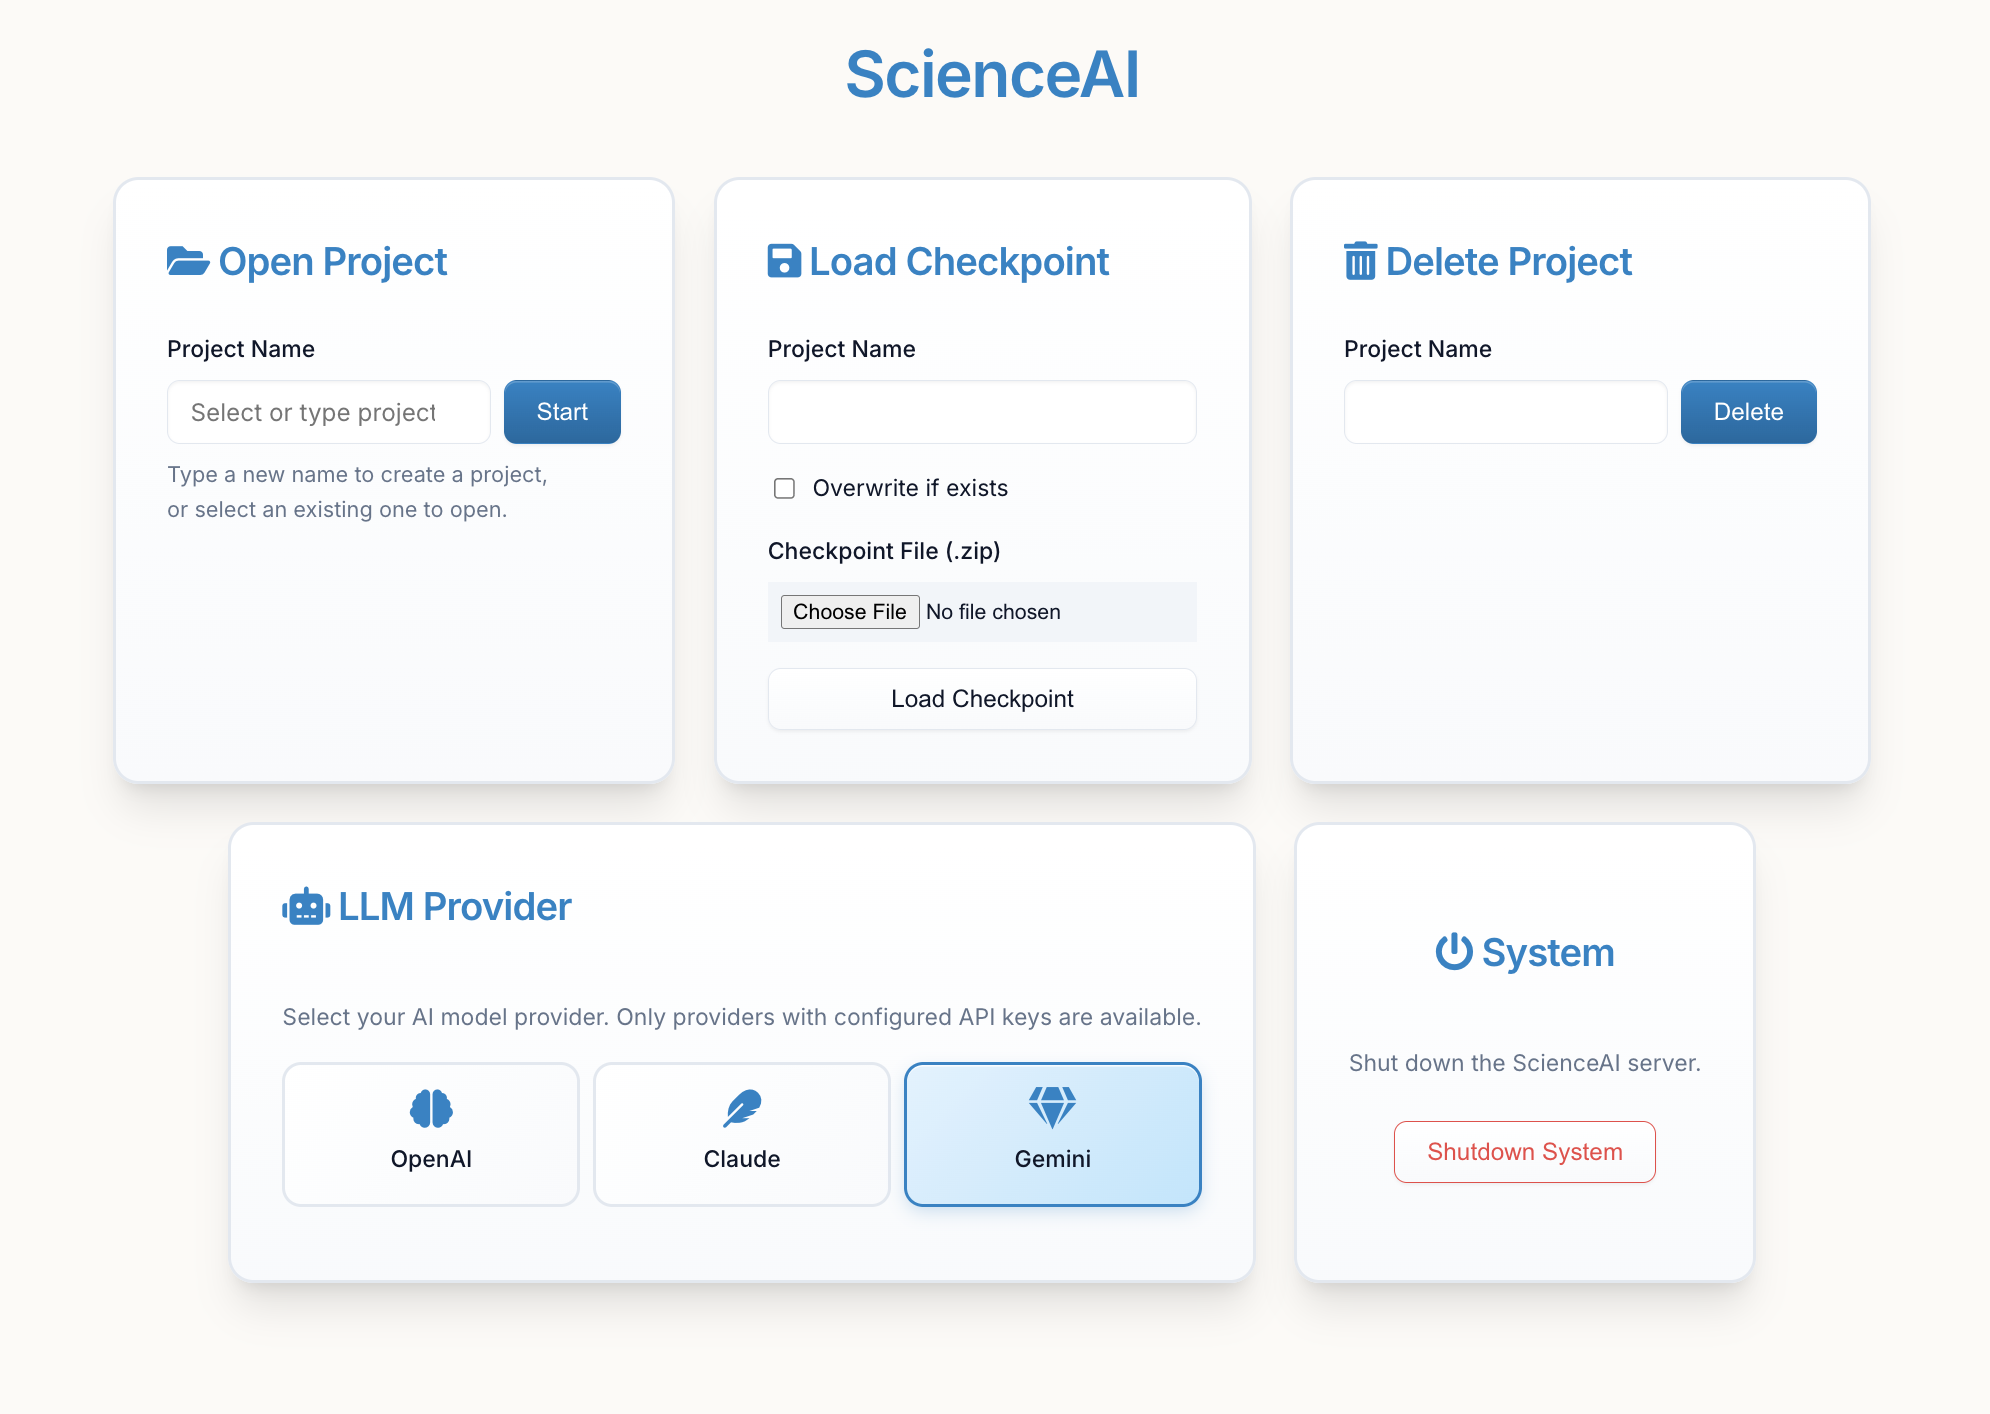
Enter your project name and click "Start" to create a new project or load an existing one.
Tip: You can switch between OpenAI, Anthropic (Claude), and Google (Gemini) models using the "LLM Provider" card in the main menu once started. See Configuration for setup details.
2. Understanding the Interface
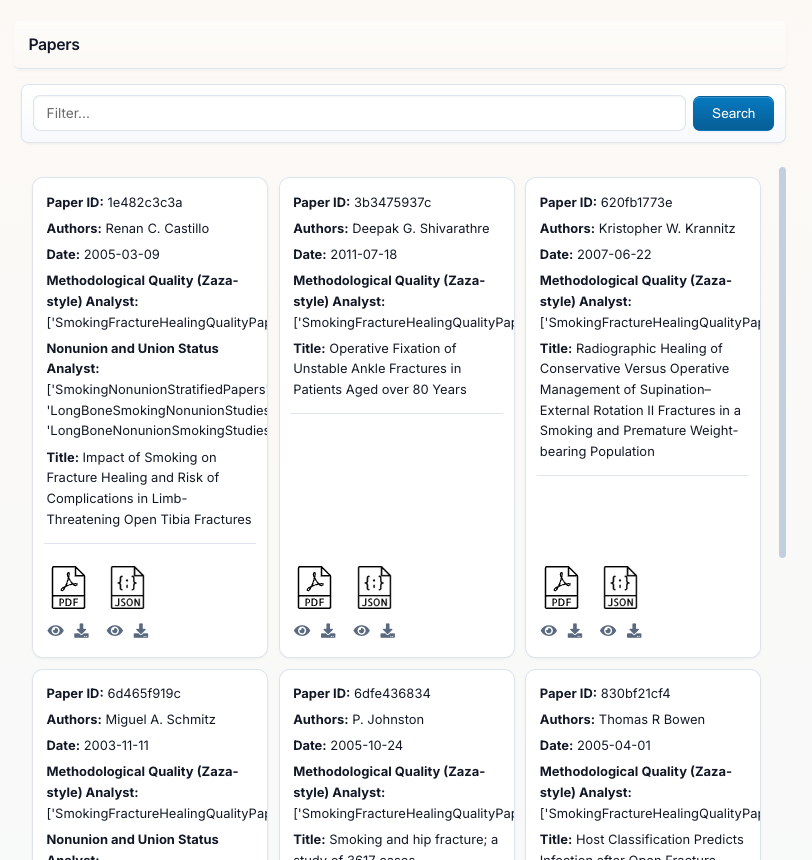
Papers Panel (Left Side): This is your literature library showing all uploaded PDFs with:
- Search Bar at the top to filter papers by title, author, or keywords
- Automatically Detected Metadata: Author, Date, Title, Journal
- Paper IDs: Each paper gets a unique identifier
- Analyst Tracking: Shows which analysts have processed each paper
- Add Papers Button: Upload additional PDFs to your project at any time
You can upload PDFs individually or as a zip folder during project creation, or add more later via the "Add Papers" button.
3. Chatting with the Principal Investigator
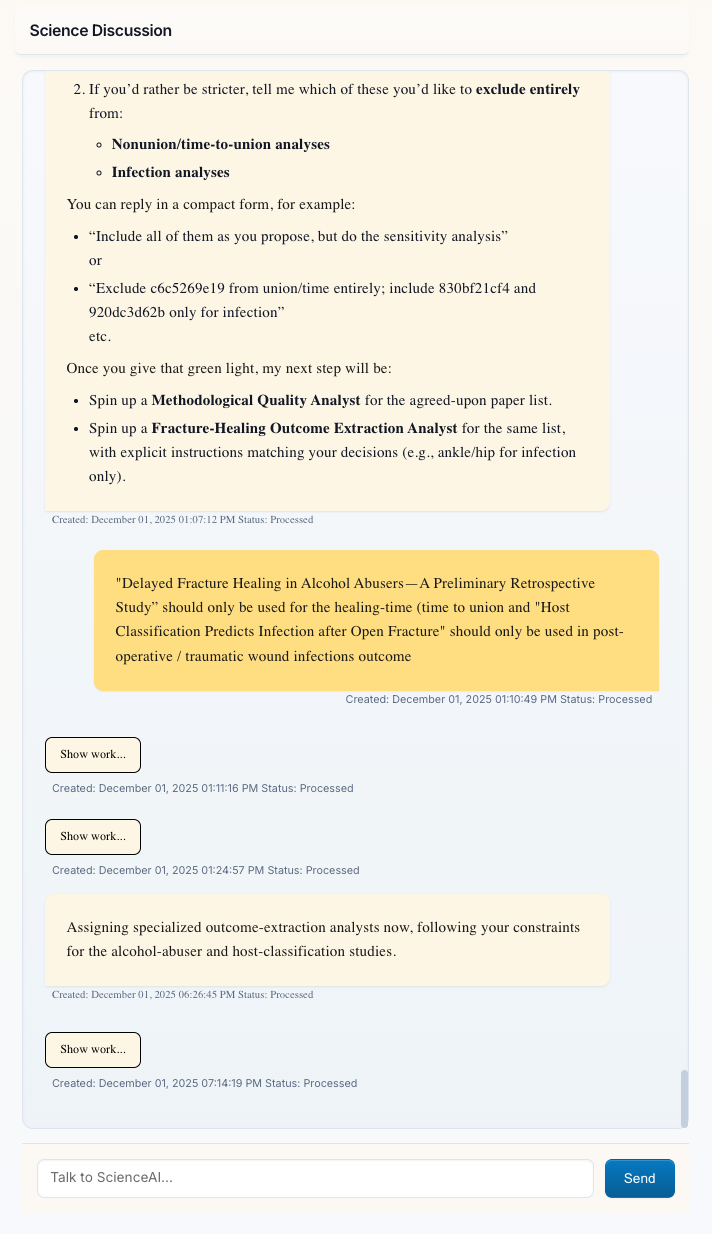
Science Discussion Panel (Right Side): This is where you interact with the Principal Investigator (PI). The PI:
- Understands complex research questions
- Plans multi-step analysis strategies
- Creates and manages Analyst Agents to accomplish your goals
- Presents synthesized findings with evidence
Key Features:
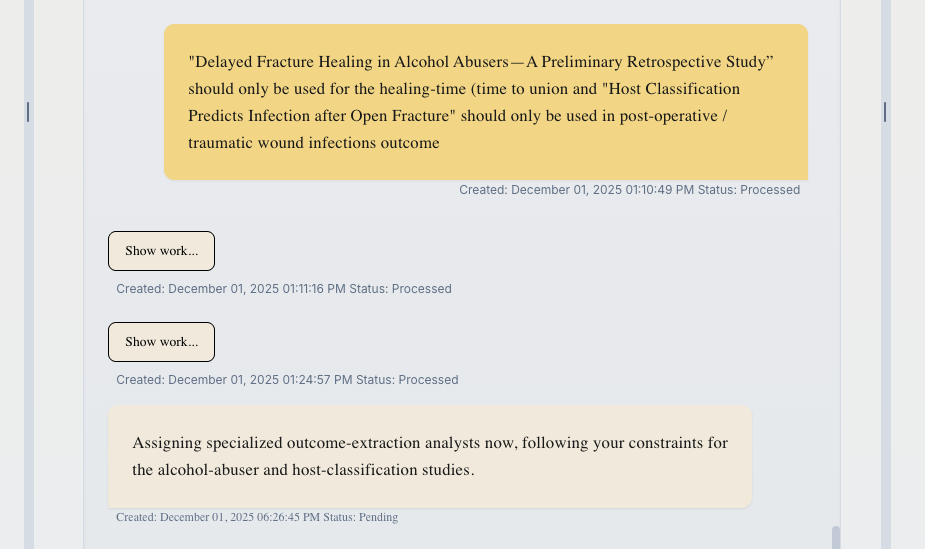
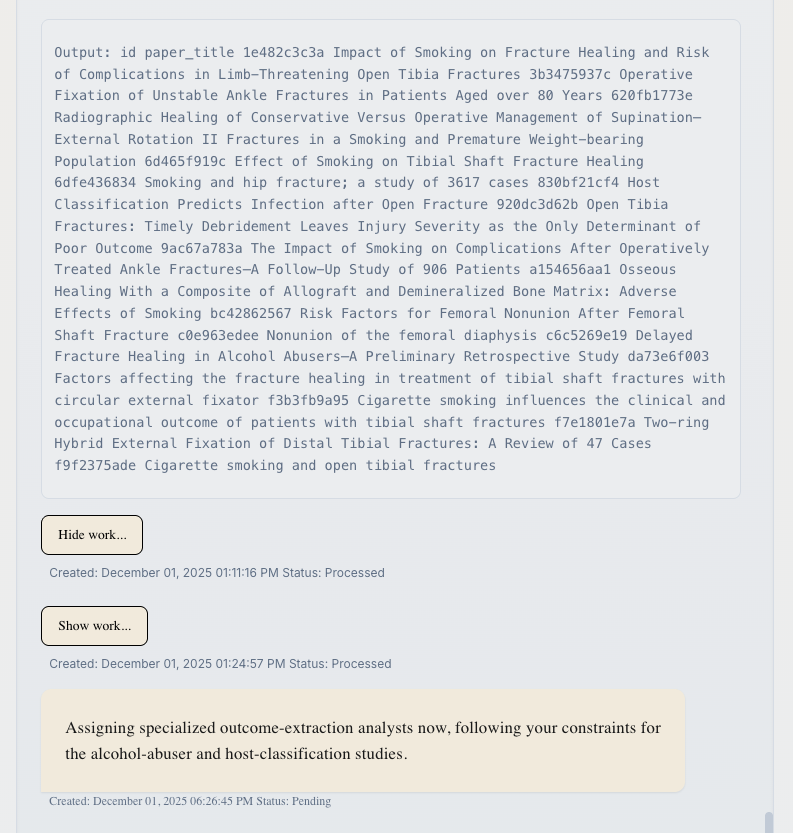
- Message Status: Messages show "Processed" (waiting for your input) or "Pending" (PI is working)
- "Show work..." Links: Click to see detailed tool calls and PI reasoning (see below)
- Timestamps: Track when each interaction occurred
- Brain Indicator 🧠: A floating emoji shows real-time context (memory) usage. It turns yellow ⚠️ or red 🔴 as the model's memory fills up.
🔍 Transparency: "Show work..." Feature
Messages from the PI include a "Show work..." link. This transparency feature lets you see exactly what the PI is doing behind the scenes.
Click "Show work..." to reveal:
- Tool Calls: Every function the PI called (e.g.,
read_paper_chunks,create_analyst,search_database) - Arguments: The exact parameters passed to each tool
- Outputs: Results returned from each operation
- Reasoning: The PI's step-by-step decision-making process
This is invaluable for:
- Understanding how ScienceAI processes your requests
- Debugging unexpected results
- Learning how to phrase better questions
- Trust through complete transparency
Click "Hide work..." to collapse the details again.
Example Questions to Ask:
- "Extract sample sizes, intervention types, and outcomes from all studies"
- "Which papers found significant effects for [specific intervention]?"
- "Create a summary table comparing study methodologies"
- "What are the outcome measures used across these papers?"
🔄 Resetting the Conversation
If you wish to start fresh while keeping your uploaded papers, use the Reset Conversation button (or the undo arrow icon in the chat interface). This will:
- Clear the chat history
- Reset the Principal Investigator's memory
- Fix any potential database locks
- Keep your uploaded papers and extracted data collections
4. Working with Analyst Agents
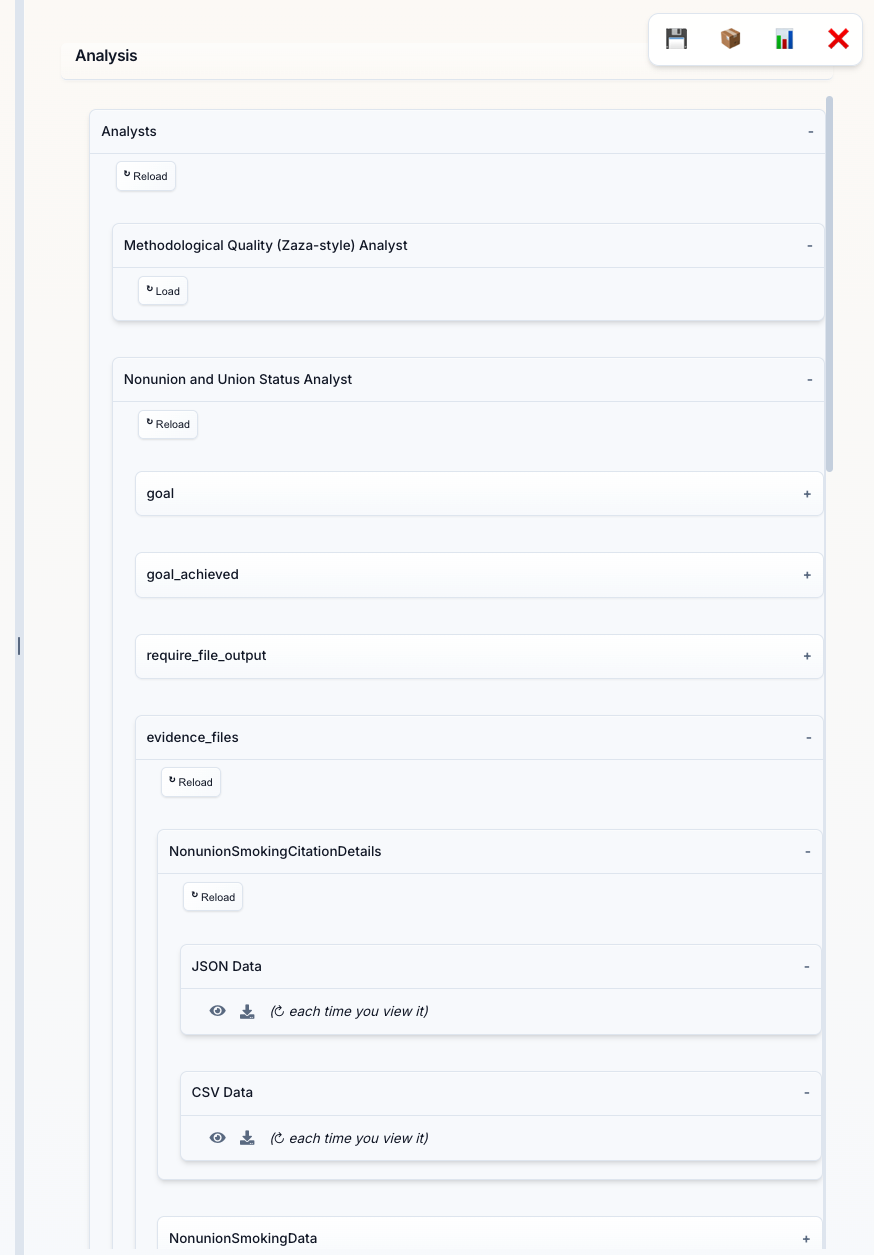
Analysis Panel (Bottom Section): When you request data extraction or specific analyses, the PI creates specialized Analyst Agents. This panel shows:
- Analyst Categories: Different types of analysts (e.g., "Study Categorization & Eligibility Analyst", "Nonunion and Union Status Analyst")
- Data Collections: Each analyst creates structured data collections with names like "NonunionSmokingData2"
- Load Button: Click to view the extracted data in a table format
- Download Button: Export data as CSV for analysis in Excel, R, or Python
Each analyst autonomously:
- Defines an extraction schema based on your request
- Processes all relevant papers
- Validates extracted data for accuracy
- Provides results with source citations
5. Viewing Extracted Data
Data Tables: Click "Load" on any data evidence_files to see the extracted data in a structured table format. Each row represents data from a paper, with columns showing:
- Standard Fields: Data you requested (e.g., smoking status, healing time, sample size)
- Provenance Metadata: Automatically added by ScienceAI
_source_quote: The exact text from the paper supporting this data_derivation: Explanation of how calculated/inferred values were determined_source_location: Where in the paper this data was found
Key Features:
- Sortable Columns: Click headers to sort
- Download CSV: Click the download button to export for further analysis
- Source Verification: Every data point links back to the original paper text
👁️ Viewing Raw Data: JSON and CSV Viewers
In the Analysis Panel, each data collection offers multiple view formats:
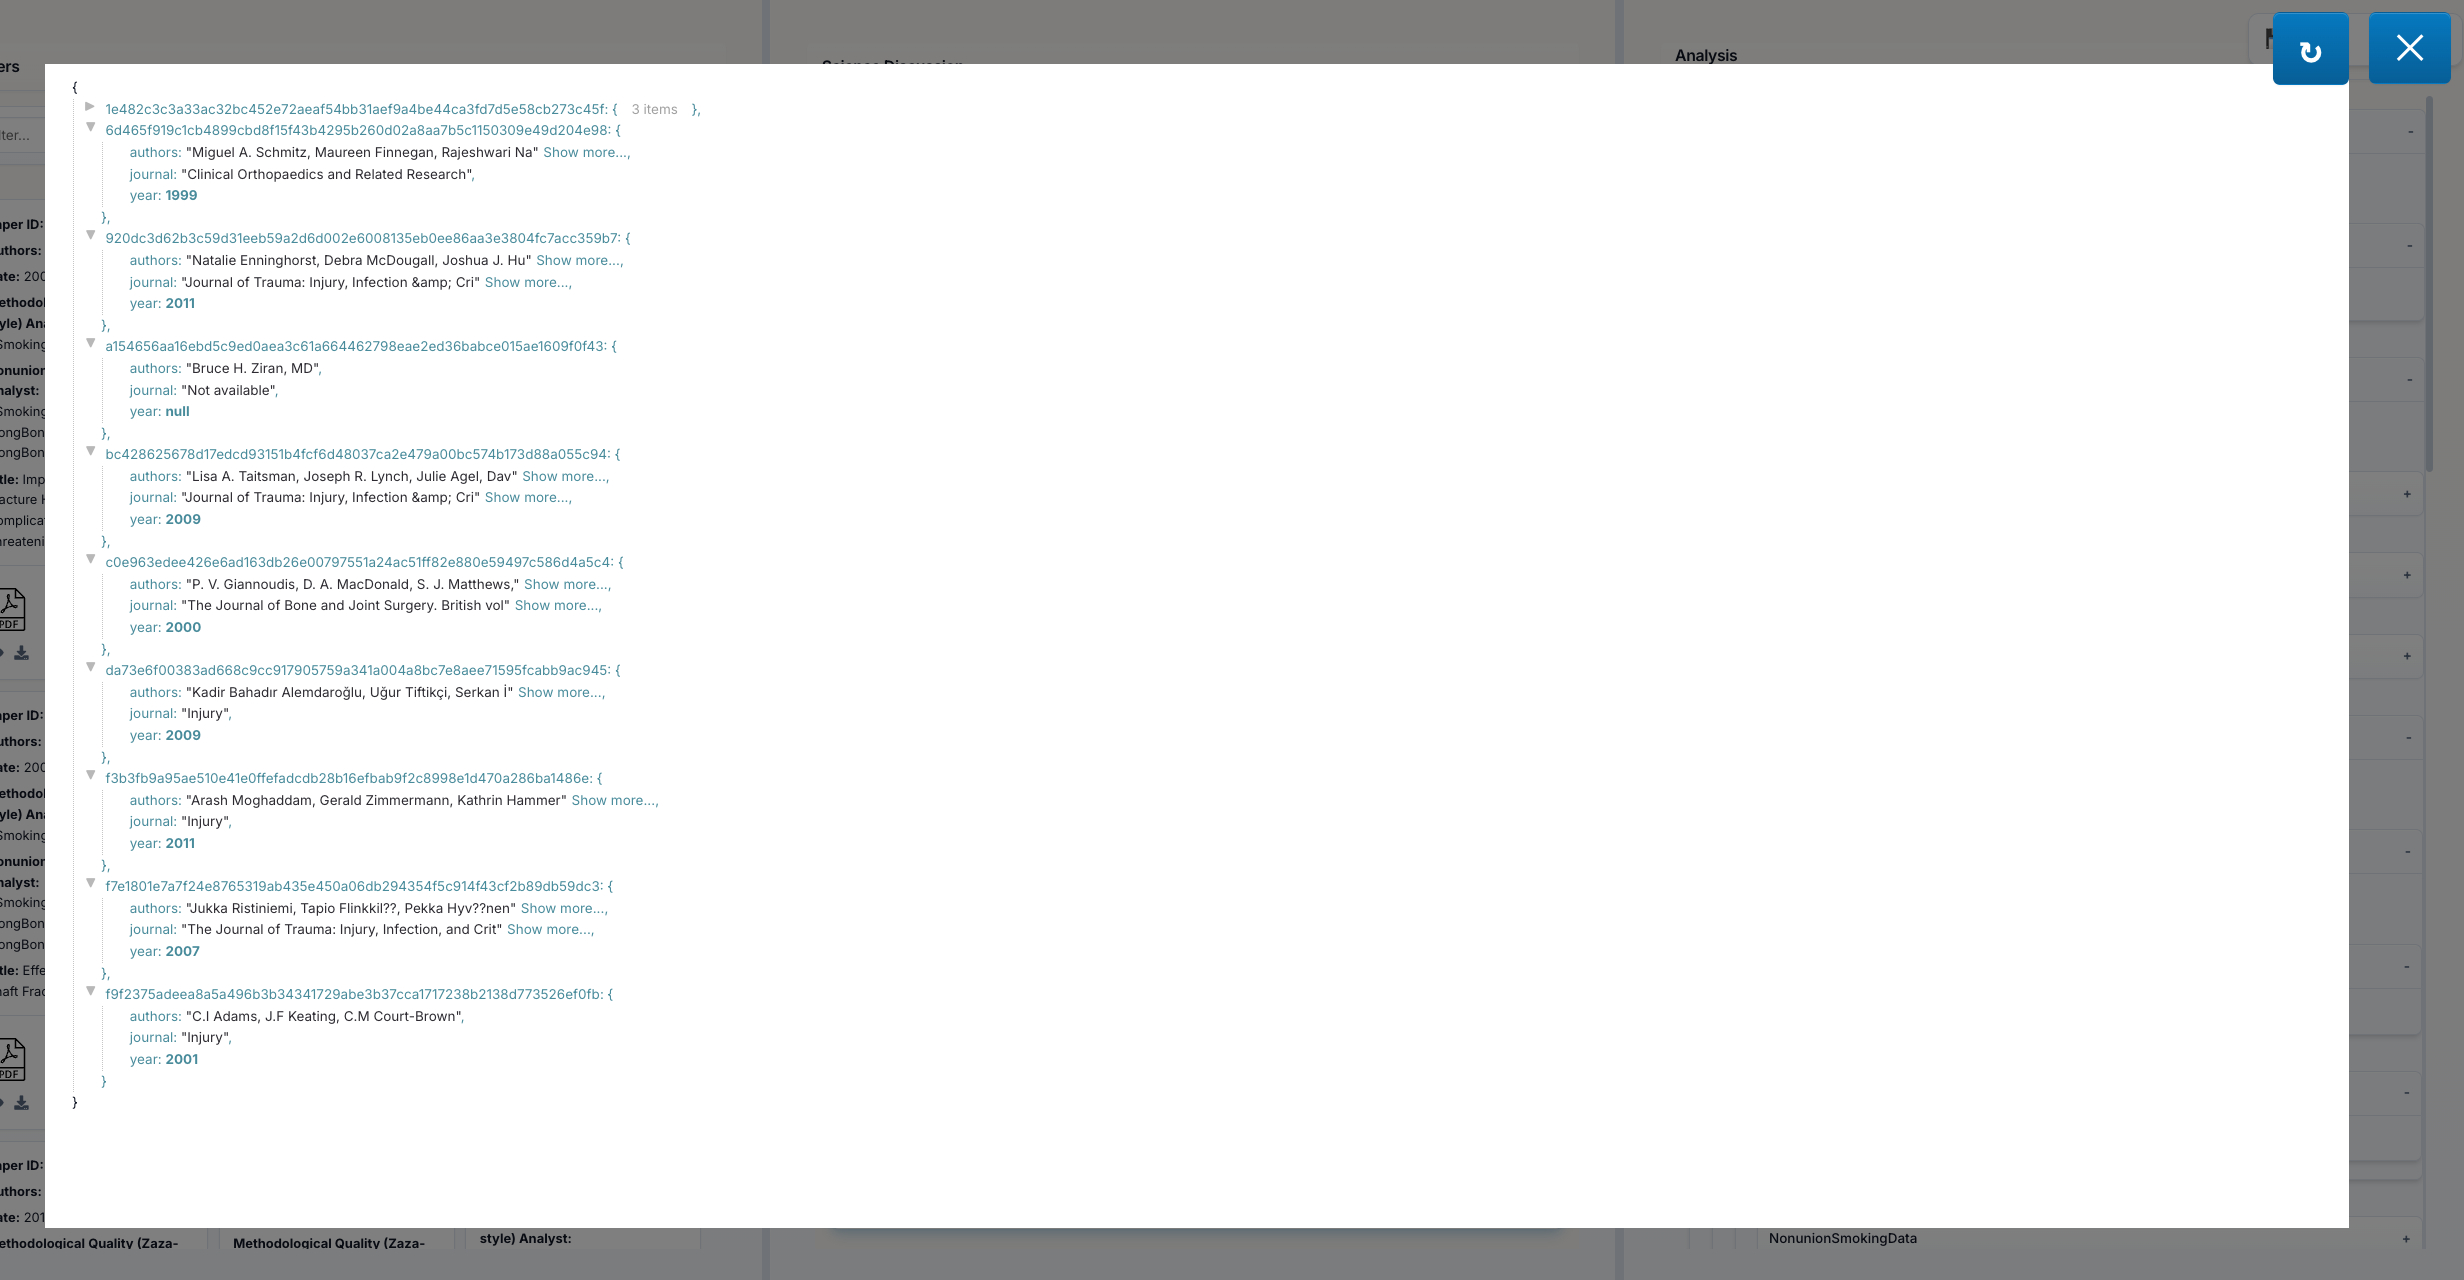
JSON Data Eye Icon (👁️): Click the eye icon next to "JSON Data" to open an interactive JSON viewer featuring:
- Syntax Highlighting: Easy-to-read colored formatting
- Collapsible Sections: Expand/collapse nested objects and arrays
- Copy Button: Copy the entire JSON to clipboard
- Raw Format: See the exact data structure as stored
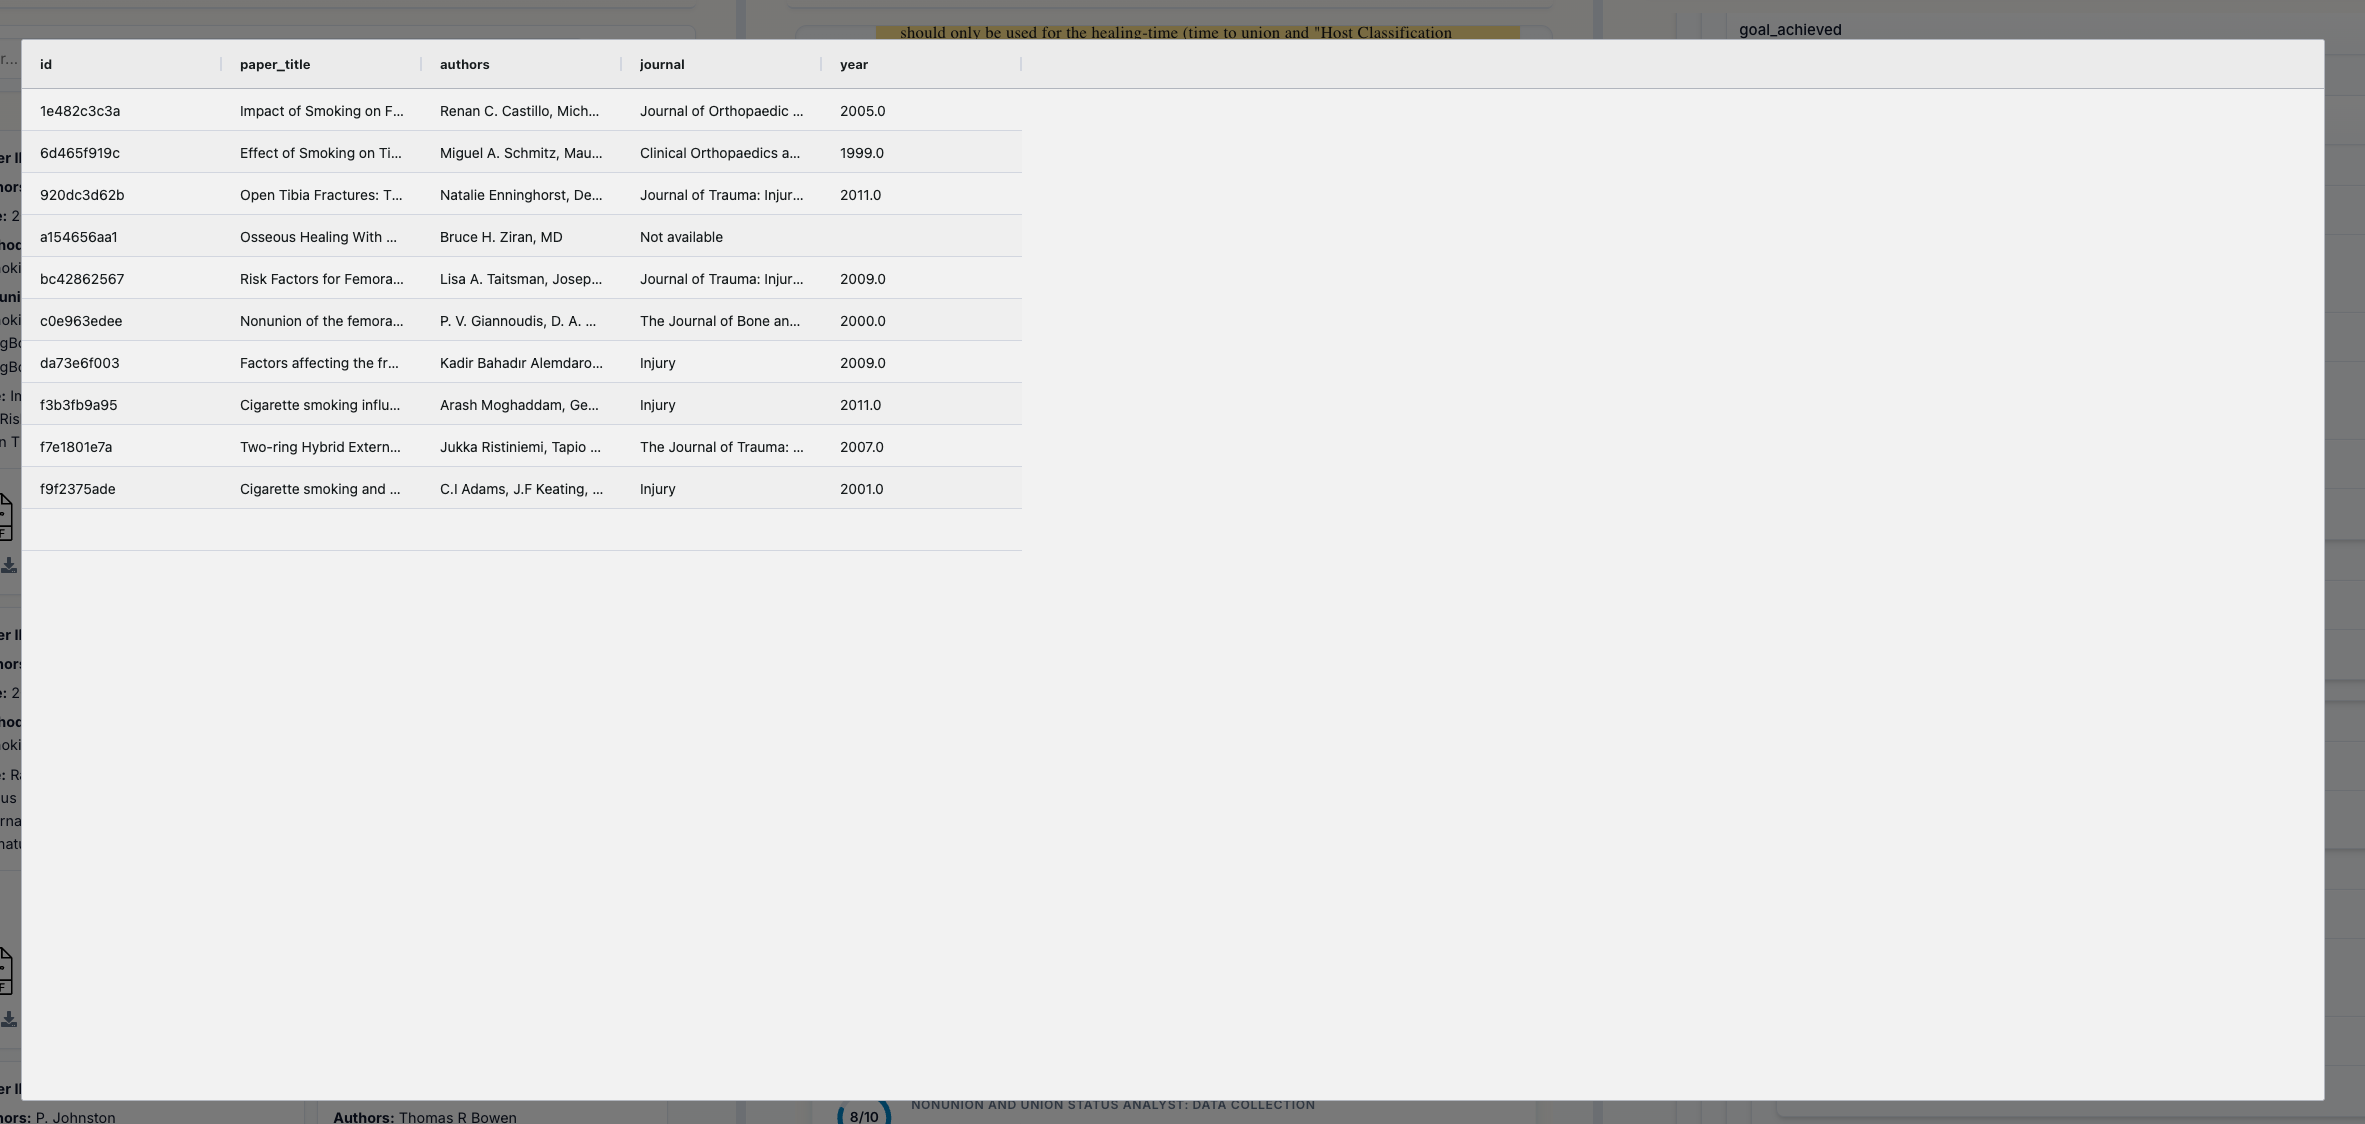
CSV Data Eye Icon (👁️): Click the eye icon next to "CSV Data" to open a spreadsheet-style viewer with:
- Grid Layout: See your data in familiar rows and columns
- Quick Preview: View data without downloading
- Inspect Format: Check CSV structure before exporting
These viewers help you:
- Verify data quality before export
- Debug extraction issues by inspecting raw values
- Choose the best format (JSON vs CSV) for your workflow
- Inspect data structure and field types
Click the Close button or press Esc to dismiss the viewer.
6. Exporting Your Work
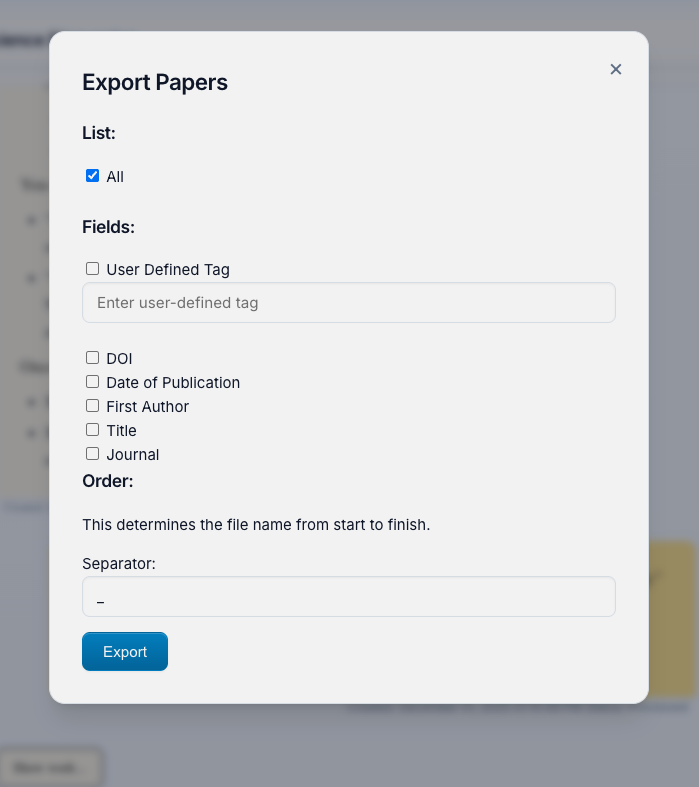
Export Button (📦): Located in the bottom control panel, this opens the Export Papers menu where you can:
Select Papers to Export:
- All: Export every paper in your project
- User Defined Tag: Filter by custom tags you've applied
Customize Filenames with detected metadata:
- Choose which fields to include: DOI, Date, First Author, Title, Journal, Tags
- Set the order of fields in the filename
- Choose separator (underscore, dash, space)
- Preview:
2023_Smith_ImplantFailureRates_JBJS.pdf
Bottom Control Panel Buttons:
- 💾 Checkpoints: Download auto-generated checkpoint saves that allow you to resume your project at the last saved state or share it with others
- 📦 Export: Export papers with custom filenames
- 📊 Extracted Data: Combines ALL extracted data into a single CSV file that you can use for analysis and verification of extracted data quality (column names may be very long, so you may want to rename them)
- ❌ Close: Return to project selection screen
💡 Example Use Cases
1. Systematic Literature Reviews
Upload 100+ papers, ask the PI to categorize them by intervention type, extract study characteristics, and generate summary tables—all automatically.
2. Meta-Analysis Data Extraction
Request extraction of effect sizes, sample sizes, and study parameters. ScienceAI handles the schema definition, extraction, validation, and CSV export.
3. Research Gap Analysis
Ask "What methodologies are under-represented?" and let analysts scan all papers to identify patterns and gaps.
4. Evidence Synthesis
"Summarize all findings related to [X]" triggers analysts to extract relevant sections, synthesize findings, and provide citations.
🐍 Python Library Usage
ScienceAI can also be used as a Python library to integrate its capabilities into your own scripts and applications.
Initialization
from scienceai.client import ScienceAI

# Initialize the client (starts backend automatically)
client = ScienceAI(project_name="MyResearchProject")
Ingesting Papers
You can upload papers programmatically and trigger preprocessing.
# Upload papers and wait for preprocessing to complete
client.upload_papers(["/path/to/paper1.pdf", "/path/to/paper2.pdf"])

# Or upload without immediate preprocessing
client.upload_papers(["/path/to/paper3.pdf"], trigger_preprocess=False)

# Manually trigger preprocessing later
client.preprocess()
Chatting with the PI
Interact with the Principal Investigator to ask questions or request analyses.
# Send a message and wait for the response (blocking)
response = client.chat("Summarize the findings of the uploaded papers.")
print(response)

# Non-blocking chat
client.chat_background("Extract sample sizes from all papers.")

# Poll for status
while True:
    result = client.poll()
    if result:
        print("Response received:", result)
        break
    print("Working...")
    time.sleep(1)

# Get full history
history = client.history()
🏗️ How It Works: Architecture Overview
The Principal Investigator (PI)
Your main interface—a conversational AI that:
- Understands research objectives
- Plans analysis strategies
- Creates and manages Analyst Agents
- Synthesizes multi-agent findings
- Communicates results clearly
Analyst Agents
Specialized workers created on-demand:
- Each has a focused research goal
- Autonomously defines data schemas
- Extracts, validates, and exports data
- Provides evidence-backed conclusions
Data Extraction Engine
- Flexible Schemas: Support for numbers, dates, text blocks, categorical data, and more
- Derivation Support: Extract calculated or inferred values with explanations
- Automatic Provenance: Every data point links to source location and quotes
- Validation: Built-in error checking and re-extraction on failure
Database & Storage
- Persistent project storage
- Efficient paper and metadata management
- Data collection tracking
- Checkpoint and export functionality
🔧 Configuration
LLM Provider Selection
ScienceAI supports multiple LLM providers with flexible authentication options:
Supported Providers
- OpenAI (GPT-4, GPT-5, o4-mini): Default provider
- Anthropic (Claude Sonnet/Opus 4.5): Via direct API or Google Vertex AI
- Google (Gemini 3 Pro): Via API key or Vertex AI service account
Setting Up Providers
OpenAI (Required for Default Setup)
# Method 1: Interactive setup
scienceai --setup-keys

# Method 2: Direct key setting
scienceai --set-key openai YOUR_OPENAI_API_KEY

# Method 3: Environment variable
export OPENAI_API_KEY="sk-..."
Anthropic Claude (Optional)
# Direct API (recommended for personal use)
scienceai --set-key anthropic YOUR_ANTHROPIC_API_KEY

# Or via environment variable
export ANTHROPIC_API_KEY="sk-ant-..."
Google Gemini (Optional)
# Standard API key (simple setup)
scienceai --set-key google YOUR_GOOGLE_API_KEY

# Or via environment variable
export GOOGLE_API_KEY="..."
# or
export GEMINI_API_KEY="..."
GCP Service Account for Production/Enterprise
For production deployments or enterprise use, you can use a GCP service account for both Gemini and Claude on Vertex AI:
Setup:
scienceai --gcp-service-account /path/to/service-account.json
This will:
- Validate your service account file
- Extract the project ID automatically
- Prompt you interactively:
✓ Valid service account file for project: my-project-123 This service account can be used for: 1. Google Gemini (native GCP models) 2. Claude on Vertex AI (Anthropic partner models) Use this service account for Claude on Vertex AI? (y/n): - Ask for your preferred Vertex AI region:
Common Vertex AI regions: - us-east5 (US East) - us-central1 (US Central) - europe-west1 (Europe West) Enter Vertex AI region (default: us-east5): - Save the configuration
Remove GCP Configuration:
scienceai --remove-gcp-config
This command allows you to selectively remove Gemini and/or Claude Vertex configurations, reverting to API key authentication.
Priority Order:
- If both GCP service account AND API key are configured for a provider:
- GCP Service Account takes priority (recommended for production)
- API Key is used as fallback
This design allows smooth transitions between development (API key) and production (service account) environments.
Provider Switching
Switch between providers via the LLM Provider card in the menu UI. Select:
- OpenAI (GPT models)
- Claude (Anthropic direct API)
- Claude on Vertex (via GCP - if configured)
- Gemini (Google models)
Unavailable providers (missing API keys) are grayed out.
Validate Your Configuration
Test all configured API keys:
scienceai --validate-keys
Output:
Validating configured API keys...

  ✓ openai: Valid (gpt-5.2 accessible)
  ✓ anthropic: Valid (claude-sonnet-4-5 accessible)
  ✗ google: Invalid (API key expired)

⚠ Some keys failed validation
CLI Options Reference
# API Key Management
scienceai --setup-keys                    # Interactive key setup
scienceai --set-key PROVIDER KEY         # Set a specific key
scienceai --validate-keys                # Validate all keys

# GCP Service Account
scienceai --gcp-service-account PATH     # Configure service account
scienceai --remove-gcp-config            # Remove service account config

# Provider Selection
scienceai --provider anthropic           # Start with specific provider

# Server Options
scienceai --port 8080                    # Custom port (default: 4242)
scienceai --skip-validation              # Skip startup key validation

# Logging
scienceai -v                             # Verbose (INFO level)
scienceai --debug                        # Debug logging
scienceai --log-level WARNING            # Specific log level
Configuration Files
API keys and GCP configuration are stored in:
~/Documents/ScienceAI/scienceai-keys.json
Example structure:
{
  "openai": "sk-...",
  "anthropic": "sk-ant-...",
  "google": "AIza...",
  "google_gcp": {
    "service_account_path": "/path/to/sa.json",
    "project_id": "my-project-123",
    "region": "us-east5"
  },
  "anthropic_vertex": {
    "service_account_path": "/path/to/sa.json",
    "project_id": "my-project-123",
    "region": "us-east5"
  }
}
📚 Detailed Documentation
🧠 Principal Investigator (PI)
The Principal Investigator (src/scienceai/principal_investigator.py) is the central orchestrator of the system. It uses an LLM-driven reasoning loop to:
- Plan Research: Decomposes user queries into sub-tasks.
- Delegate: Spawns Analyst Agents using
delegate_research()to handle specific data extraction or analysis tasks. - Execute Code: Uses
run_python_code()to perform statistical analysis, generate plots, or manipulate data using Python (pandas, matplotlib, etc.). - Synthesize: Aggregates results from multiple analysts using
reflect_on_delegations()to provide a cohesive answer. - Transparency: All PI actions are recorded and visible via the "Show work..." feature in the UI, exposing tool calls, arguments, and internal reasoning.
🕵️ Analyst Agents
Analyst Agents (src/scienceai/analyst.py) are specialized, autonomous workers created by the PI. Each analyst has a specific goal (e.g., "Extract patient demographics") and follows this workflow:
- Paper Selection: Identifies relevant papers using
get_all_papers()or filters by criteria. - Schema Generation: Automatically generates a JSON schema for data extraction based on its goal.
- Concurrent Extraction: Runs
extract_data()across all selected papers in parallel. - Validation: Uses
reflect_on_evidence()to verify that extracted data is supported by the source text. - Data Collection: Saves structured results into a named collection (e.g.,
DemographicsData) which becomes available to the PI and the user.
⛏️ Data Extraction Engine
The Data Extraction Engine (src/scienceai/data_extractor.py) is the core NLP component responsible for turning unstructured PDF text into structured data.
- Supported Types:
number,date,text_block,categorical,boolean,array,object. - Provenance Injection: Automatically adds metadata to every extracted field:
_source_quote: The verbatim text from the paper supporting the data._source_location: Page number and context._derivation: Logic used to calculate values (e.g., "Calculated as 15 males + 12 females").
- Reflection & Validation: The
reflect_on_data_extraction()function acts as a critic, comparing the extracted JSON against the paper's text to catch hallucinations or errors before saving.
💾 Database & Storage
Managed by DatabaseManager (src/scienceai/database_manager.py), the system uses a file-based storage approach for portability and simplicity.
- Paper Ingestion: PDFs are hashed (
sha256) to prevent duplicates. Text, tables, and figures are extracted and stored. - Storage Format: Uses
dictdatabaseto store project state, chat history, and data collections as JSON files. - Checkpoints: The system supports full project checkpointing. The
save_database()function creates a zip archive of the project directory, allowing users to backup, share, or resume their work at any time. - Export: Data can be exported as CSVs, and papers can be renamed/exported based on their metadata.
🤝 Contributing
We welcome contributions! Here's how:
- Report Bugs: Open an issue on GitHub with reproduction steps
- Feature Requests: Suggest new capabilities or improvements
- Pull Requests: Fork, develop, and submit PRs for review
📄 License
See LICENSE file for details.
🆘 Troubleshooting
Papers not processing? Check that PDFs are valid and not password-protected.
API errors? Verify your API key or Service Account is valid and has available credits.
Analyst not completing? Check the chat panel for error messages—the PI will explain any issues.
Cannot download data? Ensure analysts have completed their data collections before exporting.
"Context Limit Reached" Warning? This means the conversation has exceeded the LLM's memory. ScienceAI will automatically compress older messages to free up space. You can also use the Reset Conversation feature to clear the history while keeping your uploaded papers.
Ready to transform your literature review workflow? Install ScienceAI and start asking research questions!
pip install scienceai-llm
scienceai
Release history Release notifications | RSS feed


Download files
Download the file for your platform. If you're not sure which to choose, learn more about installing packages.
Source Distribution
Built Distribution
Filter files by name, interpreter, ABI, and platform.
If you're not sure about the file name format, learn more about wheel file names.
Copy a direct link to the current filters
File details
Details for the file scienceai_llm-0.4.3.tar.gz.
File metadata
- Download URL: scienceai_llm-0.4.3.tar.gz
- Upload date:
- Size: 260.1 kB
- Tags: Source
- Uploaded using Trusted Publishing? No
- Uploaded via: twine/6.1.0 CPython/3.13.7
File hashes
| Algorithm | Hash digest | |
|---|---|---|
| SHA256 |
6b0ed57b4ba21d218782459ee844a0544e4805e83e859357bb4b57cb6be56fd5
|
|
| MD5 |
440ec31407465c583cba6ccec631187b
|
|
| BLAKE2b-256 |
ab2dd23d2ae90eda65ee102d79f5dcb9a0aebeef914fd528794b57e17958427c
|
File details
Details for the file scienceai_llm-0.4.3-py3-none-any.whl.
File metadata
- Download URL: scienceai_llm-0.4.3-py3-none-any.whl
- Upload date:
- Size: 255.3 kB
- Tags: Python 3
- Uploaded using Trusted Publishing? No
- Uploaded via: twine/6.1.0 CPython/3.13.7
File hashes
| Algorithm | Hash digest | |
|---|---|---|
| SHA256 |
580871121017efc004fd34c01cd04c0301889ecb11fcca77949178dcdb223c2f
|
|
| MD5 |
0297fa0c37f2fa4fb36197540b70599c
|
|
| BLAKE2b-256 |
461f5a3a9a6802a53e60ef15abeab2832e13bfa134bd0ca00e9c21a2d02e8b8e
|


